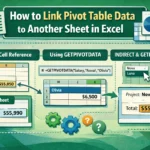
When working with Excel, it’s common to manage data across multiple worksheets within the same workbook. Sometimes, you need to automatically transfer or sync data from one sheet to another to keep everything updated without manual copying. Automating this process saves time, reduces errors, and keeps your data consistent.
In this article, you will learn multiple effective methods to transfer data automatically between Excel worksheets. From simple formulas to advanced tools like VBA, we cover all practical approaches you can use.
Steps to transfer data from one Excel sheet to another automatically:
➤ Set a named range like SalesData in your original worksheet.
➤ Select desired range in target sheet.
➤ Enter formula in Formula Bar: =SalesData
➤ Press Ctrl + Shift + Enter if needed.
➤ Optionally, format your data according to your preferences.

Use Cell References to Link Data Between Worksheets
The easiest way to transfer data automatically is by using direct cell references. This method links cells in one worksheet to another so any update on the source sheet reflects immediately on the destination sheet.
Steps:
➤ Open your Excel workbook with multiple worksheets.
➤ Go to the target worksheet such as Sheet3 where you want the data to appear.
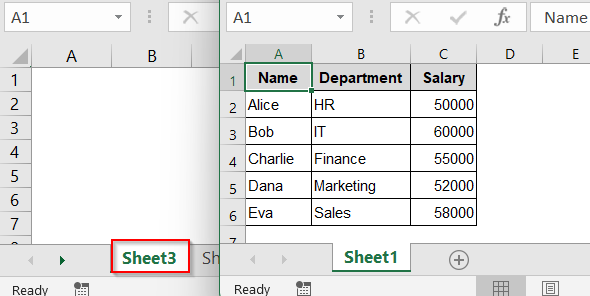
➤ Click the cell where you want to display the data such as A1.
➤ Type = to start a formula.
➤ Switch to the source worksheet by clicking its tab.
➤ Click the cell you want to transfer (for example, A1).
![]()
➤ Press Enter.
![]()
➤ The cell on your target sheet will now show the same value as the source. Whenever you change the source cell, this linked cell updates automatically such as Employee Name.
![]()
➤ Go to the formula bar and remove the dollar ($) signs from your cell reference so that they are not absolute anymore such as Sheet1!$A$1.
![]()
➤ Change formula to Sheet1!A1 in the Formula bar. Now, to transfer a range of data, use the AutoFill handle to drag the formula across columns and rows.
![]()
➤ Your data will appear without any formatting. You can format it manually or copy the formatting from the original workbook and paste Formatting under Paste Options by right-clicking on your data range.
![]()
This method works well for small or moderate-sized datasets and keeps the link live between sheets.
![]()
Utilize Named Ranges and Dynamic References
Named ranges make formulas more readable and easier to manage, especially when working with large or structured datasets. By assigning a name to a cell range and using it in formulas, you can create a more intuitive and maintainable way to transfer and update data automatically.
Steps:
➤ Go to the source worksheet.
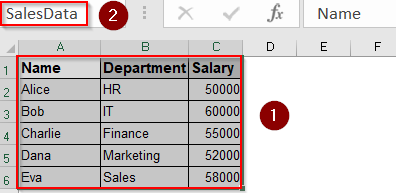
➤ Select the range of cells you want to transfer (e.g., A1:D6).
➤ Click the Name Box (left of the formula bar), type a name like SalesData, and press Enter.
➤ Switch to the target worksheet.
➤ Select the data range where you want the data to appear.
➤ Enter the formula inside Formula Bar:
='[SourceWorkbook.xlsx]Sheet1′!SalesData
![]()
➤ If you’re doing this inside the same workbook, use formula: =SalesData inside Formula Bar.
![]()
➤ Press Ctrl + Shift + Enter if you want to create an array formula (for older Excel versions).
➤ In newer Excel versions, the spill feature will automatically populate adjacent cells with the data.
➤ Your data will appear without any formatting. You can format it manually or copy the formatting from the original workbook or sheet and paste Formatting under Paste Options by right-clicking on your data range.
![]()
Using named ranges makes it easier to manage and update data links.
![]()
Automate Data Transfer Between Worksheets Using VBA
For advanced users who want full control and automation, VBA macros allow copying or syncing data programmatically. With a few lines of code, you can automate copying data, applying conditions, or even scheduling transfers during workbook events like opening or saving.
Steps:
➤ Press Alt + F11 to open the VBA editor.
➤ Insert a new module via Insert >> Module.
➤ Paste this sample code:
Sub TransferData()
    Dim sourceWS As Worksheet
    Dim targetWS As Worksheet
    Set sourceWS = ThisWorkbook.Sheets("Sheet1") 'Change to your source sheet name
    Set targetWS = ThisWorkbook.Sheets("Sheet6") 'Change to your target sheet name
    sourceWS.Range("A1:C6").Copy
    targetWS.Range("A1").PasteSpecial Paste:=xlPasteValuesAndNumberFormats
    Application.CutCopyMode = False
    MsgBox "Data transferred successfully!"
End Sub
➤ Modify the sheet names and ranges as needed.
➤ Close the VBA editor by hitting X sign at the top right.

➤ Run the code by pressing F5 key on your keyboard.
➤ Click OK on the pop up message that appears.
![]()
➤ Your data will appear without any formatting.
![]()
➤ You can format it manually or copy the formatting from the original workbook or sheet and paste Formatting under Paste Options by right-clicking on your data range.
![]()
This method copies data as static values; you can customize it to run on the workbook open, save, or via buttons.
![]()
Use Power Query to Import and Sync Data Between Sheets
Power Query is a powerful tool built into Excel that allows you to import, transform, and refresh data automatically. It’s excellent for handling large volumes of data and applying custom transformations without writing any code. Once set up, you can refresh the data manually or on a schedule.
Steps:
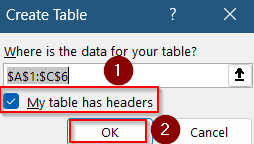
➤ Press Ctrl + T to turn your data into a table. Check your headers in the dialog box and click OK.
➤ Then, go to the Data tab >> From Table on the ribbon.
![]()
➤ In the Power Query editor, go to Home >> Close & Load.
![]()
➤ This imports the data as a dynamic table on a new worksheet which means updating the main sheet will reflect on this table upon refresh.
![]()
➤ To refresh updates, go to Data >> Refresh All under the Queries & Connections group.
![]()
➤ To set automatic refresh, go to Data tab and click on Properties under the Queries & Connections group.
➤ In the dialog box, click the Connection Properties button.
![]()
➤ Check refresh every 1 minute and refresh data when opening file. You need to edit the timer box from 60 minutes to 1 minute to make updates appear quickly.
➤ Click OK.
![]()
Frequently Asked Questions
Can I transfer data between different workbooks automatically
Yes. You can use formulas with external workbook references, Power Query connections, or VBA macros with full file paths to automate data transfers across separate Excel workbooks.
Will formulas in the source data transfer automatically?
No. Standard cell references only transfer the result, not the underlying formula. To copy actual formulas, you need to use customized VBA scripts that explicitly preserve formula structure.
How to keep transferred data updated automatically?
Formulas update instantly. Power Query needs manual or scheduled refreshes. VBA macros can automate updates by triggering on events such as opening, saving, or editing the workbook.
Is Power Query available in all Excel versions?
Power Query is built into Excel 2016 and later. For Excel 2010 or 2013, it’s available as a downloadable add-in from Microsoft’s official website and must be installed manually.
Wrapping Up
In this tutorial, we learned multiple ways to automatically transfer data between Excel worksheets using formulas, named ranges, VBA, and Power Query. Each method suits different needs and levels of control. Whether you want live links, robust refresh options, or fully automated workflows, Excel has a solution. Feel free to download the practice file and share your feedback.