When you want to share your Excel workbook with your group, sometimes you may need to make sure they dont change any valuable formulas or cell info.
Thankfully, Excel allows you to prevent others from protecting your workbook, worksheets, cells, and formulas. Moreover, you can always choose which cells you want to make editable while protecting the others.
To protect Excel workbook from editing, let’s follow the quick steps below:
➤ Click on the Review tab and choose Protect Workbook from the Protect group appearing in the top right corner.
➤ Set a password if you prefer and confirm it. You can also leave the password field empty and click Ok to protect the workbook from unwanted structural changes.
➤ Another way is to separately protect each worksheet of your workbook by choosing the Protect Worksheet option from the above-mentioned Protect group.
➤ If you want to leave certain cells unprotected, right-click on the cell(s) >> choose Format Cells >> click on the Protection tab >> uncheck the Locked box >> select Ok. Now, follow the first procedure to protect your workbook. This way, all the cells are now locked except for the ones you choose.
Read on as we explain all the different ways of protecting a workbook from adding or deleting worksheets, changing the data in the cells, locking formulas, keeping certain parts of the sheet editable, and more!
Protecting Workbook from Editing with or without a Password
When you protect your workbook using this method, Excel prevents other users from adding and deleting your worksheets. It also prevents moving, hiding, and renaming your existing worksheets. There are two ways to use this feature:
Using the Review Tab
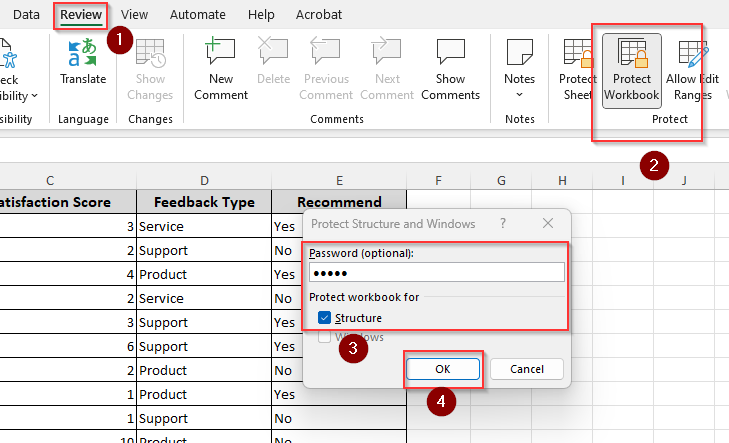
➤ Look for the Review tab on the top ribbon and click on it to open the Protect group on the right side of the ribbon.
➤ Click on the Protect Workbook option and a menu will appear with a blank field for a password. Setting a password is optional, so you can skip it by leaving the field empty. Make sure the Structure box is checked as it protects the workbook structure from editing.
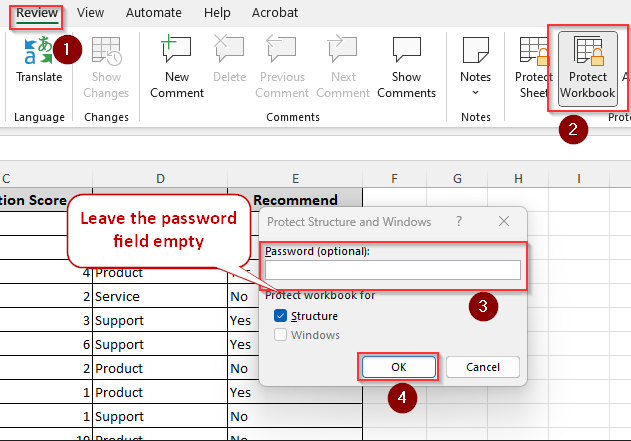
➤ Now, click Ok and see if Excel notifies you that the file is protected when you try to add or remove new worksheets. Make sure you choose Save Changes when you close the workbook.
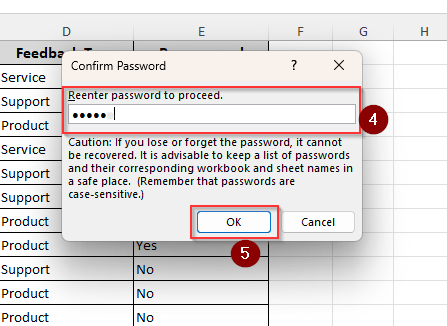
➤ If you use a password, make sure it’s easy to remember as there is no way to recover the password in case you forget it. After entering the password, you need to retype it and press Ok. Every time you try to make a change in the workbook, a prompt will appear on the screen asking for the password.

➤ Now reenter the password for confirmation and press OK.
➤ To unprotect your workbook, simply click on the Review tab >> Protect Workbook >> Type your previously set password >> select Ok. If you haven’t set a password, choose Cancel.
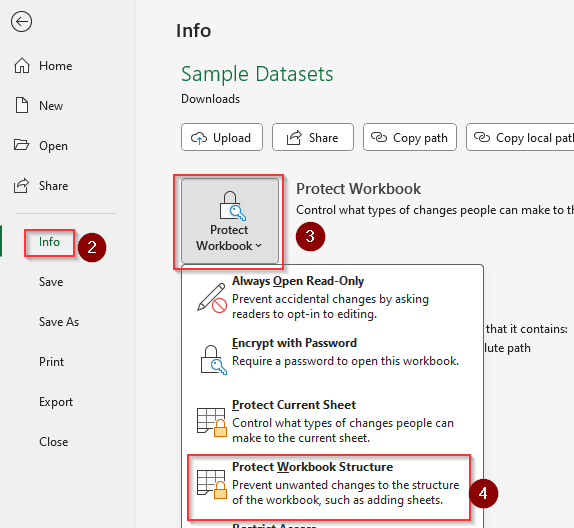
Using the Info Menu
➤ From the top ribbon, go to the File tab and a new page will arrive with a grey/green ribbon on the left side. Choose Info and click on Protect Workbook.
➤ As a drop-down menu appears, you need to click on Protect Workbook Structure to prevent changes in your Excel file.
Worksheet Protection with or without a Password
While the previous method protects the workbook structure, it doesn’t protect the cells and other relevant data from editing. Therefore, the best way to prevent unwanted changes in any Excel workbook is to protect each sheet individually. Here’s how you can do it.
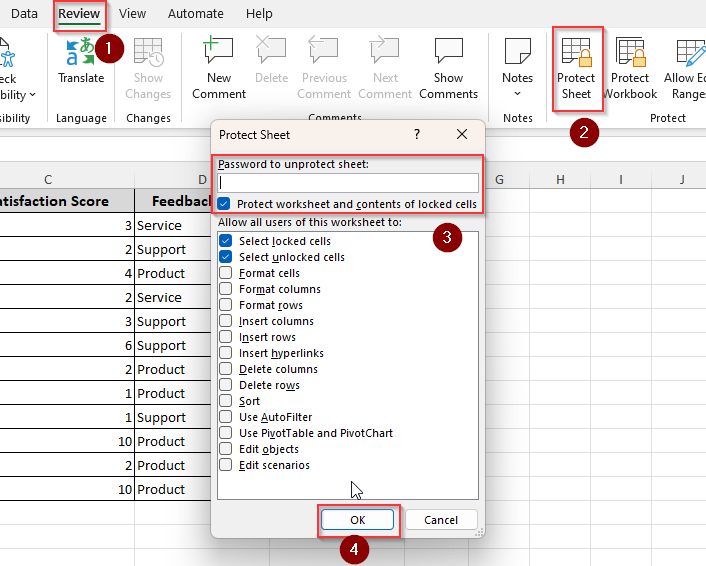
➤ Go to the Review tab and click on the Protect Sheet option from the Protect group. From the drop-down menu, check or uncheck any relevant boxes you want to allow certain edits. By default, all the boxes are unchecked except for the first two indicating your provided permissions for modifications.
➤ Type a password if you like or simply click OK. Follow the same procedure for every sheet of your workbook. At this point, the workbook won’t accept any changes within the cell data and formulas.
➤ To unprotect the sheet, click on Review and choose Unprotect Sheet. Type the passcode if necessary.
Set a Password for Opening a Workbook
For maximum security, you can set a passcode to encrypt your Excel workbook. This way, when someone tries to open or view it, they must provide the correct password. Otherwise, they won’t be able to access the workbook data or edit them. To do this, follow the steps given below:
➤ Open the File tab from the top ribbon and click on Info from the new page.
➤ From the drop-down menu, choose Encrypt with Password. Type your preferred code and re-enter them when prompted. Make sure you note down the password safely as there’s no way to recover it later.
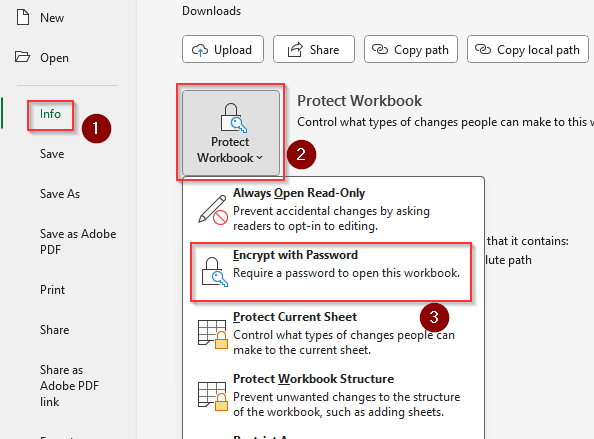
➤ From now on, every time you try to open the workbook, it will require a password to view and edit. To remove this feature, follow the exact same steps as above, clear the password from the field, and click Ok.
Locking Cells, Rows, and Formulas
If you want to protect specific cells, rows, or formulas from editing while keeping others unprotected, use this method so that Excel allows you to edit your preferred cells. It’s particularly helpful when multiple people on your team are supposed to add data in a certain row or column. For this, let’s follow these steps:
➤ Click and drag to select all the cells, rows, or formulas you want to be editable within your Excel workbook. Click on the Home tab and then the launch button of the Font group.
➤ From the Format Cells menu that just appeared, select the Protection tab. Now, uncheck the Locked box and click Ok.
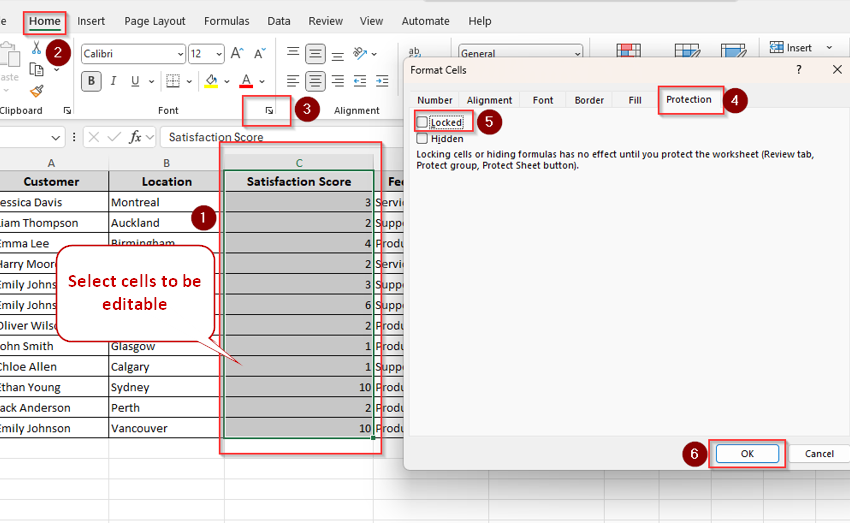
➤ Go to the Review tab and select Protect Sheet. This step is exactly the same as described in the second method. You can either choose a password or leave the field empty when the Protect Sheet menu appears. Select Ok or retype the password if prompted.
➤ In case you want to make the selected cells uneditable, follow the exact same steps and check the Locked box this time.
Activating Read-Only Mode
Although anyone can bypass it with one click, this method works when you need to notify viewers this file should not be edited. Here, you‘ll mark the Excel workbook as final or turn on the read-only mode to let your team members know this file doesn‘t require any more changes.
Excel displays a pop-up to not edit this file, but viewers can choose to make changes by clicking on Edit Anyway. Below are two ways for this:
Turning on Read-Only Mode
➤ Start by clicking on the File tab and choose Info.
➤ After that, click Protect Workbook and select Always Open Read Only. When anyone opens the workbook, they will be prompted to open it as a read-only file.
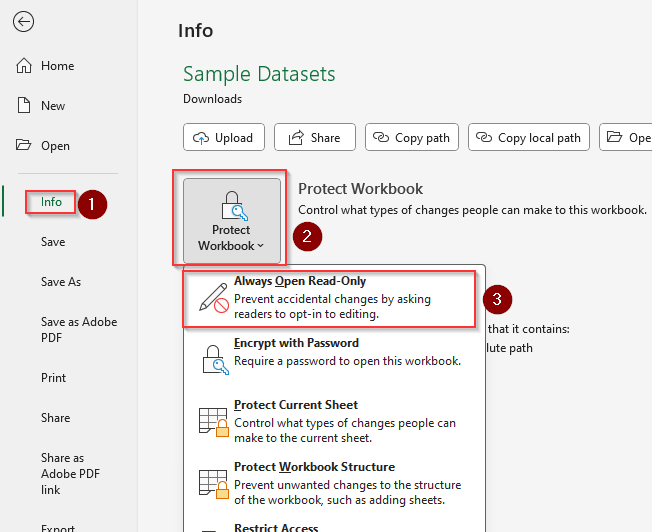
➤ To reverse the process, follow the exact same steps and click on Always Open Read Only again so that it‘s no longer highlighted.
Marking as Final
➤ Go to the File tab >> Info >> Protect Workbook >> Mark as Final. Excel will display a notification letting the viewer know this is the final draft and further editing is turned off.
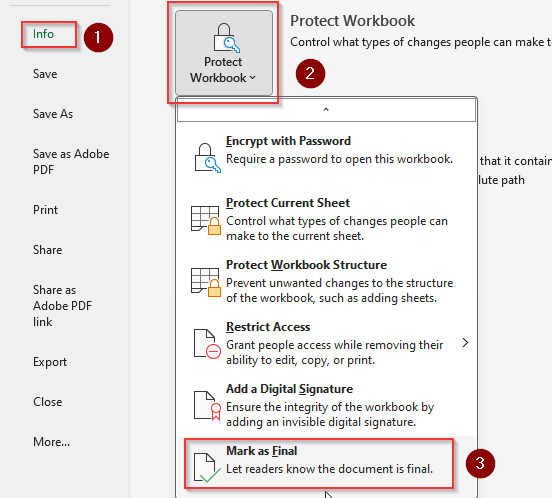
However, you can choose Edit Anyway from the top ribbon to continue making changes.
Turning on View-Only Mode While Sharing
As you share the link to your Excel workbook, you can turn on the view-only mode to allow other users to read the file but not edit it. Here’s how you can do it:
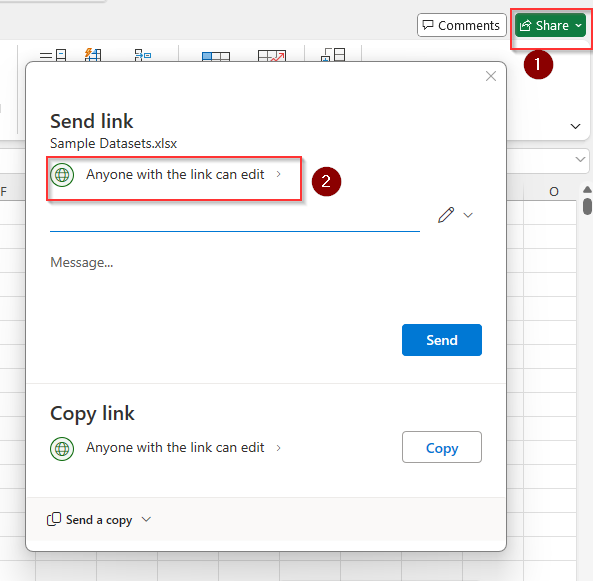
➤ Click on the Share option from the top right corner of your screen. Choose your OneDrive cloud account to store the file.
➤ Now, a new menu will appear titled Send Link. Click on Anyone with the link can edit.
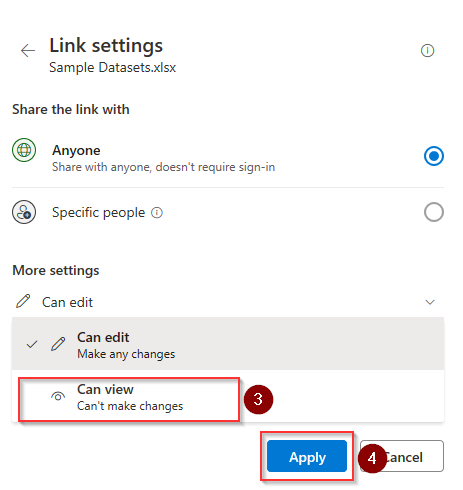
➤ Select the option Can View under More settings and press Apply. Thus your workbook will be unavailable for making any changes later.
Frequently Asked Questions
How do I know if my Excel is password protected?
If your workbook is password protected, Excel prompts for a password as you try to open it or make structural changes such as adding or deleting existing sheets. Also, the Protect Workbook option will be highlighted on the top ribbon.
How strong is Excel password protection?
Excel password protection is reliable as long as you use a strong password. Mix uppercase and lowercase letters, numbers, and symbols so that the passcode isn’t easily cracked. Avoid using common catchphrases, simple sequential patterns, or personal info like birthdays and names.
However, Excel protection can still be vulnerable to someone with deep technical knowledge.
How do I limit who can edit an Excel workbook?
Use Information Rights Management (IRM) to assign workbook modification access to specific users and restrict who can view, edit, copy, or print your workbook. For this, go to the File tab >> Info >> Protect Workbook >> Restrict Access.
Now, select your preferred permissions such as read-only or prevent copying and printing, add people who can access the workbook, and save the workbook to apply these restrictions.
Wrapping Up
It only takes a few clicks to protect your workbook from undesired editing as long as you choose the right method. Apart from the tricks we’ve covered, some also recommend converting the workbook into a PDF file or using third-party protection software.
However, these methods are complicated and time-consuming. Instead, you can choose any of the above-mentioned procedures to get the same level of security.