Unwanted characters interfere with data processing and sorting in Excel. Extracting the necessary text before such characters is an easy way to clean up your dataset. For this, Excel has several useful functions and features.
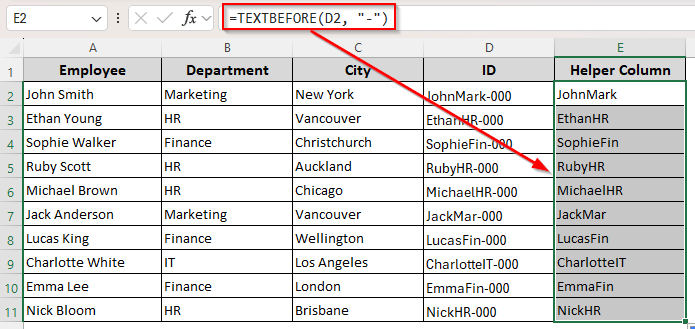
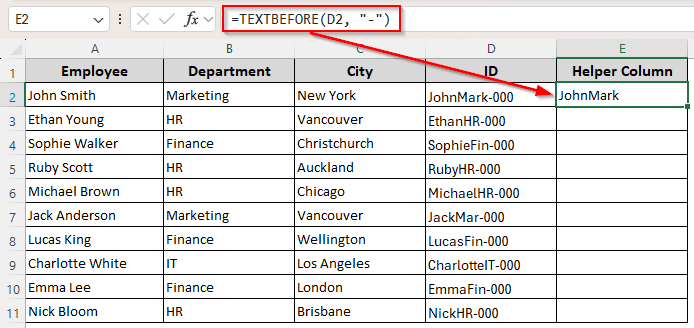
➤ Create a helper column and enter the following formula in its first cell:
=TEXTBEFORE(D2, “-“)
➤ Here, D2 is the cell containing the text string you want to change. As for the character, we’re extracting the text before the hyphen/dash (-) symbol in our dataset. Change them according to your dataset.
➤ Press Enter and drag the formula down to the remaining cells using the fill handle.
Other easy ways of extracting text before a character include using the Flash Fill feature, Find & Replace tool, and functions like LEFT, FIND, and SEARCH. This article covers all the different ways to separate specific texts from unwanted characters.
Extract Texts Before Characters Using the Flash Fill Feature
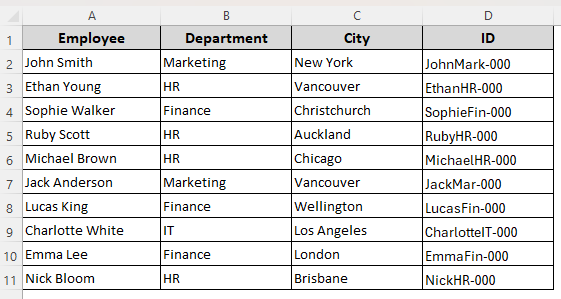
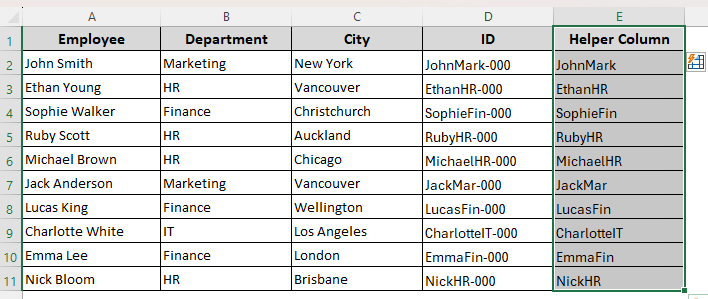
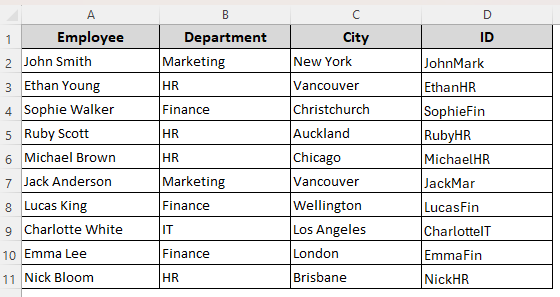
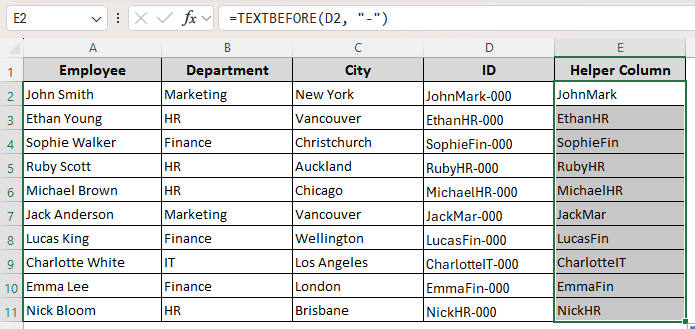
In our dataset, we have an employee info database with columns for their name, department, city, and IDs. In column D(ID), we have employee IDs with texts and codes separated by hyphens(-). Our goal is to extract the text before each hyphen.
For a less complex dataset, Excel’s Flash Fill feature can be a quick solution. However, you’ll have to manually input data in the first two cells to help Excel recognize the correct pattern. Below are the details:
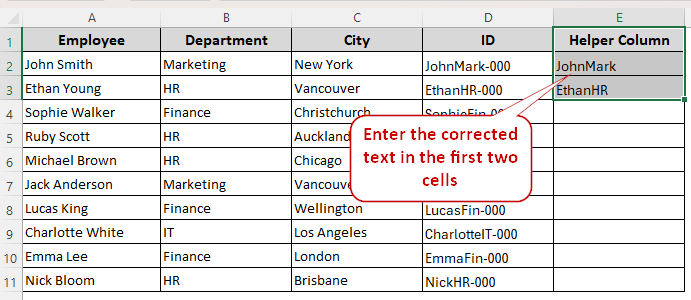
➤ In a helper column, type the corrected data with the text you want to extract in the first two cells adjacent to the original cells.
➤ Select all the cells of the helper column including the ones with corrected data and press CTRL + E .
➤ Or, go to the Data tab from the main ribbon and click on the Flash Fill icon on the Data & Tools group.
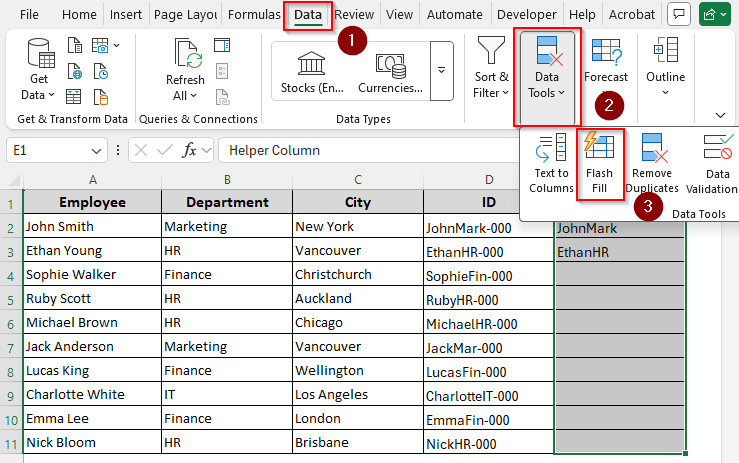
➤ The cells are now auto filled with the corrected texts before a certain character. If this method doesn’t work, manually fix a third cell and repeat the previous steps.
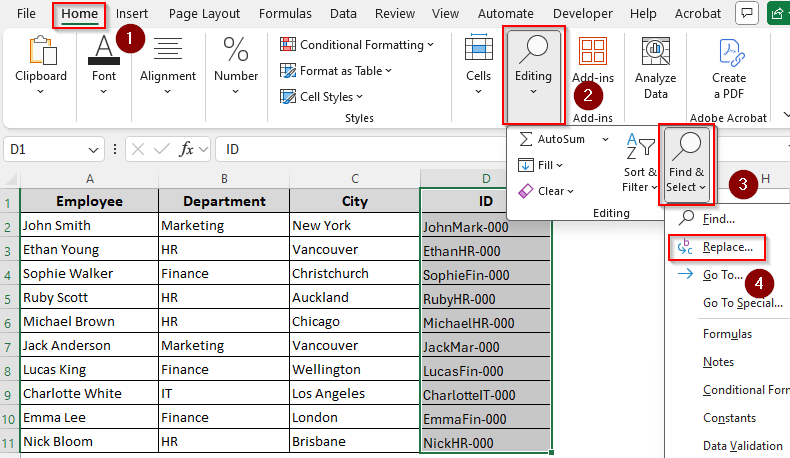
Using the Find & Replace Tool to Remove Certain Characters and Text
Only use this method if the character you want to remove only occurs once in a cell. With the Find & Replace tool, we’ll remove the character and everything after it to keep our desired text only. Here’s how:
➤ First, select the column with the texts and characters. Press CTRL + H to open the Find & Replace Tool. Or, access the Home tab on the main ribbon and click on the Editing group. Choose the Find & Select group and select Replace from the drop-down menu.
➤ In the Find What field, type the character and add an asterisk(*) after it to represent the text after the character. For example, we used -* to represent the unwanted parts of our dataset..
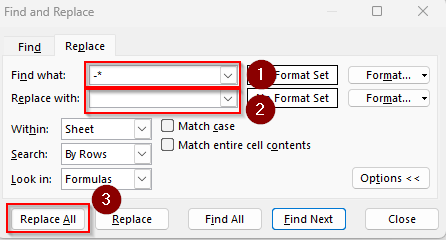
➤ Leave the Replace With field empty and click on Replace All to keep the text before the character and remove everything else.
Strip Text Before Character with the TEXTBEFORE Function
For easy text extraction, Excel introduced the TEXTBEFORE function. It strips text before a specified delimiter within a text string. If you have the web version of Excel or Microsoft 365, follow the steps given below:
➤ Create a new helper column to put the extracted text. In its first cell, type any of the following formulas:
For A Single Character:
=TEXTBEFORE(D2, “-“)
➤ Replace D2 with the cell reference containing the text string with the character. Choose the correct delimiter based on your dataset instead of the hyphen(-) symbol in the formula.
For Multiple Occurrences of the Same Character:
=TEXTBEFORE(D2, “-” , 2)
➤ Replace D2 with the appropriate cell reference. Use this formula to extract the text before the second occurrence of the character. Change the number from 2 to your preferred position if you want to extract text from a different position.
➤ In both cases, press Enter and use the fill handle (tiny + sign on the bottom corner of the cell) to apply the formula to the remaining cells.
Text Extraction with the LEFT and FIND Functions
For older Excel versions, you need to use the LEFT and FIND functions to extract text from a certain position. The FIND function locates the defined character and the LEFT function returns all text to the left of that character.
Instead of FIND, you can also use the SEARCH function. While the SEARCH function is case-insensitive, the FIND function is not. Use the right one according to your dataset. Here’s the detailed procedure:
➤ In a helper column cell, enter either of the following formulas:
=LEFT(D2, FIND(“-“, D2) – 1)
Or,
=LEFT(D2, SEARCH(“-“, D2) – 1)
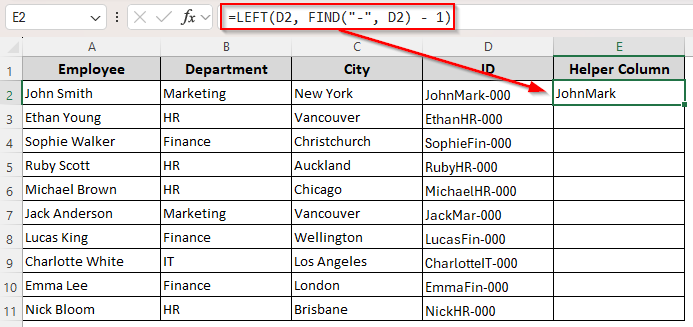
➤ Change the cell reference D2 based on your dataset. Replace the hyphen(-) with any character you need.
➤ Click Enter and drag the formula down to the rest of the cells.
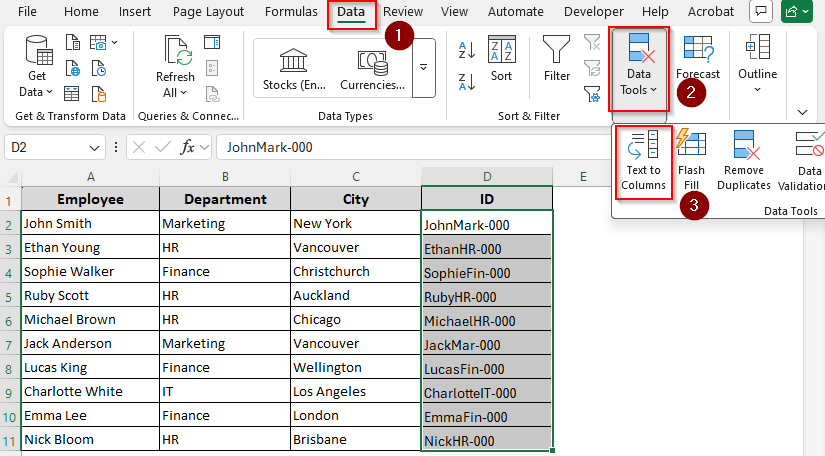
Using the Text to Columns Wizard to Separate Texts Based on Characters
If you want to extract text before a character and put the rest in a different column, the Text to Column Wizard is a good option. Here’s how to use it:
➤ From the Data tab, click on the Text to Columns option from the Data Tools group..
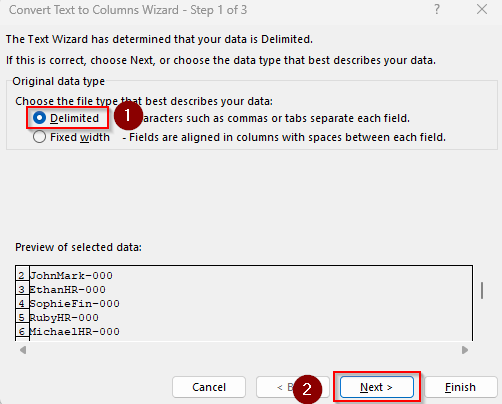
➤ In Step 1 of the Text to Columns Wizard box, you need to choose the Delimiter option and press Next.
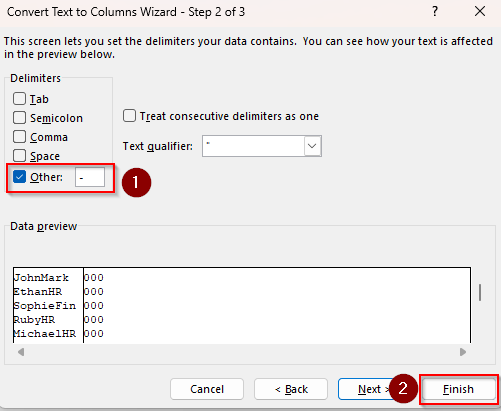
➤ In Step 2, select your preferred delimiter from the Delimiters group. If the character you’re looking for is not in the list, check the Other box and manually type it in the blank field. Now, press Finish.
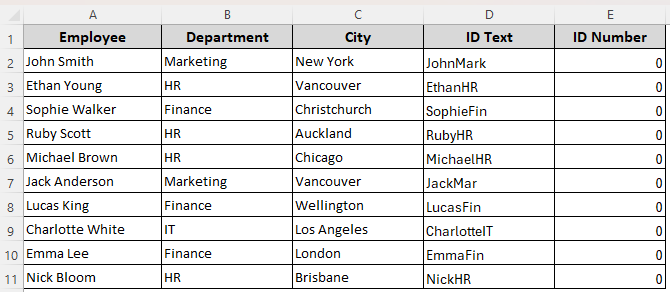
➤ As Excel separates the text before the character in a separate column, you can either keep the remaining columns or delete them.
Dynamic Text Extraction with VBA Macro
Some of the methods mentioned above are specific to your selected data and don’t apply to new entries. If you want to extract text from new entries in one click, follow the steps given below:
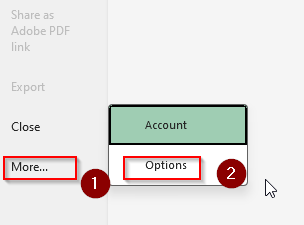
➤ First, look for the Developer tab on the main ribbon. If it’s not there, go to the File tab >> More >> Options.
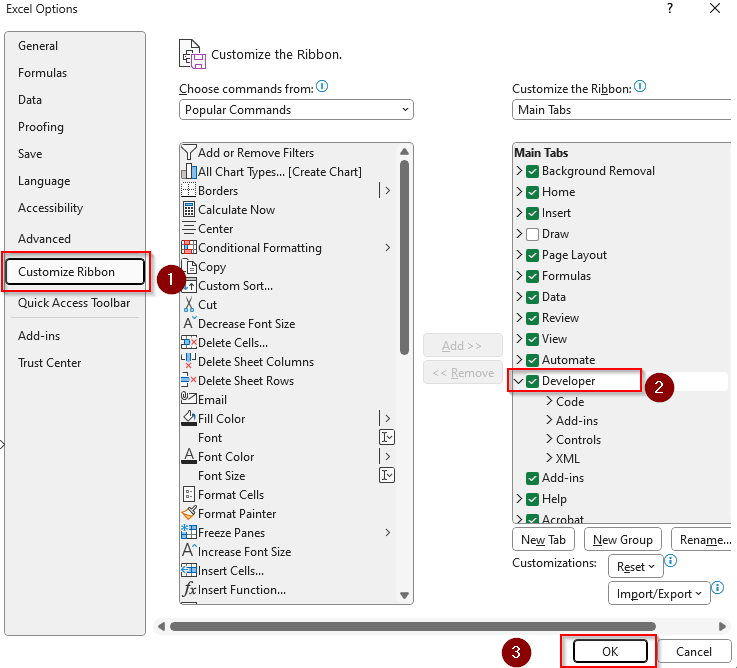
➤ Choose Customize Ribbon from the first column and the Developer option from the third. Press Ok.
➤ Go to the Developer tab and click on Visual Basic.
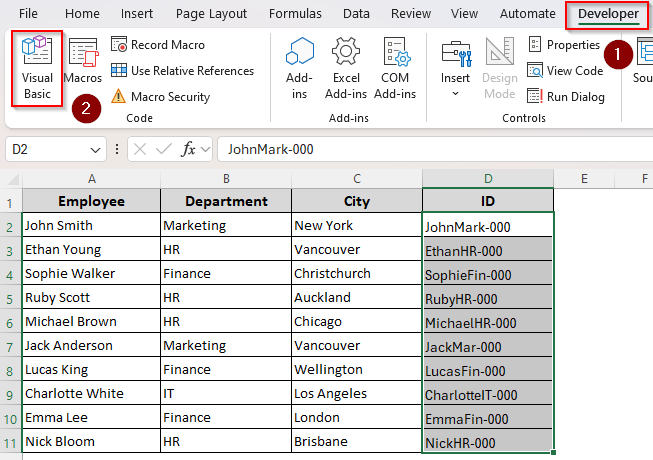
➤ As a new VBA Editor tab opens, click on Insert and select Module.
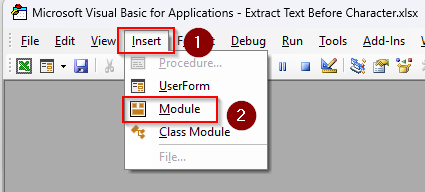
➤ In the Module box, paste the following code:
Sub ExtractTextBeforeCharacter()
Dim rng As Range
Dim cell As Range
Dim userChar As String
Dim pos As Long
Dim originalText As String
' Prompt user to select the range
On Error Resume Next
Set rng = Application.InputBox("Select the dataset range:", Type:=8)
On Error GoTo 0
If rng Is Nothing Then
MsgBox "No range selected. Exiting.", vbExclamation
Exit Sub
End If
' Ask user to enter the character
userChar = InputBox("Enter the character to extract text before:")
If Len(userChar) <> 1 Then
MsgBox "Please enter exactly one character.", vbExclamation
Exit Sub
End If
Application.ScreenUpdating = False
' Loop through each cell in the selected range
For Each cell In rng
If Not IsEmpty(cell.Value) And VarType(cell.Value) = vbString Then
originalText = cell.Value
pos = InStr(1, originalText, userChar)
If pos > 1 Then
cell.Value = Left(originalText, pos - 1)
ElseIf pos = 1 Then
' If the character is the first character, replace with empty string
cell.Value = ""
End If
' If character not found, leave cell unchanged
End If
Next cell
Application.ScreenUpdating = True
MsgBox "Extraction completed.", vbInformation
End Sub
➤ Click on the Run tab and select Run Sub/UserForm. Or, press F5 .

➤ When prompted to choose your cells, go back to the Excel tab and select the data range that you want to change. Press Ok.
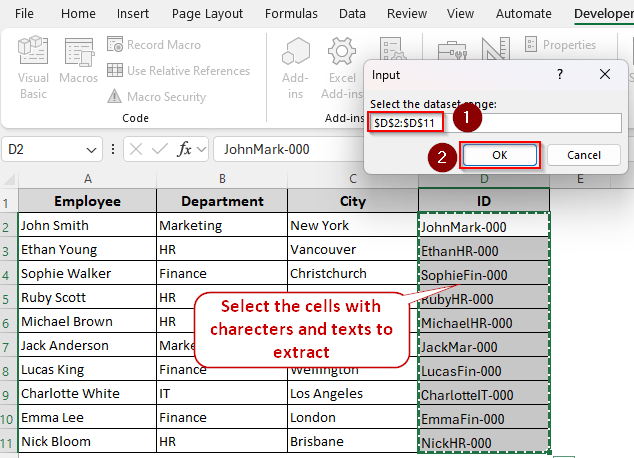
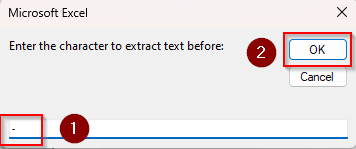
➤ Now, enter the character to extract text before it and click OK.
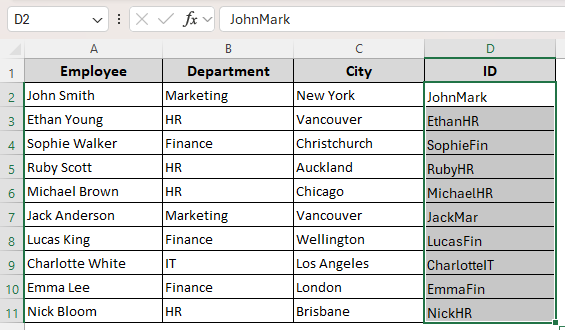
➤ Excel will now convert your dataset. Here’s our final result:
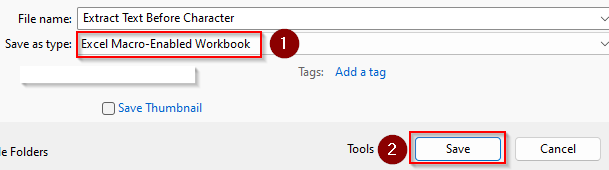
➤ To save the file with a VBA macro, open the File tab and go to Save As. In your preferred location, give the file a name and choose Excel Macro-Enabled Workbook from the Save as Type box. Finally, press Save.
Frequently Asked Questions
How do I extract text after a specific character in Excel?
To extract text after a specific character, use any of the formulas given below:
=TEXTAFTER(D2, “-“)
Or,
=RIGHT(D2, LEN(D2) – FIND(“-“, D2))
Change the cell reference and character according to your needs.
How do you extract text between texts in Excel?
Let’s say your data string is John Smith HR in cell D2. To keep the middle text (Smith), enter the following formula:
=MID(D2, SEARCH(“John”, D2) + LEN(“John”), SEARCH(“HR”, cell) – (SEARCH(“John”, cell) + LEN(“John”)))
Press Enter and drag the formula down using the fill handle.
How to extract text between delimiters in Power Query?
Go to Data >> Get & Transform >> From Table/Range. In Power Query Editor, select the column and enter the following formula in the formula bar or via Add Column >> Custom Column:
Text.BetweenDelimiters([ColumnName], “-“, “-“)
Instead of ColumnName enter the name of your original column and change the hyphens(-) with appropriate delimiters from your data.
Wrapping Up
Although using the TEXTBEFORE function is an easy and dynamic approach to extracting text before a character, it’s not applicable for old Excel versions.
So, you can use the LEFT and FIND functions or VBA coding instead. In case any error occurs after applying a formula, add the IFERROR function to fix it.