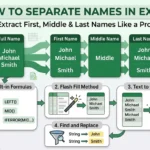
Sometimes you have data combined in one cell but want to split it into multiple rows instead of columns. While Excel has built-in tools to split data into columns, it doesn’t directly support splitting a single cell into multiple rows. Whether you’re organizing employee names, breaking apart product codes, or cleaning up imported text, there are several clever ways to split a cell vertically.
In this article, you’ll learn how to split a cell into two or more rows in Excel using formulas, Text to Columns, manual copy-paste, Power Query, and VBA automation which are suited for different scenarios and skill levels.
Steps to split a cell into two rows in Excel:
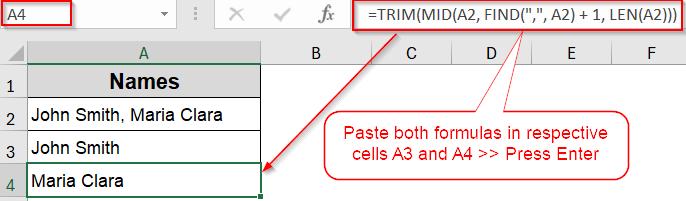
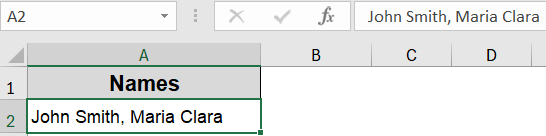
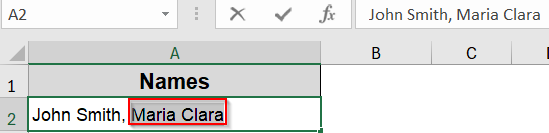
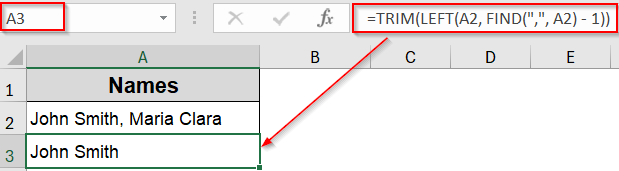
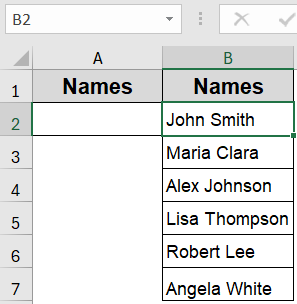
➤ Suppose cell A2 contains “John Smith, Maria Clara”.
➤ In cell A3, enter this formula to extract the first part:
=TRIM(LEFT(A2, FIND(“,”, A2) – 1))
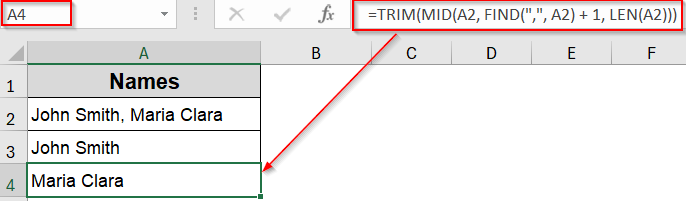
➤ In cell A4, enter this formula to extract the second part:
=TRIM(MID(A2, FIND(“,”, A2) + 1, LEN(A2)))
Split a Cell into Rows Manually with Cut and Insert Feature
If you only need to split one or two cells occasionally, the manual method is your easiest option. It requires no formulas or special features, just basic editing and Excel’s Insert Row function. This is especially useful when you’re prepping one-off data or making fast edits before a report.
Steps:
➤ Select the cell that contains both values such as A2.
➤ Place your cursor inside the formula bar or double-click the cell.
➤ Select the part you want to move to the next row and highlight it like Maria Clara.
➤ Press Ctrl + X to cut the selected text and remove commas from the initial cell if present.
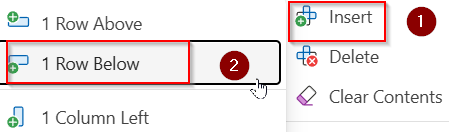
➤ Right-click the row below and choose Insert >> 1 Row Above.
➤ Click into the next cell and press Ctrl + V to paste.
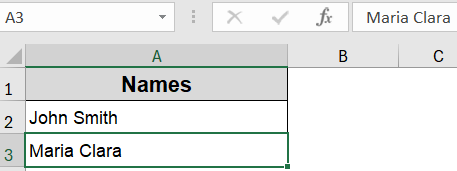
Now both names are in separate rows.
Use Formulas to Split Cell Contents into Two Rows
If you want a no-code solution but prefer automation over manual editing, formulas using LEFT, MID, and FIND can do the job. This method works well when your data has a consistent delimiter like a comma, slash, or space and you only need to split into exactly two rows.
Steps:
➤ Suppose cell A2 contains “John Smith, Maria Clara”.
➤ In cell A3, enter this formula to extract the first part:
=TRIM(LEFT(A2, FIND(“,”, A2) – 1))
➤ In cell A4, enter this formula to extract the second part:
=TRIM(MID(A2, FIND(“,”, A2) + 1, LEN(A2)))
Now, A2 and A3 cell show the two split values vertically.
Note:
Adjust the delimiter in the formulas if your separator is different (e.g., space ” “ or semicolon “;”).
Combine TEXTSPLIT with TRANSPOSE Function to Split into Rows (Excel 365 / 2021)
This method is the most efficient and scalable which is perfect for users with Excel 365 or Excel 2021. The TEXTSPLIT function handles the separation, and TRANSPOSE function arranges the split values into rows instead of columns. It’s ideal for modern workbooks, longer lists, or recurring tasks.
Steps:
➤ Suppose column cell A2 contains your aggregated data.
➤ In any blank cell (like A3), enter this formula:
=TRANSPOSE(TEXTSPLIT(A2, “,”))
➤ Press Enter.
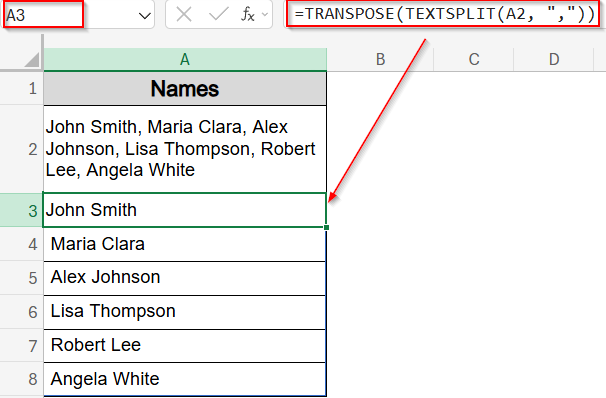
Now your values will split into separate rows automatically. You can then format your data accordingly.
Convert Columns to Rows with Text to Columns and Transpose
Excel’s Text to Columns feature is built to split data horizontally into separate columns. But if you need those values in rows instead, a quick Transpose after splitting does the trick. This method is simple and doesn’t require formulas or coding which is ideal for quick cleanup tasks.
Steps:
➤ Select the cell with the combined data (e.g., A2 cell).
➤ Go to the Data tab, click Split Text to Columns under Data Tools.
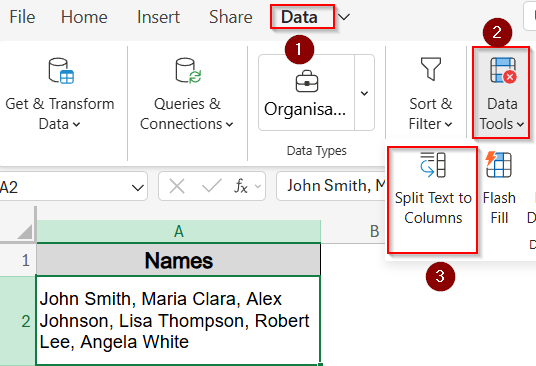
➤ Choose the delimiter (e.g., Comma), then click Apply.
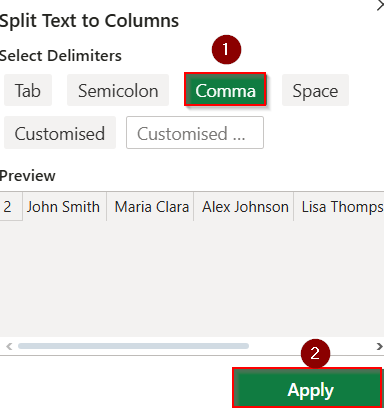
➤ The data splits into adjacent columns.
➤ Select these new columns, press Ctrl + C to copy.
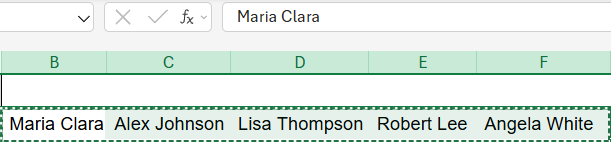
➤ Select a blank cell below (e.g., A3), right-click, choose Paste Special >> Transpose Rows and Columns.
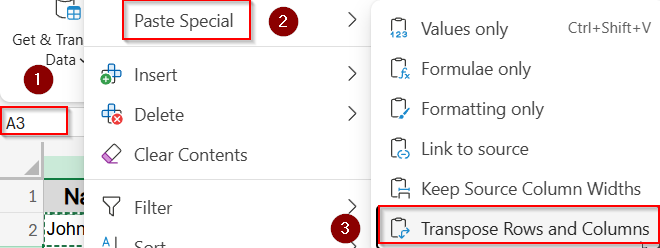
Now the data is pasted vertically into rows.
Note:
You need to delete or clear the original split columns afterwards for a cleaner look.
Utilize Power Query to Split a Cell into Rows
Power Query is best for working with large datasets or when you need repeatable, refreshable results. It can split one cell into many rows instantly based on any delimiter, and it integrates well with ongoing data processes or imports.
Steps:
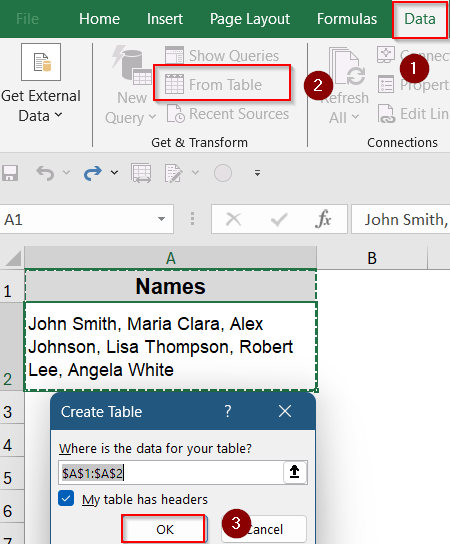
➤ Select your data range, including the cell(s) you want to split.
➤ Go to Data >> From Table/Range under Get & Transform group.
➤ If prompted, confirm the table range and click OK.
➤ In Power Query Editor, select the column with combined data.
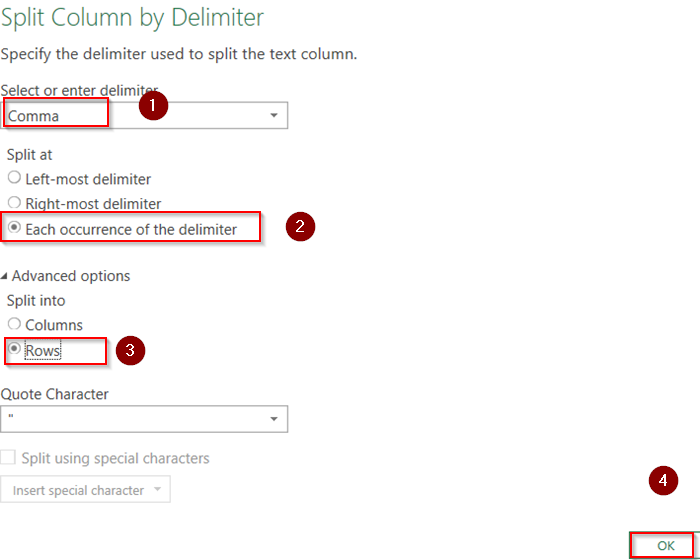
➤ Go to the Transform tab, click Split Column >> By Delimiter.
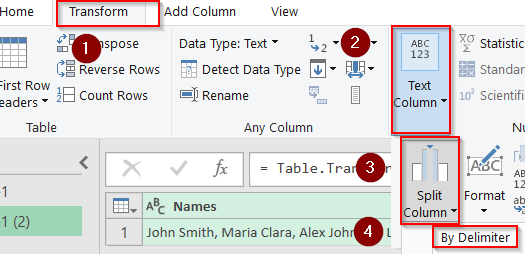
➤ Choose your delimiter (e.g., comma), select At each occurrence.
➤ In the Advanced options, select Split into Rows instead of Columns.
➤ Click OK. The data splits vertically with one value per row.
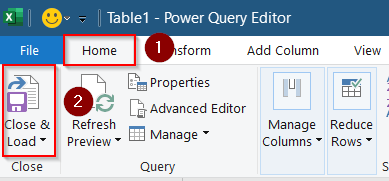
➤ Click Close & Load under Home tab to return the split data to Excel.
Note:
Power Query keeps your data connection live so you can refresh when source data changes.
Automate the Process with a VBA Macro to Split Cell into Multiple Rows
If you’re dealing with repetitive tasks, many rows, or entire worksheets needing the same action, VBA can automate the splitting process. This method is efficient and reusable for advanced users or data teams managing dynamic inputs.
Steps:
➤ Press Alt + F11 to open the VBA editor.
➤ Go to the Insert tab >> Click Module.
➤ Paste the following code:
Sub SplitCellToRows()
    Dim rng As Range, cell As Range
    Dim vSplit As Variant
    Dim i As Integer
    Set rng = Selection ' Select cells to split before running
    For Each cell In rng
        vSplit = Split(cell.Value, ",") ' Change delimiter if needed
        For i = LBound(vSplit) To UBound(vSplit)
            cell.Offset(i, 1).Value = Trim(vSplit(i))
        Next i
        ' Clear original cell if desired
        cell.ClearContents
    Next cell
    ' Optional: transpose columns to rows manually after macro runs
End Sub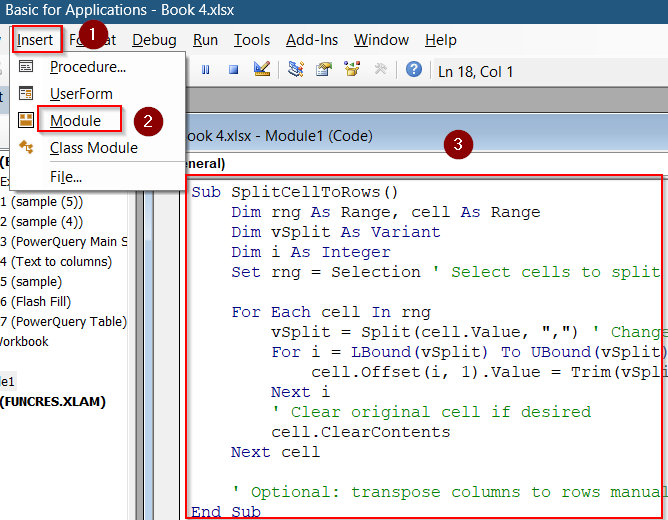
➤ Close VBA editor and return to Excel.
➤ Press Alt + F5 to run the code.
➤ Now the macro splits each part into the next adjacent column. You can remove the original column and format your data for better presentation.
Frequently Asked Questions
Can I split a single cell into rows without using formulas or VBA?
Yes, you can use manual methods like cut-paste or Text to Columns followed by Transpose feature to achieve this without any coding or formulas.
Why doesn’t Flash Fill work for splitting cells into rows?
Flash Fill works horizontally or down columns, but it cannot split values from a single cell into multiple rows. Use TEXTSPLIT or Power Query for that.
What if I have more than two values in the cell?
You can still split them into multiple rows using TEXTSPLIT with TRANSPOSE, Power Query, or a more advanced loop-based VBA macro for dynamic-length lists.
Wrapping Up
In this tutorial, we explored multiple ways to split a single cell into two rows in Excel. From quick manual edits and basic formulas to more advanced functions and tools like TEXTSPLIT, Power Query, and VBA macros. Each method offers flexibility based on your Excel version and workload. Feel free to download the practice file and share your feedback.