Sending emails manually from Outlook can be repetitive, especially when you are working with data in Excel. Whether you’re notifying employees, sending invoices, or distributing reports, automating the email process saves time and reduces the risk of human error. That is where a macro to send email from Excel becomes incredibly useful.
In this article, we will walk through different ways to build email-sending macros using Excel VBA. You will learn how to send a single email, send personalized messages in bulk, include attachments, and even trigger emails based on dropdown values in your sheets.
Steps to send a single email from Excel VBA using Outlook:
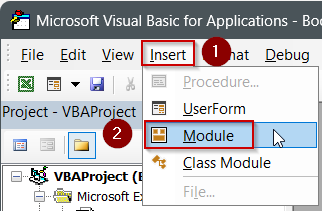
➤ Open the VBA Editor by pressing Alt + F11 .
➤ Go to Insert >> Module and paste the following code:
Sub SendSingleEmail()
    'Send one email using data in EmailInfo!A2:C2
    Dim OutApp As Object
    Dim OutMail As Object
    Dim ws As Worksheet
    Set ws = Worksheets("EmailInfo")           'source sheet
    Set OutApp = CreateObject(
    Set OutMail = OutApp.CreateItem(0)         '0 = MailItem
    With OutMail
        .To = ws.Range("A2").Value             'recipient
.Subject = ws.Range("B2").Value        'subject line
        .Body = ws.Range("C2").Value           'plain-text body
        '.Display                              'uncomment to preview first
        .Send                                  'send immediately
    End With
    MsgBox "Email sent successfully.", vbInformation
End Sub
➤ Make sure Outlook is open. Then, press F5 to run the macro.
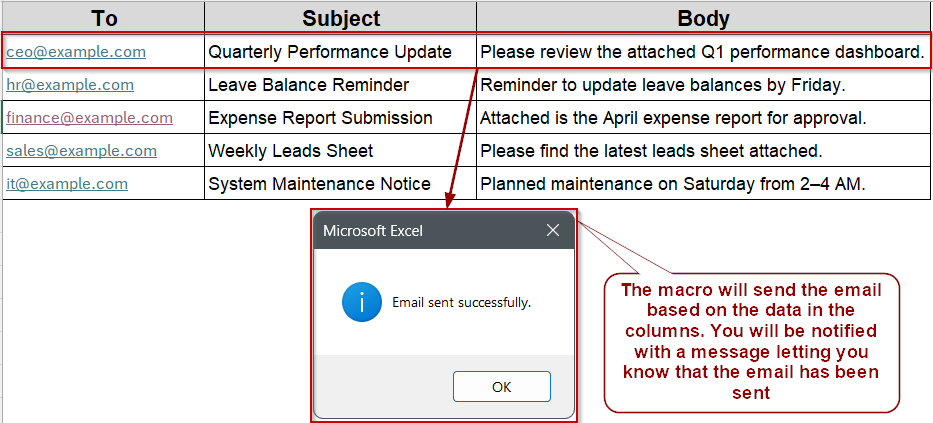
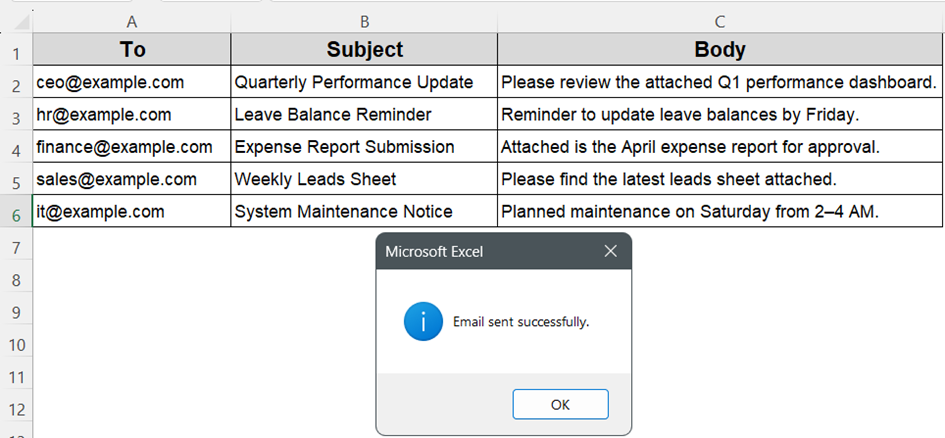
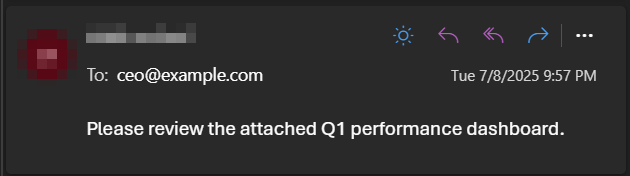
➤ The macro reads values from cells A2 to C2 in the EmailInfo worksheet and sends a fully formed email through Outlook.
➤ You will see a confirmation message once the email is sent.
Use VBA with the Outlook Object Model to Send a Single Email from Excel
When writing macros to send emails directly from Excel, a common need is to generate a single message using the data in a worksheet. If Outlook is installed and configured, you can use the Outlook Object Model through VBA to automate email creation. This approach is useful when you want to send a quick update, status report, or alert without manually copying and pasting.
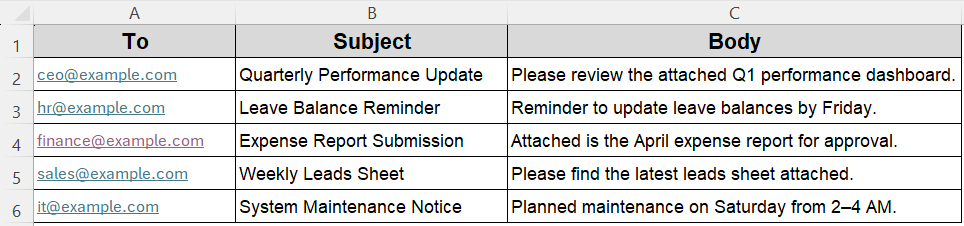
We’ll demonstrate using one worksheet called EmailInfo. It contains basic message details: recipient email, subject line, body content, and (optionally) a file path for attachment. The macro reads from the second row and builds a complete email in Outlook.
With this method, the email is sent automatically from your Outlook account without prompts or pop-ups. If the attachment field is blank, the email still sends without error. Execution is smooth, and you get a confirmation message when the process completes.
Steps:
➤ Press Alt + F11 to open the VBA Editor, then choose Insert >> Module to add a new module.
➤ Copy and paste the following code.
➤ Make sure Outlook is open, go back to the module window, and press F5 to run SendSingleEmail. The first row’s email (cells A2:D2) is sent immediately.
Sub SendSingleEmail()
    'Send one email using data in EmailInfo!A2:C2
    Dim OutApp As Object
    Dim OutMail As Object
    Dim ws As Worksheet
    Set ws = Worksheets("EmailInfo")           'source sheet
    Set OutApp = CreateObject("Outlook.Application")
    Set OutMail = OutApp.CreateItem(0)         '0 = MailItem
    With OutMail
        .To = ws.Range("A2").Value             'recipient
        .Subject = ws.Range("B2").Value        'subject line
        .Body = ws.Range("C2").Value           'plain-text body
        '.Display                              'uncomment to preview first
        .Send                                  'send immediately
    End With
    MsgBox "Email sent successfully.", vbInformation
End Sub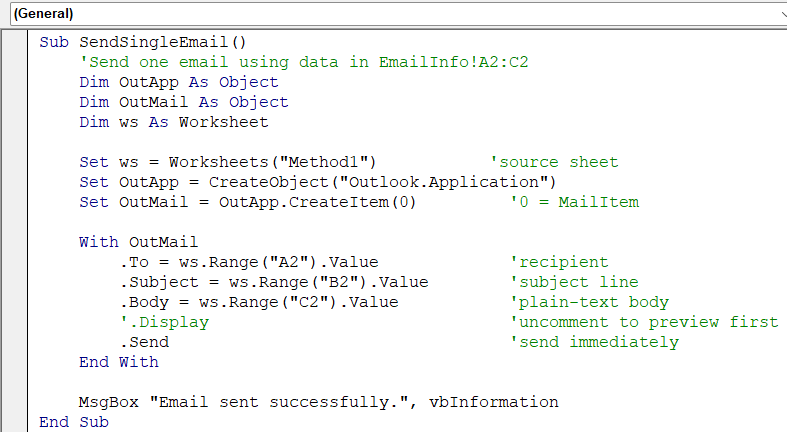
➧ CreateItem(0) creates a new MailItem.
➧ The macro pulls To, Subject, Body, and Attachment from cells A2:D2 of EmailInfo.
➧ The If block safely adds an attachment only when cell D2 is not empty, so empty paths do not trigger an error.
➧ Comment out .Send and use .Display while testing; once you are satisfied, switch back to .Send for full automation.
➤ Run the macro in your Excel sheet. A quick Message Box confirms success, so users do not have to check Outlook manually.
➤ You can check the outbox of your Outlook to confirm if the mail has been sent or not.
Preview Each Email Before Sending with .Display in Excel Macros
Sometimes, you need to look over each message before it goes out, edit the wording, add a personal line, or drop in an extra attachment. In that case, swap .Send for .Display. The macro opens each email in Outlook’s compose window and pauses until you click Send (or close the draft). Nothing is dispatched automatically.
We will reuse the EmailInfo sheet from earlier. Row 2 onward still stores To, Subject, and Body for five sample messages; no attachment column is required.
Steps:
➤ Open the VBA Editor (Alt + F11) and insert a new module.
➤ Copy and paste the code below.
Sub PreviewEmails_OneByOne()
    Dim ws As Worksheet
    Dim OutApp As Object, OutMail As Object
    Dim lastRow As Long, r As Long
    Set ws = Worksheets("EmailInfo")
    lastRow = ws.Cells(ws.Rows.Count, "A").End(xlUp).Row
    Set OutApp = CreateObject("Outlook.Application")
    For r = 2 To lastRow
        Set OutMail = OutApp.CreateItem(0)
        With OutMail
            .To = ws.Cells(r, 1).Value
            .Subject = ws.Cells(r, 2).Value
            .Body = ws.Cells(r, 3).Value
            .Display            'open draft
        End With
        '••• wait until that window is closed •••
        Do While OutMail.Sent = False And OutMail.Display = True
            DoEvents           'yields control so Excel stays responsive
        Loop
    Next r
    MsgBox "Finished displaying all emails.", vbInformation
End Sub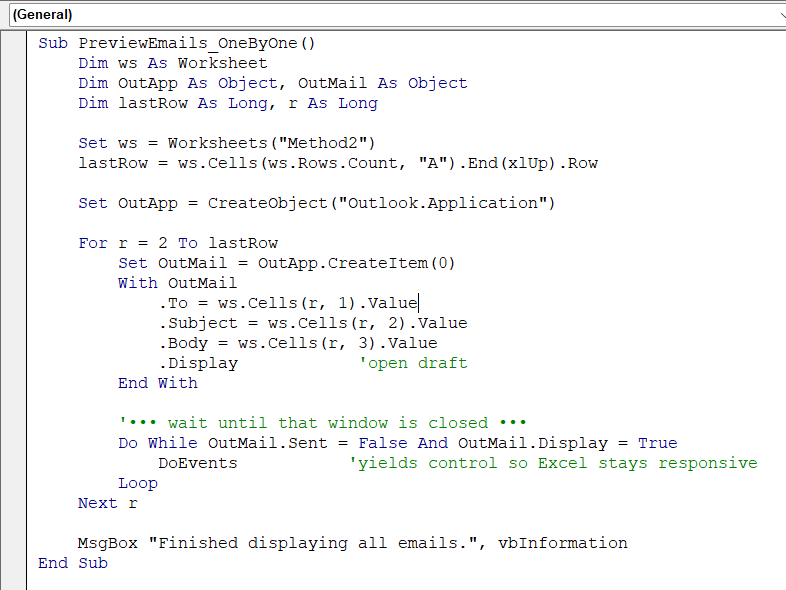
➧ .Display opens the message and waits. Outlook will not move to the next row until you manually close or send the current email, giving you full control.
➧ Comment out .Display and restore .Send when you want to switch back to silent, automatic sending.
➧ The macro keeps a single Outlook instance (OutApp) alive for speed, creating a fresh MailItem on each pass.
➧ The final MsgBox appears only after every message has been shown, confirming the loop completed.
Using .Display is the safest way to preview mail‑merge‑style messages before they leave your mailbox, while still leveraging Excel data for quick assembly.
➤ Return to Excel, then press F5 to run PreviewEmailsWithDisplay. Outlook brings up each message in turn. Review or edit as needed, then press Send in Outlook. Close any email you do not wish to send.

Automate Email Based on Cell Values Using VBA Macros in Excel
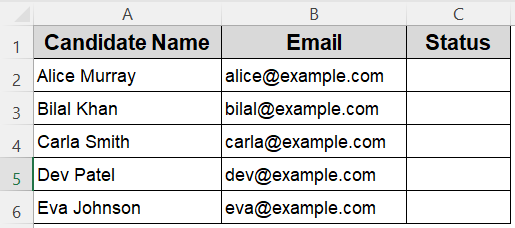
Tracking job applications in Excel often means marking each candidate as Approved or Rejected in a status column. Instead of opening Outlook and drafting separate messages every time you update that field, you can attach a Worksheet Change macro to the recruitment sheet. When you assign Approved or Rejected in a column, the macro grabs the candidate’s details, fills an email template that matches the status, and opens the message for your review.
We will use a sheet named Recruitment. Column C will act as the email trigger wiith two choices Approved and Rejected. As soon as you assign one of the two values, a ready‑to‑send email appears in Outlook customized to that candidate.
Steps:
➤ Press Alt + F11 to open the VBA Editor.
➤ In the Project Explorer, double‑click the Recruitment worksheet object (not a standard module).
➤ Paste the event code below into that sheet’s code window.
➤ Return to Excel, assign Approved or Rejected in any Status cell, and Outlook will open the corresponding email for that row.
Private Sub Worksheet_Change(ByVal Target As Range)
'Fire only when a single Status cell in column C is changed
If Intersect(Target, Me.Range("C2:C100")) Is Nothing Then Exit Sub
If Target.CountLarge > 1 Then Exit Sub
Dim statusValue As String
statusValue = LCase$(Trim(Target.Value))
If statusValue <> "approved" And statusValue <> "rejected" Then Exit Sub
Dim candidateName As String, candidateEmail As String
Dim OutApp As Object, OutMail As Object
candidateName = Me.Cells(Target.Row, 1).Value 'column A
candidateEmail = Me.Cells(Target.Row, 2).Value 'column B
Set OutApp = CreateObject("Outlook.Application")
Set OutMail = OutApp.CreateItem(0) 'mail item
With OutMail
.To = candidateEmail
Select Case statusValue
Case "approved"
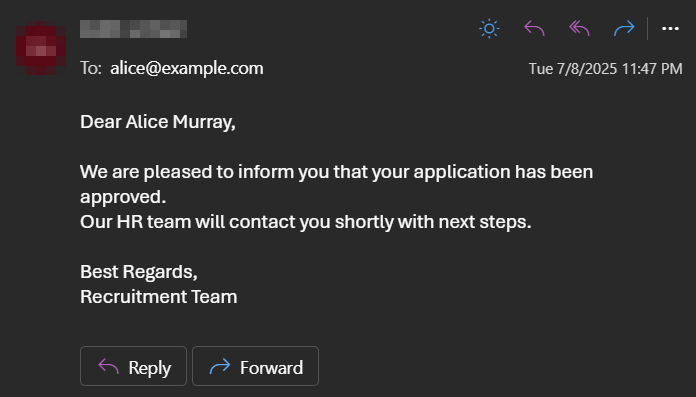
.Subject = "Congratulations on Your Offer"
.Body = "Dear " & candidateName & "," & vbCrLf & vbCrLf & _
"We are pleased to inform you that your application has been approved. " & _
"Our HR team will contact you shortly with next steps." & vbCrLf & vbCrLf & _
"Best regards," & vbCrLf & "Recruitment Team"
Case "rejected"
.Subject = "Update on Your Application"
.Body = "Dear " & candidateName & "," & vbCrLf & vbCrLf & _
"Thank you for taking the time to apply. After careful consideration, " & _
"we will not be moving forward with your application at this time." & vbCrLf & vbCrLf & _
"We appreciate your interest and wish you success in your future endeavors." & vbCrLf & _
"Sincerely," & vbCrLf & "Recruitment Team"
End Select
.Display 'show draft; review and click Send
End With
End Sub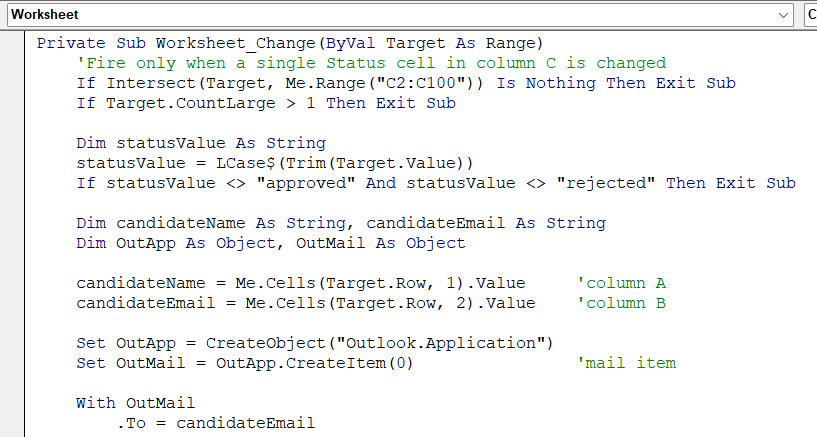
➧ Status text is converted to lowercase for a simple comparison. Only approved or rejected continue; blank cells or other text are ignored.
➧ The macro pulls Candidate Name and Email from the same row, fills a tailored subject and body, then uses .Display so you can review before sending.
➤Go back to the Excel sheet and assign a status to any of the candidates.
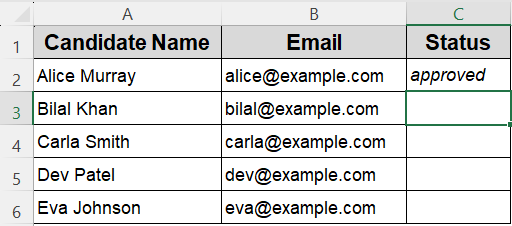
➤ Once the status has been assigned, the mail will be sent to the candidate according to the status value.
With this event‑driven approach, your recruitment sheet automatically drafts the right email every time you update the status column, saving repetitive typing while still giving you final control over each message.
Frequently Asked Questions
Do I need Outlook installed to use these email macros in Excel?
Yes, these macros rely on the Outlook Object Model, so Microsoft Outlook must be installed and configured on your system for them to work. Web-based Outlook (Outlook.com) or other email clients like Gmail won’t work with this VBA code.
Will the macros automatically send emails without confirmation?
It depends on the method:
➤ If the code uses .Send, the email is sent immediately.
➤If it uses .Display, the email opens in Outlook first so you can review it before clicking Send.
Choose .Display if you want a chance to preview or edit the email.
Can I send personalized bulk emails to multiple recipients?
Yes. You can send personalized bulk emails to multiple recipients in Excel. Each email can have its own recipient, subject, and body content based on the data in the row.
Is there a way to trigger an email without clicking a button?
Yes, you can use a worksheet change event. When you change a value in a specific column (like selecting “Approved” or “Rejected” from a dropdown), it automatically drafts the corresponding email. No button-click needed.
Wrapping Up
Sending emails directly from Excel using VBA can save time, reduce manual effort, and simplify communication, mainly when dealing with repetitive tasks. In this article, you learned how to send a single email, automate bulk messages, preview or auto-send emails, and trigger emails based on dropdown selections. Whether you’re managing a small list or building a dynamic approval system, these methods offer a flexible way to integrate Excel and Outlook for fast, customized email automation.