Excel lets you store useful information behind the scenes of your workbook including the author name, title, subject, tags, and more. These details are known as document properties or metadata, and they help with file management, searchability, and professionalism when sharing files.
In this article, we’ll walk you through several easy methods to edit document properties in Excel, whether you’re updating the author name or adding keywords for quick searches. These methods work in Excel 2013, 2016, 2019, 2021, and Microsoft Office 365.
Steps to edit document properties in Excel:
➤ Open Excel >> Go to File >> Info >> Properties
➤ Edit your desired fields like Title, Tags, Categories, etc.
➤ Press Enter to save.

Edit Document Properties from the Info Panel
This is the most straightforward method and works directly from the File tab in Excel.
Steps:
➤ Open your Excel file.
➤ Click on the File tab in the top-left corner.
➤ Select Info from the left menu.
➤ On the right, you’ll see properties like Title, Tags, Author, and Comments.
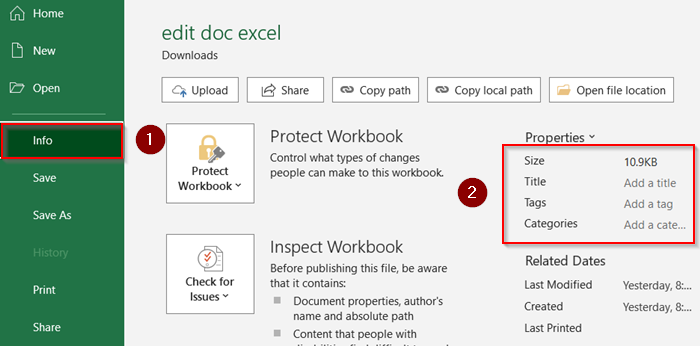
➤ Click on a field (e.g., “Title”) and type your changes.
➤ Press Enter to save.
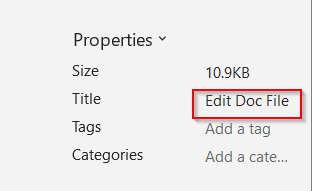
These changes are automatically saved with your file.
Open the Advanced Properties Dialog
For more detailed editing (including custom properties), use the Properties dialog box.
Steps:
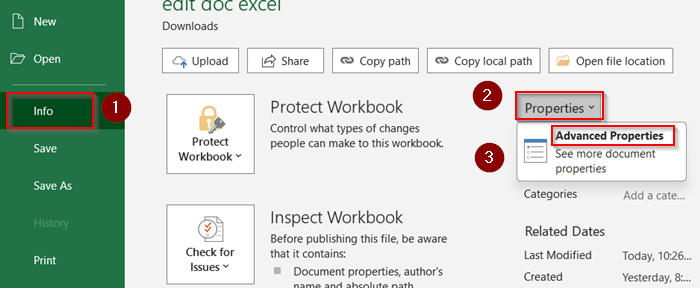
➤ Click File >> Info.
➤ On the right, click Properties.
➤ Choose Advanced Properties from the dropdown.
➤ In the new dialog box, switch to the Summary tab.
➤ Update fields like Title, Subject, Author, Manager, or Company.
➤ Click OK when done.

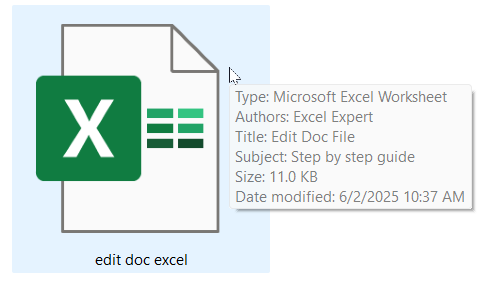
These updates will appear in Windows Explorer and when you hover over the file.
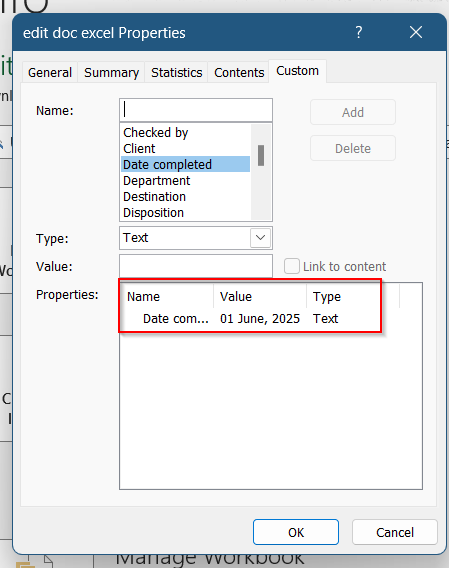
Add or Edit Custom Document Properties
You can define your own custom fields like “ProjectName” or “ReviewedBy” for internal use.
Steps:
➤ Go to File >> Info >> Properties >> Advanced Properties.

➤ In the dialog box, switch to the Custom tab.
➤ In the “Name” field, type your custom property (e.g., “ClientName”).
➤ Choose the type (Text, Date, Number, etc.).
➤ Enter the value and click Add.
➤ Click OK when finished.
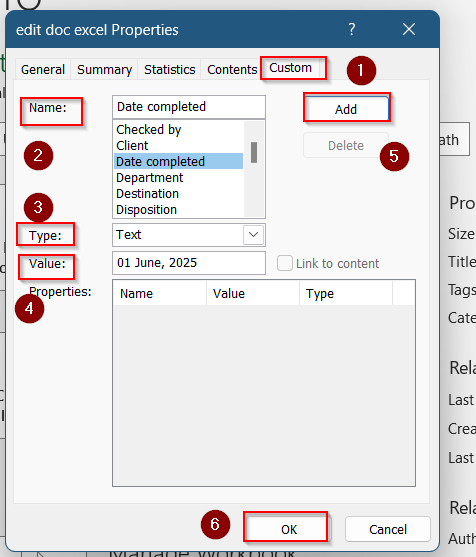
These custom fields won’t show in the Info panel but are still stored with the file.
View and Edit Properties in File Explorer (Windows Only)
You can also view and edit basic document properties without even opening Excel.
Steps:
➤ Right-click your Excel file in File Explorer.
➤ Choose Properties from the menu.
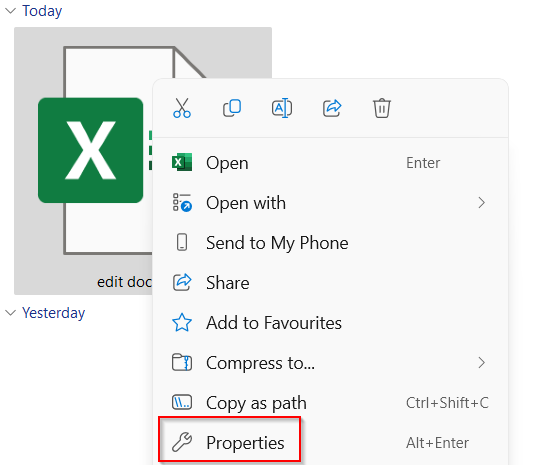
➤ Switch to the Details tab.
➤ Click on fields like Title, Tags, or Comments to edit them.
➤ Press Apply and then OK.

This is useful for batch editing file metadata on your computer.
Frequently Asked Questions
What are document properties used for?
They provide metadata about the file including author, keywords, company, and comments which is useful for file management, version tracking, and searchability.
Can I remove document properties?
Yes. Go to File >> Info >> Check for Issues >> Inspect Document, then use the Document Inspector to remove personal info like the author name.
Do custom properties appear in printouts?
No, custom or standard document properties don’t show up in printouts unless you reference them using Excel fields or VBA.
Can I make document properties required?
Excel doesn’t enforce required properties by default. However, you can use templates or VBA to prompt users to fill in certain fields.
Are these features available in Excel for Mac?
Yes, but the menu structure differs. You’ll find basic properties under File >> Properties, though some options like custom fields may be limited.
Wrapping Up
In this tutorial, we learned multiple ways to edit document properties in Excel including from the Info panel, through the advanced properties dialog, or directly from File Explorer. These small details help keep your files organized and polished for collaboration or archiving. Feel free to download the practice file and share your feedback.