Managing data in Excel becomes easier when your table grows with your entries. If you’re constantly adding new rows of information to a table, there’s a way to make Excel automatically include these new rows as part of the table. This not only helps with formatting but ensures formulas, charts, and pivot tables remain up to date.
In this article, you’ll learn how to set up your Excel table so it automatically expands when you enter new data. We’ll cover methods using Tables, structured references, and dynamic named ranges. These work in Excel 2016, 2019, 2021, and Microsoft Office 365.
Steps to make Excel table automatically expand rows using Table feature:
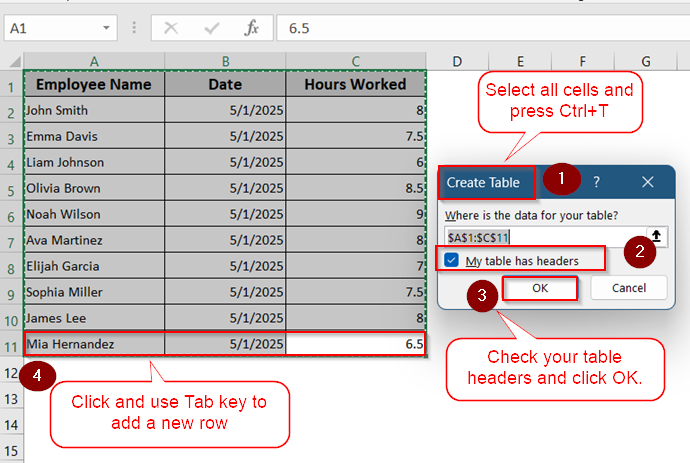
➤ Select all cells.
➤ Create an Excel Table using Ctrl + T.
➤ Make sure “My table has headers” is checked and click OK.
➤ Press Tab key anywhere in the last row of the table to start a new one.
What Does "Automatically Adding New Row" Mean in Excel Tables?
When working with Excel tables, one of the biggest time-savers is the ability to automatically add new rows as data is entered. This means when you type something directly beneath the last row of the table, Excel recognizes the input and includes it in the table range instantly. No need to manually resize the table each time.
This feature ensures that formulas, drop-downs, conditional formatting, and charts referencing the table dynamically adjust to include the new data. It keeps your file tidy, accurate, and efficient, especially useful when you’re tracking ongoing inputs like daily sales, task lists, or transaction logs.
Use Excel Table Feature (Recommended for Most Cases)
The easiest way to make Excel automatically add new rows is by using the built-in Table feature. Excel tables are designed to expand dynamically, allowing new rows to be added with minimal effort.
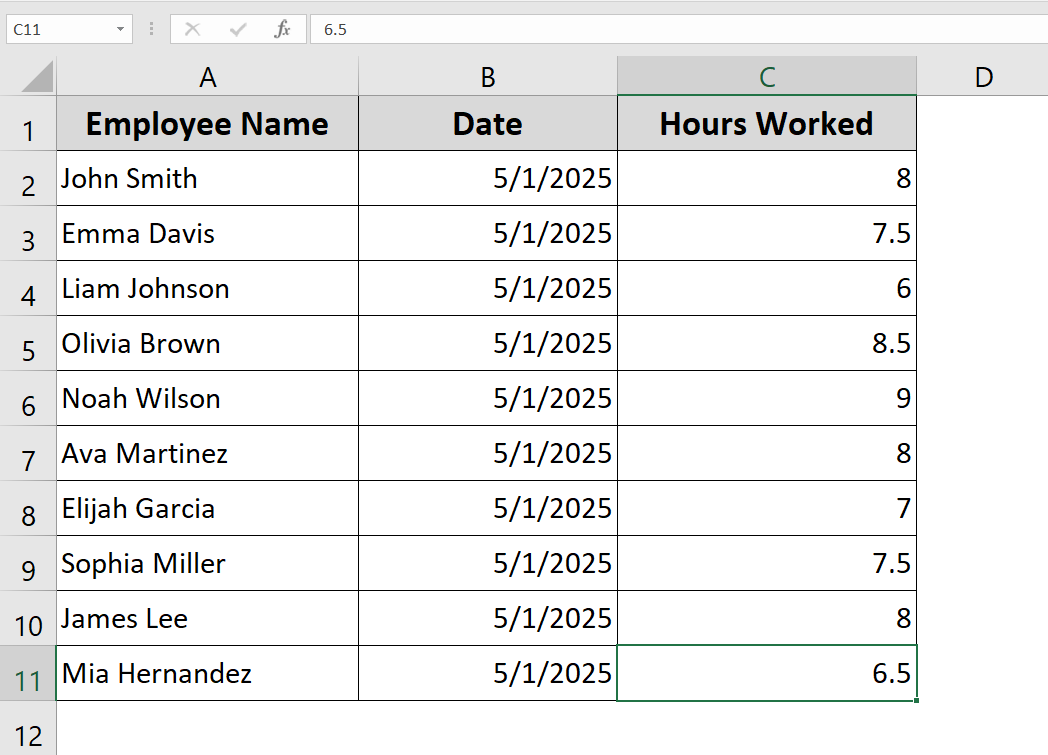
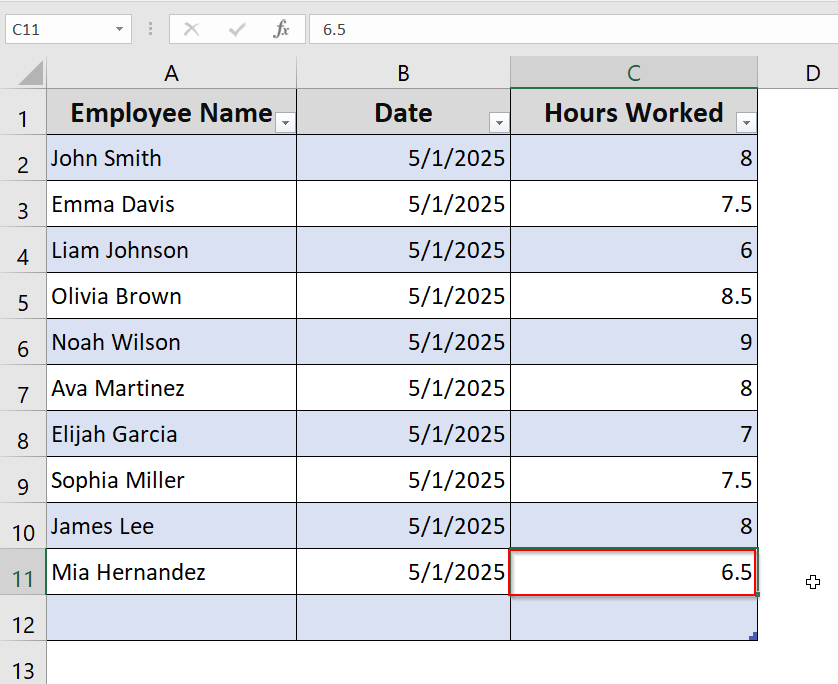
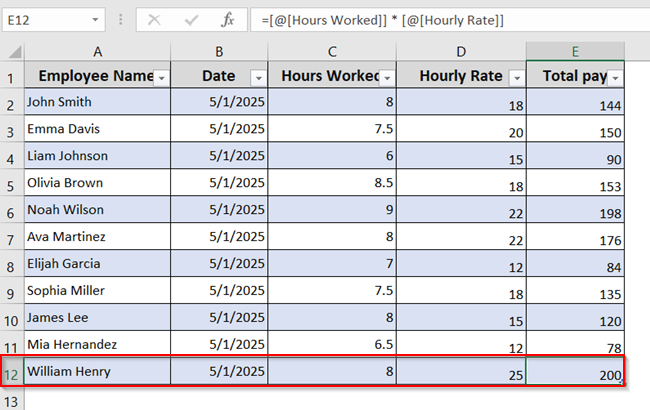
In the example below, we have a simple dataset that tracks employee work hours. Each row represents a new employee entry, and we want the table to expand automatically as new employees are added.
Steps:
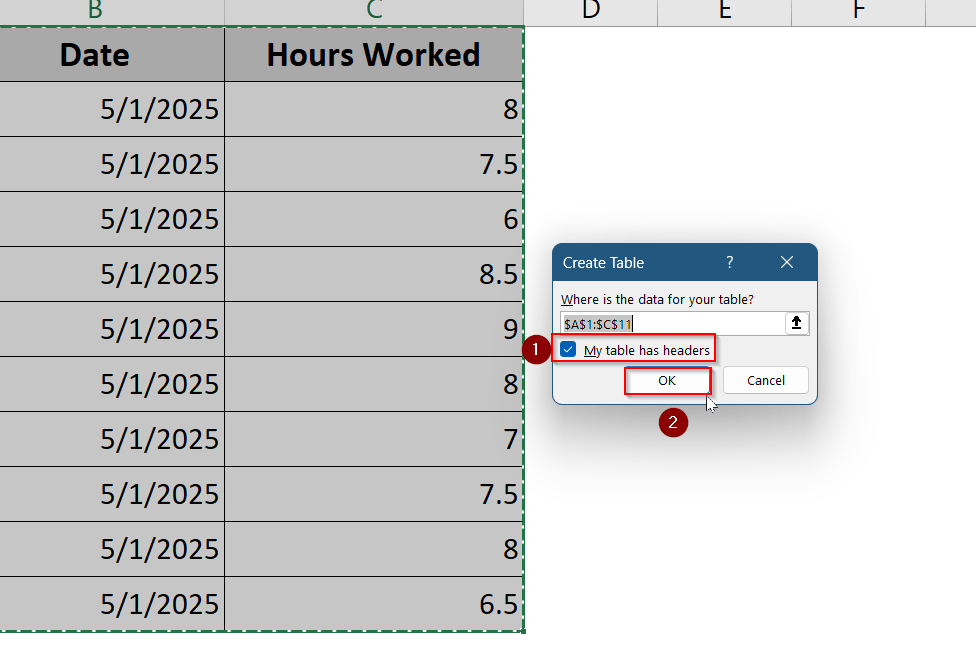
➤ Select your data range (e.g., A1:C11).
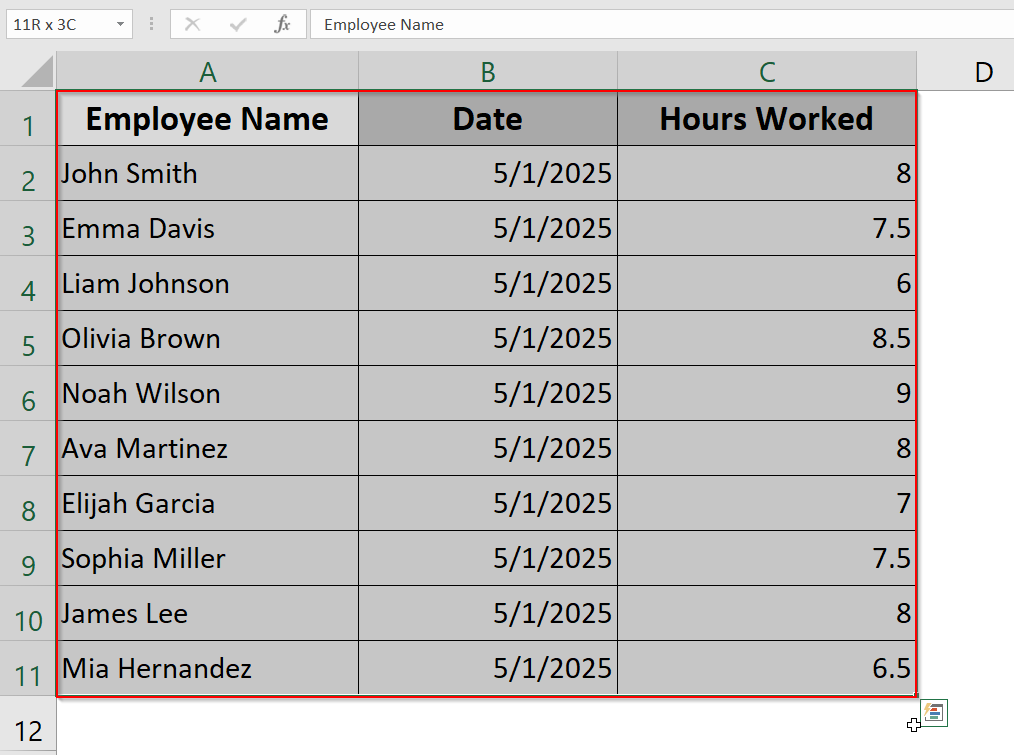
➤ Press Ctrl + T to convert it into a table. Make sure “My table has headers” is checked.
➤ Click OK.
➤ Click anywhere in the last row, then press Tab key in the last column to insert a new row.
This method is ideal for most data entry tasks and keeps things automated with minimal manual work.
Enable Structured References for Dynamic Formulas
When you convert your data into an Excel table, you unlock a powerful feature called structured references. Instead of writing formulas using traditional cell references like =B2*C2, structured references use the column headers from your table. This makes formulas easier to read, maintain, and less prone to errors.
More importantly, these formulas automatically expand to include any new rows you add to the table. You don’t have to drag the formula down or copy it manually, Excel does it for you. Let’s get started.
Steps:
➤ Make sure your data is formatted as a table (Ctrl + T).
➤ Add two new columns called Hourly Rate and Total Pay.
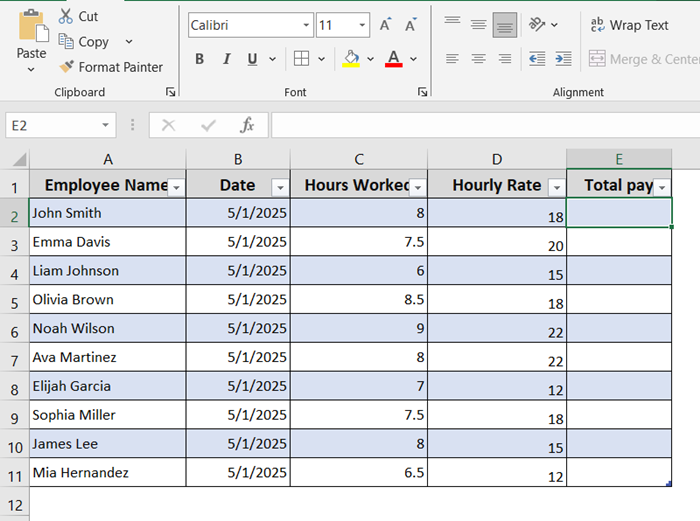
➤ In the first empty column, Enter a formula using structured references (e.g., =[@[Hours Worked]] * [@[Hourly Rate]]).
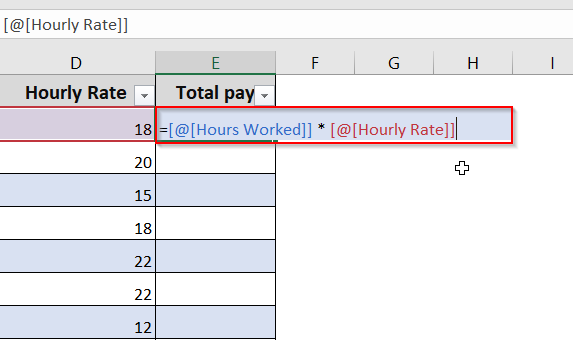
As you add new rows to the table, Excel copies the formula automatically which ensures all rows remain functional without needing to drag formulas manually.
Use a Dynamic Named Range (Advanced)
If you don’t want to use Excel Tables but still need your range to grow as you add more data, you can use a dynamic named range. This method uses a formula (like OFFSET) that automatically includes new rows in your selection which is perfect for lists that keep growing, such as employee work hour logs.
For example, if you’re tracking employee names, dates, and hours worked, a dynamic named range will expand each time you add a new entry. This keeps your charts and formulas up to date without needing to adjust ranges manually.
Steps:
➤ Go to Formulas >> Name Manager >> New.
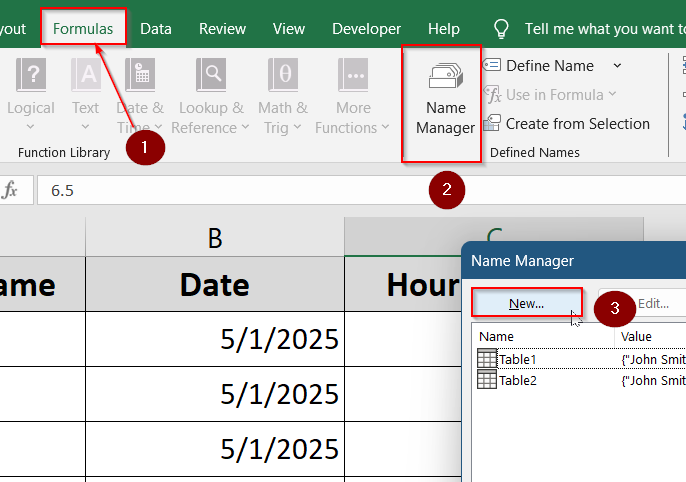
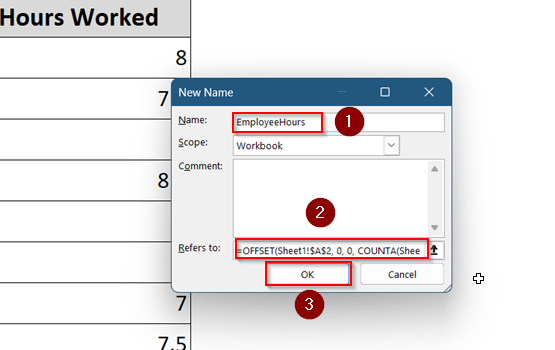
➤ Name your range (e.g., EmployeeHours).
➤ In the “Refers to” box, enter:
=OFFSET(Sheet1!$A$2, 0, 0, COUNTA(Sheet1!$A:$A)-1, 1)
➤ Click OK.
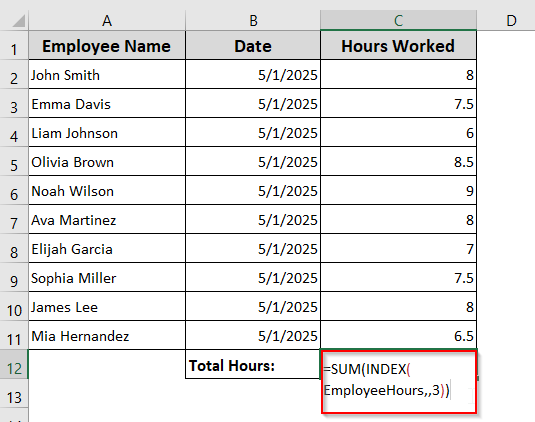
➤ Enter this formula in an empty cell to calculate total hours:
=SUM(INDEX(EmployeeHours,,3))
Frequently Asked Questions
Does pressing Enter add a new row to the table?
No, pressing Enter in Excel does not create a new row in your table. It simply moves the selection to the next cell down. To add a new row automatically, place your cursor in the last column of the last row and press Tab. This tells Excel to create and extend the table to include the new row with formatting and formulas carried over.
Will my formulas extend to new rows automatically?
Yes, if your data is inside an official Excel Table (created using Ctrl + T), then Excel automatically applies formulas to new rows. Any existing formulas, data validation, drop-down menus, or conditional formatting will also extend, ensuring your new entries match the rest of your table seamlessly.
Can I make automatic rows across multiple sheets?
Not directly. Excel Tables only work within the sheet they were created on. However, you can reference that table’s data from another sheet by using structured references or by defining a named range. This allows your formulas, charts, or summaries to stay updated when the table grows.
Is it possible to turn off automatic expansion?
Yes, you can disable Excel’s automatic table expansion feature. Go to File > Options > Proofing > AutoCorrect Options, then under the AutoFormat As You Type tab, uncheck the option that says “Include new rows and columns in table.” This will stop Excel from adding new rows or columns automatically.
Wrapping Up
In this tutorial, we learned how to make Excel tables automatically expand when new rows are added. We explored methods using Excel Tables, structured references, and dynamic named ranges. Feel free to download the practice file and share your thoughts and suggestions.