When we work with Excel files that contain multiple pages or print areas, sometimes extra blank pages appear when printing or exporting. These extra pages can cause confusion and wasted resources. However, the basic print settings do not address this issue effectively. Thus, we need to delete or remove these extra pages before printing.
For example, you have a workbook with several sheets, and you need to print only one report or sheet. However, when you tried to print it, those other extra pages also showed up. Except for this, even blank rows or columns can cause a page break and lead to extra pages. Also, if you want to present the sheets to support your report, you should delete any extra pages to make the report more organized.
In this article, we will explain two different common methods to delete extra pages in Excel, including deleting extra pages manually and resetting page breaks. We also discuss advanced methods like VBA to help you delete extra pages in case of larger datasets.
➤ First, go to File and select Print. You will see all the active pages at the bottom of the print screen.
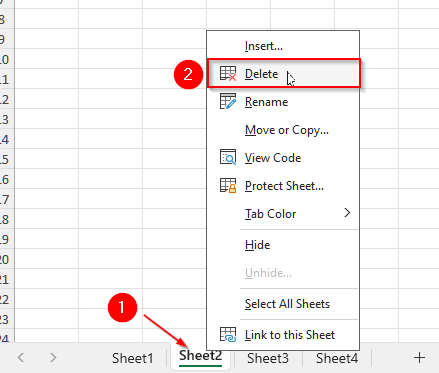
➤ Now, click on the tab of Sheet2 at the bottom of your Excel dataset.
➤ Then, right-click on the tab and you will see a list of options.
➤ Select, Delete from that list, and the sheet will be deleted.
➤ Similarly, you can delete any extra sheets from your dataset.
➤ Now, after deleting the extra sheets, go to File and select Print. You will see that only the remaining sheets are showing as pages; other pages are deleted.
Manually Delete Extra Sheets in Excel Dataset Before Printing
If your worksheet contains some extra pages or sheets that are not necessary, it is best to delete these pages manually.
We will use the below dataset to explain how to delete these extra pages manually in Excel now.
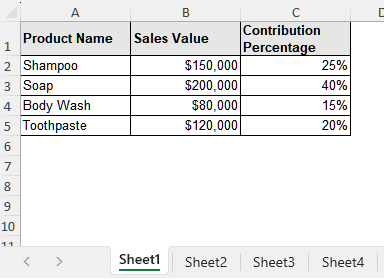
In this dataset, we have some extra sheets, namely, Sheet2 and Sheet4. The data on these two sheets is irrelevant to us. However, these sheets also appear when we try to print the workbook. Thus, we need to delete these extra pages from our dataset.
Steps:
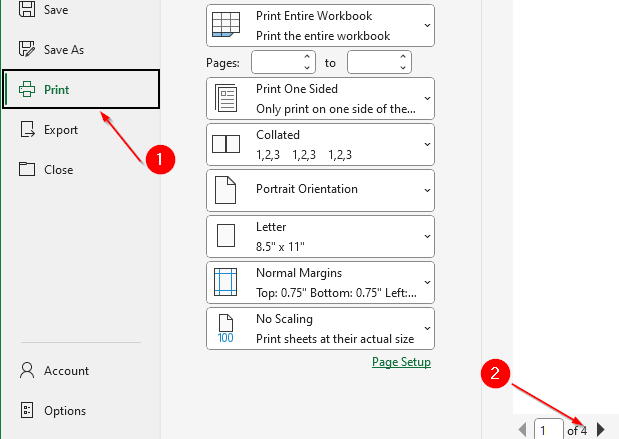
➤ First, go to the File option from the upper menu bar.
➤ Then, click on Print, and at the bottom of the screen, you will see the number of total pages that will be printed. Here, we have a total of 4 sheets, and thus, Excel will treat each of them as a single page and show us 4 pages. However, we only need to print Sheet1 and Sheet3.
➤ Now, click on the tab of Sheet2 at the bottom of your Excel dataset.
➤ Then, right-click on the tab and you will see a list of options.
➤ Select, Delete from that list, and the sheet will be deleted.

➤ Similarly, delete Sheet4 to remove the extra page. Remember, if you delete a sheet once, you cannot retrieve it again. The deletion of these sheets is permanent.
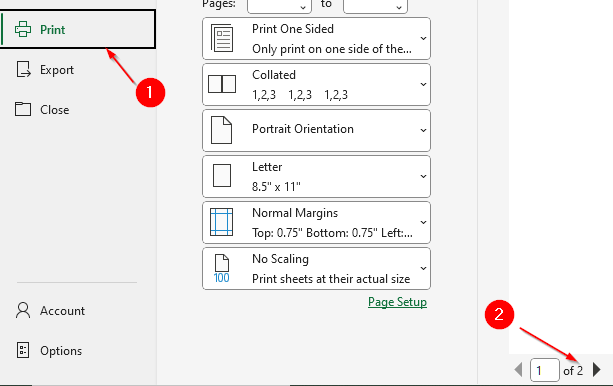
➤ Now, go to File again and select Print. You will see that only two pages are showing.
Tips:
To select multiple adjacent sheets, click the first sheet tab, then hold down Shift and click the last sheet tab. To select non-adjacent sheets, hold down Ctrl and click each sheet tab.
Delete Extra Pages by Using the Built-in Page Break Option
This is one of the most common and easiest methods used to remove extra pages in Excel.
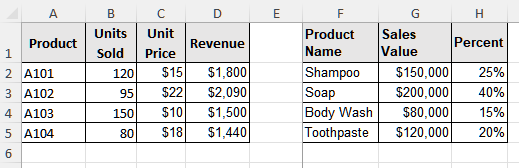
To explain how you can delete extra pages by using the built-in Page Break option in Excel, we will use the dataset below.
Steps:
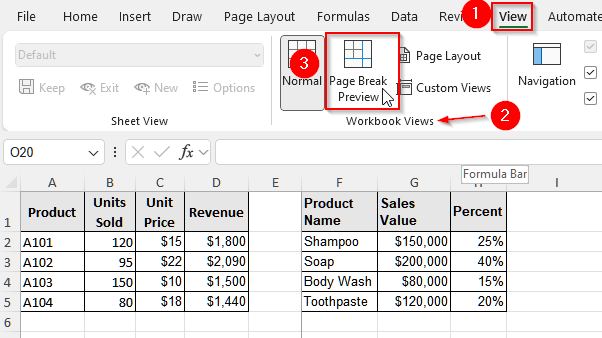
➤ First, go to the View tab on the upper menu ribbon of your Excel dataset.
➤ Then, click on the Page Break Preview from the Workbook Views group.
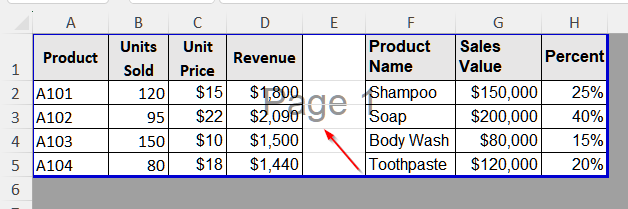
➤ Now, you will see some bold blue lines. These lines represent the current page breaks and can appear in both dashed (automatic) or solid (manual) lines, indicating where pages will separate.

➤ Then, hover your mouse cursor over any of these blue page break lines until the cursor changes to a two-sided arrow.
➤ Finally, click and drag the page break line to its desired new position, then release the mouse button to set the new break. In our dataset, as we intend to keep both of the tables on one page, we dragged the break line till it meets the starting vertical line on the left side. Now, you will it will show Page 1 only. That is, Page 2 is deleted.
Remove Extra Pages in Excel With VBA
If you have a large and messy dataset where you need to delete many unnecessary pages, VBA (Visual Basic for Applications) is your best choice. This method is clearer and more dynamic than explicitly listing every sheet you want to delete.
We will use the dataset below to explain how you can use VBA to delete extra pages in Excel.
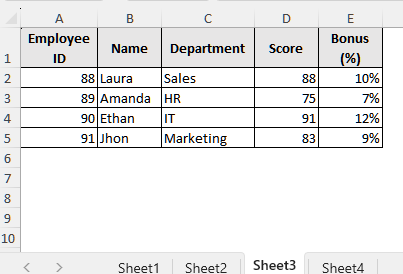
Our dataset has four sheets. Among them, Sheet2 and Sheet4 are unnecessary, and thus we want to delete them.
Steps:
➤ First, to open the VBA Editor, press Alt + F11 on your keyboard.
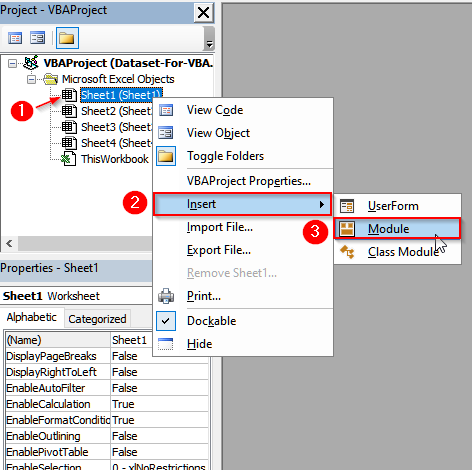
➤ Now, under the Project-VBAProject pane, you will see an option called Microsoft Excel Objects. Under this option, you will find the sheet’s names. Right-click on any of these names.
➤ You will see a list of options that will show up. Select Insert and then choose Module. It will create a new module.
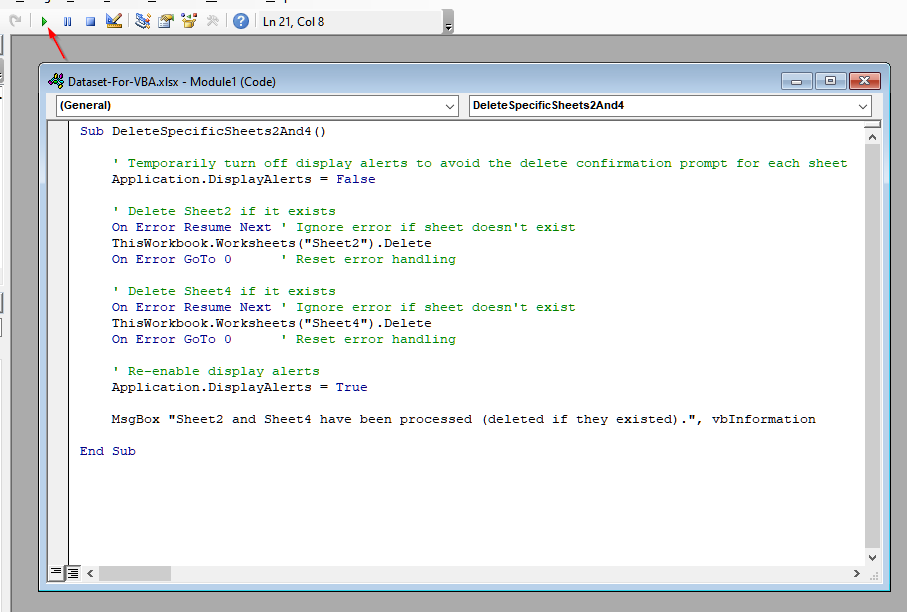
➤ Now, in the module window, paste the following code:
Sub DeleteSpecificSheets2And4()
    ' Temporarily turn off display alerts to avoid the delete confirmation prompt for each sheet
    Application.DisplayAlerts = False
    ' Delete Sheet2 if it exists
    On Error Resume Next ' Ignore error if sheet doesn't exist
    ThisWorkbook.Worksheets("Sheet2").Delete
    On Error GoTo 0      ' Reset error handling
    ' Delete Sheet4 if it exists
    On Error Resume Next ' Ignore error if sheet doesn't exist
    ThisWorkbook.Worksheets("Sheet4").Delete
    On Error GoTo 0      ' Reset error handling
    ' Re-enable display alerts
    Application.DisplayAlerts = True
    MsgBox "Sheet2 and Sheet4 have been processed (deleted if they existed).", vbInformation
End Sub
➤ Finally, on the upper ribbon, you will see a small green play button. Click on it, or you can simply press F5 to run the code. However, remember to keep your cursor inside the module where you wrote the code while pressing F5 .
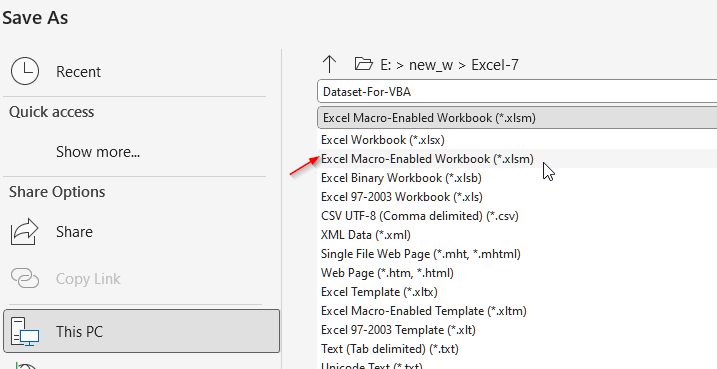
➤ Now, save your work in macro-enabled format. If this is the first time you’re saving a workbook containing macros, Excel will prompt you to save it as a “Macro-Enabled Workbook”. From the file format options, choose the .xlsm extension.
Frequently Asked Questions
Is There Any Shortcut to Remove Irrelevant Sheets to Delete Extra Pages in Excel?
Yes, there is a shortcut to remove irrelevant sheets, which ultimately deletes any extra pages from your Excel dataset while printing. To do it, simply select the tab of the extra sheet at the bottom, and click Alt + H + D + S . This will show you a confirmation prompt before the sheet is permanently removed.
Why Are Empty Rows And Columns Creating Extra Pages in My Excel Dataset?
If the seemingly empty rows and columns contained some data previously, but you removed them later, Excel internally tracks these as “last used cells”. This means Excel still considers them part of the active data range. Even if the cells did not contain any data previously, but you used the same formatting you have used in your data for these empty cells, Excel might still treat them as part of your dataset. Thus, when you go to print, it results in the inclusion of extra blank pages. To prevent it, simply use the Set Print Area option from Page Layout.
Wrapping Up
In this article, we have learned two different methods to delete extra pages. By manually deleting the extra sheets to remove any extra pages during printing, or by adjusting the page breaks, you can control exactly what you want to print. Hope you will try these methods to delete any extra pages from your dataset when needed. Also, let us know if you have any inquiries or need help with any Excel task.

