When designing forms in Excel VBA, ComboBoxes lets users select from a list instead of typing values manually. This not only improves accuracy but also enhances the user experience. One of the most common ways to populate a ComboBox is with the .AddItem method, which allows you to add values one by one directly through VBA code.
In this article, we’ll explore how the ComboBox AddItem method works in Excel VBA, where it can be used, and the different ways to apply it across UserForms and ActiveX controls.
Steps to add “Full‑Time” and “Part‑Time” to an ActiveX ComboBox with ComboBox.AddItem and instantly update the Status column in Excel:
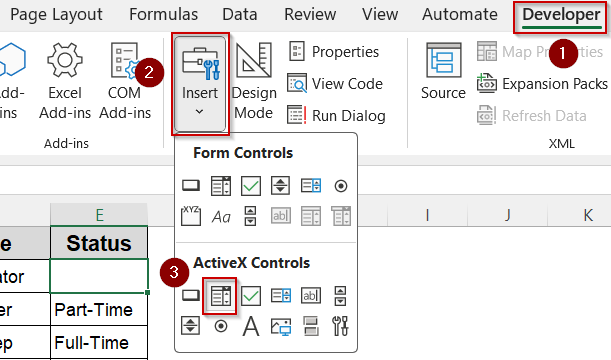
➤ On the worksheet, go to Developer >> Insert >> ActiveX Controls >> ComboBox and draw the control over cell E2 (Status column).
➤ Press Alt + F11 , open the sheet’s code window, and paste:
Private Sub Worksheet_SelectionChange(ByVal Target As Range)
Dim statusCell As Range
Set statusCell = Me.Range("E" & Target.Row) 'column E = Status
If Not Intersect(Target, Me.Range("A2:A11")) Is Nothing Then
With ComboBox1
.Visible = True
.Left = statusCell.Left
.Top = statusCell.Top
.Width = statusCell.Width
.Height = statusCell.Height
.Clear
.AddItem "Full-Time"
.AddItem "Part-Time"
.Value = statusCell.Value 'sync current status
End With
Else
ComboBox1.Visible = False
End If
End Sub
Private Sub ComboBox1_Change()
If ActiveCell.Row >= 2 And ActiveCell.Row <= 11 Then
Me.Cells(ActiveCell.Row, 5).Value = ComboBox1.Value 'write new status
End If
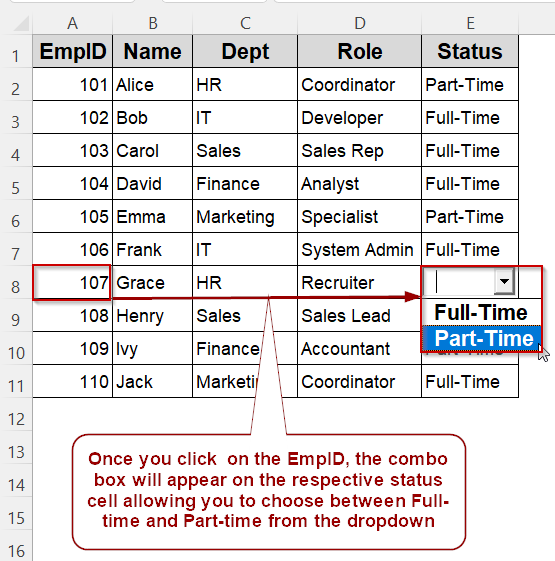
End Sub➤ Exit Design Mode. Click any EmpID cell in A2:A11.
➤ The ComboBox appears over that row’s Status cell, loaded via AddItem with “Full‑Time” and “Part‑Time.”
➤ Pick a status; the ComboBox1_Change event writes the choice back to column E instantly, without typing or errors.
Adding Items to a ActiveX ComboBox with AddItem on Excel Worksheet
When managing employee records in Excel, changing “Full‑Time” and “Part‑Time” statuses row by row can be slow and error‑prone. By inserting an ActiveX ComboBox on the worksheet and loading its list with ComboBox.AddItem in VBA, you give users a quick dropdown that updates status values without typing, eliminating spelling mistakes and speeding data entry.
Our sample sheet contains ten employees listed in rows 2 to 11, with columns A to E labeled EmpID, Name, Dept, Role, and Status. The Status column already shows a mix of “Full‑Time” and “Part‑Time.” We’ll use this dataset to demonstrate how a single ComboBox can edit any row’s status without scrolling or re‑typing.
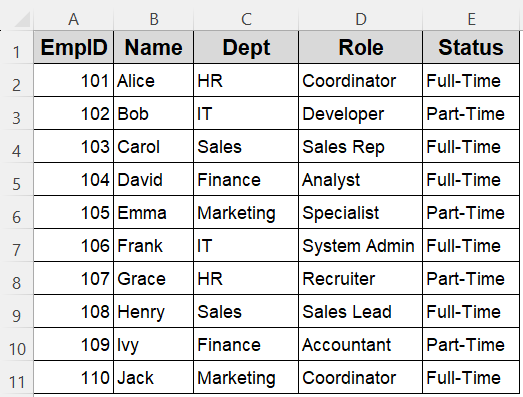
We’ll place the ComboBox beside the Status column, populate it with “Full‑Time” and “Part‑Time” using AddItem, and make it appear on the selected row. Changing the dropdown will immediately write the new status back to the worksheet.
Steps:
➤ Add a ComboBox from Developer >> Insert >> ActiveX Controls >> ComboBox in the Status column (in cell E2).
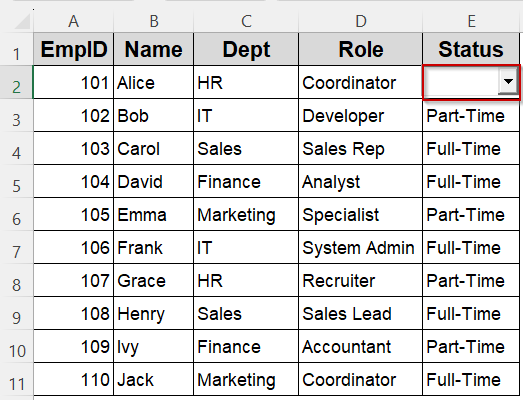
➤ This is what it should look like:
➤ Press Alt + F11 to open VBA Editor.
➤ In the worksheet module (where your data is), add this code:
Private Sub Worksheet_SelectionChange(ByVal Target As Range)
    Dim StatusCell As Range
    Set StatusCell = Me.Range("E" & Target.Row)   ' Status in column E
    ' Only show ComboBox when selecting a row in your data range (rows 2 to 11)
    If Not Intersect(Target, Me.Range("A2:A11")) Is Nothing Then
        ComboBox1.Visible = True
        ComboBox1.Left = StatusCell.Left
        ComboBox1.Top = StatusCell.Top
        ComboBox1.Width = StatusCell.Width
        ComboBox1.Height = StatusCell.Height
        ComboBox1.Clear
        ComboBox1.AddItem "Full-Time"
        ComboBox1.AddItem "Part-Time"
        ' Set current status as ComboBox value
        ComboBox1.Value = StatusCell.Value
    Else
        ComboBox1.Visible = False
    End If
End Sub
Private Sub ComboBox1_Change()
    Dim selectedRow As Long
    selectedRow = ActiveCell.Row
    If selectedRow >= 2 And selectedRow <= 11 Then
        Me.Range("E" & selectedRow).Value = ComboBox1.Value
    End If
End Sub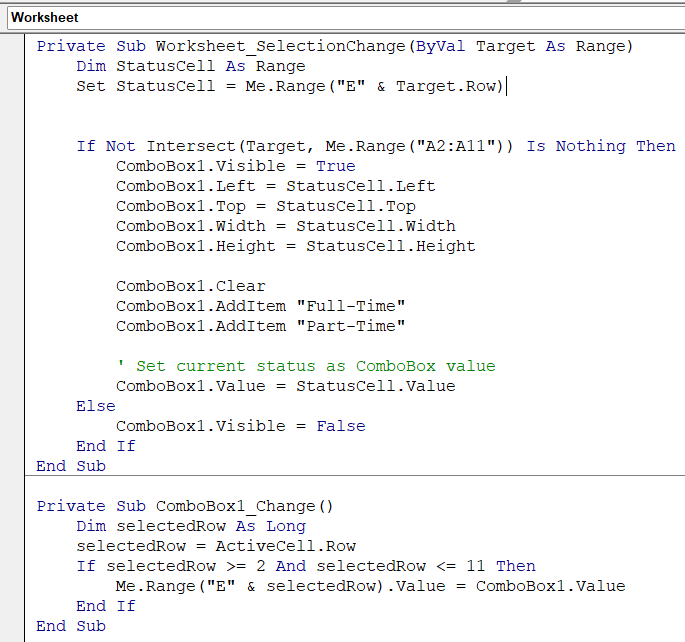
➧ Because ComboBox1.Value is set to the current Status cell, the dropdown always opens showing the employee’s existing status.
➧ When the user selects a different option, ComboBox1_Change immediately writes that choice back to the worksheet, AddItem is not called here; the list is already loaded.
➧ This cycle (Clear >> AddItem >> Select >> Update) prevents manual typing errors, keeps the status list consistent, and lets the ComboBox appear and disappear dynamically as you move through the data.
➤ Exit design mode in Excel.
➤ Click a cell in the EmplID column (A2:A11). The ComboBox appears over the Status cell in the same row.
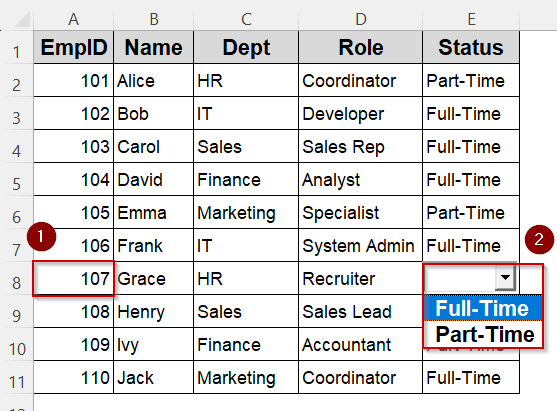
➤ Change the ComboBox selection to “Full-Time” or “Part-Time”. The status updates immediately in the worksheet.
Populate a UserForm ComboBox with AddItem in VBA
When you need to change an employee’s Department in column C, scrolling through cells and typing can introduce spelling mistakes or inconsistent abbreviations. A better approach is to open a UserForm that contains a ComboBox pre‑loaded with valid departments. By populating that ComboBox with ComboBox.AddItem in VBA, you ensure the dropdown always shows the exact department names you allow, no more typos and no manual range references.
With the AddItem calls in UserForm_Initialize, the list loads instantly whenever the form opens. Selecting a department and clicking Update writes the choice back to the Status column of the active row.
Steps:
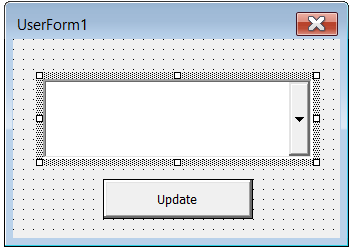
➤ Press Alt + F11 >> Insert >> UserForm.
➤ Add a ComboBox (cmbDept) and a CommandButton (cmdUpdate, caption “Update”).
➤ Paste this in the UserForm code module:
Private Sub UserForm_Initialize()
    'Load allowed departments with AddItem
    cmbDept.Clear
    cmbDept.AddItem "HR"
    cmbDept.AddItem "IT"
    cmbDept.AddItem "Sales"
    cmbDept.AddItem "Finance"
    cmbDept.AddItem "Marketing"
End Sub
Private Sub cmdUpdate_Click()
    If cmbDept.Value = "" Then
        MsgBox "Pick a department first.", vbExclamation
        Exit Sub
    End If
    Dim r As Long: r = ActiveCell.Row
    If r < 2 Or r > 11 Then
        MsgBox "Select an EmpID (A2:A11) before updating.", vbExclamation
        Exit Sub
    End If
    With Worksheets("Sheet1")      ' adjust if sheet named differently
        .Cells(r, 3).Value = cmbDept.Value   'write to column C
    End With
    MsgBox "Department updated."
    Unload Me
End Sub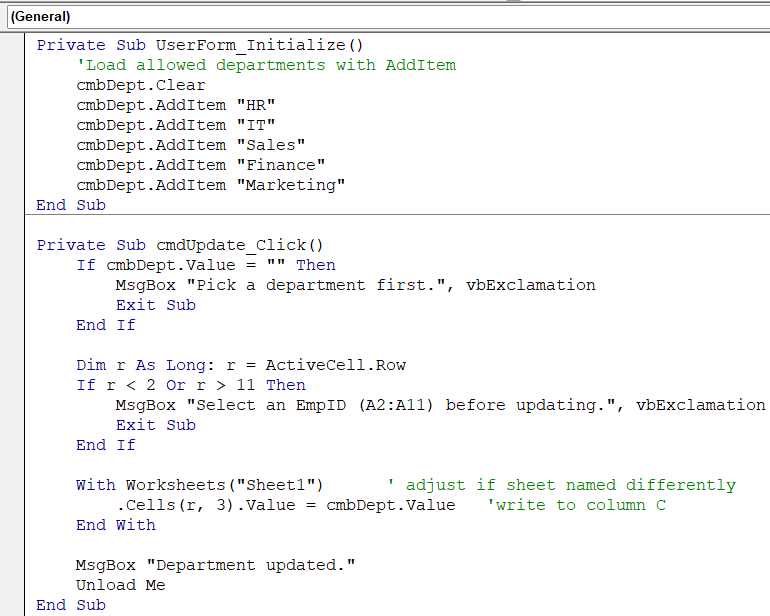
➤ In a standard module, add a launcher macro:
Sub EditDepartment()
    If Selection.Row >= 2 And Selection.Row <= 11 Then
        UserForm1.cmbDept.Value = ""              'reset
        UserForm1.Show
    Else
        MsgBox "Click an EmpID in rows 2‑11, then run EditDepartment."
    End If
End Sub
➧ Loading items inside UserForm_Initialize guarantees the ComboBox list is ready before the form appears.
➧ cmdUpdate_Click captures the chosen department (cmbDept.Value) and writes it to column C of the row whose EmpID cell is currently selected, keeping data entry in context.
➧ Using AddItem rather than ranges or arrays keeps the code short and makes it obvious where the permitted department values come from.
➧ The launcher macro ensures users pick an EmpID first, then the form opens with the AddItem‑populated ComboBox.
➤ Back in Excel, select the Dept cell that you want to update and run the macro. Select your desired department and click on update.
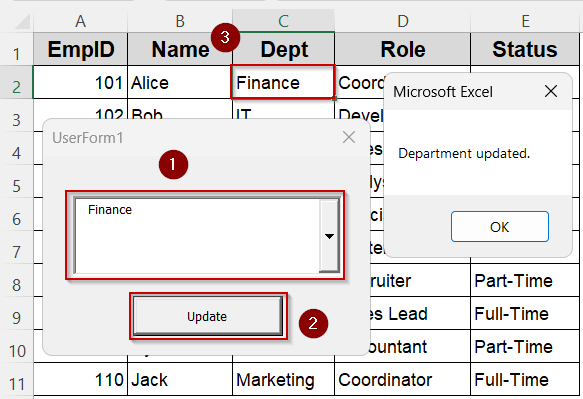
The cell will be updated with the new department.
Frequently Asked Questions
What is ComboBox.AddItem used for in VBA?
AddItem lets you append a new item (string) to an ActiveX or UserForm ComboBox via code. Use it to dynamically populate dropdowns without relying on worksheet ranges.
Can I insert items at a specific position using AddItem?
Yes. Use the optional Index parameter:
ComboBox1.AddItem “Text”, 0
This inserts “Text” at the top of the list (index 0).
Why doesn’t AddItem work if the ComboBox has a RowSource?
AddItem is disabled when RowSource is set. You must clear RowSource or change to a Value List style before using AddItem to avoid permission errors.
Can AddItem fill multi‑column ComboBoxes?
Yes, for controls with ColumnCount > 1, each .AddItem “a;b;c” creates one row with multiple columns. For UserForm ComboBoxes, use .List(row, column) or assign a 2-D array instead.
Wrapping Up
Using AddItem to populate ComboBoxes in Excel VBA is a powerful way to simplify data entry. Whether you’re working with an ActiveX ComboBox on a worksheet or a ComboBox inside a UserForm, this method ensures consistency and reduces typing errors. You can dynamically update dropdown options, control how users interact with data, and write selections directly back to the sheet. It’s a simple, efficient technique that makes your Excel interfaces more interactive, reliable, and user-friendly.