
UserForms in Excel VBA let you build interactive forms that improve user experience and data input. Instead of entering values directly into cells, you can collect information through buttons, text boxes, drop-downs, and other controls. These forms make your macros more user-friendly and help prevent input errors.
In this article, we’ll explore Excel VBA UserForm examples step-by-step. You’ll learn how to create a simple UserForm, add controls like text boxes and combo boxes, transfer data to sheets, and trigger macros using form buttons. These examples will help you design functional interfaces that work smoothly in real Excel environments.
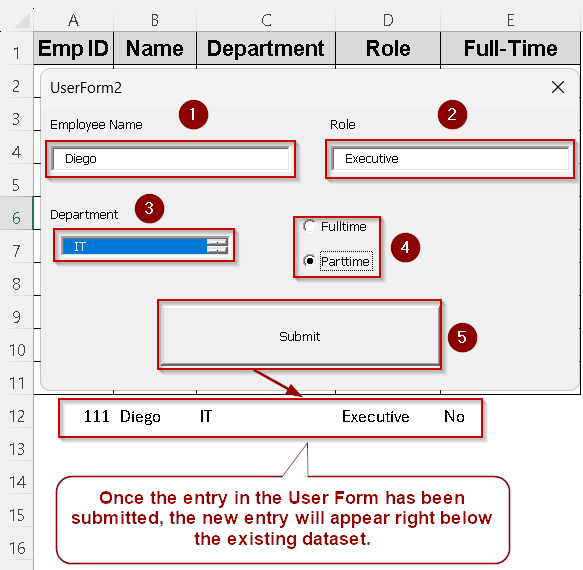
Steps to build a UserForm that records multiple user inputs into the Employees sheet in Excel:
➤ Open the VBA Editor (Alt + F11) and go to:
Insert >> UserForm
➤ Add controls to the form. TextBox1 for Employee Name. TextBox2 for Role. ListBox1 for Department selection (multi-item list). OptionButton1 (label it Full-Time). OptionButton2 (label it Part-Time). CommandButton1 (set its caption to “Submit”).
➤ Paste this code inside the UserForm_Initialize event to populate the ListBox and set a default employment status:
Private Sub UserForm_Initialize()
    With ListBox1
        .AddItem "HR"
        .AddItem "IT"
        .AddItem "Sales"
        .AddItem "Finance"
        .AddItem "Marketing"
    End With
    OptionButton1.Value = True  ' Set Full-Time as default
End Sub
➤ Double-click the Submit button to open its code window and paste the following:
Private Sub CommandButton1_Click()
    Dim ws As Worksheet
    Set ws = ThisWorkbook.Sheets("Employees")
    Dim nextRow As Long, nextID As Long
    nextRow = ws.Cells(ws.Rows.Count, 1).End(xlUp).Row + 1
    nextID = ws.Cells(nextRow - 1, 1).Value + 1
    ' Validate required fields
    If TextBox1.Value = "" Or TextBox2.Value = "" Or ListBox1.ListIndex = -1 Then
        MsgBox "Please complete all fields."
        Exit Sub
    End If
    ' Write data to the worksheet
    ws.Cells(nextRow, 1).Value = nextID
    ws.Cells(nextRow, 2).Value = TextBox1.Value
    ws.Cells(nextRow, 3).Value = ListBox1.Value
    ws.Cells(nextRow, 4).Value = TextBox2.Value
    ws.Cells(nextRow, 5).Value = IIf(OptionButton1.Value, "Yes", "No")  ' Full-Time = Yes
    MsgBox "Employee record added."
    ' Clear form for next entry
    TextBox1.Value = ""
    TextBox2.Value = ""
    ListBox1.ListIndex = -1
    OptionButton1.Value = True
End Sub
➤ Close the VBA Editor, then press Alt + F8 , select the form, and click Run.
➤ Fill out the form with a name, role, department, and employment type. Then click Submit.
Create a Simple UserForm for a Single Input
A simple UserForm lets users input data through a text box and submit it with a button. This basic form is commonly used to add or update records directly into a worksheet.
For this demo, we’ll create a UserForm that collects a user’s name and adds it to the Data sheet in column A. The form contains a Label to prompt the user, a TextBox to enter the name, and a Command Button to submit.

When the user clicks the button, the name is copied into the next empty row on the worksheet, and the form clears the input ready for the next entry. This example introduces the core controls and basic VBA interaction with worksheets.
Steps:
➤ Press Alt + F11 to open the VBA Editor.
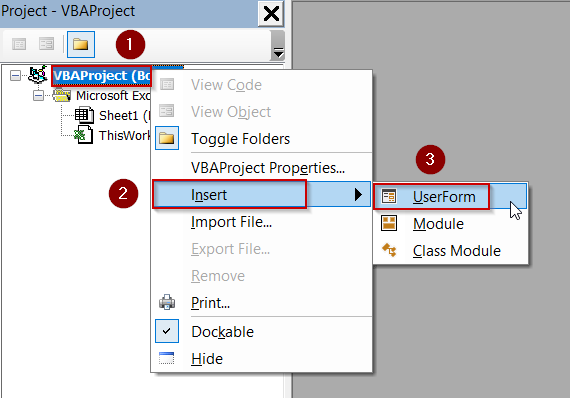
➤ In the Project Explorer, right-click the workbook name, choose Insert >> UserForm.
➤ Add a Label, a TextBox, and a Command Button from the Toolbox to the form.
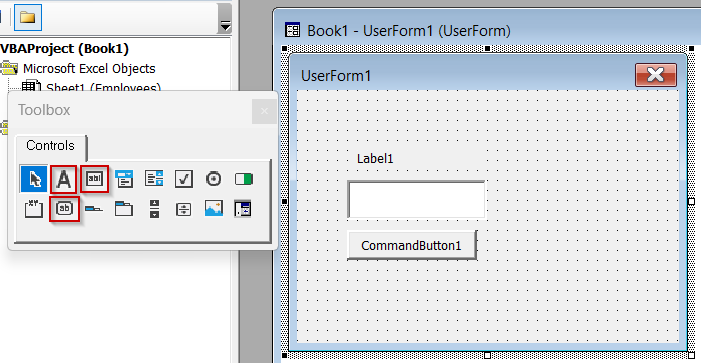
➤ Set the Label caption to “Enter Name:” and the Command Button caption to “Add Name”.
➤ Double-click the Command Button to open its code window, then paste this code:
Private Sub CommandButton1_Click()
    Dim ws As Worksheet
    Set ws = ThisWorkbook.Sheets("Employees")
    Dim nextRow As Long
    nextRow = ws.Cells(ws.Rows.Count, "A").End(xlUp).Row + 1
    If TextBox1.Value <> "" Then
        ws.Cells(nextRow, 2).Value = TextBox1.Value
        TextBox1.Value = ""               ' Clear input box
        TextBox1.SetFocus                 ' Return focus to textbox
        MsgBox "Name added successfully."
    Else
        MsgBox "Please enter a name."
    End If
End Sub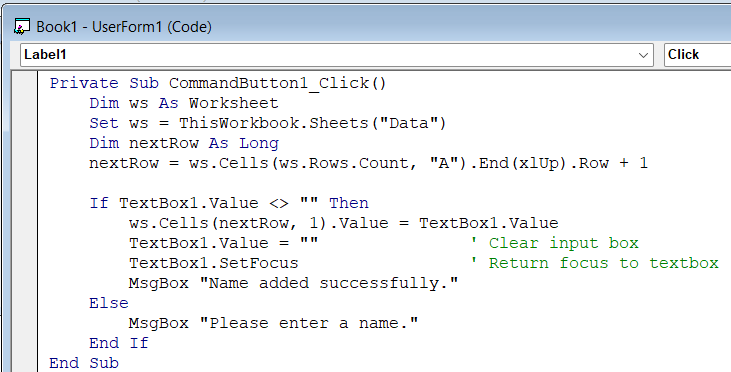
➧ Set ws = ThisWorkbook.Sheets("Data") sets ws to point to the Data worksheet where names will be stored.
➧ nextRow = ws.Cells(ws.Rows.Count, "A").End(xlUp).Row + 1 finds the next empty row in column A by starting from the bottom and moving up. Adjust "A" if you want to store data in a different column.
➧ If TextBox1.Value <> "" Then checks if the user has typed something. This prevents blank entries.
➧ ws.Cells(nextRow, 1).Value = TextBox1.Value writes the textbox content to the worksheet at the calculated row and column 1 (which is column A). Change 1 if using a different column.
➧ TextBox1.Value = "" clears the input box after submission, ready for new entry.
➧ TextBox1.SetFocus moves the cursor back to the textbox so users can quickly enter the next name.
➧ MsgBox "Name added successfully." confirms the addition to the user.
➧ The Else block shows a message if the user tries to submit without typing anything.
➤ Close the VBA Editor and return to Excel.
➤ Press Alt + F8 , select the UserForm name, and click Run to open the form.
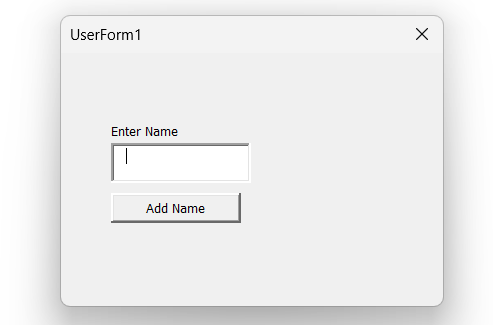
➤ Enter a name in the TextBox and click “Add Name.”
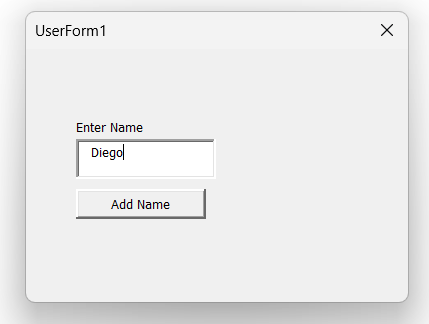
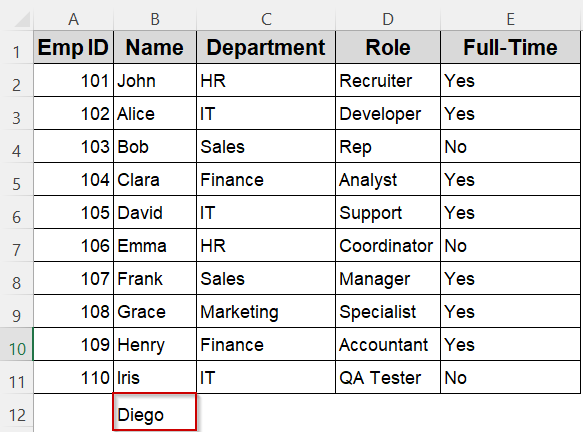
The name will appear in the Data sheet in the next available row in column B.
➤ If the TextBox is empty, the form will prompt you to enter a name.
Customize this code by changing the sheet name and column references to fit your own workbook layout and data needs.
Build an Interactive UserForm for Multiple Inputs in a Row
This UserForm example demonstrates how to gather multiple types of user inputs using controls like ListBoxes, CheckBoxes, and OptionButtons. It’s perfect for scenarios where users need to select options, make multiple choices, or pick from a list.
The macro auto-generates the next Emp ID based on the previous row and fills in the rest from user selections.
Steps:
➤ Press Alt + F11 to open the VBA Editor, then choose Insert >> UserForm.
➤ Insert the following controls. TextBox1 for the employee’s name. TextBox2 for the role. ListBox1 for selecting the department (e.g., Sales, IT, HR, Finance, Marketing). OptionButton1 and OptionButton2 for Full-Time and Part-Time. CommandButton1 labeled Submit
➤ Add this code to the UserForm_Initialize event to pre-load the department list:
Private Sub UserForm_Initialize()
    With ListBox1
        .AddItem "HR"
        .AddItem "IT"
        .AddItem "Sales"
        .AddItem "Finance"
        .AddItem "Marketing"
    End With
    OptionButton1.Value = True  ' Default to Full-Time
End Sub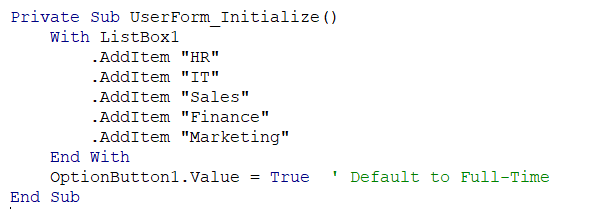
➤ Now, double-click CommandButton1 and paste the following code:
Private Sub CommandButton1_Click()
    Dim ws As Worksheet
    Set ws = ThisWorkbook.Sheets("Employees")
    ' Get the next Emp ID
    Dim nextRow As Long, nextID As Long
    nextRow = ws.Cells(ws.Rows.Count, 1).End(xlUp).Row + 1
    nextID = ws.Cells(nextRow - 1, 1).Value + 1
    ' Validate inputs
    If TextBox1.Value = "" Or TextBox2.Value = "" Or ListBox1.ListIndex = -1 Then
        MsgBox "Please complete all fields."
        Exit Sub
    End If
    ' Write data to the sheet
    ws.Cells(nextRow, 1).Value = nextID
    ws.Cells(nextRow, 2).Value = TextBox1.Value
    ws.Cells(nextRow, 3).Value = ListBox1.Value
    ws.Cells(nextRow, 4).Value = TextBox2.Value
    ws.Cells(nextRow, 5).Value = IIf(OptionButton1.Value, "Yes", "No")
    MsgBox "Employee record added."
    ' Reset form
    TextBox1.Value = ""
    TextBox2.Value = ""
    ListBox1.ListIndex = -1
    OptionButton1.Value = True
End Sub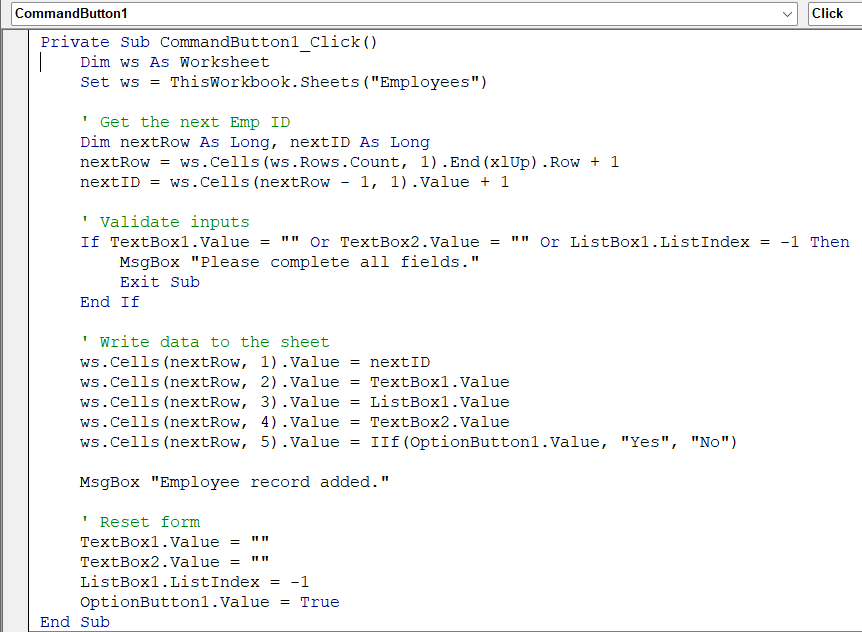
➧ CommandButton1_Click finds the next empty row and auto-increments the Emp ID by reading the last value in column A. If you're starting from scratch, make sure row 2 contains the first data row.
➧ The TextBox and ListBox inputs collect name, role, and department. Validation ensures none are left blank before proceeding.
➧ The selected employment status is checked using the OptionButtons. If Full-Time is selected, “Yes” is entered; otherwise, “No”.
➧ Finally, the form clears all inputs to allow a fresh entry.
➤ Run the macro, fill in the form, and click Submit.
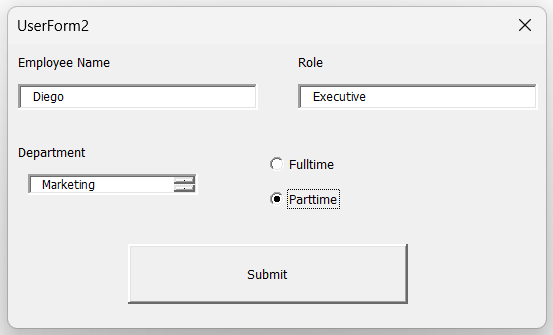
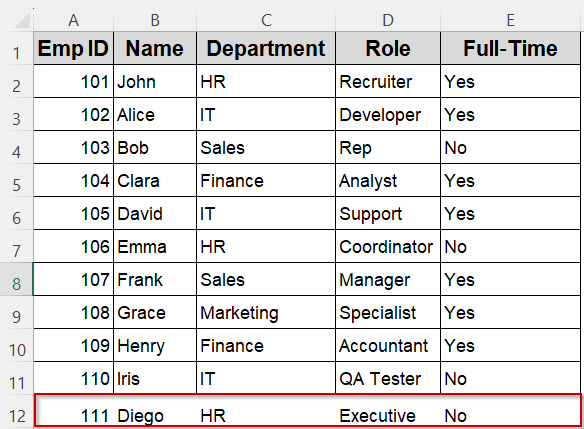
The new record will be added to the next row in the Employees sheet with the appropriate values under each column.
Design a Multi-Page UserForm to Organize Categorized Inputs in Excel VBA
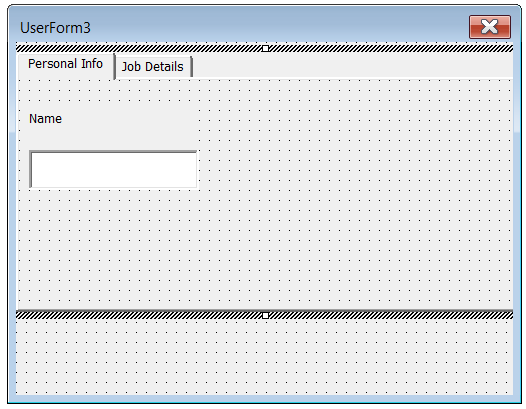
When your form needs to collect diverse information, a Multi-Page UserForm helps organize controls neatly into tabs. This example shows how to use the MultiPage control to separate user inputs across pages for better usability.
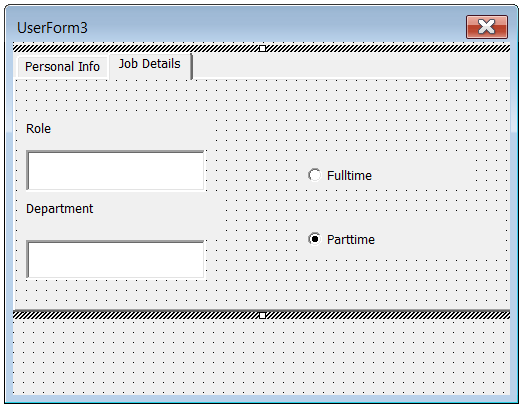
In this demonstration, the UserForm has two pages: Personal Info and Job Details. Users enter their name and email on the first page, and job title and department on the second. The Submit button saves all inputs into the worksheet named “Data.”
Steps:
➤ Press Alt + F11 to open the VBA Editor, then choose Insert >> UserForm.
➤ From the Toolbox add a MultiPage control. Rename Page 1 to Personal Info and Page 2 to Job Details.
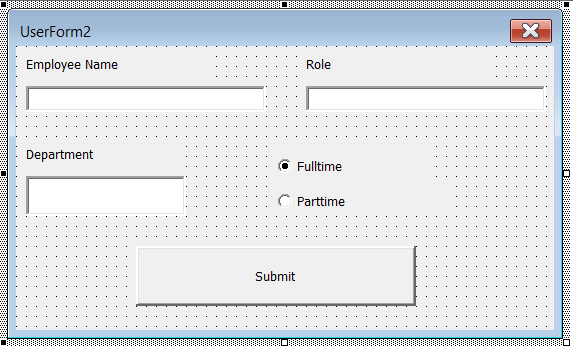
➤ On Page 1 add a TextBox txtName and Label “Employee Name”.
➤ On Page 2 add a TextBox txtRole, a Label “Role”, a ListBox lstDept (for departments), and two OptionButtons optFull (Full‑Time) and optPart (Part‑Time) inside a Frame.
➤ Add a CommandButton btnSubmit labeled “Submit”.
➤ Paste this code in the UserForm:
Private Sub UserForm_Initialize()
    Dim item As Variant
    For Each item In ThisWorkbook.Names("DeptList").RefersToRange
        lstDept.AddItem item.Value
    Next item
    optFull.Value = True          ' Default status
End Sub
Private Sub btnSubmit_Click()
    Dim ws As Worksheet
    Set ws = ThisWorkbook.Sheets("Employees")
    Dim nextRow As Long, nextID As Long
    nextRow = ws.Cells(ws.Rows.Count, 1).End(xlUp).Row + 1
    nextID = ws.Cells(nextRow - 1, 1).Value + 1      ' auto‑increment ID
    ' Validate entries
    If txtName.Value = "" Or txtRole.Value = "" Or lstDept.ListIndex = -1 Then
        MsgBox "Please complete every field."
        Exit Sub
    End If
    ' Write to sheet
    ws.Cells(nextRow, 1).Value = nextID
    ws.Cells(nextRow, 2).Value = txtName.Value
    ws.Cells(nextRow, 3).Value = lstDept.Value
    ws.Cells(nextRow, 4).Value = txtRole.Value
    ws.Cells(nextRow, 5).Value = IIf(optFull.Value, "Yes", "No")
    MsgBox "Employee record added."
    ' Reset form
    txtName.Value = ""
    txtRole.Value = ""
    lstDept.ListIndex = -1
    optFull.Value = True
    MultiPage1.Value = 0
End Sub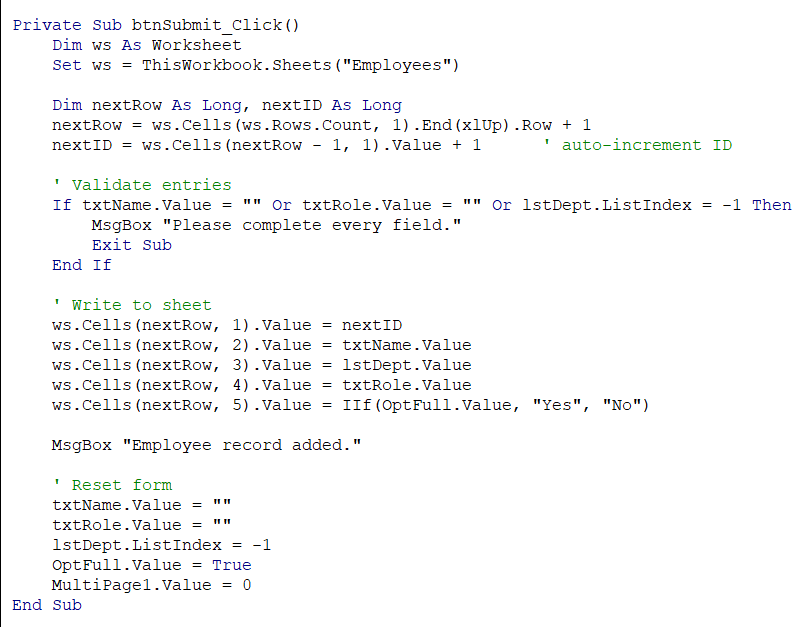
➧ nextRow finds the first blank row in column A; nextID takes the previous Emp ID and adds 1, keeping IDs sequential.
➧ The validation block stops the macro if any field is empty or no department is chosen, preventing incomplete records.
➧ The ListBox supplies the Department, and the OptionButtons translate to “Yes” for Full‑Time or “No” for Part‑Time.
➧ After writing the data, the form clears all inputs and returns to the first tab so the user can add another employee.
➧ Change sheet name, control names, or column numbers only if your workbook layout is different; otherwise, the code works unchanged with the five‑column Employees sheet.
➤ Run the UserForm in an Excel sheet.
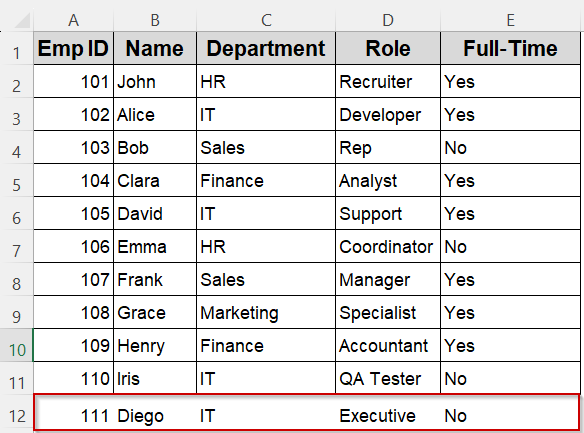
It will feel the dataset with your inserted data.
Utilize the Initialize Event to Pre‑Populate UserForm Controls in Excel VBA
You can make a UserForm feel polished by filling controls automatically when the form opens. The UserForm_Initialize event runs as soon as the form loads, letting you populate combo boxes, list boxes, or set default values without manual input from the user.
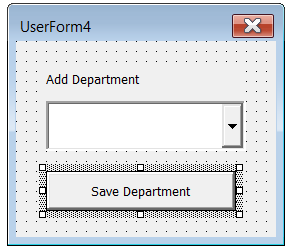
In this example, the form contains a ComboBox that lists every department from the named range DeptList on the Employees sheet. A Command Button lets the user confirm the selection and write the department into the next empty row in column B.
Steps:
➤ Press Alt + F11 to open the VBA Editor, then choose Insert >> UserForm.
➤ Add a ComboBox named cboDept and a CommandButton named btnSave with caption Save Department.
➤ Paste this code into the form’s code window:
' Fill the ComboBox when the form opens
Private Sub UserForm_Initialize()
    Dim item As Variant
    For Each item In ThisWorkbook.Names("DeptList").RefersToRange
        cboDept.AddItem item.Value
    Next item
    cboDept.ListIndex = 0          ' Select first department by default
End Sub
' Store the chosen department in the Employees sheet
Private Sub btnSave_Click()
    Dim ws As Worksheet
    Set ws = ThisWorkbook.Sheets("Employees")
    Dim nextRow As Long
    nextRow = ws.Cells(ws.Rows.Count, "A").End(xlUp).Row + 1   ' first blank row
    ws.Cells(nextRow, 3).Value = cboDept.Value                 ' write to column C
    MsgBox "Department saved."
    ' Optional reset
    cboDept.ListIndex = 0
    cboDept.SetFocus
End Sub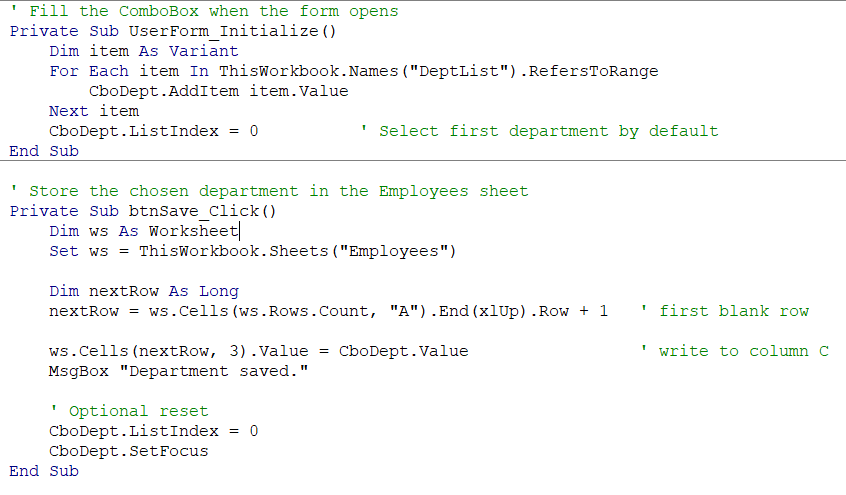
➧ The For Each item loop reads every cell in the named range and adds it to cboDept. You can swap cboDept for any other control if needed.
➧ cboDept.ListIndex = 0 preselects the first entry so the list never appears blank. Change or remove this line to set a different default.
➧ nextRow finds the first empty data row by searching column A, which holds Emp ID. Adjust the column reference if your layout differs.
➧ ws.Cells(nextRow, 3).Value writes the chosen department to column C. Change the column number if your Department field is elsewhere.
➧ After saving, the form resets the ComboBox and returns focus to it. Replace these lines with Me.Hide if you prefer the form to close after each save.
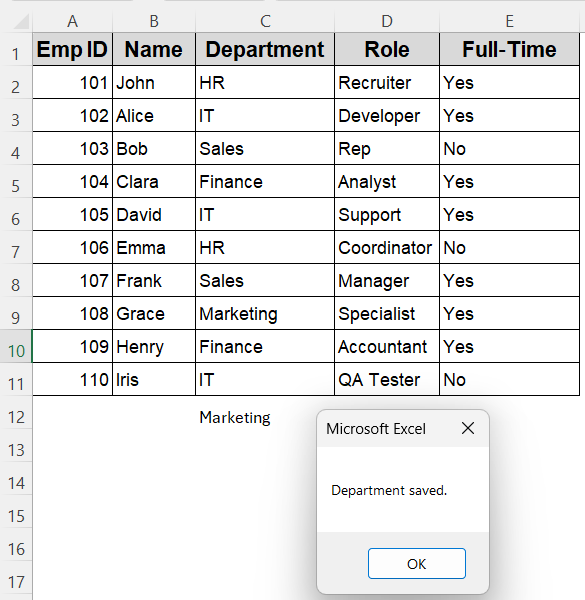
➤ Close the editor, run the UserForm, choose a department, and click Save Department. The selected department is written to the first empty row of column C in the Employees sheet.
Use this pattern to load any list automatically and keep dropdown values consistent with your workbook data.
Frequently Asked Questions
Can I create UserForms on Excel for Mac?
No, you can’t. Excel for Mac (post-2016) does not support creating or editing VBA UserForms. You’ll need Excel for Windows to design forms.
How do I populate a ComboBox automatically?
Use the UserForm_Initialize event to loop through a named range or list and add items to the ComboBox. It ensures the control is filled before the form appears.
Why use a MultiPage control in a UserForm?
A MultiPage control organizes inputs into separate tabs (like Personal Info, Job Details), simplifying complex forms and improving user experience by grouping related fields.
Are UserForms more reliable than worksheet input?
UserForms standardize data entry and reduce user error, but they require extra validation code. They’re ideal for guided input, though spreadsheet layouts are simpler for quick entries.
Wrapping Up
UserForms in Excel VBA unlock the power to build interactive and user-friendly interfaces for data entry, reporting, or workflow automation. Whether you are collecting names in a TextBox, letting users choose items from a ComboBox, or building a multi-page input form, UserForms make your macros feel like real applications. Each method you learned, from simple forms to advanced controls, can be customized to fit your workbook’s goals.


Unfortunately, There Is No Date or Counting in Form