Exporting data from external sources often converts dates into 8-digit numbers. Excel dates are basically sequential serial numbers, but 8-digit numbers are not the same. Therefore, Excel doesn’t recognize these numbers as dates. Certain cell formatting and Excel functions will help you turn 8-digit numbers into Excel-recognized dates.
➤ For an 8-digit number in YYYYMMDD(19900215) format, create a helper cell and enter the following formula in the neighboring cell of the first numeric value:
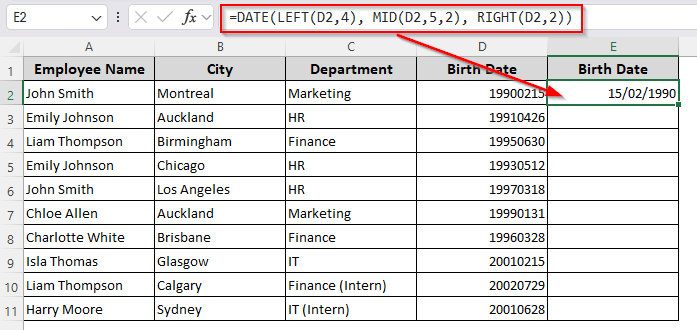
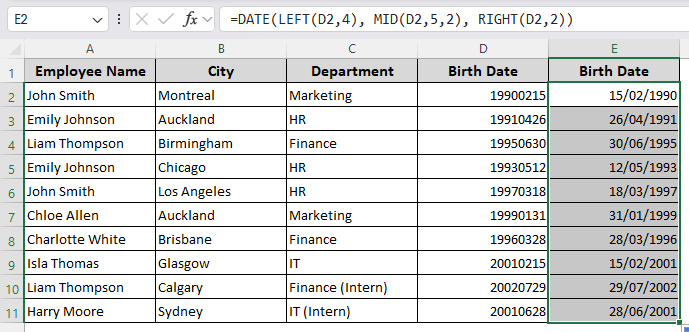
=DATE(LEFT(D2, 4), MID(D2,5,2), RIGHT(D2,2))
➤ Replace D2 with the appropriate cell reference containing the numeric value. Press Enter.
➤ Drag the formula down to the remaining cells and Excel will convert all the numbers into dates.
Depending on the date format, some parts of the formula will change. This article covers all the methods of converting 8-digit numbers into dates using flash fill, DATE, DATEVALUE, TEXT functions, power query, and VBA macro.
Manually Converting Digits into Dates with Flash Fill
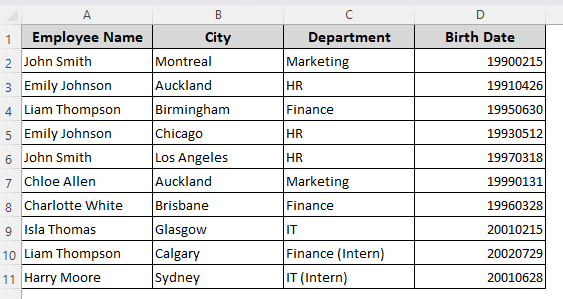
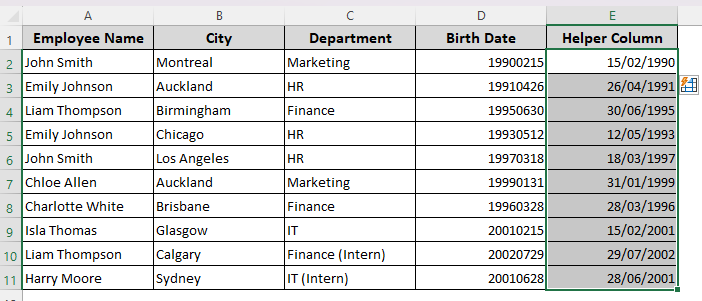
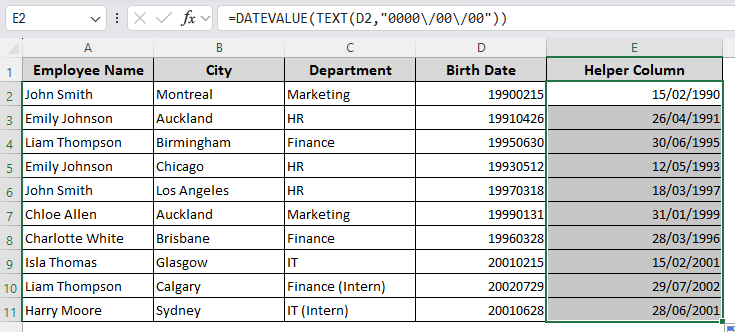
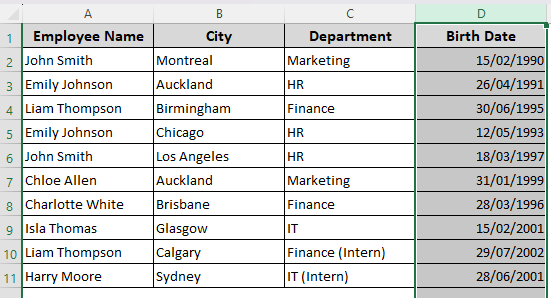
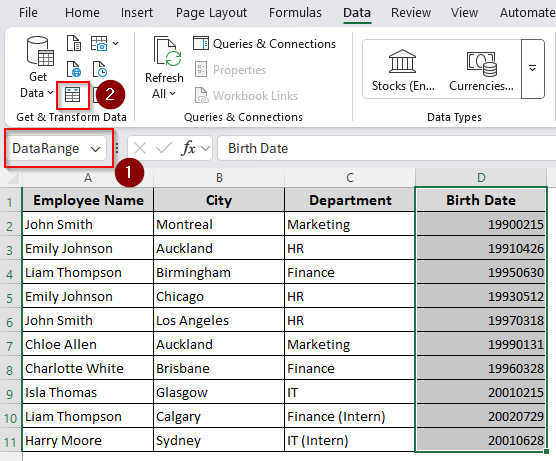
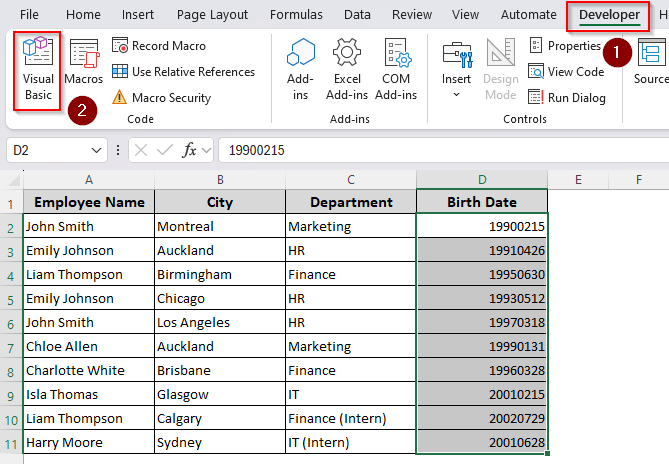
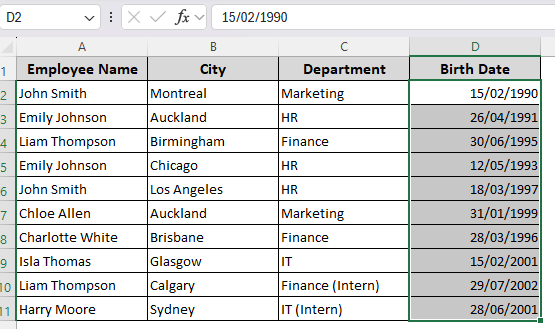
In our dataset, we have general employee info including their names, cities, and birth dates. In column D(Birth Date), we have some dates in YYYYMMDD format. Here, the first 4 digits represent the year, the next 2 digits represent the month, and the remaining 2 are the day. We’ll convert the numbers into dates following the dd/mm/yyyy format.
Excel’s Flash Fill feature recognizes data patterns and applies them to the selected cells. For small datasets, this feature might work to arrange the numbers in a default date format. Here’s the full procedure:
➤ Create a helper column and select the first cell adjacent to the targeted cell. Now, manually type the date in the correct format.
➤ For example, convert 19900215 into 15/02/1990 or 15-02-1990.
➤ Do the same for a second cell. This will help Excel to recognize the pattern.
➤ As you enter the values, Excel automatically recognizes them as dates and displays them as the default date values as shown in the following image:
➤ Select all the cells of the helper column and press CTRL + E .
➤ Or, go to the Data tab and click on the Flash Fill icon in the Data Tools group.
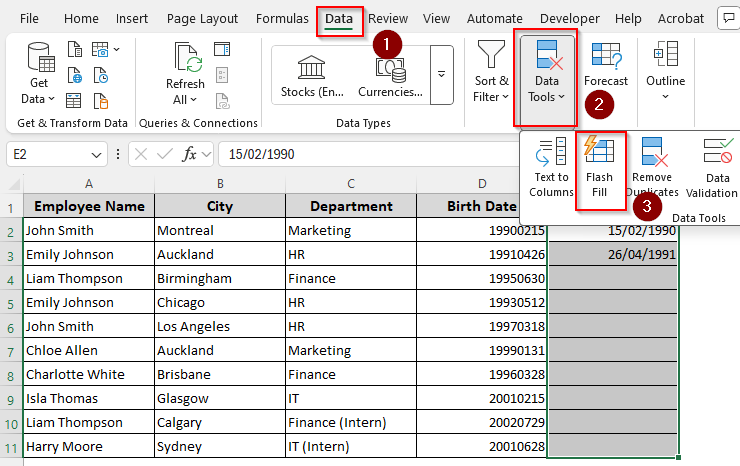
➤ Excel will now correctly turn the numbers into your device’s default date format. If this doesn’t work the first time, repeat the process for a third cell.
Combining the DATE Function with LEFT, RIGHT, and MID Functions
With the DATE function, you can convert numbers of text strings into dates. However, as our numbers aren’t recognizable as dates by Excel, we need to guide it with functions like LEFT, RIGHT, and MID. Here’s how:
➤ Create a helper column and type any of the following formulas in a neighboring cell to your targeted numeric value:
For YYYYMMDD(19900215) Format
=DATE(LEFT(D2,4), MID(D2,5,2), RIGHT(D2,2))

For DDMMYYYY(02151990) Format
=DATE(RIGHT(D2,4), MID(D2,3,2), LEFT(D2,2))
➤ Instead of D2, use the cell reference containing your 8-digit number.
➤ Use the tiny + sign (fill handle) on the bottom corner of the cell to drag the formula down to the remaining cells.
Converting Numbers to Date with the TEXT and DATEVALUE Function
Another easy way to format 8-digit numbers as dates is to use the TEXT function. As it transforms the data into text, we’ll combine it with the DATEVALUE function. For this, follow the steps given below:
➤ In a helper column cell, enter any of the following formulas:
For YYYYMMDD(19900215) Format
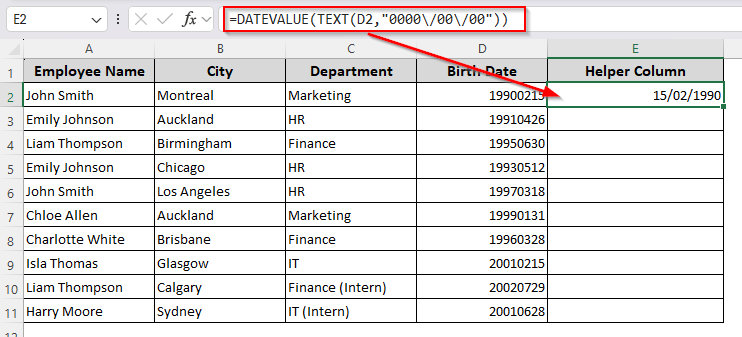
=DATEVALUE(TEXT(D2, “0000\/00\/00”))
Or,
=DATEVALUE(TEXT(D2, “0000-00-00”))
For DDMMYYYY(02151990) Format
=DATEVALUE(TEXT(D2, “00\/00\/0000”))
Or,
=DATEVALUE(TEXT(D2, “00-00-0000”))
➤ Replace D2 with the appropriate cell reference. Click Ok.
➤ Drag the formula down to apply it to the remaining cells.
Note:
Sometimes the formula gives a hashtag error (######) instead of dates. To fix this, select the cells and click on the downward arrow (launch icon) on the Number group. Select Date and choose your desired format. Finally, press Ok.
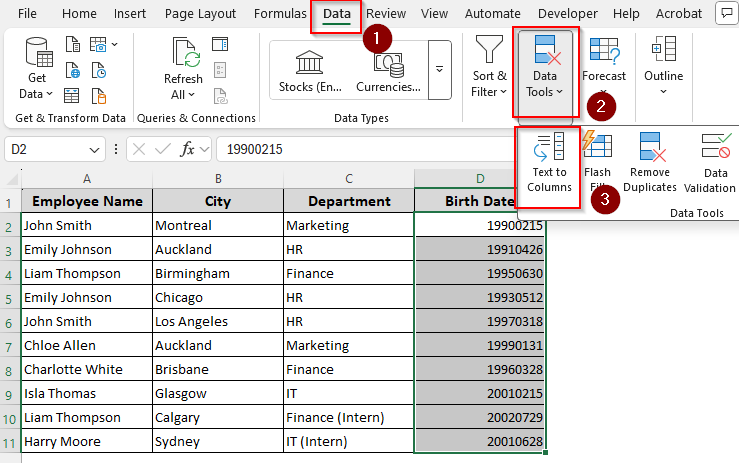
Format Numbers to Date with the Text to Columns Wizard
To directly convert bulk numbers into dates, using the Text to Columns Wizard is an effective solution. Let’s get to the process:
➤ Select your data range and click on the Data tab. In the Data Tools group, choose the Text to Columns option.
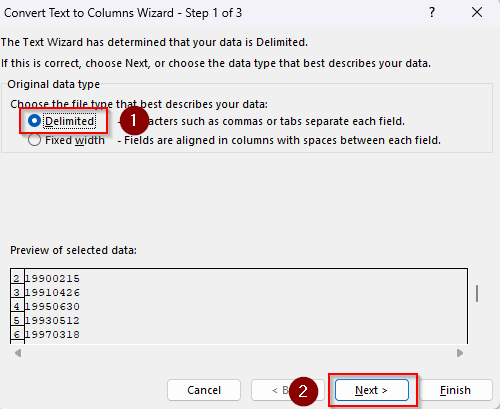
➤ As the Convert Text to Columns Wizard opens, select Delimited in the first step and click Next.
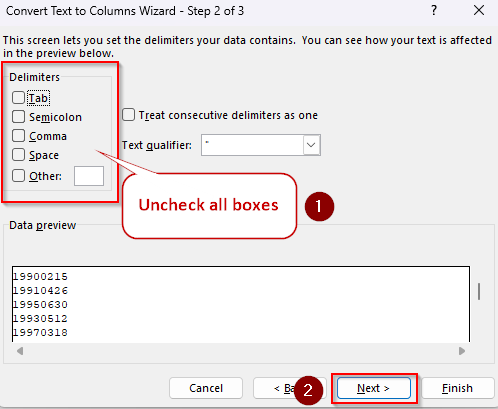
➤ In step 2, uncheck all the boxes from the Delimiters group, and press Next.
➤ When you proceed to step 3, select Date from the Column Data Format group, and click the downward arrow beside the Date option.
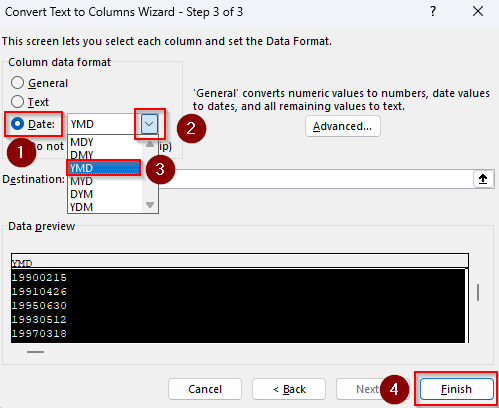
➤ Choose YMD if your 8-digit numbers start with the year (YYYYMMDD format). Otherwise, click on DMY for datasets starting with day (DDMMYYYY format).
➤ Click Finish and Excel will change the numbers into corresponding dates.
Transform Number Columns into Dates with Power Query
For complex datasets, the Power Query tool can be a dynamic solution. Although it’s a lengthy process, it always works and applies to future entries. To use the tool, follow the steps given below:
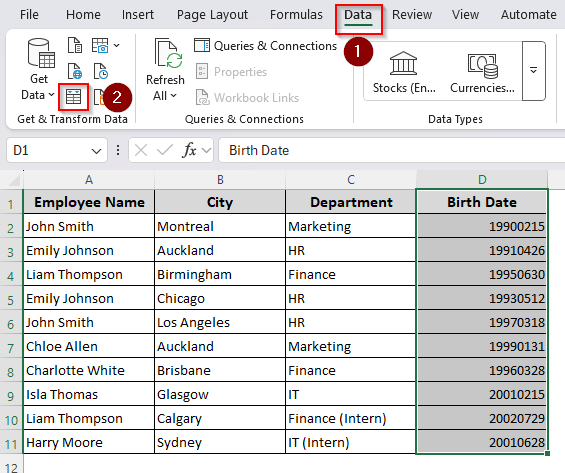
➤ Select the column range with the 8-digit numbers and go to the Data tab.
➤ From the Get & Transform Data group, click on the From Table/Range icon.
➤ When the Create Table box appears, click Cancel.
➤ Go to the Name box and give a name to your data range without any spaces. Press Enter and click on the From Table/Range icon once again.
➤ From the Power Query Editor, click on the Transform tab >> Text Column >> Split Column >> By Positions.
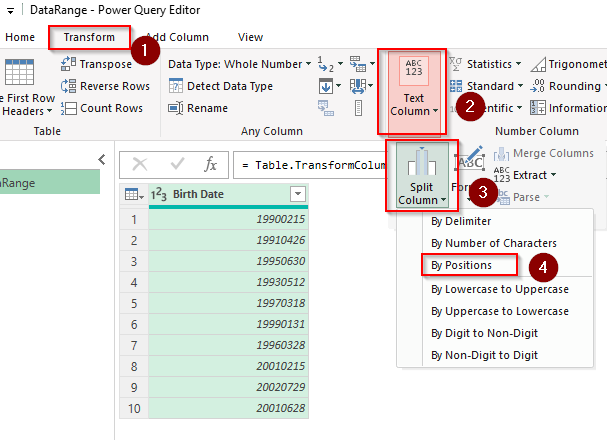
➤ In the Split Column by Positions box enter the following in the Positions field:
- For YYYYMMDD(19900215) Format: 0,4,6
- For DDMMYYYY(02151990) Format: 0,2,4
➤ Press Ok. Preview the new columns and check if it’s split correctly.

➤ Select all three columns by pressing CTRL + A and click on the Transform tab >> Text Column >> Merge Columns.
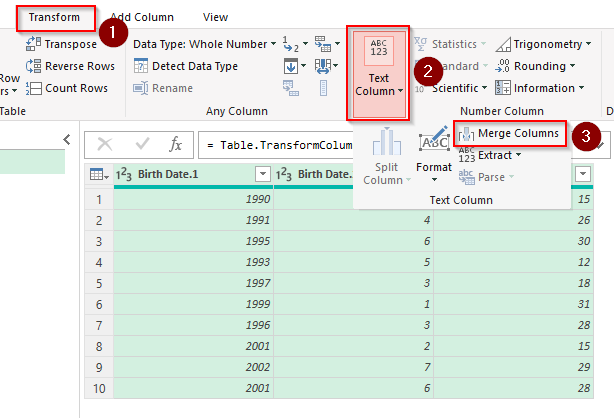
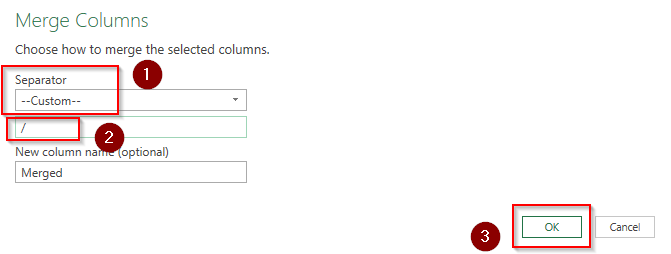
➤ In the Merge Column box, choose Custom in the Separator category and select type ‘/’ or ‘-‘ to separate the day, month, and year in the merged column. Click Ok.
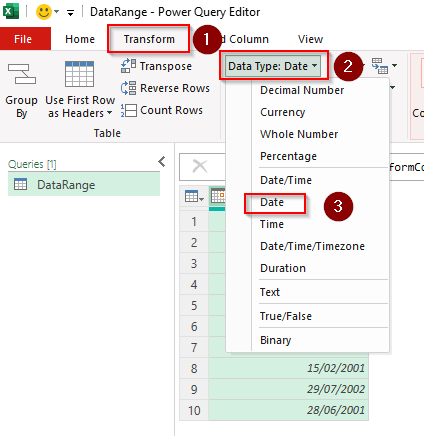
➤ In the Transform tab, go to the Any Column group and click on Data Type. Choose Date from the drop-down menu and press Ok.
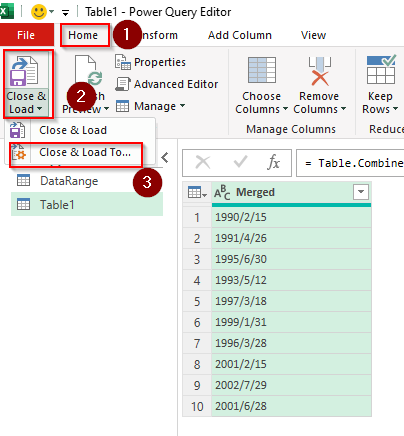
➤ Finally, click on the Home tab and click on the downward arrow sign beside the Close & Load option. Choose Close & Load To from the given options.
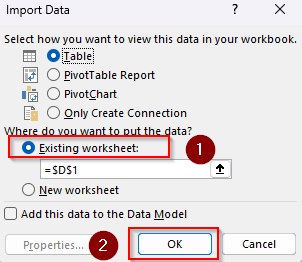
➤ In the Import Data box, click on Existing Worksheet and press Ok.
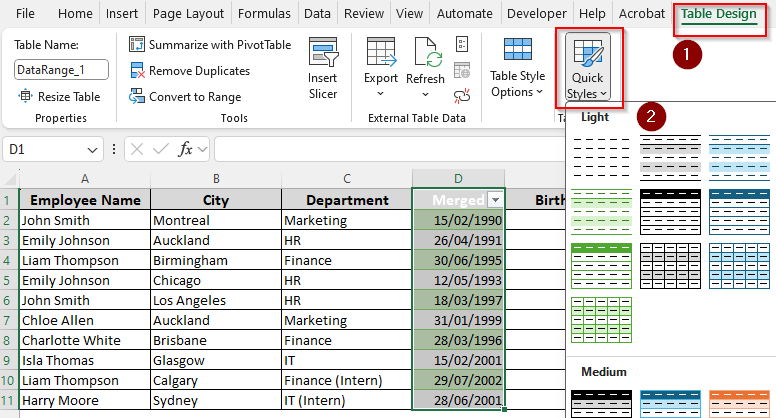
➤ As Excel loads the new column in your worksheet, you can change the column format by clicking on Table Design >> Quick Styles.
Creating a Custom VBA Macro for Bulk Conversion
To create a VBA macro, you need to insert a relevant code using the developer options. Follow the steps given below to customize a VBA macro that turns 8-digit numbers into dates:
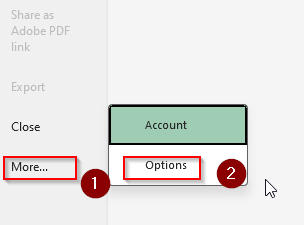
➤ Look for the Developer tab in the top ribbon. If it’s not there, go to Files >> More >> Options.
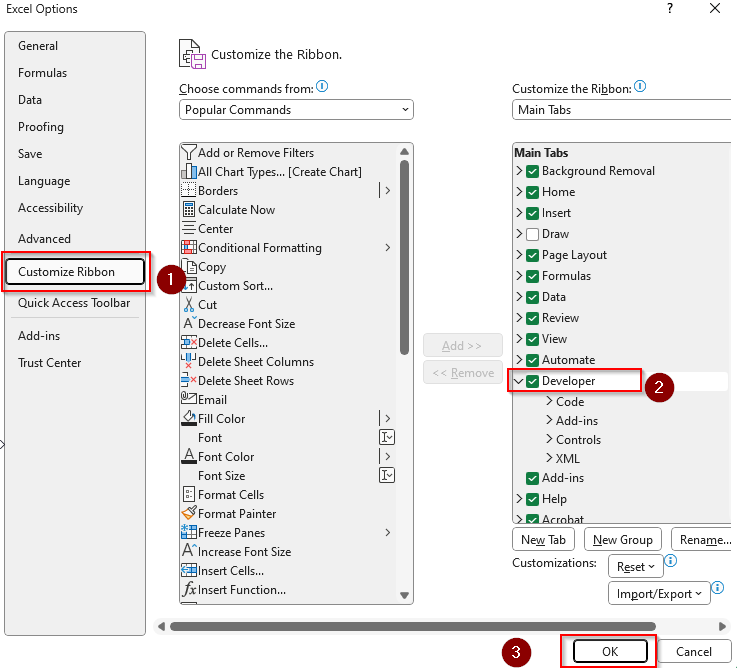
➤ From the side column, choose Customize Ribbon and check the Developer box. Click Ok.
➤ Select the cells with 8-digit numbers and click on the Developer tab. Go to Visual Basic. You can also press Alt + F11 .
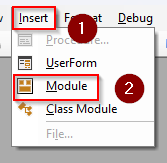
➤ As the VBA editor opens, click on Insert and choose Module.
➤ Paste the following code in the blank module box:
Sub NumberToDate()
Dim cell As Range
Dim userInput As String
Dim fmt As String
Dim numStr As String
Dim yearPart As Integer
Dim monthPart As Integer
Dim dayPart As Integer
Dim resultDate As Date
' Ask the user for date format
userInput = InputBox("Enter the date format: 'YYYYMMDD' or 'DDMMYYYY'", "Choose Date Format", "YYYYMMDD")
fmt = UCase(Trim(userInput))
' Validate format input
If fmt <> "YYYYMMDD" And fmt <> "DDMMYYYY" Then
MsgBox "Invalid format entered. Use 'YYYYMMDD' or 'DDMMYYYY'.", vbExclamation
Exit Sub
End If
' Process each selected cell
For Each cell In Selection
If IsNumeric(cell.Value) And Len(CStr(cell.Value)) = 8 Then
numStr = CStr(cell.Value)
On Error GoTo InvalidDate
If fmt = "YYYYMMDD" Then
yearPart = CInt(Left(numStr, 4))
monthPart = CInt(Mid(numStr, 5, 2))
dayPart = CInt(Right(numStr, 2))
ElseIf fmt = "DDMMYYYY" Then
dayPart = CInt(Left(numStr, 2))
monthPart = CInt(Mid(numStr, 3, 2))
yearPart = CInt(Right(numStr, 4))
End If
' Create and assign the date
resultDate = DateSerial(yearPart, monthPart, dayPart)
cell.Value = resultDate
cell.NumberFormat = "dd/mm/yyyy"
End If
Next cell
Exit Sub
InvalidDate:
MsgBox "One or more dates are invalid. Please check your data.", vbExclamation
End Sub
➤ Press F5 or click on the Run tab and choose Run Sub/UserForm. You can change how you want to display the final dates by editing the following marked section:
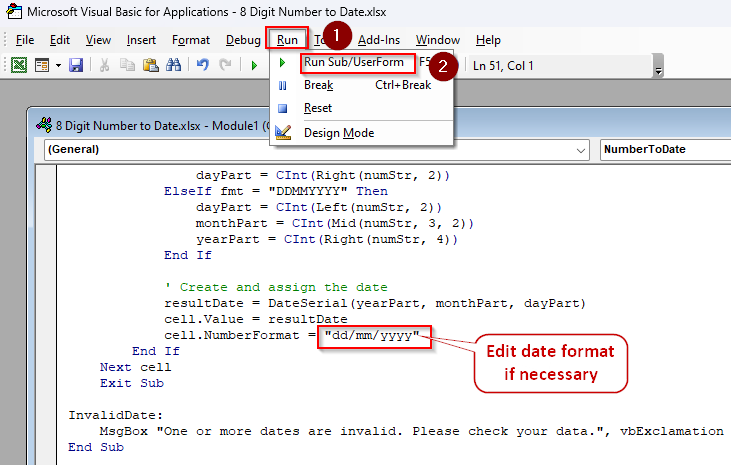
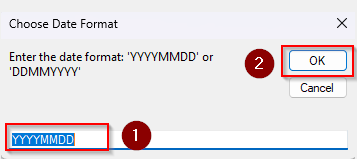
➤ Now, Excel will prompt you to define the date format. Type YYYYMMDD or DDMMYYYY in the Choose Date Format dialog box depending on your dataset.
➤ Go back to the Excel tab and your selected range has now been converted into dates.
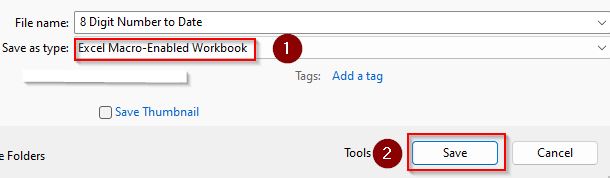
➤ To save the changes, go to the File tab and click on Save As. While saving the file in your desired location, choose Excel Macro-Enabled Workbook from the Save as Type options.
Frequently Asked Questions
How to convert date time into numbers in Excel?
To convert date and time into numbers, right-click on the cell containing the date and time. Select Format Cells from the context menu. In the Format Cells dialog box, go to the Number tab. Under the Category section, click on select General or Number, and press OK. In the final data, the whole number part represents the date, and the decimal part represents the time.
How to calculate date difference in numbers?
To calculate the date difference and show the result as a number of days, we’ll subtract one date from another. Enter the start date and end date in separate cells and type the following formula:
=End_Date – Start_Date
For example, if the start date is in cell A1 and the end date in cell B1, type: =B1 – A1
How can I set the date format in Excel?
Choose the cells with dates and press CTRL + 1 . You can also press the launch icon in the Number group from the top ribbon. As the Format Cells dialog box opens, select Date from the Category group and choose a date format from the options under Type. Finally, click Ok.
Concluding Words
8-digit numbers can be formatted in different ways with the year, month, and dates in different positions. It’s important to identify the correct format and the positions of the date elements to apply a formula correctly.
Using the power query tool or VBA macro is more reliable than other methods. However, flash fill or a simple DATE function is also useful as long as you recognize the date pattern accurately.