Time in decimals can be overwhelming, especially when dealing with huge time logs and calculations. It not only makes the Excel confusing but also makes the time calculation complex. To make the data readable and to ease the computation, we often need to convert decimal time to hours and minutes in Excel. It is quite simple, and you can save yourself from a lot of hassle if you know the quick hacks.
Steps to convert decimal time to hours and minutes in Excel with simple division formula:
➤ Click on the output cell.
➤ Divide the decimal time value by 24, like the formula below –
=B2/24, where B2 is the cell where you have stored time in decimals.
➤ Drag the cells to apply the same formula for the entire column.
➤ Select the column and press Ctrl + 1 to format the cells.
➤ Choose Custom and h:mm to format the cells to time.
Today, we will walk you through the interesting ways you can convert decimal time to hours and minutes in Excel. This includes easy methods like basic division, TEXT functions, INT, and MOD functions, giving insight into customized formulation for tools like VBA and Power Query. This will help to format time cumulatively based on your needs by avoiding common mistakes.
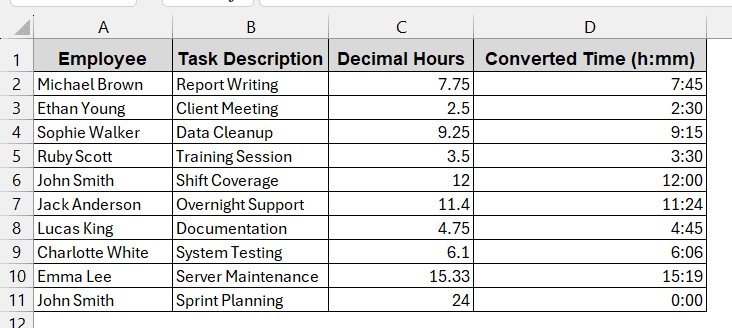
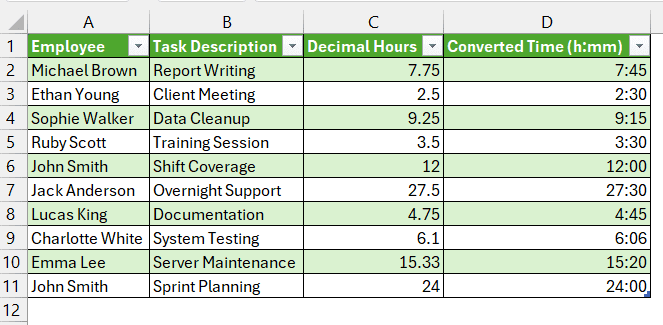
Divide Decimal Time by 24
One of the easiest ways to convert time to hours and minutes is to divide it by 24. In Excel, one day is programmed equivalent to 24 hours. For this reason, dividing the decimal breaks it down to the hour values. This can be later formatted to time values to get the exact time.
Steps:
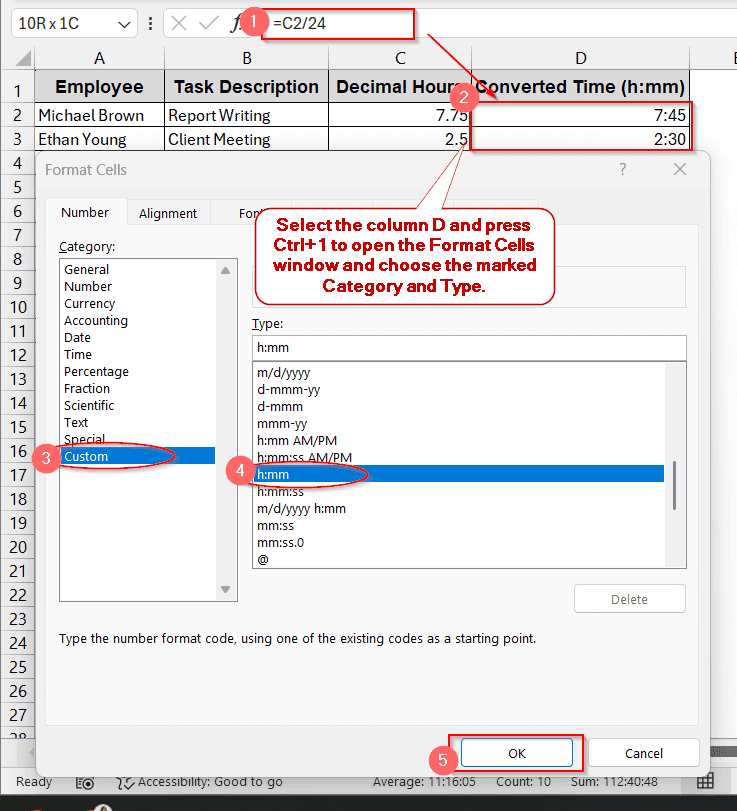
➤ Click on the cell where you want to store the result.
➤ Divide the decimal value by 24 by using the following formula –
=C2/24, where C2 is the cell where time is stored in decimal.
➤ Drag the cells to apply the same formula for the entire column D.
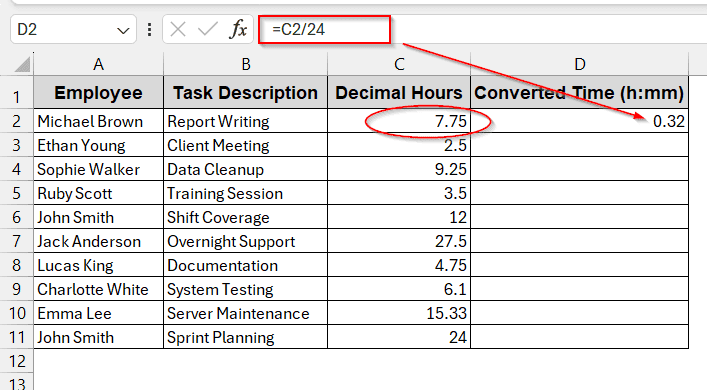
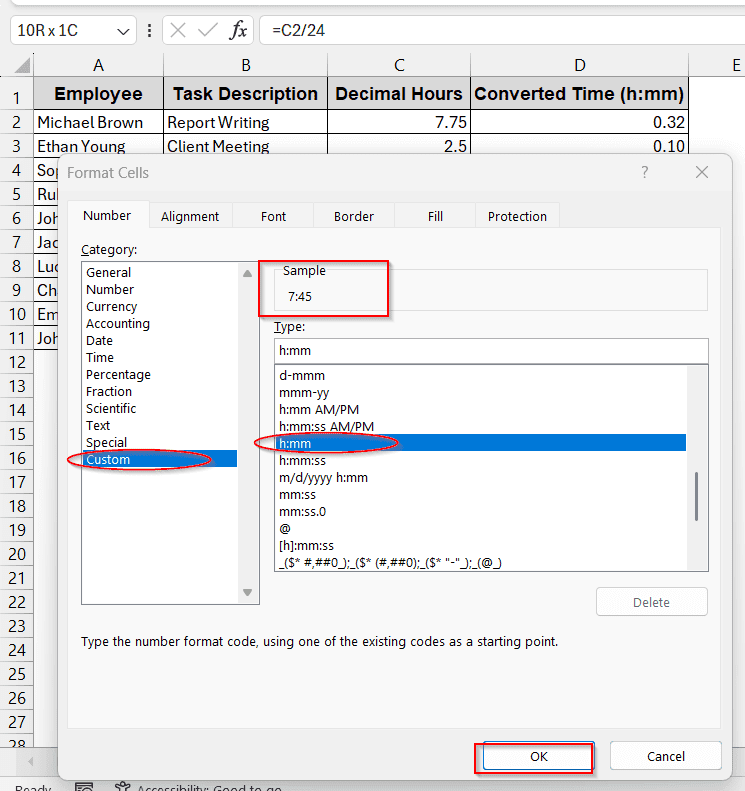
➤ To change the formatting of the time to hours and minutes, select column D and press Ctrl + 1 . You can also right-click and select Format Cells.
➤ Initially, the Format Cell window has Category set to Number.
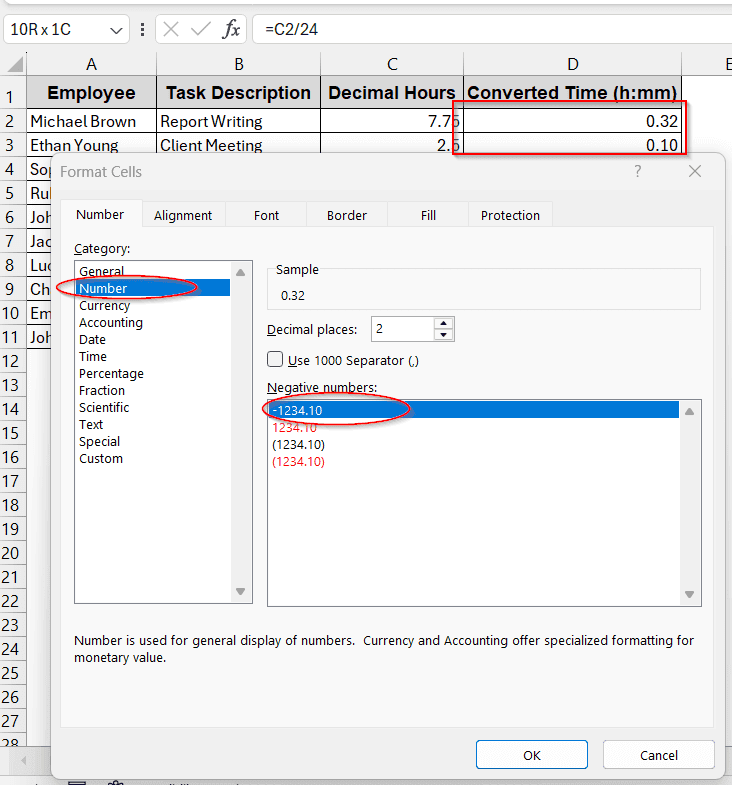
➤ Change the Category to Custom and the Type to h:mm. The Sample shows the result of the first cell of the column to help you determine if the value resembles what you require. If everything feels right, click OK.
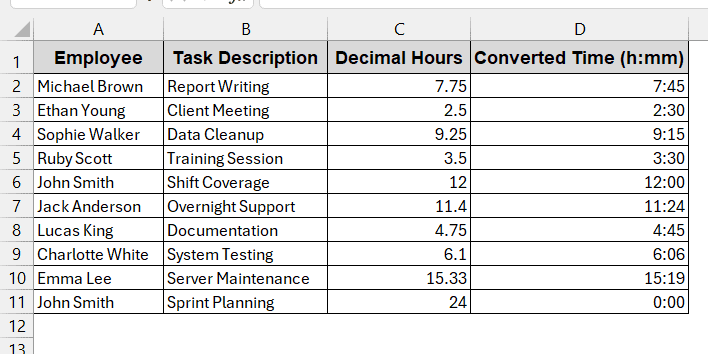
➤ Finally, the table will look like this –
Note:
Always divide the decimal time before formatting it to time to get the accurate value.
Use the TEXT Function To Convert Decimal to Hours & Minutes
The TEXT function in Excel has a unique characteristic – it converts numeric values to text strings based on your needs. Without performing any calculation, this function allows you to convert decimal time to hours and minutes. It can be easily achieved by dividing the value by 24 inside the TEXT function.
Steps:
➤ Click on the cell where you want to store the result
➤ Write the TEXT formula –
=TEXT(C2/24, “h:mm”)
where C2 is the cell containing the decimal time.
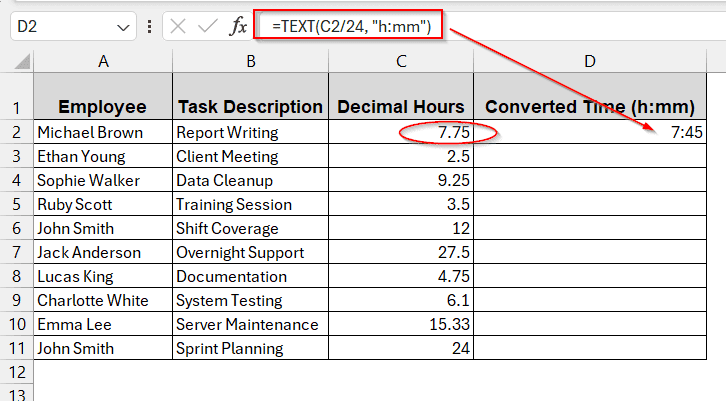
➤ Press Enter and drag the cells to generate the same value for all the cells.
Note:
➧ No extra formatting needed as the times are automatically converted to h:mm due to the parameter in the formula.
➧ The TEXT function does not allow you to do any calculations on the result values as they are stored as text, not numeric values. To do further calculations, change them to numeric first.
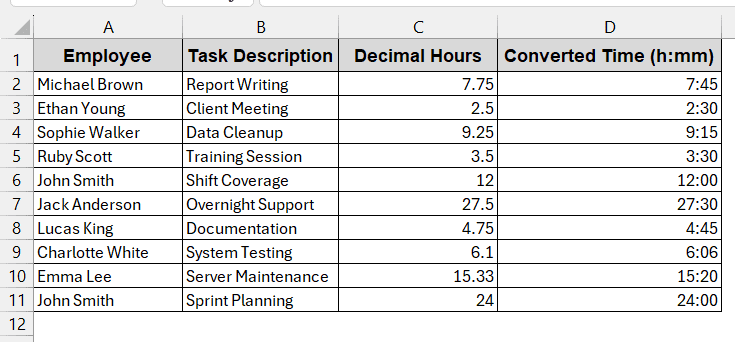
Converting Time With INT and MOD Functions
We can also convert decimal time to hours and minutes in Excel, with the combination of INT and MOD functions. These functions help to manually break the decimal into hours and minutes without converting it to a Time format.
Steps:
➤ Click on the cell you want to store the output.
➤ Write the formula of INT and MOD in this pattern, where C2 is the cell containing initial time values.
=INT(C2) & “:” & ROUND(MOD(C2,1)*60,0)
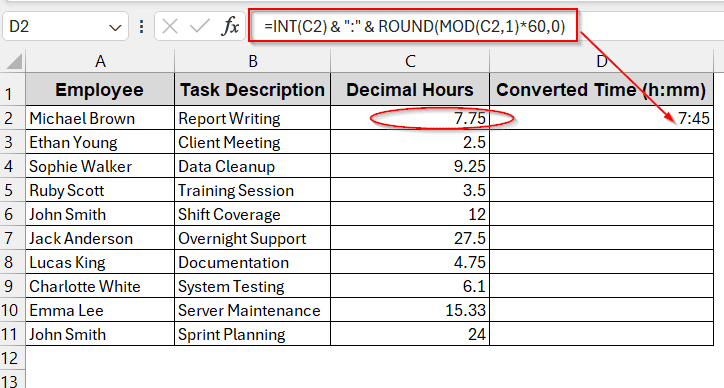
➤ Drag the cells to generate the same formula for the entire column.
Note:
The output values are stored in text using this formula. Therefore, no further calculation is possible without changing it to numerical.
Running VBA Code For Bulk Conversion
Using Excel’s built-in tools like Visual Basic Applications (VBA), can be a great tool for time conversion. While dealing with large datasets, when filling all the columns one by one becomes hectic, it is better to use customized formulations with VBA. Generally, it converts decimal time to hours and minutes for every row simultaneously.
Steps:
➤ Go to the Developers tab and click on Visual Basic to open the VBA Editor window.
➤ In the VBA window, click the Insert tab and choose Module.
➤ Paste the following code in the space-
Sub ConvertDecimalToTime_StoreInColumnD()
    Dim rng As Range
    Dim cell As Range
    Dim destCell As Range
    Dim rowOffset As Long
    ' Prompt user to select the range of decimal values (e.g., C2:C11)
    On Error Resume Next
    Set rng = Application.InputBox("Select the range of decimal times to convert (e.g., C2:C11):", Type:=8)
    On Error GoTo 0
    If rng Is Nothing Then Exit Sub
    For Each cell In rng
        If IsNumeric(cell.Value) Then
            ' Calculate the destination cell in Column D on the same row
            rowOffset = cell.Row
            Set destCell = cell.Worksheet.Cells(rowOffset, "D")
            ' Convert and store the time
            destCell.Value = cell.Value / 24
            destCell.NumberFormat = "h:mm"
        End If
    Next cell
End Sub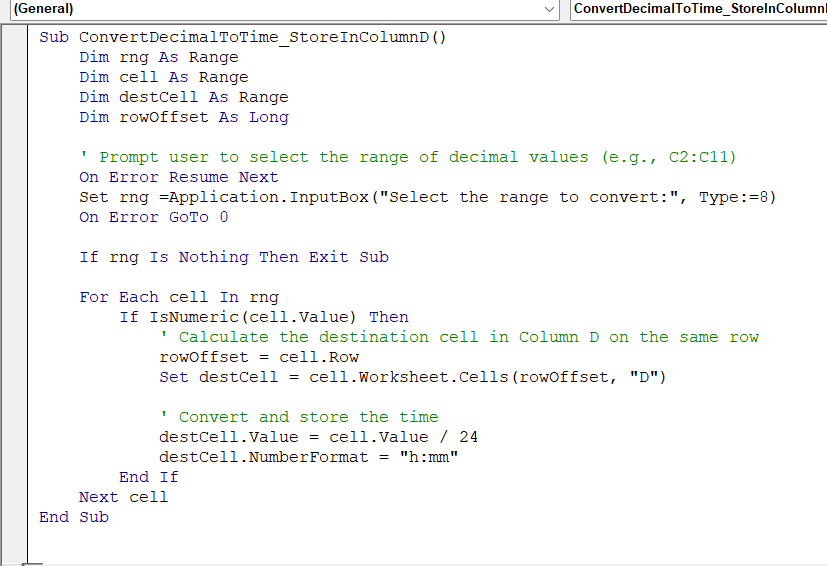
➤ Press Ctrl + S to save the code and click Yes if any window appears.
➤ Close the VBA editor window.
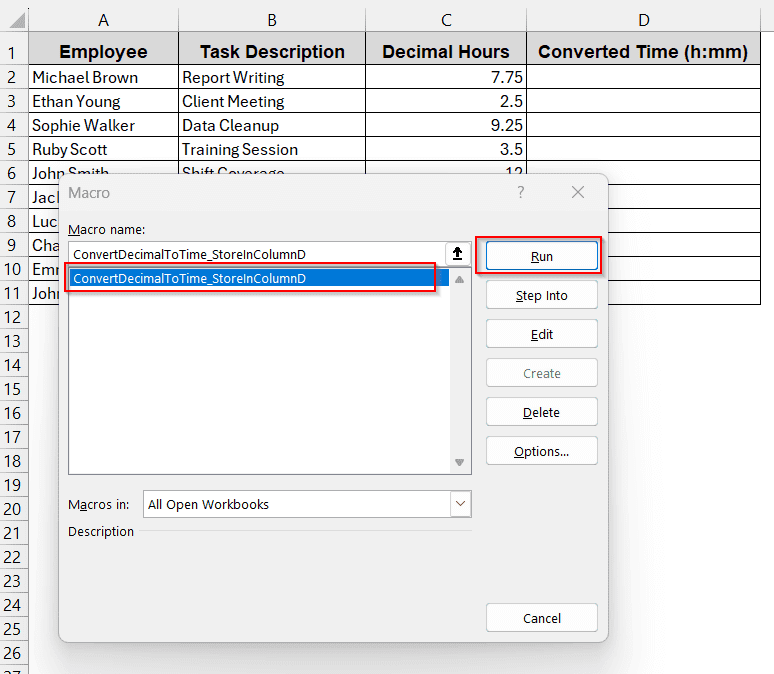
➤ Click on Macros on the Developer tab beside the Visual Basic.
➤ On the Macro Name, select the Option ConvertDecimalToTime_StoreInColumnD and click on Run.
(This is the name of the customized function you created in the Editor.)
➤ As you click Run, a window appears asking for the range of the cells you want to convert to time and hours.
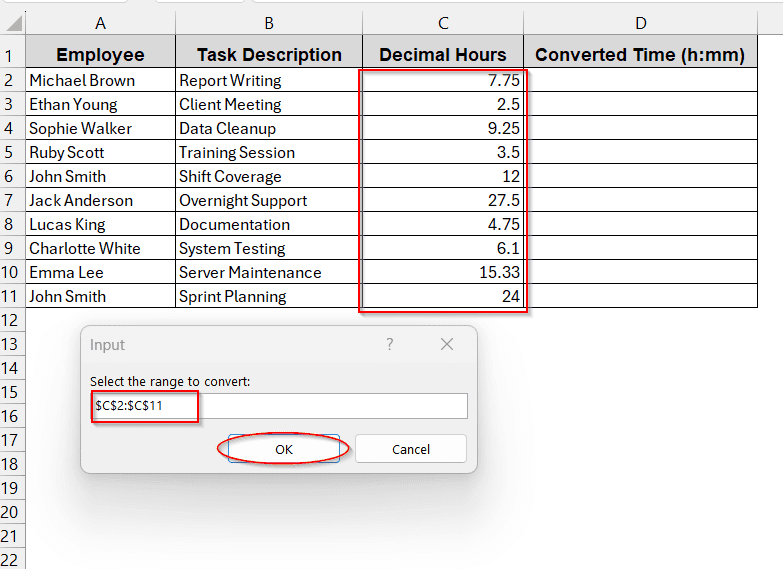
➤ Here, the range is C2 to C11.. You can just drag the cells to select the range. After that, press OK to proceed.
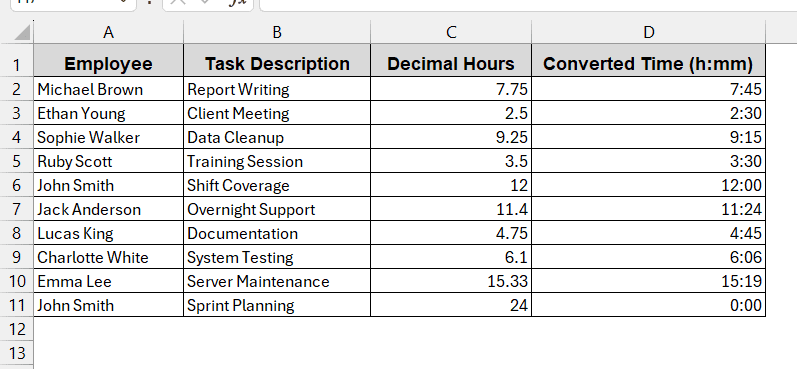
➤ This will automatically generate column D with the time in h:mm format without further formatting or filling cells.
Note:
You can modify the code to overwrite the times in the same column without storing them in adjacent columns.
Launch Power Query For Bulk Conversion
Similar to VBA, Power Query can also help to clean, format, and store your decimal time values in Excel. Without using formulas time and again, dragging cells and filling them, you can formulate in the Power Query Editor. This is better because it helps you to handle a large database and create your own customized solution for the required problem.
Steps:
➤ Go to the Data tab and click on From Table/Range.
➤ A window appears asking for the cell range. You choose the entire table or only the column having the time in decimals. If no cell is selected, the range is set to the entire table.
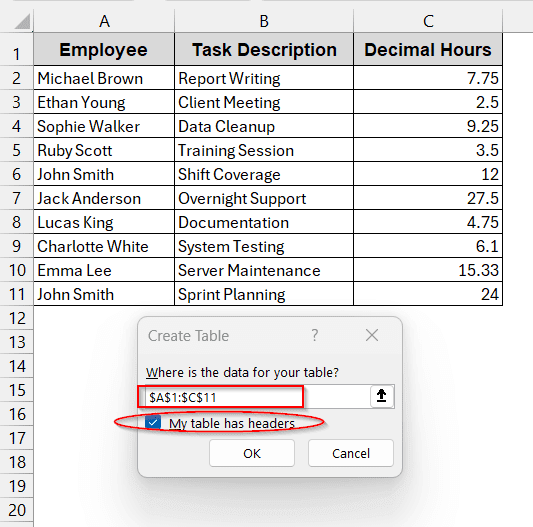
➤ Click OK to open the Power Query Editor window showing the selected cells.
➤ Select the Add Column tab to create a customized new column for time in hours and minutes.
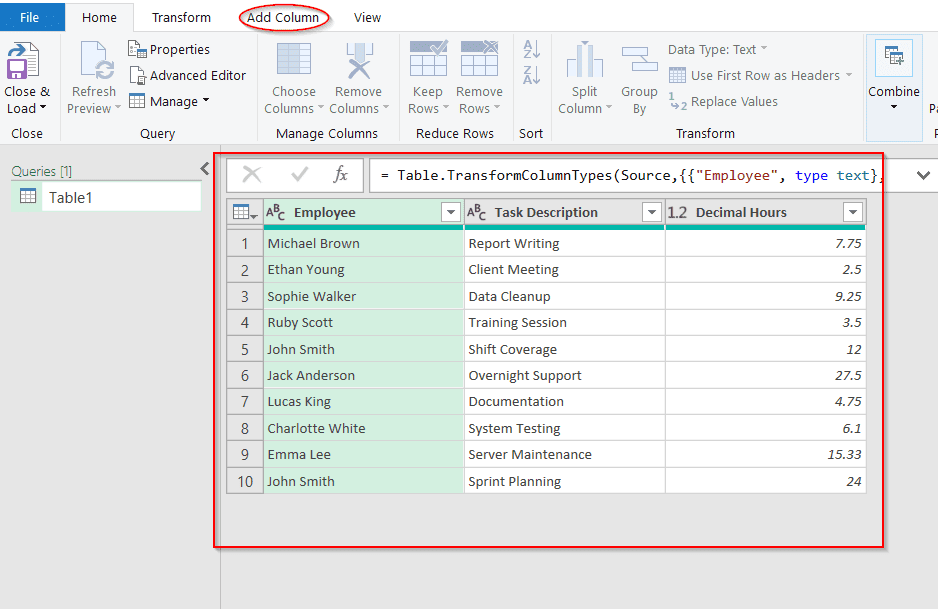
➤ Select Custom Column to open a new window for formulating your own formula.
➤ Give a name to the column, which will work as the header, and write your code in the Custom Column Formula.
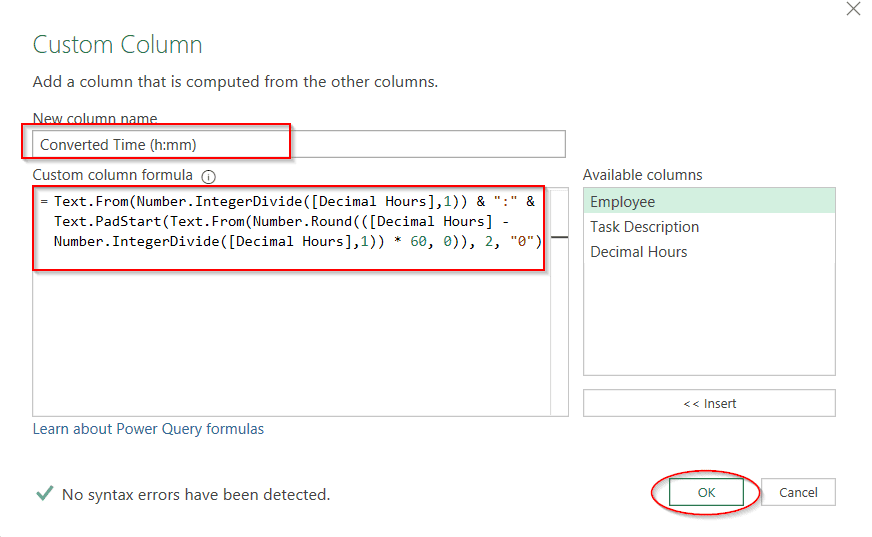
➤ Clicking OK will generate a new column in the Power Query Editor window with the name you chose, containing the time in hours and minutes.
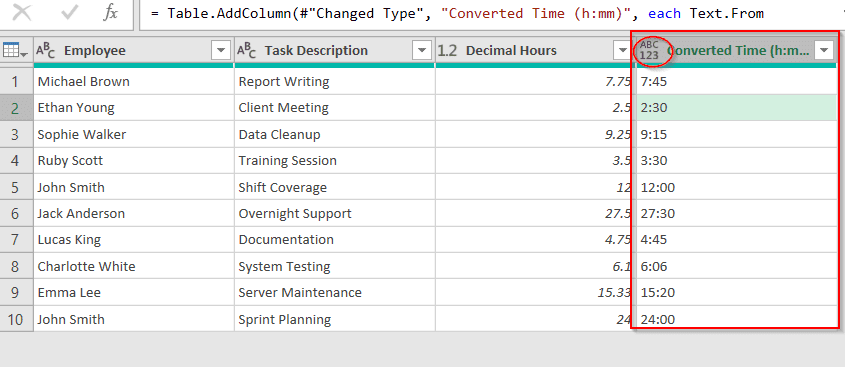
➤ See the top left of the header of the new column. The ABC 123 suggests the values are in text form instead of time-formatted values.
➤ If you are satisfied with your data, click on the Home tab -> Close & Load.
➤ This will create a new worksheet in the same Excel file, like the format below, with this new column.
Note:
➧ The above formula formats the result column into text. Therefore, we can’t process any more calculations here.
➧ To generate the time column with the Time formatting, write the following formula instead of the one discussed above.
=#time(Number.IntegerDivide([Decimal Hours],1), Number.Round(([Decimal Hours] – Number.IntegerDivide([Decimal Hours],1)) * 60, 0), 0)
(However, this formula will give an error for 24 or larger decimal hour values. Thus, use this only when your decimal values do not exceed 24 hours.)
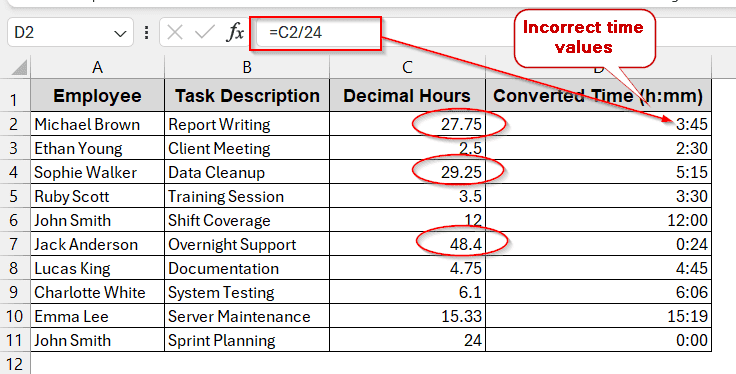
Converting Decimal Values Greater Than 24 to Hours and Minutes
Decimal values greater than 24 are often depicted as the next day. However, while converting to time and minutes, Excel often fails to document these values. Either it gives mistaken values or shows an error. To avoid this, we must use a custom time format.
You can use the time format to [h]: mm:ss to record cumulative decimal time values. You can follow any of the methods and change the formatting to get the actual result.
Steps:
➤ Click on the output cell and write the division formula
=C2/24, where C2 is the cell containing decimal hours.
➤ Drag the cells to generate the same result for all the other rows.
➤ Open the Format Cells window by pressing Ctrl + 1 to avoid the incorrect values
➤ Choose Custom as Category and [h]:mm:ss as Type.
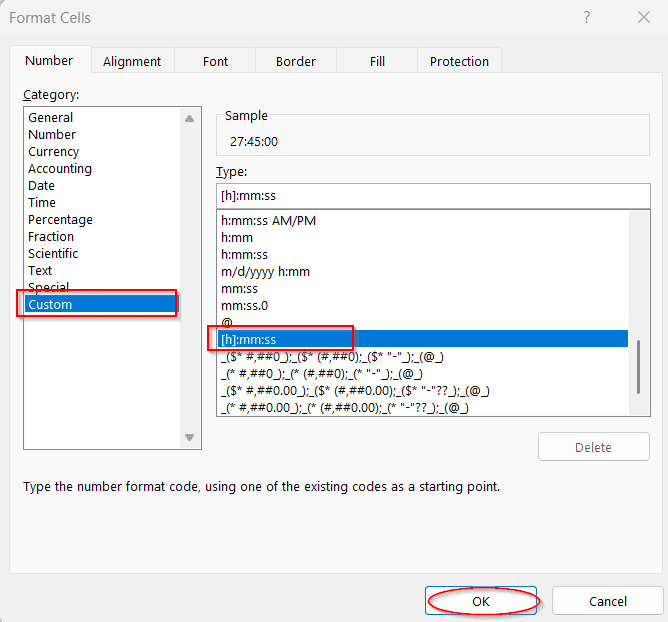
➤ This will change the incorrect values to the correct time values.

Frequently Asked Questions
How to convert time and minutes to decimal in Excel?
To convert time and minutes to decimal in Excel, just multiply the value by 24. It directly stores the value in decimal. For example, if your cell contains 7:45, it will be converted to 7.75.
Can Excel convert a time greater than 24 hours?
Excel can also convert times greater than 24 hours with just formatting time to [h]:mm. This acts as a MOD function, eliminating the negative values.
How to fix ##### error after formatting?
The ##### error occurs due to two reasons: if the width is smaller than the contents, or due to a formatting mistake. To adjust these errors, try to fix the width of the cells or change the format of the cells with appropriate values.
How can I round minutes while converting time and hours?
If you want to convert time to hours and minutes and round it, you can use specific functions. With the generic formula of conversion, use the ROUND, MROUND, FLOOR or CEILING functions. This will round the time to the nearest whole number or according to your requirement.
How do I change decimal time to hours in Excel?
When you want to change the time to only hours, you can just multiply it by 24. Also, there is a specialized function named HOUR only built for this usage. You can use it to ease your calculations even more.
Summing Up
In this article, we tried to give you a clear understanding of how to convert decimal time to hours and minutes in Excel. For this, we covered simple division methods, TEXT functions, and even VBA and Power Query. Going through them step-by-step can excel your Excel journey.