A Data Dictionary in Excel is an essential tool that serves as a centralized reference, providing clear descriptions of each field in a dataset, making it easier for users to understand and manage the dataset.
Although Excel does not offer any built-in tools to create a Data Dictionary, we can use its various functions and formatting options to easily build one.
Follow the steps below to create your very own working Data Dictionary in Excel:
➤ Start by selecting your entire dataset and converting it into a Table.
➤ Next, create a new worksheet and set up necessary column headers for the Data Dictionary.
➤ Link the column headers in the Data Dictionary to the headers of the original dataset.
➤ Then, manually enter clear descriptions, data types, and rules for each field in the Data Dictionary to guide users.
➤ Finally, apply data validation on the main dataset to ensure that only valid entries are allowed.
In this article, we will learn how to create a Data Dictionary in Excel by following five simple steps.
Step-by-Step Guide for Creating a Data Dictionary in Excel
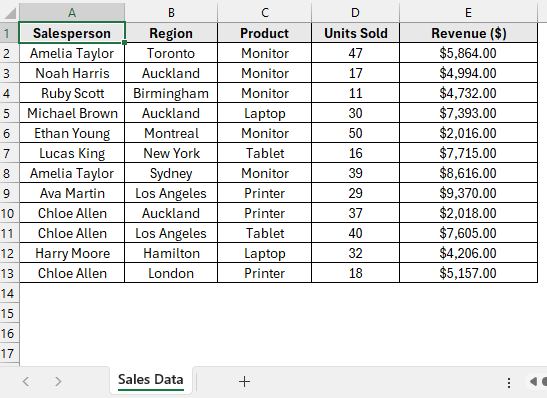
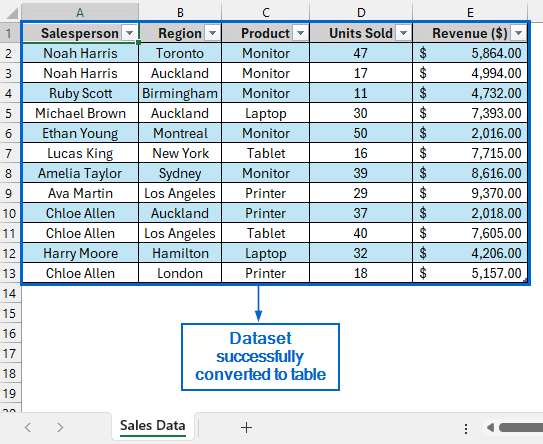
In the sample dataset, we have a worksheet called Sales Data containing information about Salesperson, Region, Product, Units Sold and Revenue generated. We will now construct a Data Dictionary based on this dataset.
Creating a data dictionary in Excel is simple and straightforward if you follow the right steps. Follow the steps below to create your very own fully functional data dictionary in Excel.
Step 1: Convert the Dataset into a Table
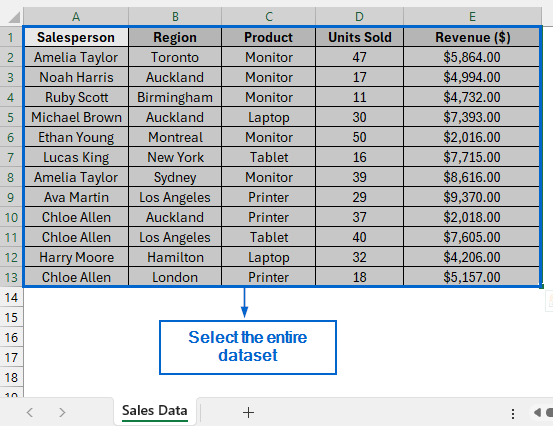
➤ Open the Sales Data worksheet and select the entire dataset by dragging the mouse across all rows and columns.
Note:
Instead of manually selecting the dataset, click any cell within it and press Ctrl + A to select the entire dataset.
➤ Next, head to Insert >> Tables >> Table from the main menu.
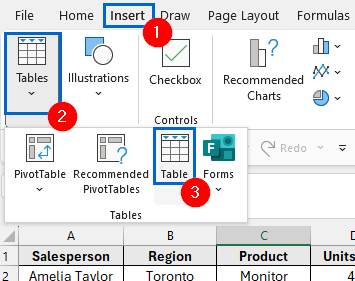
➤ In the Create Table dialogue box, select the My table has headers option and click OK.
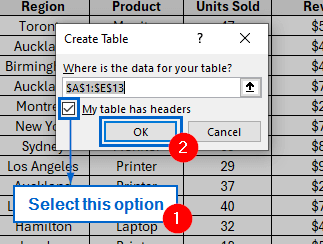
➤ The dataset is now successfully converted into an Excel table.
Instead of manually selecting the dataset, click any cell within it and press Ctrl + A to select the entire dataset.
Step 2: Create a New Worksheet for Data Dictionary
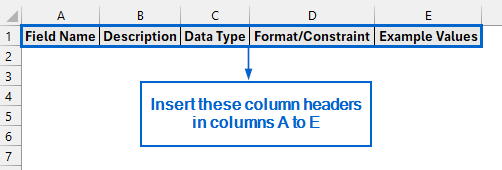
➤ Click the “+” icon at the bottom of the sheet tabs to insert a new worksheet, and rename it to Data Dictionary.

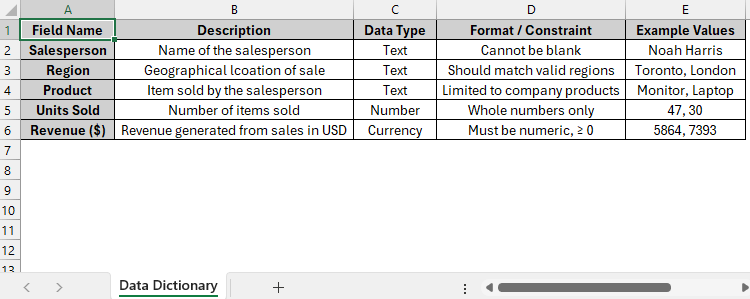
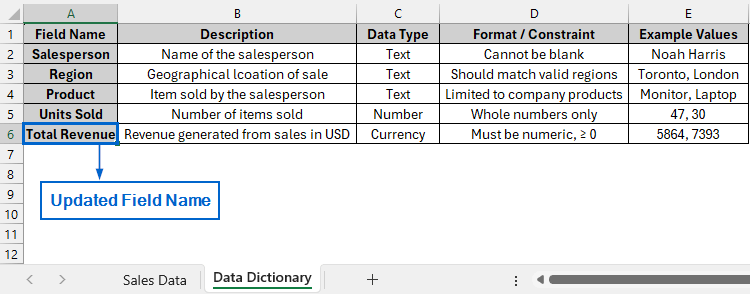
➤ In the new worksheet, create five column headers in columns A to E named Field Name, Description, Data Type, Format/Constraint, and Example Values.
Note:
These columns will serve as the structure of Data Dictionary, providing a clear framework to display each field’s purpose.
Step 3: Link the New Column Headers with the Original Dataset
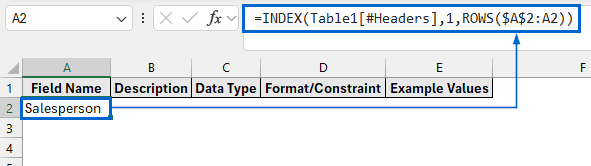
➤ In the Data Dictionary worksheet, select cell A2 and type the following formula:
=INDEX(Table1[#Headers],1,ROWS($A$2:A2))
Breakdown of the Formula:
- Table1[#Headers] refers to all the headers of the table created from the original dataset.
- ROWS($A$2:A2) part counts the number of rows in the range $A$2:A2.
- INDEX(…, 1, …) part retrieves the header of the first row of the table based on column number provided by ROWS($A$2:A2).
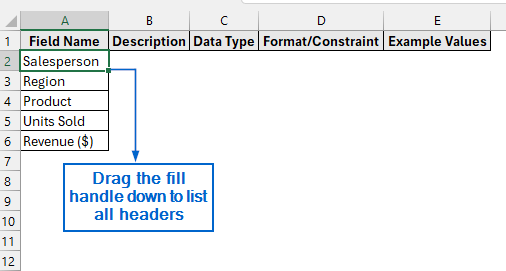
➤ Next, select cell A2 again and drag the fill handle downwards to list all table headers vertically in the Data Dictionary.
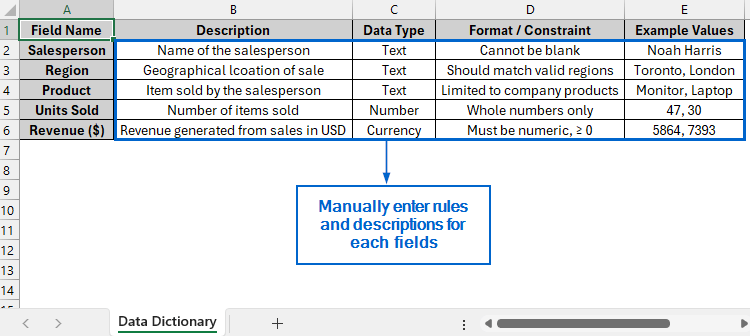
Step 4: Manually Add Description and Rules for Each Field in the Data Dictionary
➤ Open the Data Dictionary worksheet and enter clear descriptions and rules for each field, explaining the meaning and constraints of the corresponding Field Names from the original dataset.
Step 5: Apply Conditional Formatting to Necessary Columns
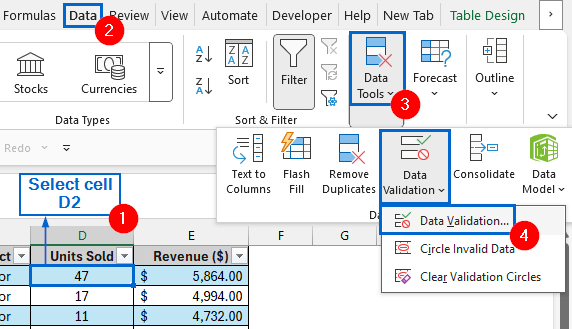
➤ Head to Sales Data worksheet, select cell C2, and got to Data >> Data Tools >> Data Validation from the main menu.
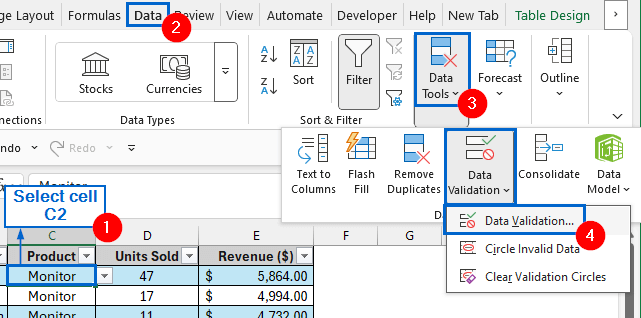
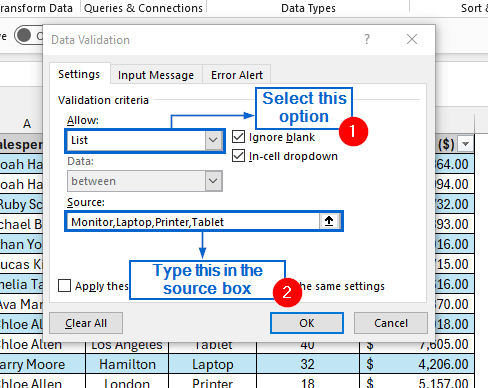
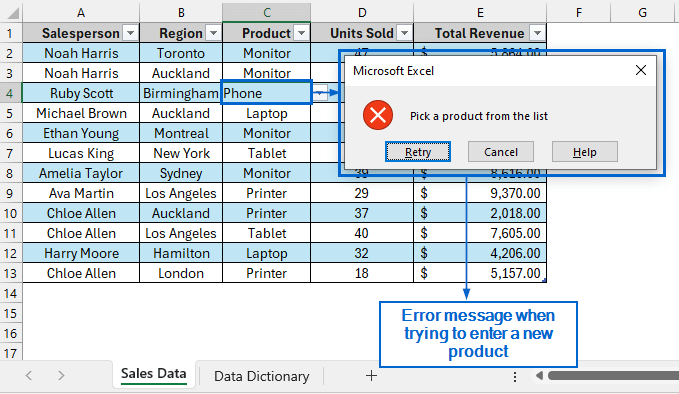
➤ In the Data Validation dialogue box, go to the Settings tab, set Allow to List, and enter “Monitor, Laptop, Printer, Tablet” in the Source box.
Note:
Keep the Ignore blank and In-dell dropdown boxes checked.
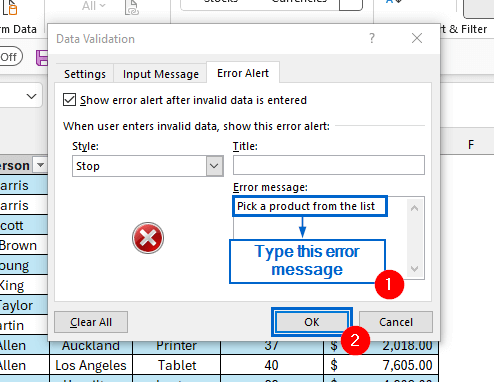
➤ Then, go to the Error Alert tab, set the Error message to “Pick a product from the list”, and click OK.
➤ Next, select cell D2 and again navigate to Data >> Data Tools >> Data Validation.
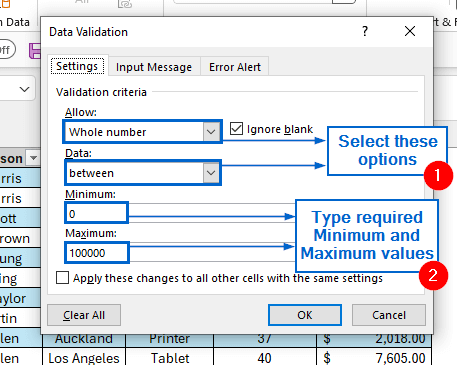
➤ Go to the Settings tab, and under Validation criteria, set Allow to Whole number, Data to between, and enter the desired Minimum and Maximum values.
Note:
Keep the Ignore blank box checked.
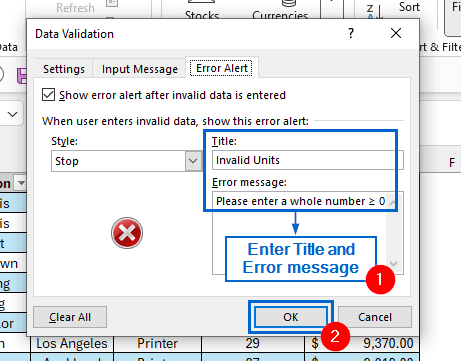
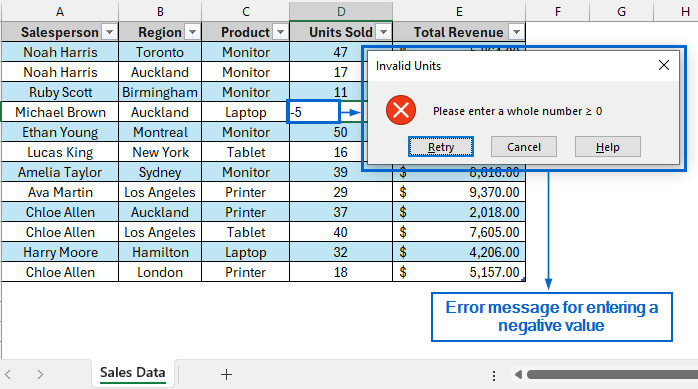
➤ Then, go to the Error Alert tab, set the Title to “Invalid Units”, enter “Please enter a whole number ≥ 0” as the Error message and click OK.
➤ Again go to Data >> Data Tools >> Data Validation after selecting cell E2.
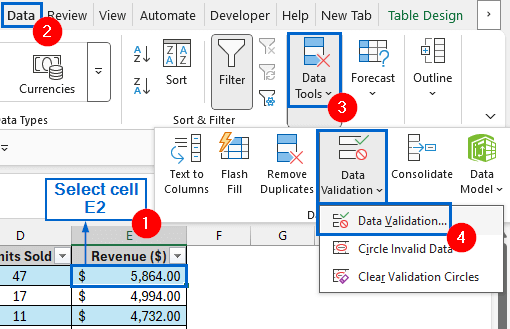
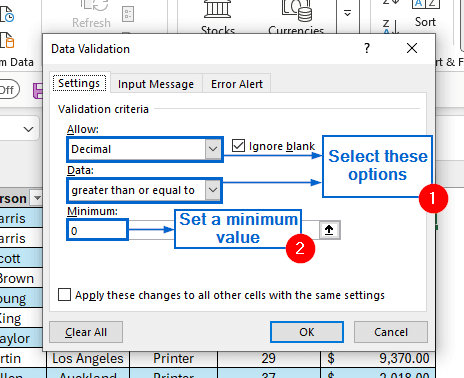
➤ In the Settings tab, under Validation criteria, set Allow to Decimal, Data to greater than or equal to, and Minimum to 0.
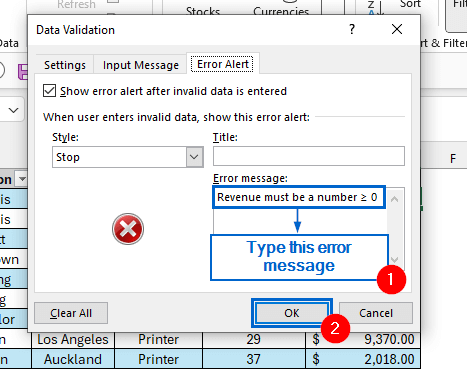
➤ Finally, head to the Error Alert tab, type “Revenue must be a number ≥ 0” as the Error message and click OK.
Step 6 (Optional): Test the Data Dictionary Functionality
➤ Go to the Sales Data worksheet, select cell E1 and rename the Revenue ($) column to Total Revenue.
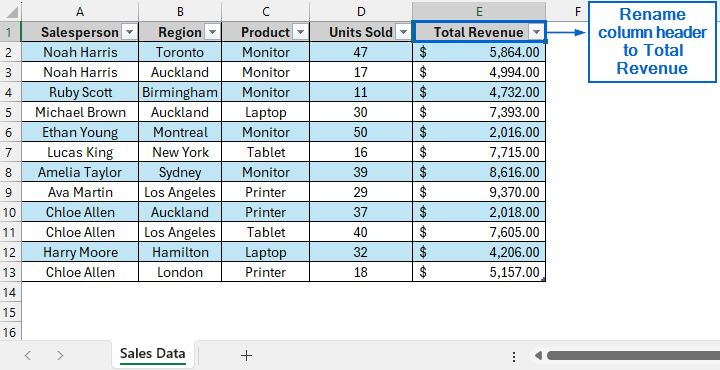
➤ Then, switch to the Data Dictionary worksheet, and you will see that the Field Name column has automatically updated to reflect the change, confirming that the Data Dictionary is functioning correctly.
➤ Again head to the Sales Data worksheet and try renaming a cell in the Product column to a value not included in the dataset. An error message will appear, prompting you to select a product from the predefined list.
➤ You can also try entering negative values in the Units Sold or Revenue columns; an error message will appear, prompting you to enter valid positive numbers.
Frequently Asked Questions
Can I Protect the Data Dictionary to Prevent Users from Editing It?
Yes, you can easily add protection to the Data Dictionary to prevent users from making unwanted changes. Simply go to the Review tab from the main menu, select Protect Sheet, and set a password to secure it.
Does Creating a Data Dictionary Affect Workbook Performance?
For small to medium datasets, the impact of creating a Data Dictionary is minimal. However, for large datasets with multiple formulas, validations, or dynamic links, you may experience slower performance or increased processing time.
Concluding Words
Knowing how to create a Data Dictionary in Excel is essential for organizing your dataset and helping users to easily understand it. In this article, we have discussed how to create a fully functional dataset using five simple steps. Feel free to practice all these steps to build your very own custom Data Dictionary.