
After you scan a code, your barcode scanner should immediately move to the next row for a new entry so that you don’t have to press the Enter key every time. However, some devices and software might not have this auto-enter feature, and they insert all codes in a single line unless you press Enter.
To avoid this and make the scanning process hands-free, you must enable the Auto-Enter (also known as a suffix or carriage return) feature by reprogramming your scanner or changing software settings. If that fails, you can use a VBA macro to make Excel move the selection down to the next cell automatically.
➤ Search for your user manual online using the model name of your barcode scanner. Inside the manual, look for barcodes related to Add Suffix, Add Carriage Return or Add CR, Add Line Feed, Terminator,or Add Enter Key.
➤ Once you locate the section, scan the barcode for it and follow the given instructions to add the Enter Key or Carriage Return feature. You might have to go to the ASCII chart to find the corresponding numbers to scan.
➤ If this doesn’t work, create a custom VBA macro (code given below) and run it to make Excel auto-enter each entry.
In this article, we’ll cover the methods of setting a barcode scanner to auto-enter by reprogramming the scanner, changing software settings, and using VBA coding.
Reprogramming the Scanner with a Barcode
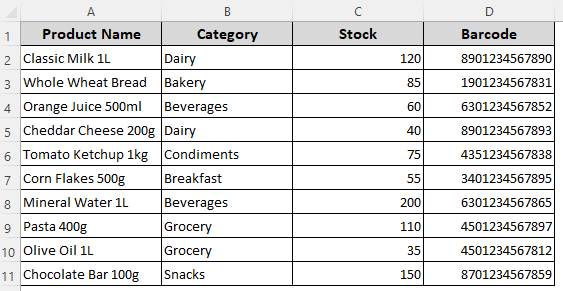
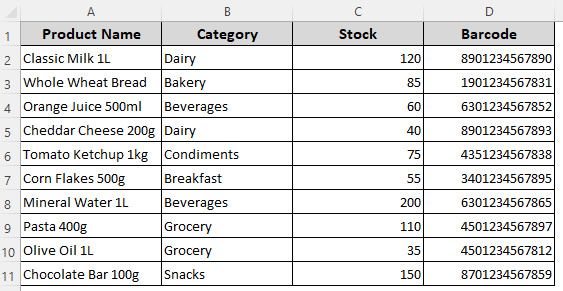
Our sample dataset has columns for Product Name, Category, Stock, and Barcode. We’ll put the scanned barcodes in the Barcode column (Column D).
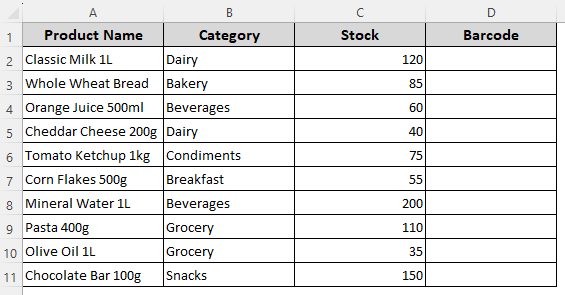
Usually, moving to the next row after each entry is controlled by the scanner’s settings or the software. So, you must configure your device and software first to auto-enter codes.
Almost all modern barcode scanners can be programmed by scanning a sequence of special Configuration Barcodes found in the user manual. Here’s how to use them to enable auto-entering codes:
➤ First, locate the user manual for your specific scanner model (e.g., Honeywell, Symbol, Zebra, Winson, etc.). You can usually find this online by searching for [Your Scanner Model] User Manual PDF.
➤ Open the manual and look for any of the following options:
- Add Suffix or Set Suffix
- Add Carriage Return/Add CR/Add Line Feed
- Terminator
- Add Enter Key
- Add or Enter Key Barcode
➤ Under any of these sections, you’ll find one or multiple Configuration Sequences for scanning. Follow the steps as given in the user manual. You’ll need to scan one or more codes to change the settings and save them.
➤ For example, in this user manual for the Netum Scanner (All Bluetooth Scanner) from its official site, we have a To Add a Prefix or Suffix section under Custom Prefix and Suffix.
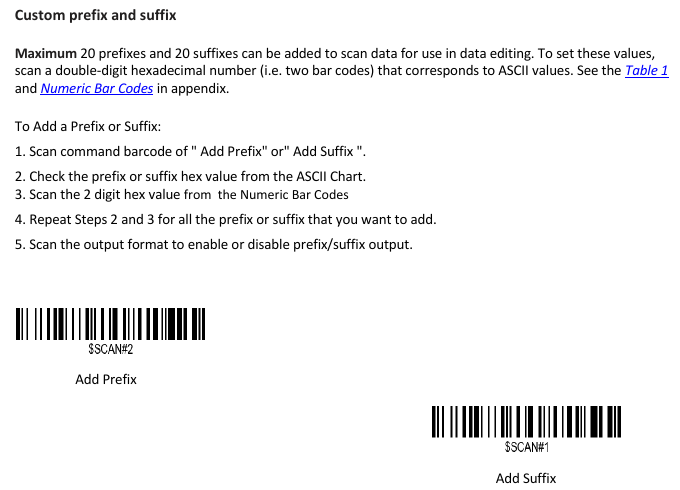
➤ Here, you need to scan the Add Suffix command barcode to get started. After that, refer to the ASCII Chart to get the suffix hex value for the Ctrl key. In this case, the value is 97H.
➤ Now, we’ll scan only the 2-digit hex value (97) from the Numeric Bar Codes Section. For the digits 90, first scan $NO#9 and then scan $NO#7.
➤ Finally, go to the Output Format section and scan the barcode for Enable Suffix Output.
➤ Your scanner’s settings are now changed to auto-enter. Test it on your Excel data and the active cell selection should immediately jump down to the cell below.
➤ Here’s our final data:
Changing Your Barcode Scanning Software’s Settings
Excel add-ins like LoMag or Scan-IT to Office that allows you to use your phone or PC for barcode scanning. If you’re using a scanning software instead of a device, you need to change the software settings to auto enter the codes. Let’s get to the steps:
➤ After connecting the devices, go to the Home tab on Excel and click on Add-ins. Select the scanning software you’re using.
➤ As a task pane opens on the right side of the Excel window, look for a gear icon (⚙) or a button labeled Settings. If you can’t find it, look for Options, Properties, or Configuration.
➤ Enable the necessary options depending on what’s available. You might find options like Move to Next Row After Enter, Select Next Row Automatically, Carriage Return, or Line Feed. Once done, press Save or Ok.
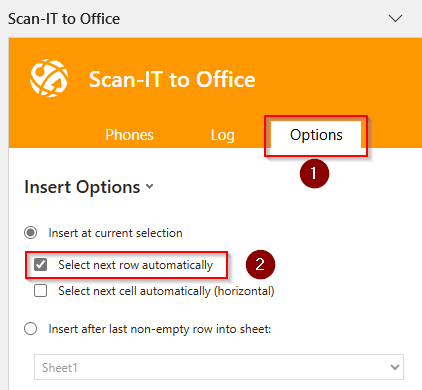
➤ For example, in the Scan-IT to Office software, we clicked on the Options tab.
➤ Scroll down to find the Insert Options section. Under the given options, check the Move to Next Row After Enter box.
➤ Press Ok.
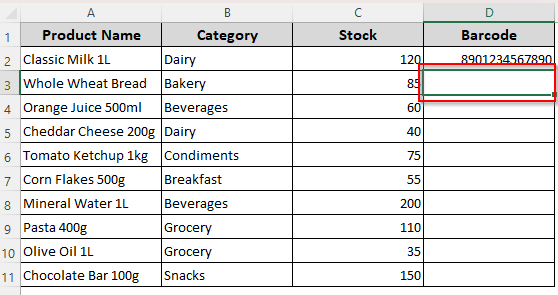
➤ Now, Excel will immediately move to the next row after each entry.
Setting Up Default Key Movement for Excel
The default behavior for Excel is to move down as you press the Enter key. If all your scanner or software configurations are set correctly, you can reset the settings in Excel to enable auto-enter. Here’s how:
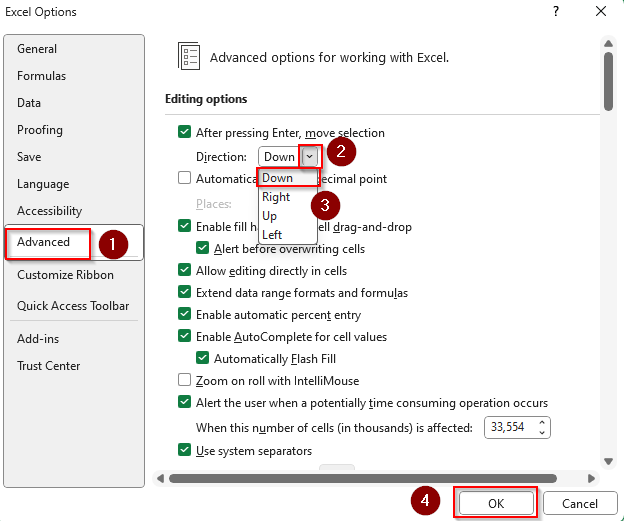
➤ Go to the File tab and click on Options.
➤ In the Excel Options box, click on Advanced and locate the Editing Options group.
➤ Check the After Pressing Enter, Move Selection box and click on the Direction drop-down. Choose Down from the menu and press Ok.
Customized VBA Macro to Make Excel Auto-Enter Barcodes
In case none of the above-mentioned methods work, you can use a customized VBA macro to make Excel move down automatically once a cell is filled. For this, follow these steps:
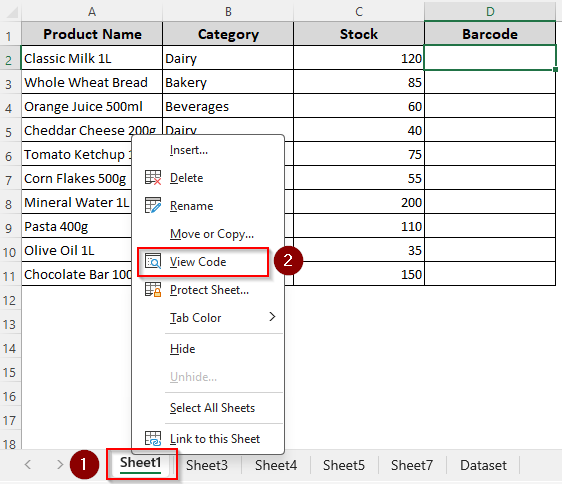
➤ Right-click on your sheet name and select View Code from the menu. As this code is specific for a worksheet module and not a standard module, make sure you only follow this method instead of pressing a shortcut key (ALT + F11) or using the Visual Basic >> Insert >> Module button.
➤ In the module box, paste the following code:
' -------------------------
' Paste this into the Sheet module (e.g. Sheet1)
' -------------------------
Private targetRange As Range  ' stores user-selected range
Private Sub Worksheet_Change(ByVal Target As Range)
On Error GoTo SafeExit
' If no range has been set yet, ask user to select one
If targetRange Is Nothing Then
On Error Resume Next
Dim userSel As Range
Set userSel = Application.InputBox( _
Prompt:="Select the range or column where auto move should apply:", _
Title:="Set Target Range", Type:=8)
On Error GoTo SafeExit
If userSel Is Nothing Then GoTo SafeExit
Set targetRange = userSel
MsgBox "Auto move-down will apply to: " & targetRange.Address, vbInformation
End If
' Ignore when nothing changed
If Target Is Nothing Then GoTo SafeExit
' Only care about changes inside the selected range
Dim rngD As Range
Set rngD = Intersect(Target, targetRange)
If rngD Is Nothing Then GoTo SafeExit
' Skip if sheet protected
If Me.ProtectContents Then GoTo SafeExit
Application.EnableEvents = False
' Move selection to the next row below the last changed cell
Dim bottomCell As Range
Set bottomCell = rngD.Cells(rngD.Cells.Count)
bottomCell.Offset(1, 0).Select
SafeExit:
Application.EnableEvents = True
End Sub
Sub MoveToNextRow()
' Not used, but kept for compatibility if needed later
End Sub
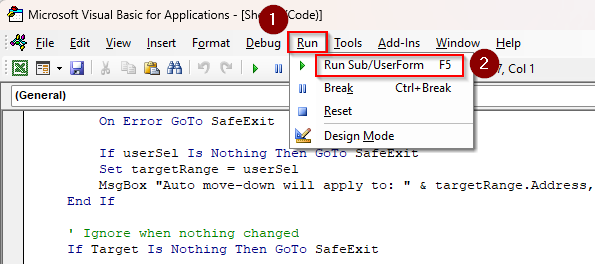
➤ Press F5 or click on the Run tab >> Run Sub/UserForm.
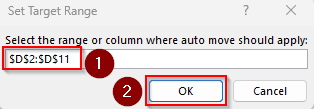
➤ Now edit a cell or scan a barcode. The first time you edit any cell on that sheet, it pops up an InputBox asking you to select a range or column. Enter the range where you’ll put the codes.
➤ As we’ll put our barcodes in Column D, we entered the range D2:D11. Press Ok once done. in the
➤ From now on, Excel will detect new input and move the cursor to the next cell.
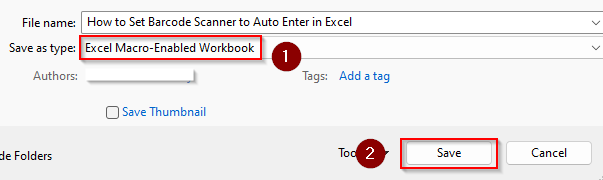
➤ Make sure you save the file as an Excel Macro-Enabled Workbook to save the changes and reuse the macro.
Downloadable Resources
Get our practice workbook or necessary files that we have worked with to prepare this article.
Setting Barcode Scanner to Auto-Enter.xlsx
Frequently Asked Questions
How to enter the new barcode into the cell on the right in Excel?
Configure your barcode scanner to add a Tab key instead of Enter (scan the Add Tab Key or Add Suffix barcode from the manual). Or, go to the File tab >> Options >> Excel Options dialog box >> Advanced >> Editing Options group >> Direction drop-down >> Right >> Ok. This moves the cursor to the next cell on the right after each scan.
How to create a barcode in Excel?
To create a barcode, use the following formula:
=CODE128(A2)
Instead of A2, enter the first cell reference where you want the code. Press Enter and drag the formula down to generate more code for the next rows. Or, install a barcode font (e.g., Code 128 or Code 39) and type your product codes, select the cells, and change the font to the barcode font to display them as scannable barcodes.
How to automatically fill item names after scanning a barcode?
First, create a reference table that contains the barcodes (Column A), products (Column B), and other details in a new sheet. Name the sheet ProductList or something else you prefer. In a new sheet, scan the codes in Column A, starting from cell A2. If you want to automatically return the product name for that barcode, enter this formula in an empty cell:
=VLOOKUP(A2, ProductList!$A$2:$D$10, 2, FALSE)
Replace A2 with the cell containing the barcode, ProductList!$A$2:$D$10 with the sheet name and its range, and 2 with the column number containing the product names. Press Enter and drag down if needed.
Concluding Words
If Excel enters all your scanned codes in one cell instead of moving to the next cell, it’s more likely to be related to the scanner configuration or software setting. You need to refer to your scanner’s user manual to fix the problem. However, if you want to make the change using Excel, the only way is to use a VBA macro.