When working with Excel, sometimes a single validation rule is not enough to ensure data quality. You may want to apply multiple custom criteria to control what users can enter in a cell. For example, you might require a number to be both greater than 10 and less than 100, or text to meet several conditions simultaneously.
In this article, you’ll learn how to enforce multiple validation rules in Excel using logical formulas and other smart techniques. From combining AND/OR logic to requiring unique or date-based entries, these methods improve input accuracy and simplify data control.
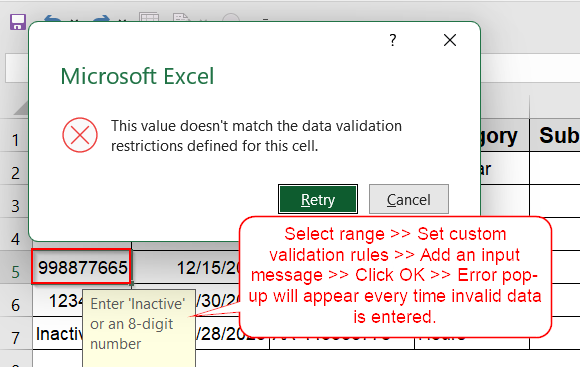
Steps to apply custom multiple criteria in Excel:
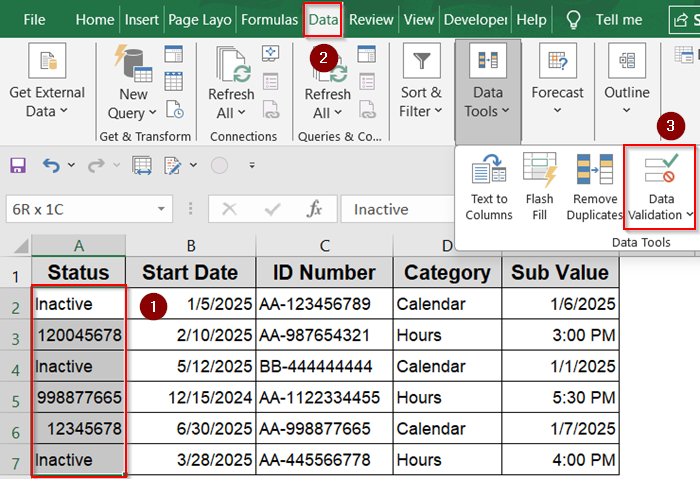
➤ Select your range such as A2:A7.
➤ Go to Data tab >> Data Validation under Data Tools.
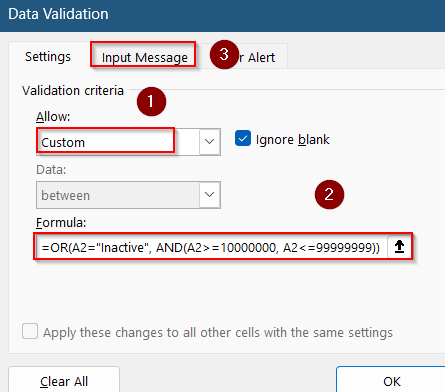
➤ Under the Settings tab, set Allow to Custom.
➤ In the Formula box, enter:
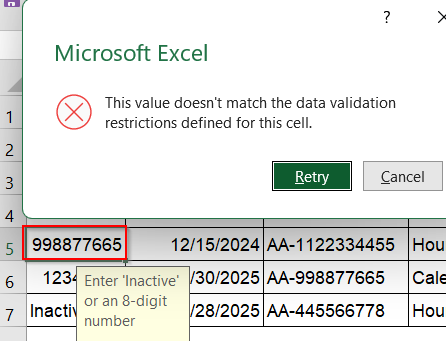
=OR(A2=”Inactive”, AND(A2>=10000000, A2<=99999999))
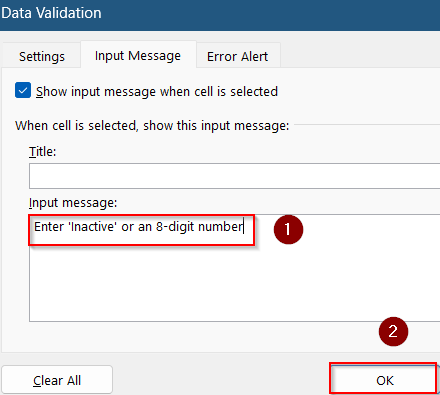
➤ Optionally, add an input message like “Enter ‘Inactive’ or an 8-digit number“.
➤ Click OK.
Create Custom Criteria Using AND/OR
Use this when a cell must meet one of multiple conditions, such as being either a specific text like “Inactive” or a number within a certain range. This method is ideal for status columns where both text and number-based inputs are allowed.
Steps:
➤ Select cells A2:A7.
➤ Go to Data tab >> Data Validation under Data Tools.
➤ Under the Settings tab, set Allow to Custom.
➤ In the Formula box, enter:
=OR(A2=”Inactive”, AND(A2>=10000000, A2<=99999999))
➤ Optionally, add an input message like “Enter ‘Inactive’ or an 8-digit number“.
➤ Click OK.
This rule ensures only “Inactive” or a number between 10,000,000 and 99,999,999 is allowed. Otherwise, Excel restricts user input with an error pop-up.
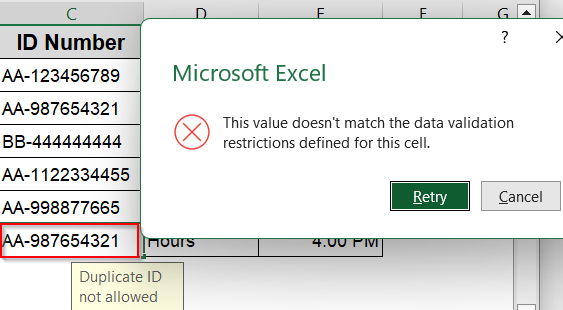
Enforce Uniqueness Using COUNTIF
When you want to prevent duplicate values such as employee or record IDs, this method enforces uniqueness within the selected range.
Steps:
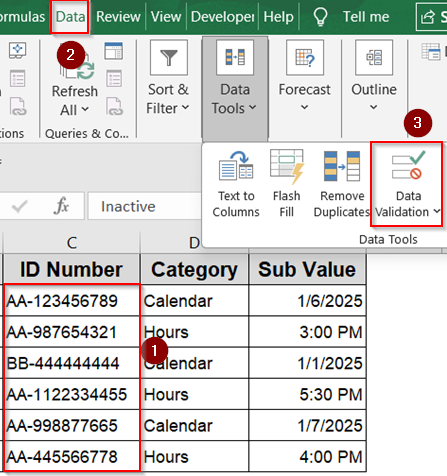
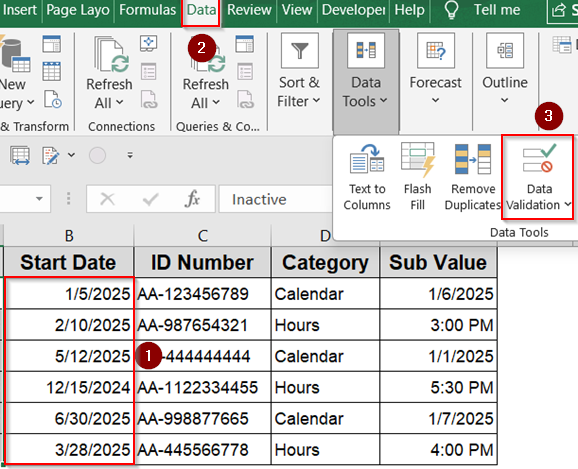
➤ Select range C2:C7.
➤ Go to Data tab >> Data Validation under Data Tools.
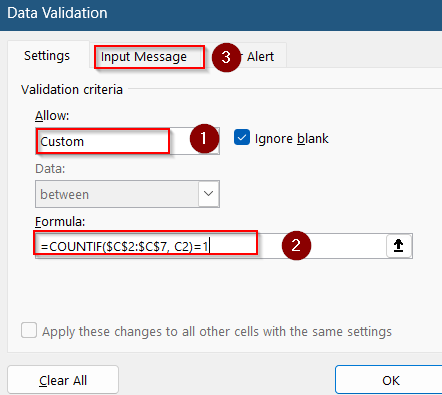
➤ Under the Settings tab, set Allow to Custom.
➤ In the Formula box, enter:
=COUNTIF($C$2:$C$7, C2)=1
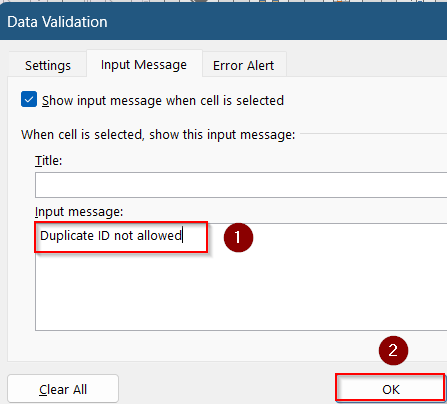
➤ Add an error message like “Duplicate ID not allowed“.
➤ Click OK.
Only unique IDs will be accepted in this column now. Similar entries will be blocked with an error pop-up window.
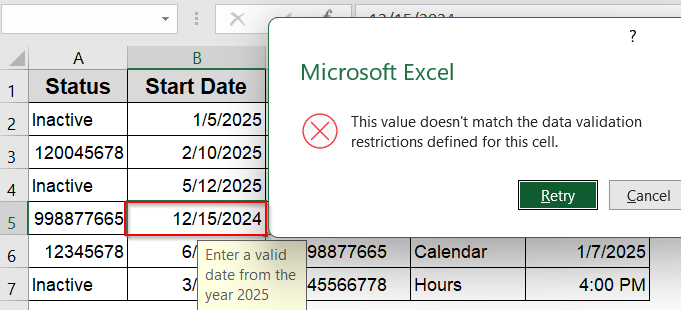
Apply Date Validations Within a Specific Range
Use this rule when you want to ensure only dates from a defined period such as during a project cycle or fiscal year. It helps limit user input to realistic or expected timelines.
Steps:
➤ Select range B2:B7.
➤ Go to Data tab >> Data Validation under Data Tools.
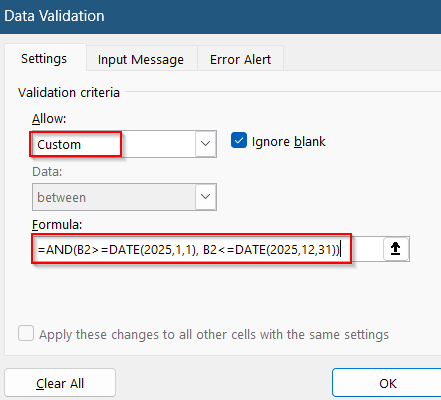
➤ Under the Settings tab, set Allow to Custom.
➤ Use this formula to limit values to the year 2025:
=AND(B2>=DATE(2025,1,1), B2<=DATE(2025,12,31))
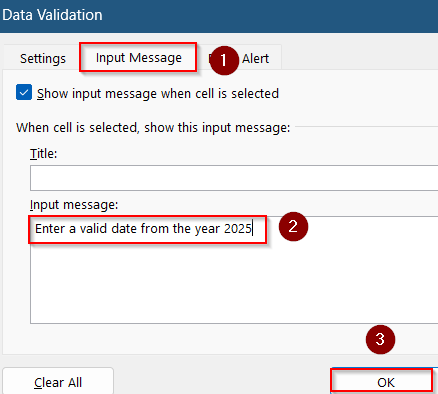
➤ Optionally include a message: “Enter a valid date from the year 2025“.
➤ Click OK.
This ensures only valid 2025 dates are accepted in the Start Date column. Entries from any other year become restricted with an error pop-up dialog.
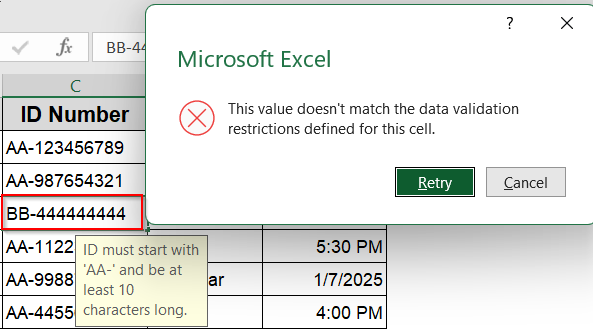
Build Rules with Prefix and Length Requirements
For ID formats that must start with a specific prefix and meet a minimum character count, this formula ensures formatting consistency while allowing flexibility with the rest of the input.
Steps:
➤ Select C2:C7.
➤ Go to Data tab >> Data Validation under Data Tools.

➤ Under the Settings tab, set Allow to Custom.
➤ In the Formula box, enter:
=AND(LEFT(C2,3)=”AA-“, LEN(C2)>9)
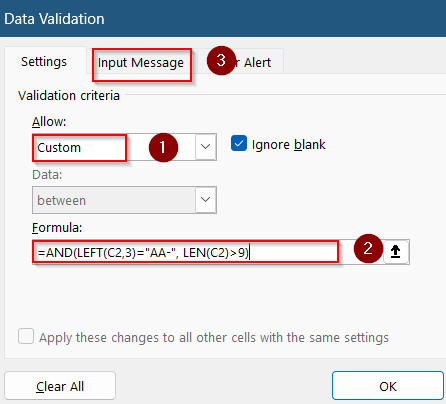
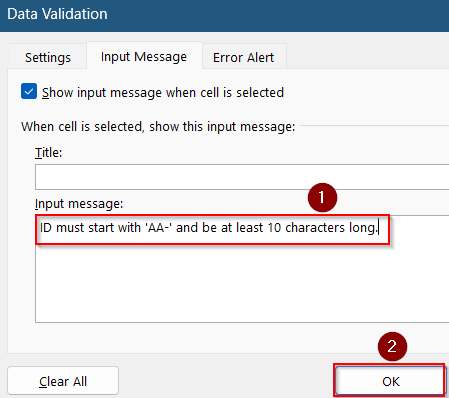
➤ Optionally include a message: “ID must start with ‘AA-‘ and be at least 10 characters long.”
➤ Click OK.
This enforces structure across the ID column. Non-matching entries are blocked with an error pop-up.
Set Up Dynamic Time and Date Validation Relative to Today
If you want to limit entries to dates within the next week based on the current date, this approach lets the rule stay up-to-date without manual changes to the validation range.
Steps:
➤ Select B2:B7.
➤ Go to Data tab >> Data Validation under Data Tools.

➤ Under the Settings tab, set Allow to Custom.
➤ Enter this formula:
=AND(B2>=TODAY(), B2<=TODAY()+6)
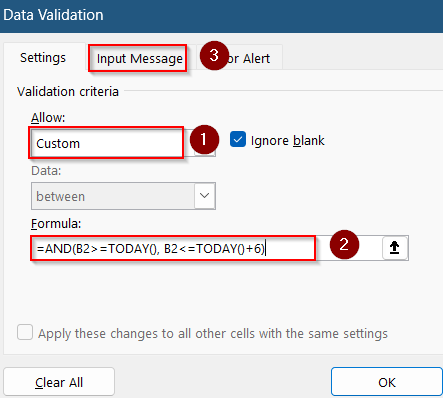
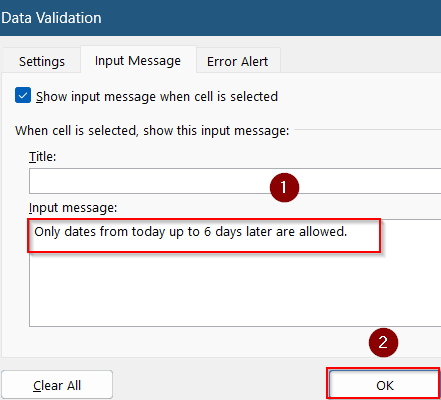
➤ Add message: “Only dates from today up to 6 days later are allowed.”
➤ Click OK.
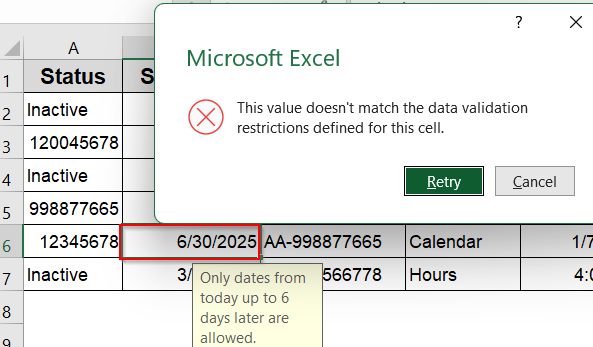
If a user enters a date outside this 7-day window, Excel will immediately display a validation error.
Combine Nested AND/OR Logic for Hybrid Criteria
Sometimes a range of values is allowed plus a specific outlier (like a fixed number or text). Nesting AND and OR functions gives you maximum flexibility in defining such compound rules.
Steps:
➤ Select the range you want to apply the rule to, such as E2:E7.
➤ Go to Data tab >> Data Validation under Data Tools.
➤ Under the Settings tab, set Allow to Custom.
➤ Enter the formula:
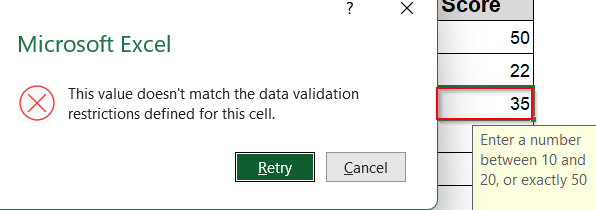
=OR(AND(C2>=10, C2<=20), C2=50)

➤ Add an input message like “Enter a number between 10 and 20, or exactly 50”. Click OK.

This formula will allow any number from 10 to 20, or exactly 50 which is useful for numeric thresholds with exceptions. If we insert an entry like 35, it will result in an error.
Validate Input Based on Named Range or Dynamic List
Excel doesn’t support multiple validations per cell but you can simulate this using a formula that checks if a value exists in a named list. This allows you to centrally manage your valid entries and keep validation dynamic.
Steps:
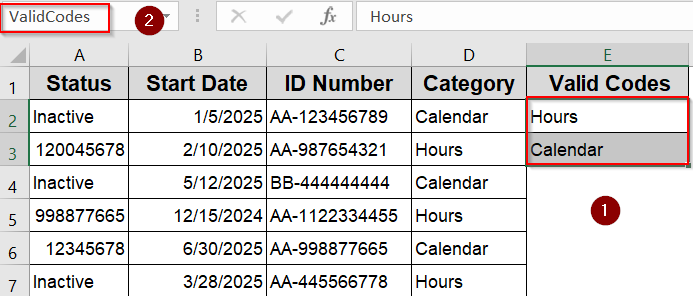
➤ Select your list of valid values (e.g., E2:E3) and name it ValidCodes inside the name box next to the formula bar.
➤ Now select the cells where you want to validate (e.g., D2:D7).
➤ Go to Data tab >> Data Validation under Data Tools.
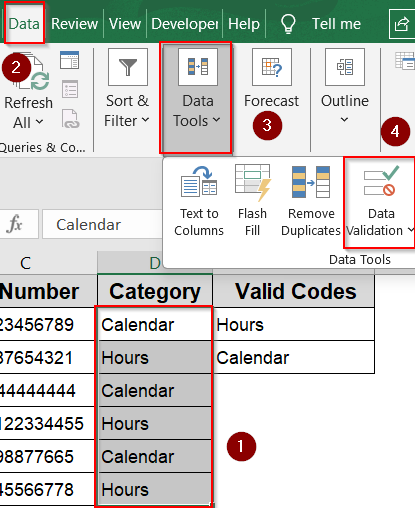
➤ Under the Settings tab, set Allow to Custom.
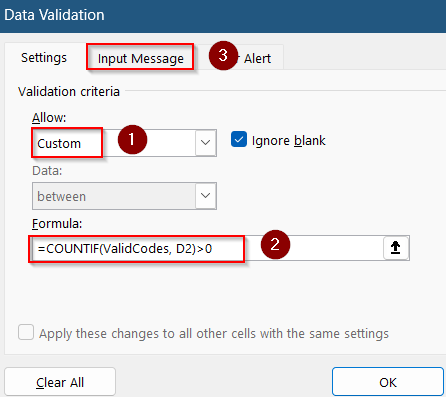
➤ Use the formula:
=COUNTIF(ValidCodes, D2)>0
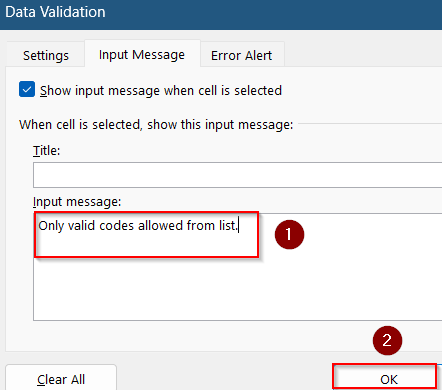
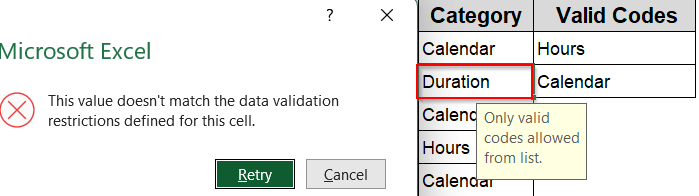
➤ Add an input message like “Only valid codes allowed from list.”
➤ Click OK.
Now only values that match an entry in the ValidCodes list are allowed. Anything outside will show an error pop-up in column D such as Duration.
Frequently Asked Questions
Can I use data from another range in custom validation?
Yes. Use functions like INDIRECT, COUNTIF, or named ranges in your formula to validate against values from other cells or external lists.
Why is my custom data validation formula not working?
Ensure your formula starts with the active cell reference, not a fixed one. Also, double-check for syntax errors and make sure referenced ranges are correct.
Can I apply different validation rules based on another cell’s value?
Yes, use an IF formula within Data Validation to apply different rules conditionally, depending on the value of another related cell.
Can I use text and numeric conditions simultaneously?
Yes. Using AND and OR, you can combine text checks (ISTEXT, comparison with strings) with numeric conditions (ISNUMBER, greater/less than) in one formula.
What happens if I reference a cell outside the validation range in my formula?
Your formula can reference any cell, but make sure relative/absolute references are correctly set to avoid errors when applied to multiple cells.
Wrapping Up
In this tutorial, we learned how to create powerful Excel Data Validation rules using multiple custom criteria. From combining AND/OR logic to validating against dates, ranges, or external lists, each method ensures better control and consistency in your spreadsheets. Feel free to mix and adapt these techniques based on your dataset’s needs, and experiment with new formulas to take your data quality a step further.