When working with Excel reports or imported data, column widths often need adjusting to make your sheets look clean and readable. Whether you want to set a fixed width, apply formatting across multiple columns, or automatically fit content, VBA gives you precise control.
In this article, you’ll learn three practical VBA methods to change column widths in Excel. Each method is tied to a real-world scenario, from formatting single or multiple columns to auto-fitting dynamic data, so you can apply the right solution for your use case.
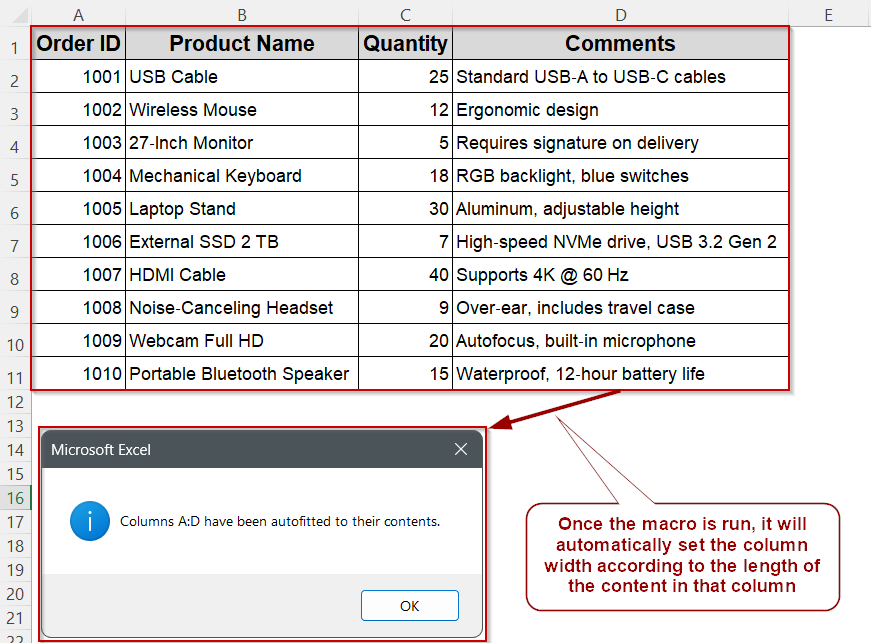
Steps to automatically adjust column width based on content using VBA:
➤ Press Alt + F11 , go to Insert >> Module, and paste the code below:
Sub AutoFit_Columns()
    Dim ws As Worksheet
    Dim targetRange As String
    Set ws = ThisWorkbook.Sheets("Sheet1")   ' Change sheet name if needed
    targetRange = "A:D"                      ' Columns to AutoFit
    ws.Columns(targetRange).AutoFit
    MsgBox "Columns " & targetRange & " have been autofitted to their contents.", _
           vbInformation
End Sub
➤ The macro defines which columns to resize using the targetRange variable.
➤ It applies Excel’s AutoFit feature to adjust each column’s width to match its longest cell entry.
➤ This ensures all text is fully visible while eliminating excess white space.
➤ After resizing, a message box confirms that the columns were successfully adjusted.
➤ To execute: go back to Excel, press Alt + F8 , choose AutoFit_Columns, and click Run.
Change the Width of a Single Column Using VBA
In some Excel tasks, you may want to adjust the width of one column to improve visibility or ensure consistency. For instance, if your Order ID column always has short fixed-length entries, manually resizing it can be repetitive. With a VBA macro, you can instantly set the column width to a specific value.
In this example, we will work with a dataset on Sheet1 that includes columns Order ID, Product Name, Quantity, and Comments. The macro will set the width of Column A (Order ID) to a fixed size of 15 character units.
Steps:
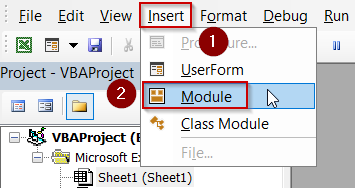
➤ Press Alt + F11 , choose Insert >> Module.
➤ Paste this code:
Sub SetColumnWidth_Single()
    Dim ws As Worksheet
    Dim targetCol As String
    Dim newWidth As Double
    Set ws = ThisWorkbook.Sheets("Sheet1")  ' Change sheet name if needed
    targetCol = "A"                         ' Column to resize (Order ID)
    newWidth = 15                           ' Width in character units
    ws.Columns(targetCol).ColumnWidth = newWidth
    MsgBox "Column " & targetCol & " width set to " & newWidth & " characters.", _
           vbInformation
End Sub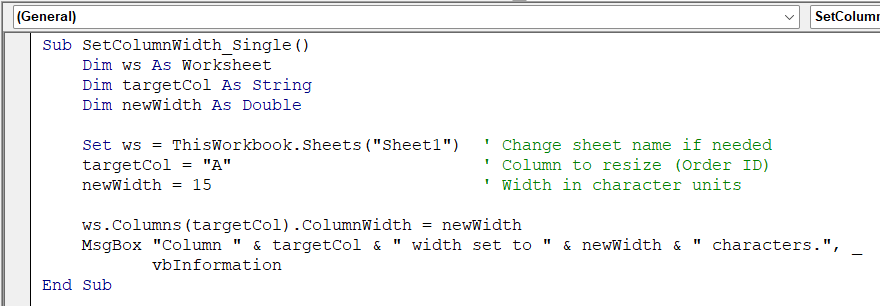
➧ newWidth = 15 defines the exact width in character units.
➧ ws.Columns(targetCol).ColumnWidth = newWidth applies the width to the entire column on Sheet1.
➧ A message box confirms the adjustment and displays the final width.
➤ Return to Excel, press Alt + F8 . Select SetColumnWidth_Single and click Run.
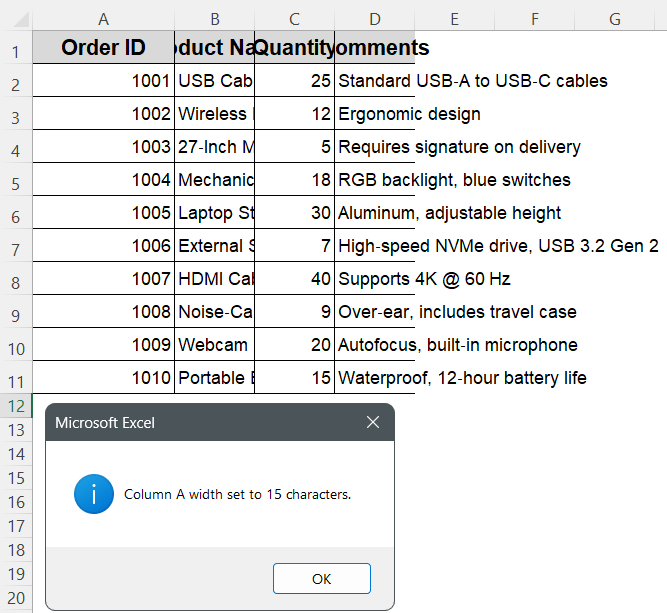
➤ Column A will now have a fixed width of 15 characters, keeping all Order IDs neatly aligned.
Set Matching Widths for Multiple Columns with VBA
When several columns hold similar data, giving them the same width creates a clean, balanced look. Instead of dragging each column border, you can use one macro to resize all selected columns at once.
For this example, our dataset on Sheet1 includes Product Name (column B) and Comments (column D), which we’ll set to a uniform width along with Quantity (column C). The macro below changes columns B to D to 25 characters each.
Steps:
➤ Press Alt + F11 , choose Insert >> Module and paste this code:
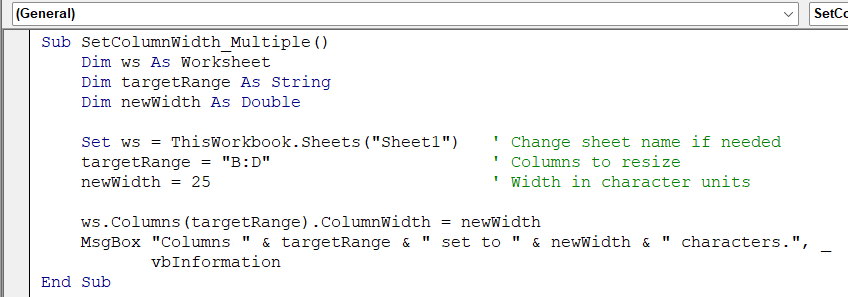
Sub SetColumnWidth_Multiple()
    Dim ws As Worksheet
    Dim targetRange As String
    Dim newWidth As Double
    Set ws = ThisWorkbook.Sheets("Sheet1")   ' Change sheet name if needed
    targetRange = "B:D"                      ' Columns to resize
    newWidth = 25                            ' Width in character units
    ws.Columns(targetRange).ColumnWidth = newWidth
    MsgBox "Columns " & targetRange & " set to " & newWidth & " characters.", _
           vbInformation
End Sub
➧ newWidth = 25 defines the fixed width in character units for each of those columns.
➧ ws.Columns(targetRange).ColumnWidth = newWidth applies the width to all specified columns at once.
➧ A message box confirms which columns were resized and to what width.
➤ Return to Excel, press Alt + F8 .
➤ Select SetColumnWidth_Multiple and click Run.
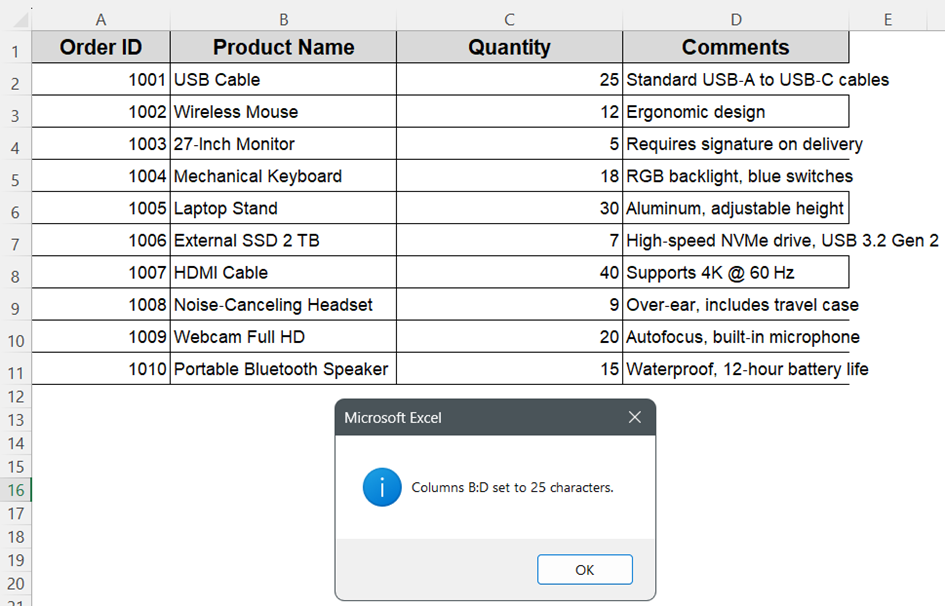
➤ Columns B to D will now share a uniform width of 25 characters, giving your sheet a neat, consistent layout.
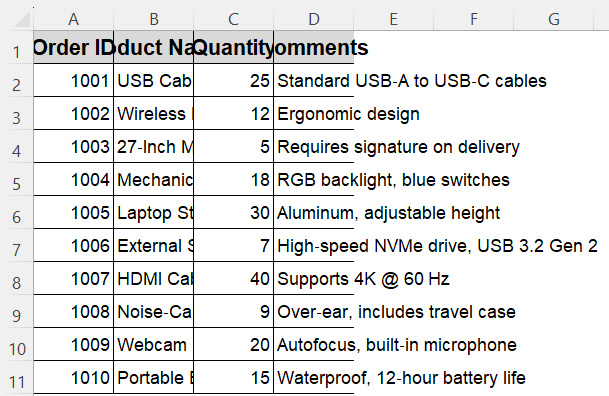
Automatically Fit Column Width to Content with VBA
Data that changes frequently can leave columns either too narrow to show all text or unnecessarily wide. VBA can apply Excel’s AutoFit feature to resize selected columns so every value is fully visible without manual adjustments.
In this example, our sample dataset on Sheet1 occupies columns A to D. The macro below automatically fits each of these columns to the widest entry it contains.
Steps:
➤ Press Alt + F11 , choose Insert >> Module and paste this code:
Sub AutoFit_Columns()
    Dim ws As Worksheet
    Dim targetRange As String
    Set ws = ThisWorkbook.Sheets("Sheet1")   ' Change sheet name if needed
    targetRange = "A:D"                      ' Columns to AutoFit
    ws.Columns(targetRange).AutoFit
    MsgBox "Columns " & targetRange & " have been autofitted to their contents.", _
           vbInformation
End Sub
➧ ws.Columns(targetRange).AutoFit resizes each column so its width matches the longest cell entry in that column.
➧ A message box confirms completion and lists the columns that were adjusted.
➤ Return to Excel, press Alt + F8 and select AutoFit_Columns and click Run.

➤ Columns A through D will automatically adjust to fit their contents, eliminating hidden text and wasted space.
Frequently Asked Questions
What does the value for .ColumnWidth represent in VBA?
The ColumnWidth property measures width in units based on the width of the “0” character in the workbook’s default font. For example, a width of 8.43 equals 64 pixels
How do I auto-adjust column width to fit contents in VBA?
Use the .AutoFit method. For example, Columns(“A:D”).AutoFit resizes each column to match the widest cell in that column.
Can I apply both fixed and automatic resizing in one macro?
Yes. First apply .AutoFit on your target columns, then use .ColumnWidth = X to cap widths if they exceed a maximum acceptable size.
Why is .AutoFit sometimes making columns too wide?
Columns can expand unsafely if a single cell has extremely long content. Solution: apply .AutoFit, then loop back to set a maximum width threshold.
Wrapping Up
Adjusting column widths using VBA can simplify your Excel workflows, especially when dealing with reports, dynamic data imports, or formatted printouts. Whether you’re setting fixed widths, adjusting multiple columns at once, or using AutoFit to resize based on content, these VBA techniques give you precision and control far beyond manual formatting. Use them as-is or tweak them for your specific tasks, and you’ll save both time and effort while keeping your spreadsheets clean and professional.