Working with dates in Excel can sometimes be tricky, especially when you need to extract parts like the day, month, year or extract a whole date from time and text into separate cells for analysis or formatting. Since Excel stores dates as serial numbers, simply copying and pasting won’t work. However, Excel offers multiple formulas and tools to separate date components easily.
In this article, you’ll learn step-by-step how to extract and format dates using built-in functions like DAY, MONTH, YEAR, TEXT, and other flexible date-handling techniques that work in Excel 2013, 2016, 2019, 2021, and Microsoft Office 365.
Steps to separate date in Excel using formula:
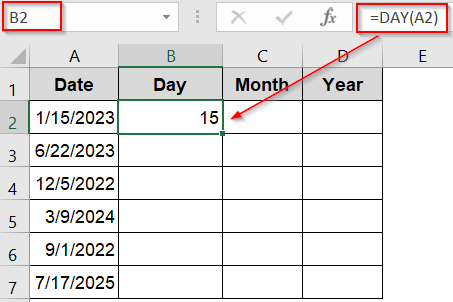
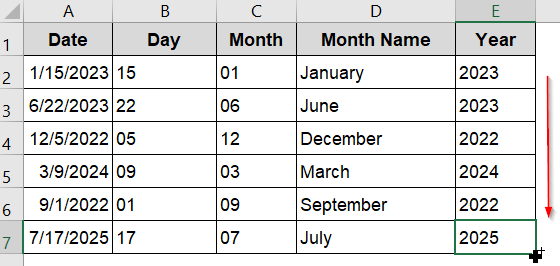
➤ Suppose your dates start in cell A2. In cell B2, type the formula to extract the day: =DAY(A2)
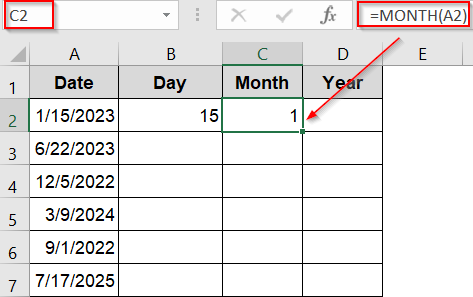
➤ In cell C2, extract the month: =MONTH(A2)
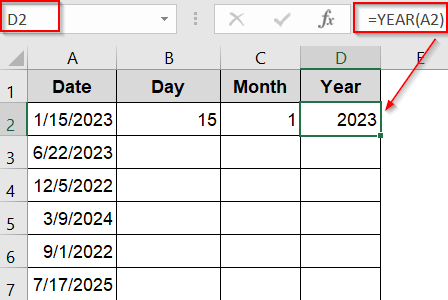
➤ In cell D2, extract the year: =YEAR(A2)
➤ Drag the formulas down using the AutoFill handle to apply them to the rest of your dataset.

Use DAY, MONTH, and YEAR Functions to Extract Date Parts
Use Excel’s built-in DAY, MONTH, and YEAR functions when you want to isolate parts of a date into separate columns. These are especially helpful for sorting, filtering, or grouping records chronologically.
Steps:
➤ Suppose your dates start in cell A2. In cell B2, type the formula to extract the day:
=DAY(A2)
➤ In cell C2, extract the month:
=MONTH(A2)
➤ In cell D2, extract the year:
=YEAR(A2)
➤ Drag the formulas down using the AutoFill handle to apply them to the rest of your dataset.
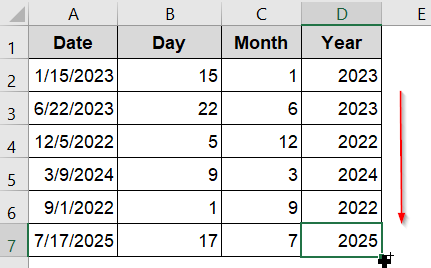
Now Excel will display the day, month, and year as separate numbers.
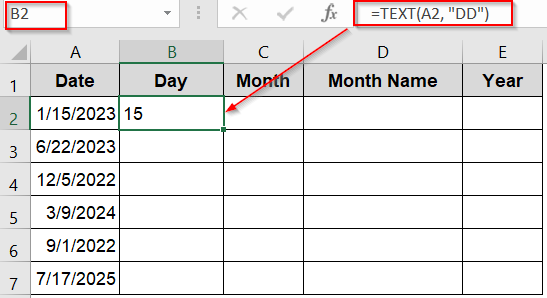
Format Date Parts as Text Using the TEXT Function
The TEXT function is ideal when you want to display date components with leading zeros, show full month names, or use text formatting for reports or exports. Use the TEXTSPLIT function if you have access to Microsoft Office 365.
Steps:
➤ For the day (with leading zero if needed), use formula in B2 cell:
=TEXT(A2, “DD”)
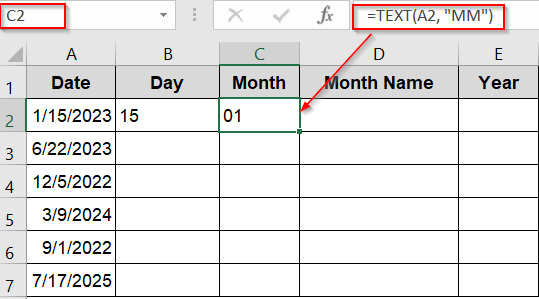
➤ For month number with leading zero, use formula in C2 cell:
=TEXT(A2, “MM”)
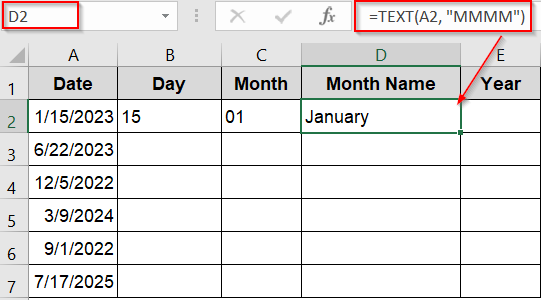
➤ For full month name (e.g., January), use formula in D2 cell:
=TEXT(A2, “MMMM”)
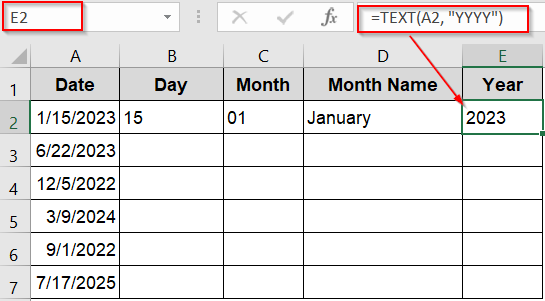
➤ For the year (4 digits), use formula in E2 cell:
=TEXT(A2, “YYYY”)
➤ Apply the formulas down the column for multiple rows using the AutoFill handle.
➤ Alternatively, use the TEXTSPLIT function in A2 cell if you have Excel 365:
=TEXTSPLIT(TEXT(A2, “dd-mm-yyyy”), “-“)
➤ Drag down from B2 to the rest of the cells.
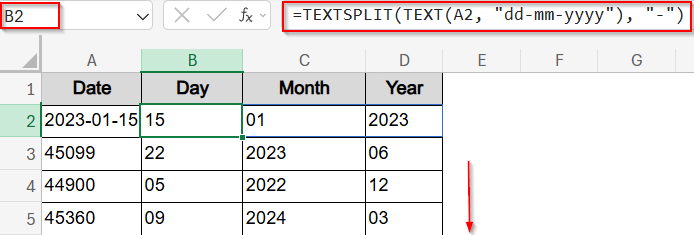
This formula also works wonderfully for dates formatted as text format and spills automatically.
Extract Only the Date from a Date-Time Values
If your cells contain both date and time, Excel allows you to strip out the time portion using simple formulas. This is useful when you’re only interested in the date, not the timestamp.
We’ll use different functions like INT, TRUNC, ROUNDDOWN, etc to pull out only dates from the date-time cell. Let’s see now how each of the functions does the job here.
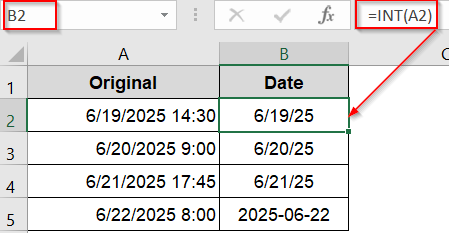
INT function
Apply the INT function to remove the time portion by rounding down to the nearest whole number. It’s perfect for converting combined date-time values into clean date-only results.
Steps:
➤ Suppose column A contains a combined date-time value.
➤ In another column (e.g., B2), extract the date with the INT function:
=INT(A2)
➤ Press Enter.
➤ Drag down using the AutoFill handle.
ROUNDDOWN function
The ROUNDDOWN function is another easy way to discard the time portion. It behaves like INT function but gives you control over decimal rounding, helpful in cases with unusual decimal formatting.
Steps:
➤ Type formula in B2 cell:
=ROUNDDOWN(A2, 0)
➤ Press Enter.
➤ Drag down using the AutoFill handle.

TRUNC function
TRUNC function removes the fractional (time) part of a datetime value by cutting off everything after the decimal. This ensures you’re left with the date value only, without rounding.
Steps:
➤ Type formula in B2 cell:
=TRUNC(A2)
➤ Press Enter.
➤ Drag down using the AutoFill handle.
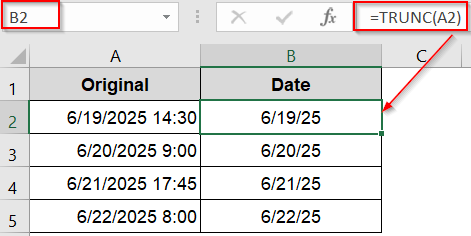
This formula truncates the value at zero decimal places and effectively removes the time portion.
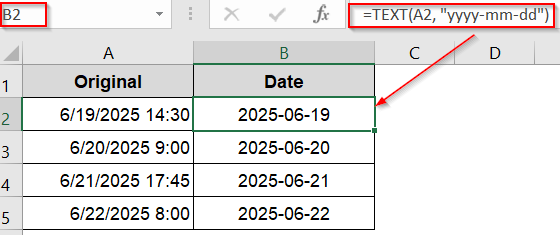
TEXT function
This returns the date as a text string in DD-MM–YYYY format. You won’t be able to do date calculations unless you convert it back to a date value.
Steps:
➤ Type formula in B5 cell:
=TEXT(A5, “yyyy-mm-dd”)
➤ Press Enter.
➤ Drag down using the AutoFill handle.
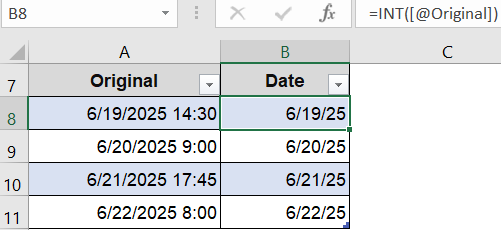
INT function for Table
When working with Excel Tables, use a structured reference and the INT function to remove time while keeping dynamic table formatting. This spills across rows automatically and supports refreshable data.
Steps:
➤ Enter this formula in B8 cell:
=INT([@Original])
➤ Replace Original with your column name.
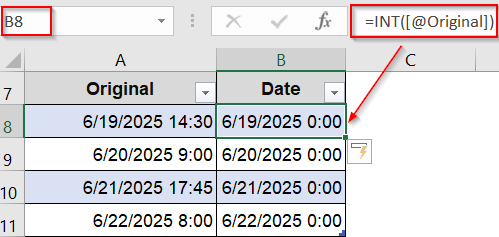
➤ To remove the blank time values such as (0:00) from the end, select your range B8:B11 and press Ctrl + 1 to open the Format Cells dialog.
➤ Under the Number tab, go to Date and pick a format without time and then click OK.

Now your Date column has been formatted accordingly.
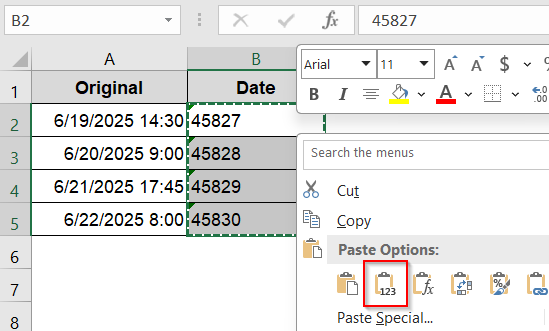
LEFT function
LEFT function is useful when your date-time values are text-based. It lets you slice off just the date portion based on a fixed character count. You’ll need to convert text to numbers after.
Steps:
➤ Use the LEFT function in B2 cell to separate date in text format:
=LEFT(A2,5)
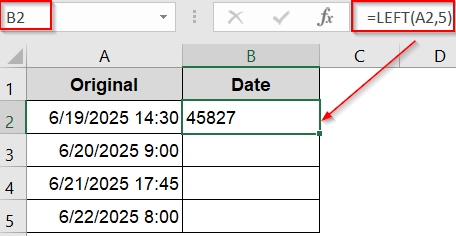
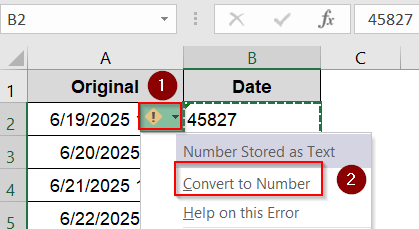
➤ Drag down using AutoFill and copy the whole range >> Right-click in the same column and choose Values under Paste Options.
➤ Click the yellow error sign that appears and select Convert to Number.
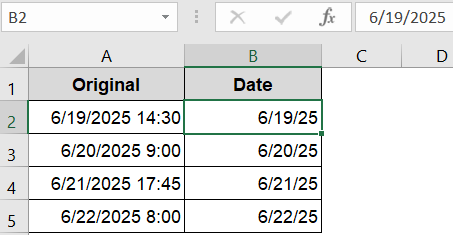
➤ After that, select your range B8:B11 and press Ctrl + 1 to open the Format Cells dialog.
➤ Under the Number tab, go to Date and pick a format without time and then click OK.

Now, your dates are extracted in your desired format.
Frequently Asked Questions
How do I extract the year, month, and day from a date in Excel?
You can use functions like =YEAR(A2), =MONTH(A2), and =DAY(A2) to pull each part of a date into separate cells. These formulas work with any standard Excel date format.
What’s the difference between using TEXT and DATE functions?
TEXT formats date parts as readable strings (e.g., “01” or “January”), while DATE functions return numeric values that Excel can sort or calculate with. Use TEXT for display and DATE for math.
How do I remove the time portion from a datetime value in Excel?
Use =INT(A2) or =TRUNC(A2) to keep just the date. You can also reformat the cell as “Date” only, which visually hides the time but keeps it in memory unless stripped.
Why is my date showing as a number like 45623.75?
Excel stores dates as serial numbers. The integer part is the date, and the decimal part is the time. Format the cell as Date from Format Cells tab to display it correctly.
Wrapping Up
In this tutorial, we learned how to separate date components in Excel using formulas like DAY, MONTH, YEAR, TEXT, and others. We also covered how to strip time from date-time values and how Excel internally stores date/time using serial numbers. Whether you’re formatting reports or cleaning raw data, these techniques will help you break down any date into its core parts with ease. Feel free to download the practice file and share your feedback.