When you are working with an Excel dataset, you often need to insert new rows to manage data. It may need to add single rows, multiple rows, or rows at a specific level. However, manually adding them takes time and increases the chances of errors, especially for large datasets.
In such cases, Excel VBA to insert rows can make the process more accurate and faster. That is why in today’s article, we will walk you through five practical methods to insert rows with Excel VBA. It includes inserting a single row, multiple rows, adding based on selection, at alternate positions, inside tables, with or without formatting, and inserting rows in Nth position.
➤ Select the cell in your dataset where you want to insert a row.
➤ Press Alt + F11 to open the VBA editor.
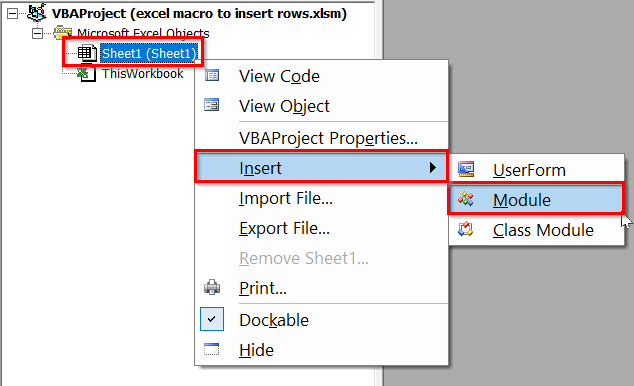
➤ Right-click on your sheet name in the left VBAProject pane >> Insert >> Module.
➤ Insert the following VBA into the new module.
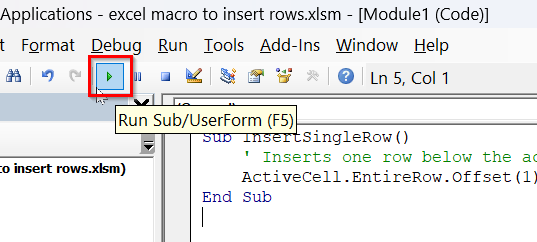
Sub InsertSingleRow()
    ' Inserts one row below the active cell's row
    ActiveCell.EntireRow.Offset(1).Insert Shift:=xlDown
End Sub
➤ Run the VBA code.
➤ A single blank row will be inserted below the currently selected cell.

Insert a Single Row with Excel VBA
It is the most basic and commonly used method, where you add a single blank row with VBA. The method is helpful when you want to insert just one row without affecting the rest of the worksheet. The VBA adds an empty row exactly where you have selected for new data.
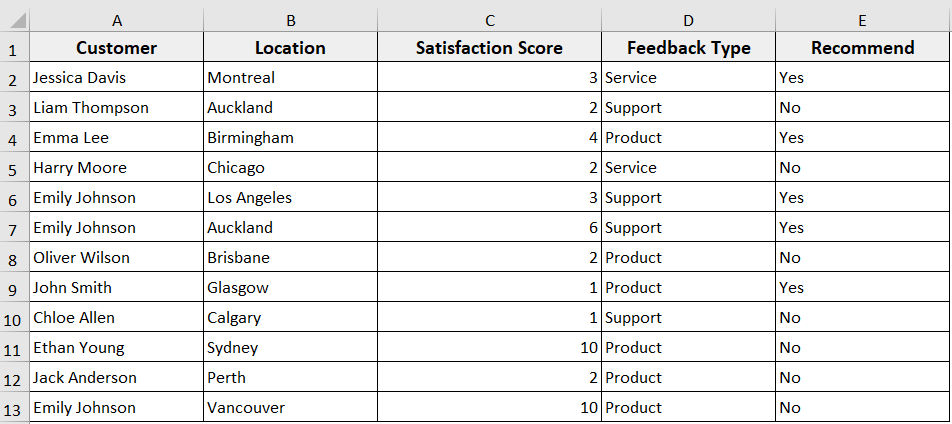
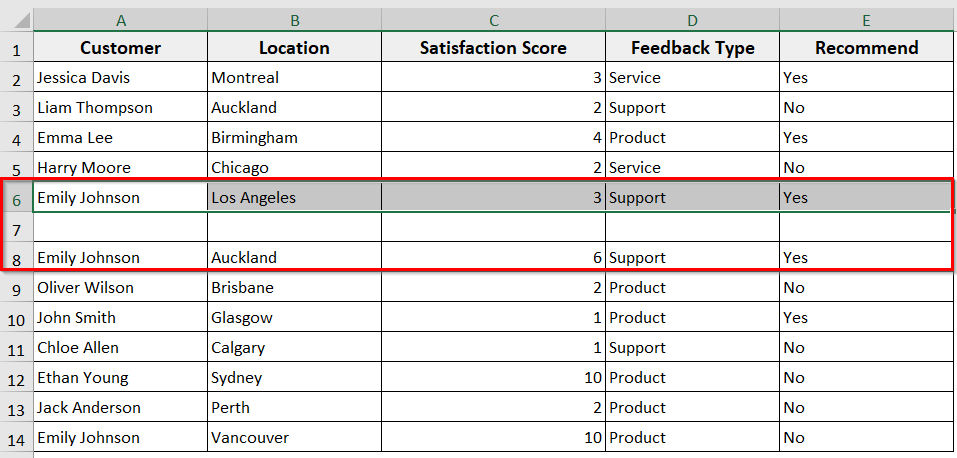
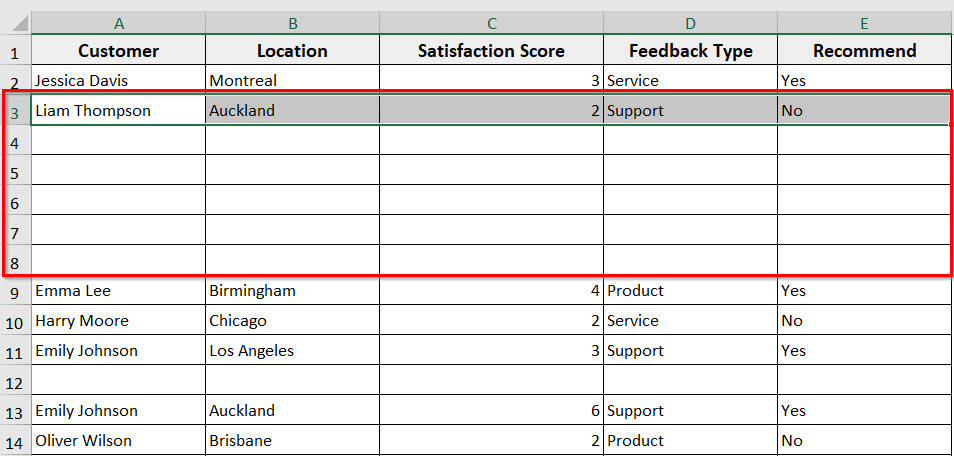
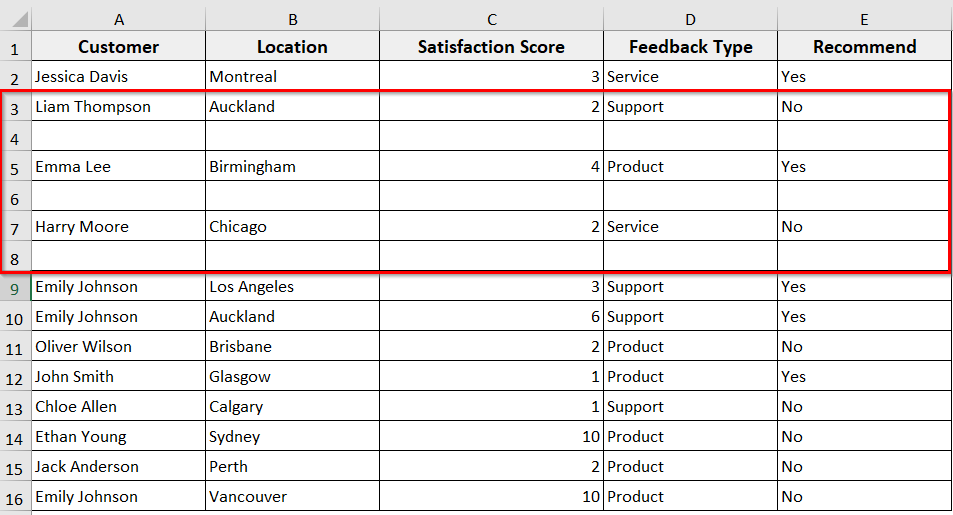
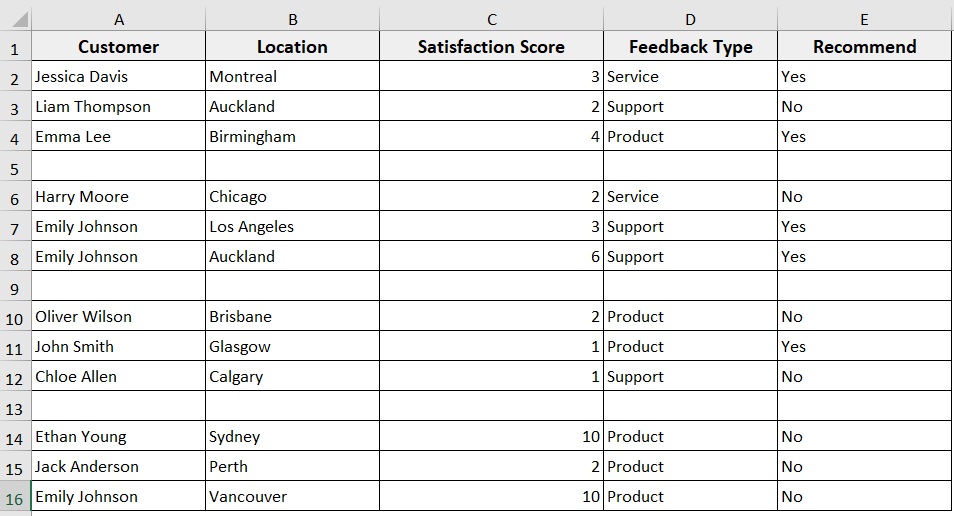
In the following dataset, we have customer feedback information. Now we are going to add rows in this dataset with Excel VBA in different scenarios.
Steps:
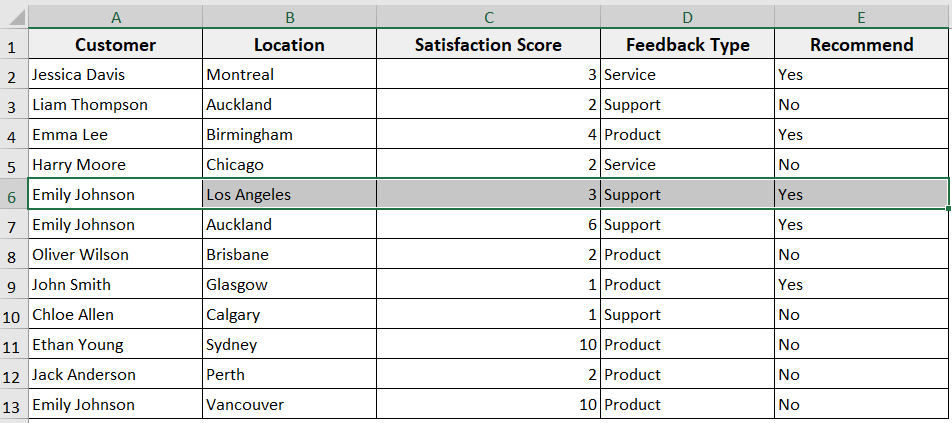
➤ In your Excel dataset, select the cell where you want to insert the blank row, above or below.
➤ Press Alt + F11 to open the VBA editor.
➤ In the VBAProject, right click on your sheet name >> Insert >> Module.
➤ In the new module, insert the following VBA code.
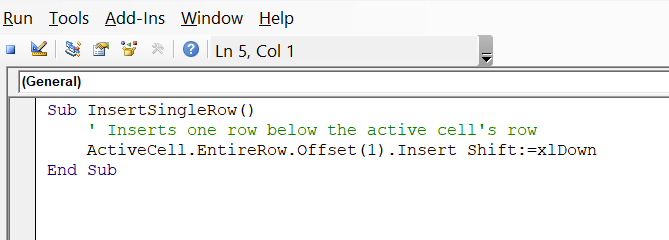
Sub InsertSingleRow()
' Inserts one row below the active cell's row
ActiveCell.EntireRow.Offset(1).Insert Shift:=xlDown
End Sub
Note:
➥ This VBA code will add a new row below the currently selected cell.
➥ If you want to insert a row above the current row, Change Offset(1) to Offset(0)
➤ Run the code or just press F5 .
➤ In the Macros, select InsertSingleRow >> click Run.
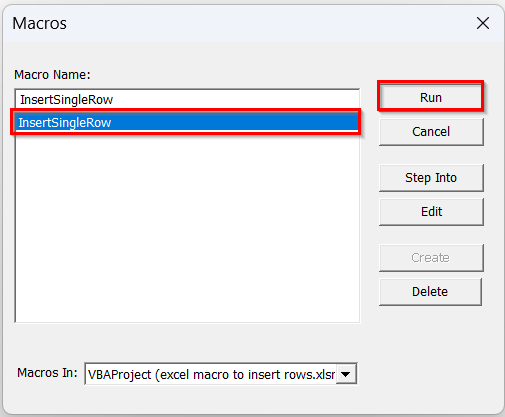
➤ The VBA will insert one blank row below the currently selected cell.
Insert Multiple Rows Using Excel VBA
Instead of inserting a single row, you can add multiple rows at once when you need to. With VBA, you can insert several rows all at a time, either at a specific position or based on your specified position.
Steps:
➤ Similar to the above step, select the cell in your dataset where you want to add rows.
➤ Open the VBA editor and insert a new module.
➤ In the new module, insert the following VBA code.
➤ Here, change For i = 1 To 5 to the number of rows you want to add. For example, use 10 to insert 10 rows.
Sub InsertMultipleRows()
Dim i As Integer
For i = 1 To 5
ActiveCell.EntireRow.Offset(1).Insert Shift:=xlDown
Next i
End Sub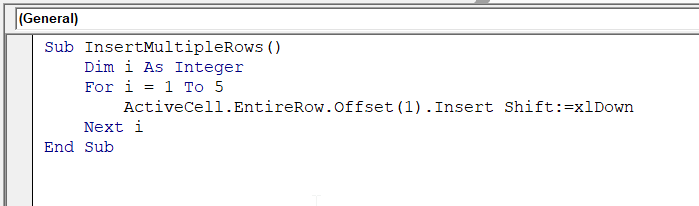
➤ Run the code.
➤ The VBA will add 5 blank rows below the cell you have selected.
Insert Rows in Specific Sheets
You can use the method when you need to add rows only in specific sheets, not in the whole workbook. The VBA lets you choose which sheet you want to add rows to. Thus, it helps you maintain large workbooks efficiently, targeting specific sheets only.
Steps:
➤ Open the VBA editor and insert a new module.
➤ Copy and paste the following VBA code to the module.
Sub InsertRowInSelectedSheets()
Dim ws As Worksheet
Dim targetRow As Long
targetRow = 5 ' Change this to the row where you want to insert
For Each ws In ThisWorkbook.Worksheets
If ws.Name = "Sheet1" Or ws.Name = "Sheet3" Then
ws.Rows(targetRow) .Insert Shift:=xlDown
End If
Next ws
End Sub
Note:
➥ Change targetRow = 5 to the row where you want to insert
➥ ws.Name = “Sheet1” Or ws.Name = “Sheet3” to your target specific sheet name.
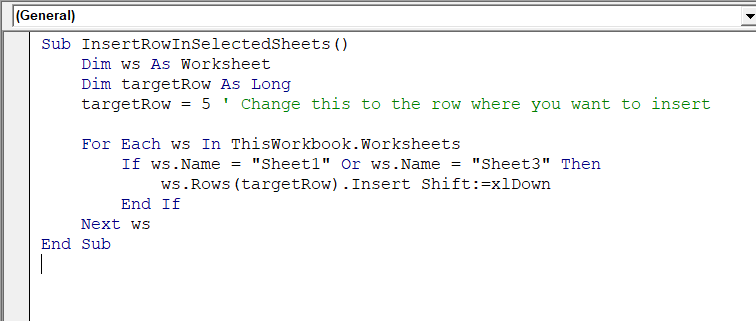
➤ Run the code.
➤ The VBA code will insert a blank row at row 5, but only in Sheet1 and Sheet3.
Insert Rows Based on the Selection
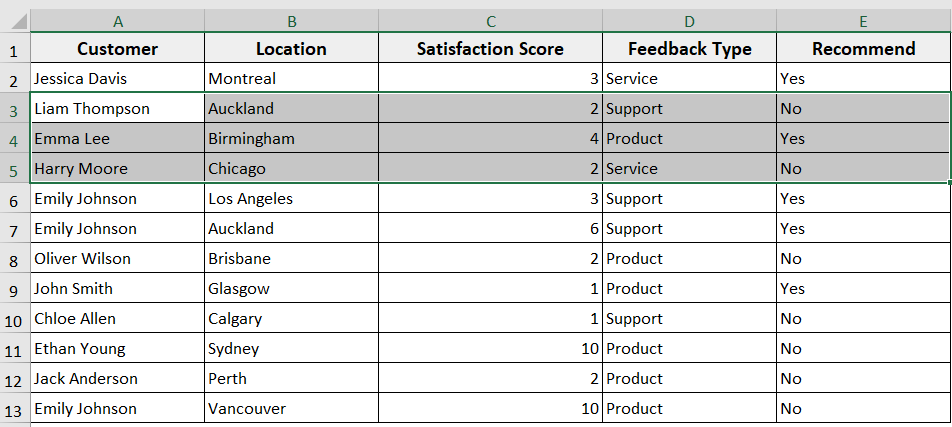
If you want to add blank rows based on what you have selected, this method can be helpful. Here, the VBA checks how many rows you have selected and adds the same number of blank rows above or below. It will save you time as you don’t have to count rows manually.
Steps:
➤Select a range of cells after each one you want to add new rows.
➤ Open the VBA editor and add a new module.
➤ Insert the following VBA module. You can just copy and paste it.
Sub InsertRowsForEachSelectedRow()
Dim rng As Range
Dim i As Long
Set rng = Selection
Application.ScreenUpdating = False
' Loop from bottom to top
For i = rng.Rows.Count To 1 Step -1
rng.Cells(i, 1).EntireRow.Offset(1).Insert Shift:=xlDown
Next i
Application.ScreenUpdating = True
End Sub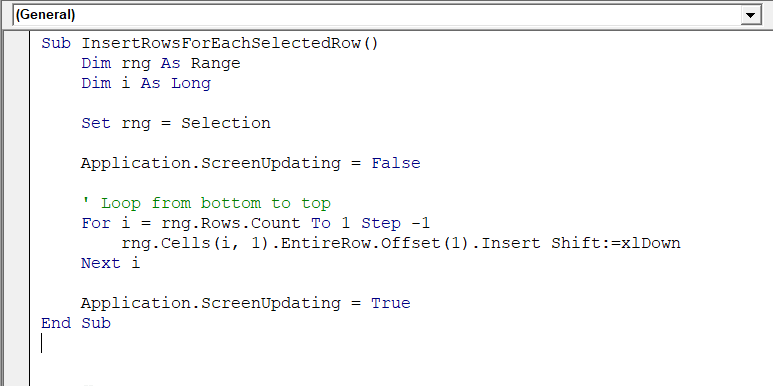
➤ Run the code
➤ The macro inserts a blank row after each row in that selection.
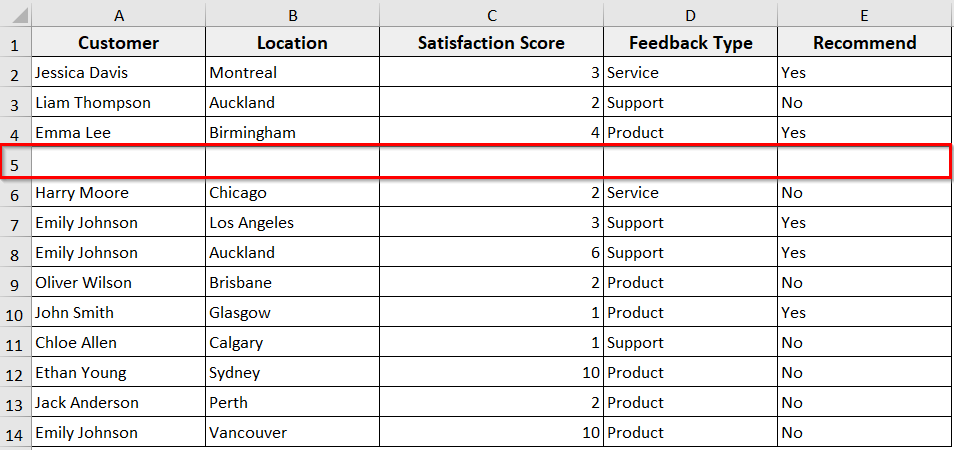
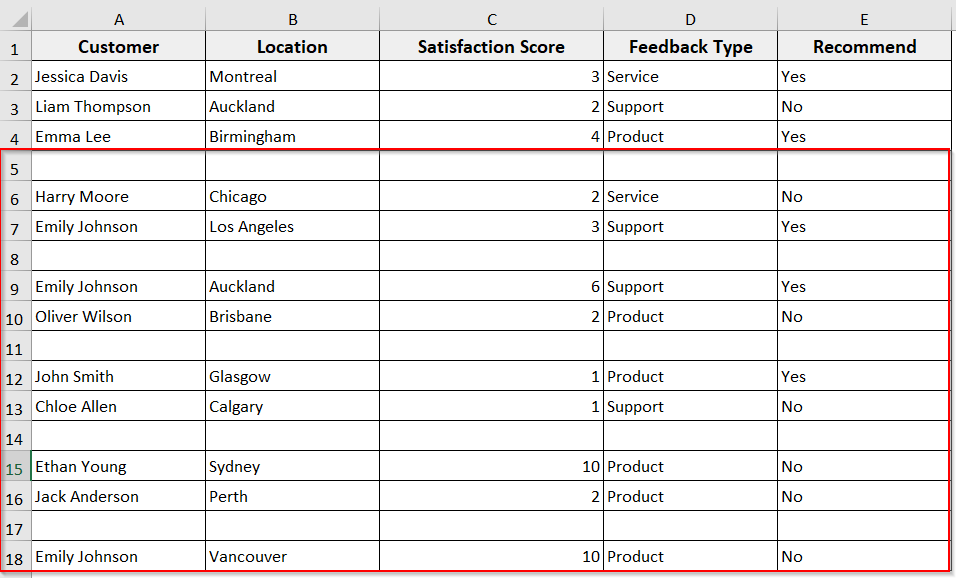
Insert Alternate Rows from a Specific Cell
You can use this method when you need to insert rows at alternate positions. In this method, the VBA starts from a specific cell and inserts a blank row after every other row. For example, if it starts from cell A5, it will insert a blank row after A5, then after A7, A9, and so on.
Steps:
➤ Open the VBA editor
➤ Insert new module.
➤ Insert the following VBA code in the module. In this code, you can change Step -2 to Step -1 if you want to insert after every row, not alternate.
Sub InsertAlternateRows()
Dim startCell As Range
Dim ws As Worksheet
Dim lastRow As Long
Dim i As Long
Set ws = ActiveSheet
Set startCell = Application.InputBox("Select the starting cell", Type:=8)
lastRow = ws.Cells(ws.Rows.Count, startCell.Column).End(xlUp).Row
Application.ScreenUpdating = False
' Loop from bottom to top to avoid row shift issues
For i = lastRow To startCell.Row + 1 Step -2
ws.Rows(i).Insert Shift:=xlDown
Next i
Application.ScreenUpdating = True
End Sub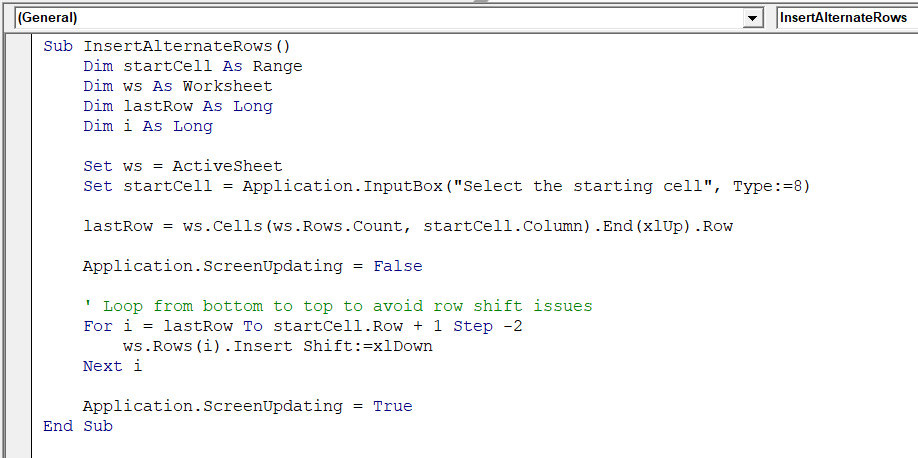
➤ Run the code.
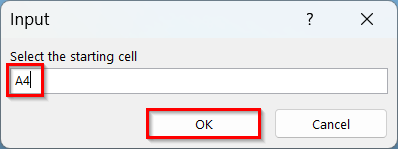
➤ The macro will display an input box to let you select the starting cell.
➤ Enter the starting cell >> click OK. As for our dataset, we have selected A4.
➤ The VBA will insert rows downward, skipping every other row starting from the one after your selected cell.
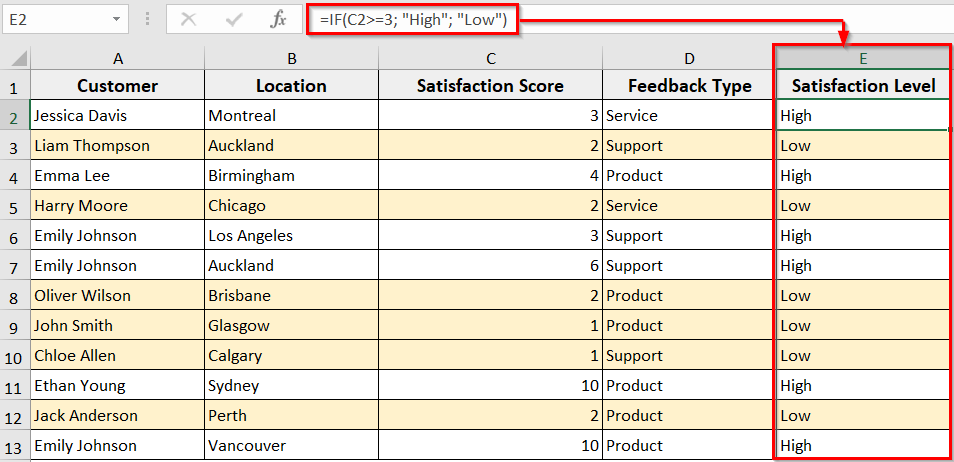
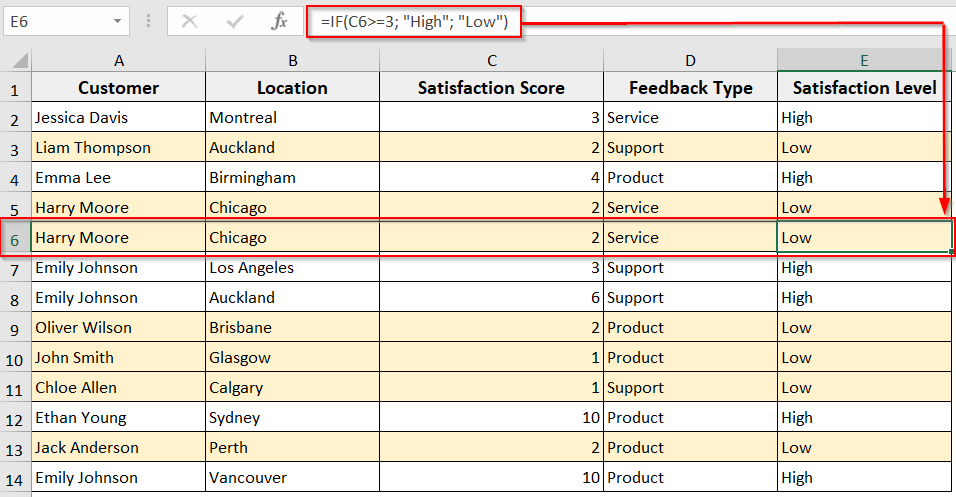
Insert Row with Formula and Formatting
With this method, you can insert a new row that automatically contains your existing formula and formatting. The method ensures your added new rows perfectly match your dataset without reapplying the formulas and formatting manually.
In the following customer feedback dataset, we have applied formulas in Column E to determine the high or low satisfaction level, highlighting the rows containing low satisfaction level. Now we will insert rows to this dataset with a formula and formatting with VBA.
Steps:
➤ Select any cell in the row where you want to insert a new row below.
➤ Press Alt + F11 to open the VBA editor and insert a new module.
➤ In the new module, copy and paste the following VBA code.
Sub InsertRowWithFormulaAndFormatting()
Dim selectedRow As Long
Dim ws As Worksheet
Set ws = ActiveSheet
selectedRow = Selection.Row
ws.Rows(selectedRow + 1).Insert Shift:=xlDown, CopyOrigin:=xlFormatFromLeftOrAbove
ws.Rows(selectedRow).Copy
ws.Rows(selectedRow + 1).PasteSpecial Paste:=xlPasteFormats
ws.Rows(selectedRow).Copy
ws.Rows(selectedRow + 1).PasteSpecial Paste:=xlPasteFormulas
Application.CutCopyMode = False
End Sub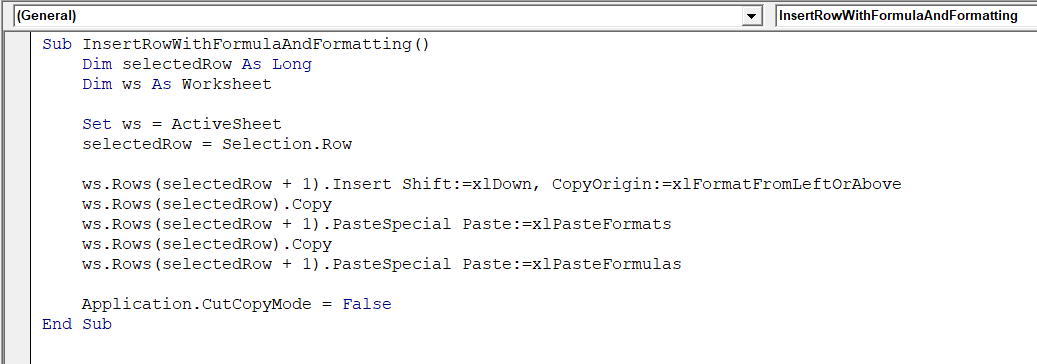
➤ Close the VBA editor
➤ Run the macro by pressing Alt + F8 >> select InsertRowWithFormulaAndFormatting >> Click Run.
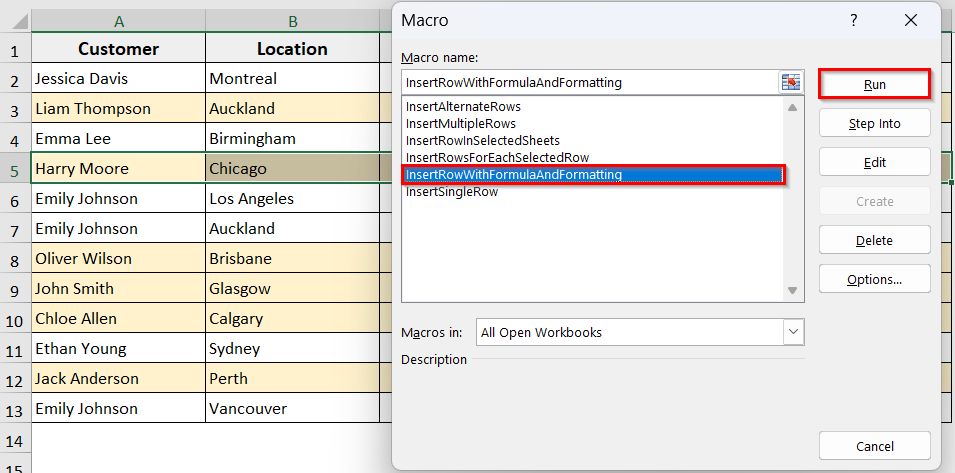
➤ A new row will be added below your selected row with your formula and formatting.
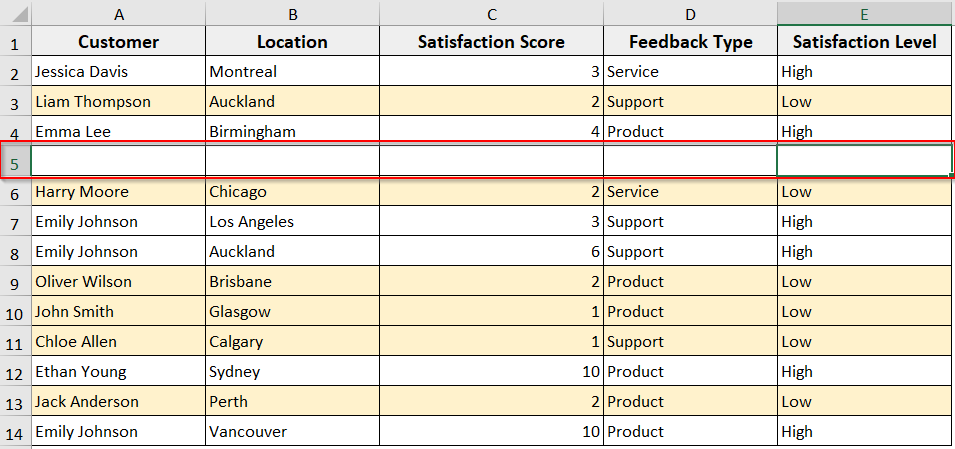
Insert Row without Formulas and Formatting
Now, let’s say your dataset contains formulas and formatting, but you want to add a row without carrying over it. Then you can use the following VBA code for this method. The method inserts a completely blank row into your dataset at a specific location without any existing formulas, formatting, or data.
Steps:
➤ In the new VBA module, insert the following VBA code. You can change insertRow = 5 to any row number as needed.
Sub InsertBlankRow()
Dim insertRow As Long
insertRow = 5 'Change this to the row number where you want the new row
Rows(insertRow).Insert Shift:=xlDown
End Sub
➤ Run the code.
➤ The code will insert a new blank row in row 5. It will contain no formulas, no formatting, just a clean row.
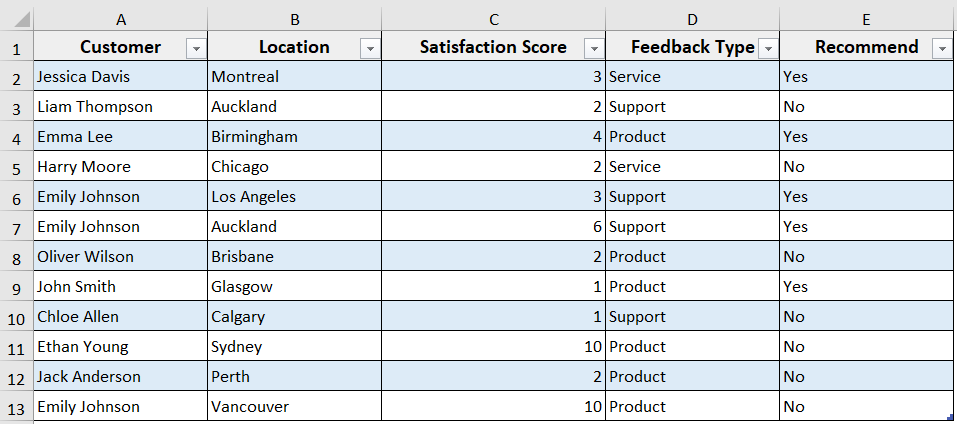
Insert Row into an Excel Table with VBA
In Excel, if you are working with structured data in a table and need to add a new row, this method can help you out. The following VBA code will automatically expand the table, adding new rows and any formulas or formatting carried over without extra effort.
To demonstrate the method, we have converted our customer feedback dataset into a table. Now we are going to add a new row at the end of the table with Excel VBA.
Steps:
➤ Open the VBA editor by pressing Alt + F11 .
➤ Insert a new module.
➤ Copy and paste the following VBA code to the VBA module. In this code, just replace “Sheet1” with your sheet name and “Table1” with your actual table name.
Sub InsertRowIntoTable()
Dim tbl As ListObject
Set tbl = ThisWorkbook.Sheets("Sheet1").ListObjects("Table1")
' Adds a new blank row at the end of the table
tbl.ListRows.Add
End Sub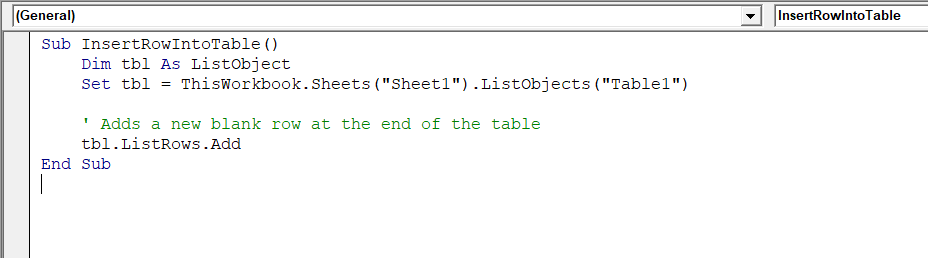
➤ Run the code by pressing F5 or clicking Run.
➤ A new row will be added to the bottom of your Excel Table, including all the formatting and formulas of the table.

Insert Rows at Every Nth Row
When working with a large dataset, in some cases, you may need to insert rows at regular intervals for better readability or formatting.
You can use this method when you’re preparing data for printing, visual grouping, or conditional processing. In this method, the VBA automatically adds a blank row to your specified Nth row.
Steps:
➤ Open the VBA editor and insert a new module.
➤ Insert the following VBA into the new module.
Sub InsertRowsEveryNthRow()
Dim ws As Worksheet
Dim lastRow As Long
Dim n As Long
Dim i As Long
Set ws = ThisWorkbook.Sheets("Sheet1") 'Change sheet name if needed
n = 3 'Change this to insert after every Nth row
Application.ScreenUpdating = False
lastRow = ws.Cells(ws.Rows.Count, "A").End(xlUp).Row
For i = lastRow To n Step -n
ws.Rows(i + 1).Insert Shift:=xlDown
Next i
Application.ScreenUpdating = True
End Sub
Note:
In the VBA code,
➥ Replace “Sheet1” with your actual sheet name
➥ Change N = 3 to your desired interval. For example, 5 for every 5th row
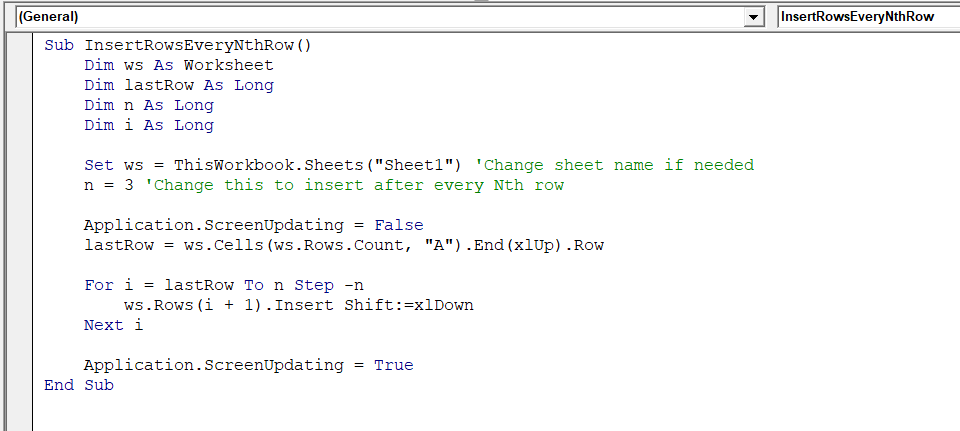
➤ Run the code.
➤ The macro will insert a blank row after every 3rd row or whatever interval you set.
Frequently Asked Questions
How do I insert 20 rows in Excel at once with VBA?
➤ Select a cell where you want the new rows
➤ Press Alt + F11 to open the VBA editor.
➤ Click Insert >> Module.
➤ Insert the code in the module.
Sub InsertTwentyRows()
    Dim i As Integer
    For i = 1 To 20
        ActiveCell.EntireRow.Offset(1).Insert Shift:=xlDown
    Next i
End Sub
➤ Run the code.
How to create a dynamic row sequence in Excel?
You can create a dynamic row sequence that updates when you insert or delete rows. Steps are as follows
➤ Insert the following formula in the helper column:
=ROW() – ROW($A$1)
➤ It will automatically number rows dynamically, adjusting when rows are added or removed.
What is the shortcut for auto-inserting a row in Excel?
➤ Select the entire row where you want the new row to appear.
Then Ctrl + Shift + + (Plus key)
➤ It will insert a blank row above the selected row.
Wrapping Up
In today’s quick tutorial, we have learnt how to insert rows in a dataset with Excel VBA in different scenarios. These VBA codes effectively help you to automate insertion tasks, no matter where and how you need to add rows. Feel free to download our sample Excel workbook and try out the VBA macros by yourself. Let us know how these codes have simplified your Excel tasks.