When working with Excel, sometimes we need to repeat actions until a certain condition is met, but we don’t know in advance how many times. For instance, processing rows, validating input, highlighting cells, or generating dynamic data. That is where the While…wend loop is used. It lets you run a block of code repeatedly while a condition remains True.
This makes it easy to automate tasks like those. In this article, we will learn what the while…wend loop is, its syntax, how it works, and practical examples to help you use it efficiently in Excel VBA.
➤ The While…Wend loop repeats tasks in VBA as long as a condition is True.
➤ Use it when you don’t know in advance how many times the loop will run.
➤ While…Wend cannot exit early with Exit While.
➤ It is useful for row-by-row operations like processing tasks, validating input, and formatting cells.
➤ You can do simple, condition-based automation in Excel with a While Wend statement in VBA.
What is the While…Wend Statement in Excel VBA?
The While…Wend statement in Excel VBA is a looping construct. It allows you to execute a block of code repeatedly as long as a specified condition is met. This While…Wend loop is particularly useful when you need to perform an action until a certain condition is True, but you don’t know in advance how many iterations are required.
That means here you don’t know in advance how many times the action will repeat. The loop checks the condition first, and if it’s True, it runs the action. It keeps repeating until the condition becomes False.
You can think of it like going through a dataset row by row. For example, you want to mark all pending tasks as “Processed.” The loop will check each row, perform the action if needed, and continue until it reaches an empty row.
Syntax:
The basic syntax of the While…Wend Loop in Microsoft Excel is:
While condition
‘Statements to execute
Wend
Below is what each part means:
➥ condition: A logical test that must be True for the loop to run.
➥ statements: The actions that VBA executes while the condition is True. You can include one or more statements.
➥ Wend: Marks the end of the loop and returns control to check the condition again.
Here is a simple example of the While Wend loop in Excel VBA.
Dim i As Integer
i = 1
While i <= 5
   MsgBox i
   i = i + 1
Wend
It starts with i = 1 and keeps looping while i is less than or equal to 5. The loop runs 5 times—one time for each number.
Examples of Using While Wend Statement in Excel VBA
The While…Wend statement in Excel VBA lets you repeat actions while a specific condition is True. It’s perfect for automating tasks like processing rows, validating input, or formatting cells.
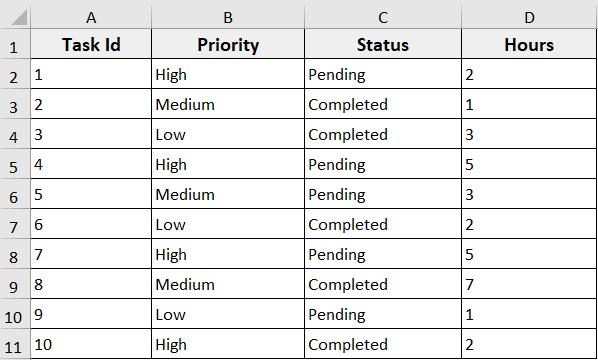
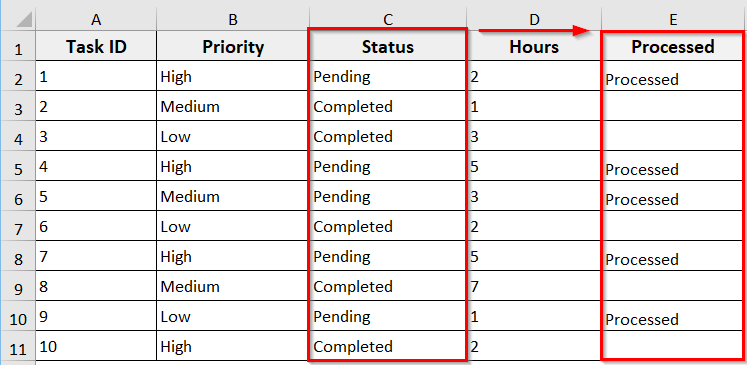
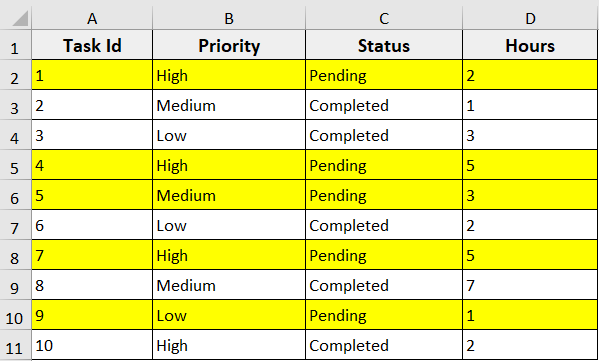
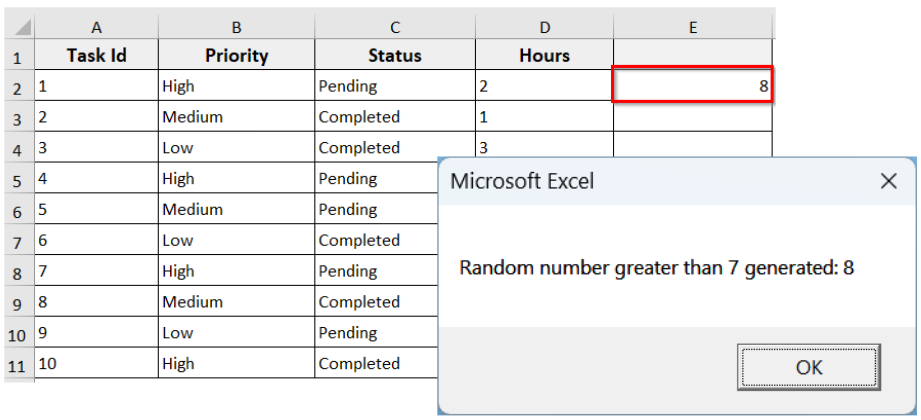
In the dataset below, we have a sample dataset with different priorities, statuses, and hours. Now we are going to use While…Wend loops to automate tasks like marking Pending tasks as Processed, validating input, highlighting rows, copying completed tasks, creating custom message boxes, generating random numbers, and calculating total hours for High-priority tasks.
Example 1: Simple Counter
When working with Excel, sometimes you just need to count how many times a certain action happens, like looping through rows or tracking completed tasks. Using a While Wend loop with a counter makes this easy. It helps you keep track of iterations and ensures your macro runs in a controlled way without missing any data.
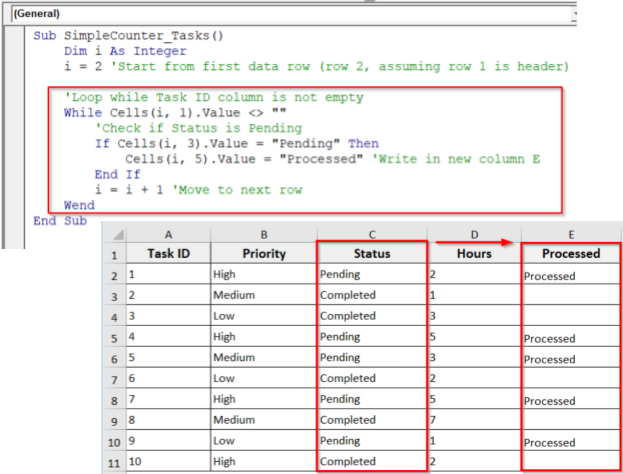
In this example, we will loop through all tasks and mark each Pending task as “Processed” in a new column E.

Steps:
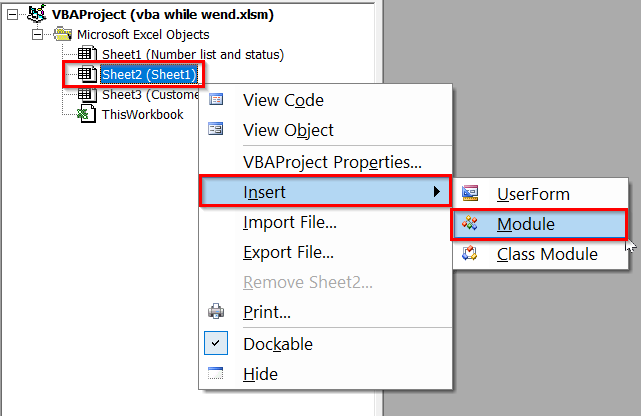
➤ Press Alt + F11 to open the VBA editor.
➤ In the VBA editor, right-click on your sheet name >> Click Insert >> Module.
➤ In the new module, insert the following VBA code. You can just copy and paste it.
Sub SimpleCounter_Tasks()
    Dim i As Integer
    i = 2 'Start from first data row (row 2, assuming row 1 is header)
    'Loop while the Task ID column is not empty
    While Cells(i, 1).Value <> ""
        'Check if Status is Pending
        If Cells(i, 3).Value = "Pending" Then
            Cells(i, 5).Value = "Processed" 'Write in new column E
        End If
        i = i + 1 'Move to next row
    Wend
End Sub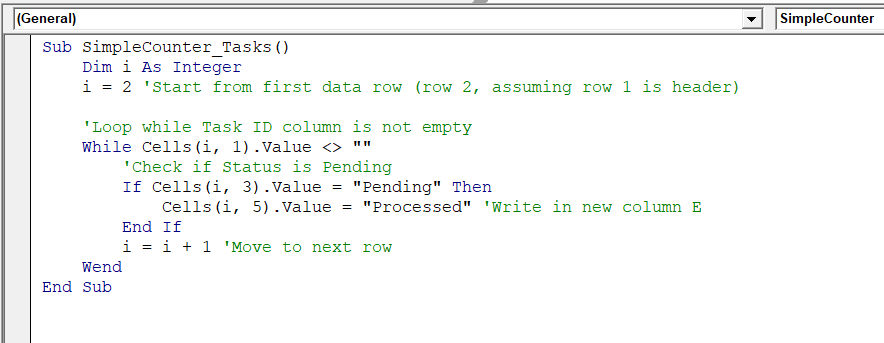
➤ Run the code.
➤ The macro iterates through all tasks in the dataset and updates as Processed only tasks with Status = Pending.
➥ i = 2: starts from row 2 (first row of data).
➥ While Cells(i, 1).Value <> "": checks if the Task ID cell is not empty.
➥ If Cells(i, 3).Value = "Pending": only processes rows where Status is “Pending.”
➥ Cells(i, 5).Value = "Processed": writes “Processed” in Column E.
➥ i = i + 1: moves the counter to the next row.
➥ Wend: loops back to check the condition again until an empty cell is reached.
Example 2: Validating User Input
In some cases, while working with an Excel dataset, we need to check that the information we have entered is correct, complete, and acceptable before using it in our macro or Excel sheet. It helps to prevent errors like selecting a non-existent or entering an invalid number, making your VBA code safer and more user-friendly.
We can do so with the while…wend statement. In this example, we will ask the user to enter a Task ID. The macro will keep asking until the input matches an existing Task ID in the dataset.
Steps:
➤ Open the VBA editor.
➤ Insert the following VBA code in the new module.
Sub ValidateTaskID()
    Dim taskID As Variant
    Dim maxID As Integer
    maxID = 10 'Maximum Task ID in dataset
    'Ask user to input Task ID
    taskID = InputBox("Enter a Task ID (1 to " & maxID & "):")
    'Keep asking while input is invalid
    While taskID < 1 Or taskID > maxID
        taskID = InputBox("Invalid input. Please enter a Task ID between 1 and " & maxID & ":")
    Wend
    'Show confirmation
    MsgBox "You selected Task ID: " & taskID & " - Task: " & Cells(taskID + 1, 2).Value
End Sub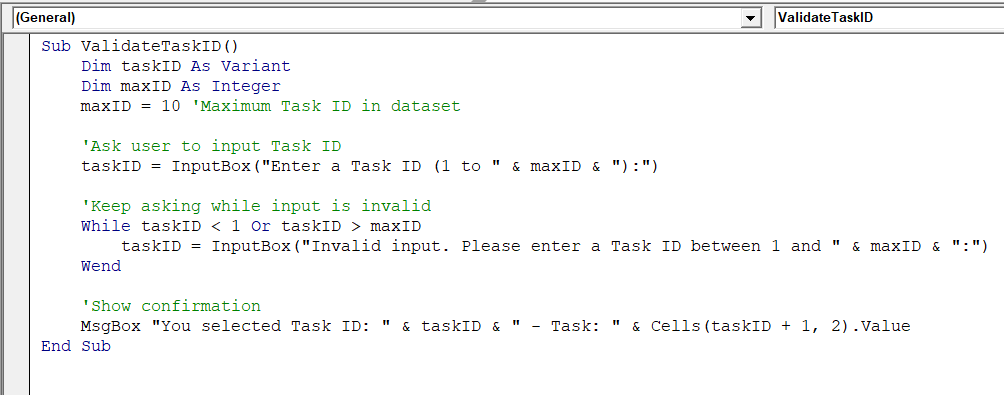
➤ Run the code.
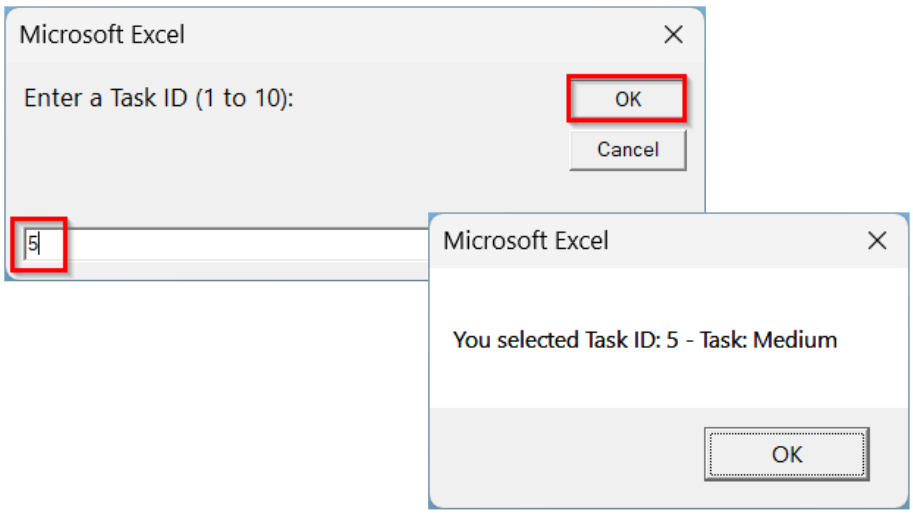
➤ The macro will first ask you to enter a Task ID. If the input is valid, between 1 and 10, for example, 5, it will show a confirmation message with the Task ID and Task Name.
➤ Now, if we enter an invalid value like 12, the macro sees it is invalid. As a result, a new InputBox pops up with Invalid input. Please enter a Task ID between 1 and 10.
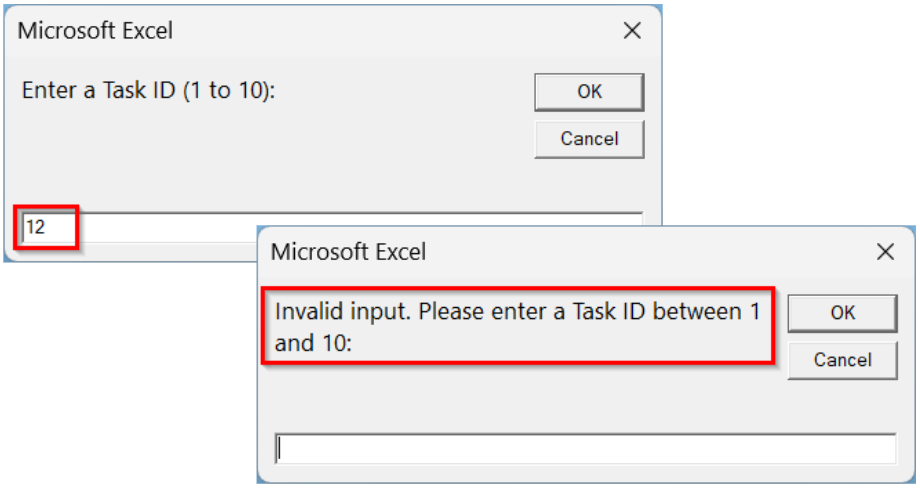
➤ The macro keeps asking until you enter a valid Task ID.
➥ Dim maxID As Integer: sets the maximum valid Task ID.
➥ taskID = InputBox(...): asks the user for a Task ID.
➥ While taskID < 1 or taskID > maxID: checks if input is invalid.
➥ InputBox inside loop: keeps asking until user enters a valid ID.
➥ Wend: loops back to check the condition again.
➥ MsgBox: confirms the valid Task ID and shows the task name from the dataset.
Example 3: Formatting Cells Based on a Condition
In some cases, if you want to highlight specific rows or cells that meet certain conditions, the while…wend statement can help you out. In this example, we will highlight all tasks with the status “Pending” in yellow using the while wend statement in VBA.
Steps:
➤ Open the VBA editor.
➤ Insert the following VBA code in a new module.
Sub HighlightPendingTasks()
    Dim i As Integer
    i = 2 'Start from first data row (row 2)
    'Loop until the Status column (column C) is empty
    While Cells(i, 1).Value <> ""
        If Cells(i, 3).Value = "Pending" Then
            Cells(i, 1).Resize(1, 4).Interior.Color = RGB(255, 255, 0) 'Highlight entire row yellow
        End If
        i = i + 1
    Wend
End Sub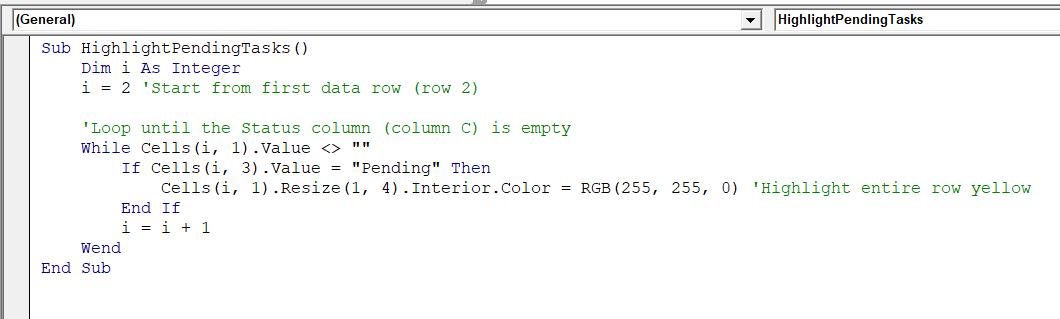
➤ Run the code.
➤ The macro will loop through all rows in the dataset. Whenever it finds a task with “Pending” in the Status column, it will highlight the entire row in yellow.
➤ Completed tasks rows will remain uncolored.
➥ i = 2: starts at row 2 (row 1 is headers).
➥ While Cells(i, 1).Value <> "": keeps looping until it finds a blank row.
➥ If Cells(i, 3).Value = "Pending": checks if the Status column has “Pending”.
➥ Resize(1, 4).Interior.Color = RGB(255, 255, 0): highlights the full row (columns A to D) in yellow.
➥ i = i + 1: moves to the next row.
➥ Wend: repeats until no more rows.
Example 4: Copying Data to Another Worksheet
You can also use the While…wend statement to copy specific rows from one sheet to another. Now, in this example, we will copy all tasks with Status as “Completed” to a new sheet called CompletedTasks with the help of this statement.
Steps:
➤ Open the VBA editor (Alt + F11).
➤ Insert a new module.
➤ Copy and paste the following code into the new module.
Sub CopyCompletedTasks()
    Dim src As Worksheet, dst As Worksheet
    Dim i As Integer, dstRow As Integer
    'Set source sheet
    Set src = ThisWorkbook.Sheets("Sheet1")
    'Check if destination sheet exists, create if not
    On Error Resume Next
    Set dst = ThisWorkbook.Sheets("CompletedTasks")
    On Error GoTo 0
    If dst Is Nothing Then
        Set dst = ThisWorkbook.Sheets.Add
        dst.Name = "CompletedTasks"
    End If
    'Clear previous data
    dst.Cells.Clear
    'Copy header row
    dst.Range("A1:D1").Value = src.Range("A1:D1").Value
    'Start from row 2
    i = 2
    dstRow = 2
    'Loop until Task ID is empty
    While src.Cells(i, 1).Value <> ""
        If LCase(src.Cells(i, 3).Value) = "completed" Then
            dst.Range("A" & dstRow & ":D" & dstRow).Value = src.Range("A" & i & ":D" & i).Value
            dstRow = dstRow + 1
        End If
        i = i + 1
    Wend
    MsgBox "Copied " & (dstRow - 2) & " completed tasks to '" & dst.Name & "'."
End Sub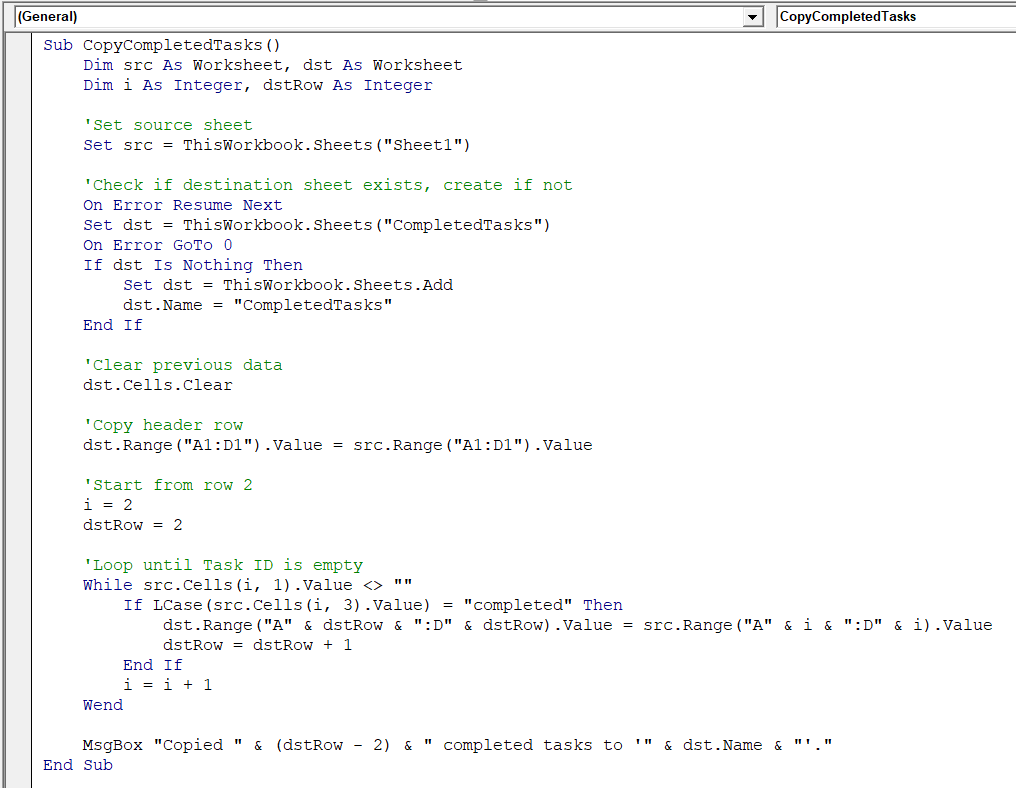
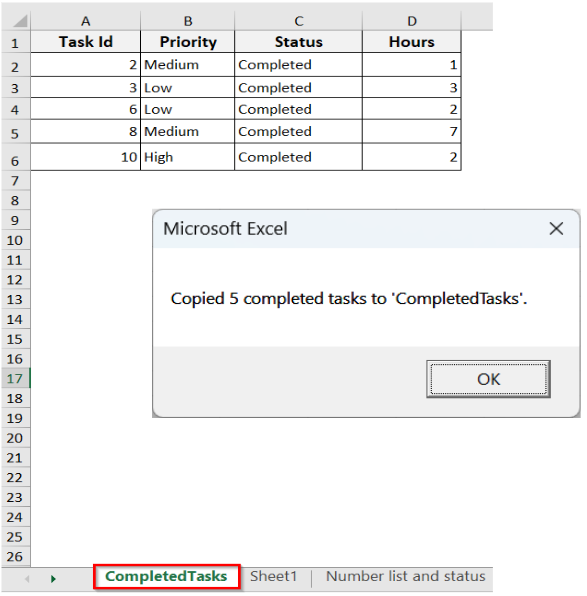
➤ Run the code.
➤ The macro loops through your dataset. It copies all tasks with Status = “Completed” to the CompletedTasks sheet and shows a message with the total copied.
➥ Dim i, dstRow: counters for source and destination rows.
➥ Set src = … : identifies the source sheet.
➥ Set dst = …: creates a destination sheet if missing.
➥ While src.Cells(i, 1).Value <> "": loops until Task ID is empty.
➥ If LCase(...) = "completed": checks for completed tasks (case-insensitive).
➥ dst.Range(...).Value = src.Range(...).Value: copies the row.
➥ i = i + 1: moves to the next row.
➥ dstRow = dstRow + 1: moves to the next row in the destination.
➥ Wend: repeats the loop until the condition is false.
Example 5: Creating a Custom Message Box
While Wend loop lets you create custom message boxes in case you want to notify users about specific data or conditions in your dataset, like pending tasks, alerts, or summaries. Using a While…Wend loop, you can display messages for multiple rows without manually checking each one.
Steps:
➤ Press Alt + F11 and open the VBA editor.
➤ Insert a new module.
➤ In the new module, insert the following code. You can just copy the code and paste it into the module.
Sub CustomMessageBox()
    Dim i As Integer
    i = 2 'Start from first data row
    'Loop while Task ID is not empty
    While Cells(i, 1).Value <> ""
        'Check if Status is Pending
        If Cells(i, 3).Value = "Pending" Then
            MsgBox "Task ID " & Cells(i, 1).Value & _
                   " is pending. Priority: " & Cells(i, 2).Value
        End If
        i = i + 1 'Move to next row
    Wend
End Sub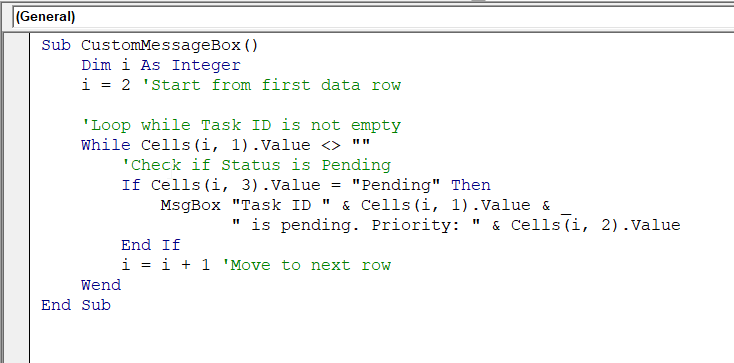
➤ Run the code.
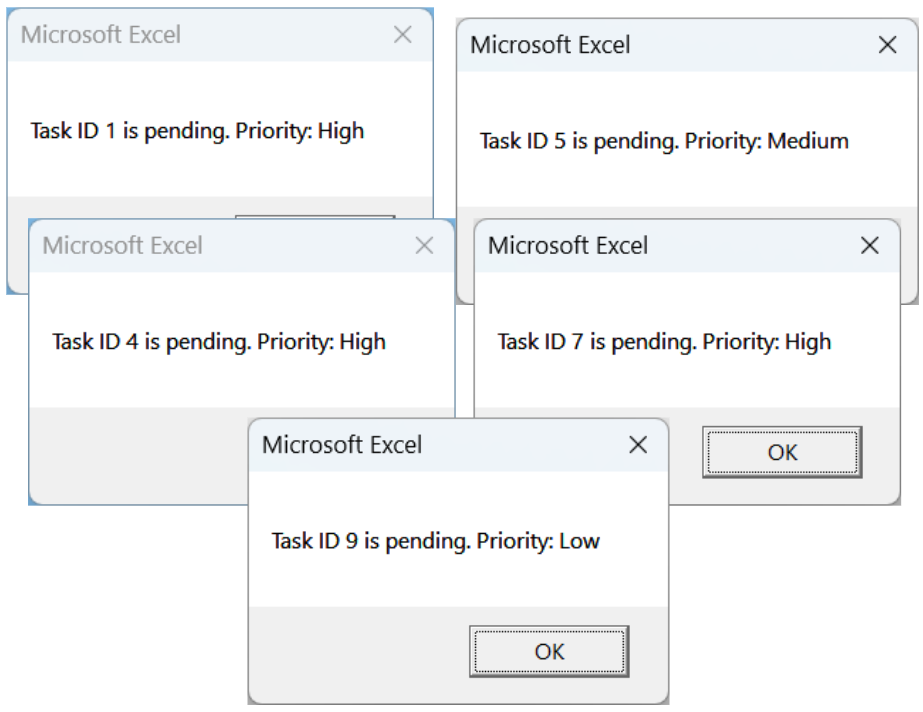
➤ The macro will show a message box for each task that is pending with its Priority status.
➤ It avoids all the completed tasks.
➥ i = 2: starts from the first data row.
➥ While Cells(i, 1).Value <> "": loops until it finds an empty Task ID.
➥ If Cells(i, 3).Value = "Pending": checks if the task is pending.
➥ MsgBox: displays a message for the pending task.
➥ i = i + 1: moves to the next row.
➥ Wend: repeats until the condition is false.
Example 6: Generating Random Numbers
If you need random values in Excel VBA for tasks like simulations, testing, or sample data generation, this method can help you out. You can generate random numbers that make your macros more dynamic and versatile by using the Rnd function.
For example, you can assign random task IDs, create test scores, or build datasets without manually entering values. This feature helps automate repetitive tasks and adds variety to your Excel projects.
Steps:
➤ Press Alt + F11 and open the VBA editor.
➤ Insert a new module.
➤ In the new module, insert the following VBA code.
Sub RandomUntilCondition_Cell()
    Dim rndNum As Integer
    rndNum = Int((10 - 1 + 1) * Rnd + 1) 'Random number between 1 and 10
    'Loop until the number is greater than 7
    While rndNum <= 7
        rndNum = Int((10 - 1 + 1) * Rnd + 1)
    Wend
    'Show result in message box
    MsgBox "Random number greater than 7 generated: " & rndNum
    'Write result in cell E2
    Cells(2, 5).Value = rndNum 'Column 5 = E
End Sub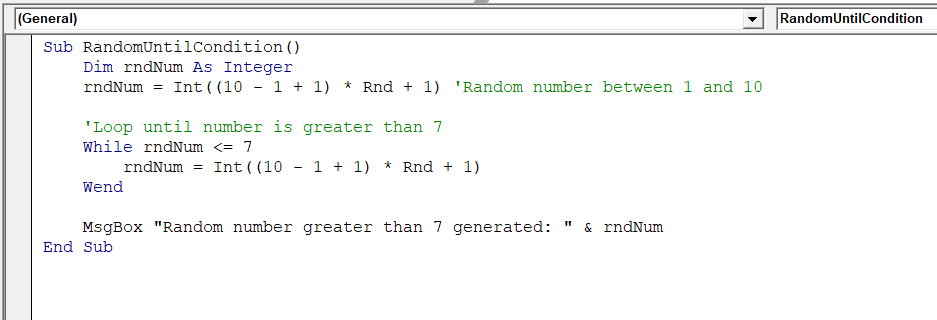
➤ Run the code.
➤ The macro will generate random numbers until one is greater than 7. Then A message box pops up showing the number, the same number is written in cell E2 of the active sheet.
➥ rndNum = Int((10 - 1 + 1) * Rnd + 1): generates the first random number between 1 and 10.
➥ While rndNum <= 7: loop continues as long as the number is 7 or less.
➥ rndNum = Int((10 - 1 + 1) * Rnd + 1): generates a new random number inside the loop.
➥ Wend: ends the loop when the number is greater than 7.
➥ MsgBox "Random number greater than 7 generated: " & rndNum: shows the random number in a message box.
➥ Cells(2, 5).Value = rndNum: writes the result in cell E2 (column 5).
Example 7: Nested While…Wend Loops
Sometimes, you need to run one loop inside another to handle more complex tasks. In Excel VBA, nested While Wend loops help when you want to check multiple conditions at different levels.
For example, you might loop through rows of tasks, and inside each row, loop through columns to check details. This structure makes your VBA code more powerful and flexible for handling layered or repetitive tasks.
Steps:
➤ Open the VBA editor.
➤ Copy and paste the following VBA code in the new module in the VBA editor.
Sub NestedWhileLoops()
    Dim i As Integer, j As Integer
    Dim totalHours As Integer
    totalHours = 0
    i = 2 'Start from first data row
    'Outer loop – go through all tasks
    While Cells(i, 1).Value <> ""
        'Check if Priority is High
        If Cells(i, 2).Value = "High" Then
            j = Cells(i, 4).Value 'Get hours for this task
            'Inner loop – add each hour one by one
            While j > 0
                totalHours = totalHours + 1
                j = j - 1
            Wend
        End If
        i = i + 1 'Next task
    Wend
    'Show result
    MsgBox "Total hours for High priority tasks: " & totalHours
End Sub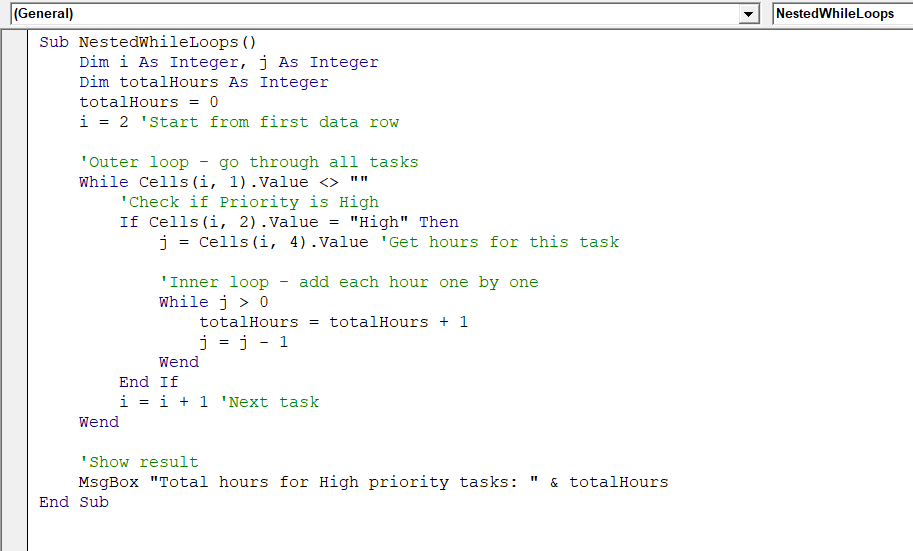
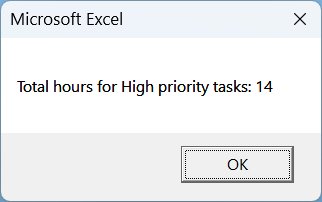
➤ Run the code.
➤ The macro loops through the dataset. For every high-priority task, the inner loop adds up the hours one by one for the tasks and finally shows the total in a message box. For example, in our dataset, the total hours for high-priority tasks are 14.
➥ i = 2: starts from row 2 (data row).
➥ Outer While Cells(i, 1).Value <> "": goes through all tasks.
➥ If Cells(i, 2).Value = "High": only processes High priority tasks.
➥ j = Cells(i, 4).Value: gets the hours value for that task.
➥ Inner While j > 0: counts hours one by one.
➥ totalHours = totalHours + 1: adds to total.
➥ j = j - 1: decreases the hour count.
➥ MsgBox: shows the total hours.
Frequently Asked Questions
What Is the Difference Between While…Wend and Do While…Loop in VBA?
While…Wend loops run while a condition is True, but cannot exit early. Do While…Loop is more flexible. It allows condition checks at start or end, and lets you use Exit Do to stop the loop anytime.
Can Exit While to Terminate a While…Wend Loop Early?
No, While…Wend does not support Exit While. You cannot terminate the loop early. If you need this functionality, use a Do While…Loop. It allows Exit Do to stop the loop at any point.
What is the disadvantage of the While Wend loop?
The main disadvantage is that while…wend cannot exit the loop early with a command like Exit While. It also offers less flexibility compared to Do While…Loop. It makes complex or conditional looping harder to control.
Wrapping Up
In this guide, we have explored how to use the while…wend loop in Excel VBA to automate tasks efficiently. You can apply this loop to process rows, validate input, format cells, copy data, create a custom message box, or generate random values, nest it in another loop, and so on. You can also download the sample Excel dataset to practice the code examples shared in this article and see how exactly they work.