Extracting specific portions of text from cells is a common task in Excel, whether you’re cleaning data, preparing reports, or organizing information. Many users struggle to pull the text they need efficiently, especially when the position or delimiter varies.
In this article, we will explore six practical methods to extract text after the nth character in Excel. Each method includes clear step-by-step instructions and a sample dataset so that you can follow along easily.
Steps to extract text after nth character in Excel:
➤ Place your dataset in A2:A11, ensuring each cell contains text entries.
➤ In B2, type the formula to extract text after a fixed number of characters:
=RIGHT(A2,LEN(A2)-6)
Replace 6 with the number of characters you want to skip.
➤ Press Enter to apply the formula to the first row.
➤ Drag the fill handle down to apply the formula to all rows in your dataset.
➤ Verify that column B now shows only the text appearing after the specified number of characters in each entry.

Separate Text After the First Space Using RIGHT and FIND Functions
If you want to extract everything after the first space in a text string without manually splitting the text, this method is simple and effective. By combining RIGHT and FIND functions, Excel dynamically locates the first space and returns all text that follows. We’ll use the following dataset:
Steps:
➤ Place your dataset in A2:A11, ensuring each cell contains text with at least one space.
➤ In B2, type the following formula to extract all text after the first space:
=RIGHT(A2,LEN(A2)-FIND(" ",A2))
➤ Press Enter to apply the formula to the first row.
➤ Drag the fill handle down to apply the formula to all rows in your dataset.
➤ Verify that column B now displays only the portion of text appearing after the first space in each entry.

Extract Text After a Fixed Number of Characters Using RIGHT Function
If you know the exact number of characters to skip before extraction, this method provides a straightforward solution. By using the RIGHT function combined with LEN, Excel returns all text after the specified number of characters. This approach is ideal for datasets where text length before extraction is consistent.
Steps:
➤ Place your dataset in A2:A11, ensuring each cell contains text entries.
➤ In B2, type the formula to extract text after a fixed number of characters:
=RIGHT(A2,LEN(A2)-6)
Replace 6 with the number of characters you want to skip.
➤ Press Enter to apply the formula to the first row.
➤ Drag the fill handle down to apply the formula to all rows in your dataset.
➤ Verify that column B now shows only the text appearing after the specified number of characters in each entry.

Fetch Text After First Delimiter Using TEXTAFTER Function
If you’re using Excel 365 and want a simple way to extract text after a specific delimiter, the TEXTAFTER function is the perfect choice. This function directly pulls everything after a chosen character, such as a space, comma, or hyphen, making it ideal for extraction
Steps:
➤ Place your dataset in A2:A11, ensuring each cell contains text with a space or chosen delimiter.
➤ In B2, type the formula to extract text after the first space:
=TEXTAFTER(A2, " ")
➤ Press Enter to apply the formula to the first row.
➤ Drag the fill handle down to apply the formula to all rows in your dataset.
➤ Verify that column B now displays only the portion of text appearing after the delimiter in each entry.

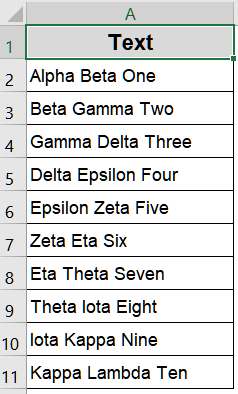
Retrieve Text After Nth Character Using the MID Function
If you need to extract text starting from a specific character position, the MID function is an ideal choice. By specifying the starting position and combining it with the LEN function, you can capture all text from that point onward. This method works best for datasets where the starting position is consistent.
Steps:
➤ Place your dataset in A2:A11, ensuring each cell contains text entries.
➤ In B2, type the formula to extract text starting from a specific character:
=MID(A2, 7, LEN(A2))
Replace 7 with the character position where you want extraction to begin.
➤ Press Enter to apply the formula to the first row.
➤ Drag the fill handle down to apply the formula to all rows in your dataset.
➤ Verify that column B now displays only the text starting from the specified character in each entry.
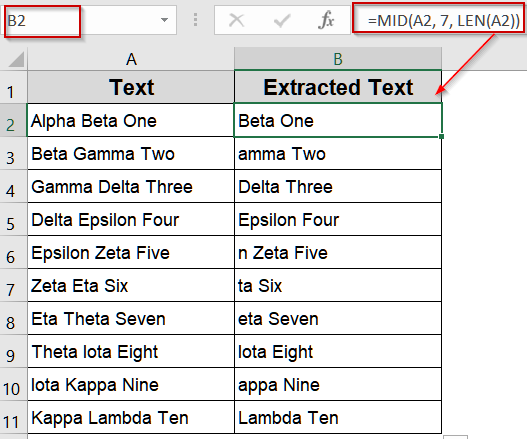
Obtain Nth Word Using TEXTSPLIT and INDEX Functions
If your text contains multiple words separated by spaces, combining TEXTSPLIT with INDEX function allows you to extract a specific word or segment efficiently. This method is perfect for single-column datasets where you want to pull the nth word.
Steps:
➤ Place your dataset in A2:A11, ensuring each cell contains text with multiple words.
➤ In B2, type the formula to extract a specific word:
=INDEX(TEXTSPLIT(A2," "),2)
Replace 2 with the word number you want to extract.
➤ Press Enter to apply the formula to the first row.
➤ Drag the fill handle down to apply the formula to all rows in your dataset.
➤ Verify that column B now displays only the chosen word from each entry.
Pull out the Nth Word Dynamically Using TRIM, MID, and SUBSTITUTE Functions
If you want to extract the nth word from text where word lengths vary, this advanced method is ideal. By combining TRIM, MID, and SUBSTITUTE functions, Excel dynamically isolates any word in a single-column dataset, making it perfect for flexible extraction.
Steps:
➤ Place your dataset in A2:A11, ensuring each cell contains text with multiple words.
➤ In B2, type the formula to extract the nth word dynamically:
=TRIM(MID(SUBSTITUTE(A2," ",REPT(" ",LEN(A2))),(2-1)*LEN(A2)+1,LEN(A2)))
Replace 2 with the word number you want to extract.
➤ Press Enter to apply the formula to the first row.
➤ Drag the fill handle down to apply the formula to all rows in your dataset.
➤ Verify that column B now displays the nth word from each text entry accurately.

Downloadable Resources
Get our practice workbook or necessary files that we have worked with to prepare this article.
Extract Text After Nth Character in Excel.xlsx
Frequently Asked Questions
Can I extract text after the nth character without knowing the delimiter?
Yes, using formulas like MID with LEN or the TRIM, MID and SUBSTITUTE, you can dynamically extract text even if there’s no consistent delimiter, making it ideal for variable-length strings.
Which method is best for Excel 365 users?
For Excel 365, TEXTAFTER function is the simplest and most efficient method. It handles delimiters and occurrences directly, allowing dynamic extraction without complex nested formulas, making it fast and easy for modern Excel versions.
How do I extract text after the nth word instead of nth character?
To extract after the nth word, combine TEXTSPLIT with INDEX or use the TRIM, MID and SUBSTITUTE function approach. These methods separate words based on spaces and return the specific word or segment you need.
Can these formulas handle large datasets?
Yes, these formulas work well on large datasets. However, dynamic methods like TRIM, MID and SUBSTITUTE or TEXTAFTER function may slightly impact performance with extremely large spreadsheets, so testing on a sample before applying is recommended.
Is it possible to extract text after multiple different delimiters?
Yes, by nesting formulas or using TEXTAFTER with array functions, you can handle multiple delimiters. For complex scenarios, TRIM, MID and SUBSTITUTE can also adapt to extract text after various characters consistently.
Wrapping Up
In this tutorial, we explored six effective ways to extract text after the nth character in Excel, from simple fixed-position formulas to dynamic, delimiter-based methods. These techniques help simplify data processing, improve accuracy, and save valuable time. Feel free to download the practice file and share your feedback.