When we are working with an Excel dataset and we need to select a range of cells starting from the active cell to the end of our data, true keyboard shortcuts like Ctrl + Arrow Keys work out. However, doing it like this manually can lead to mistakes, especially in large datasets.
With Excel VBA, you can automate this process and quickly select ranges in any direction. That’s why, in today’s article, we will walk you through 8 practical VBA methods to select a range from the active cell to the end. These include using Range.End, CurrentRegion, Find, Excel Tables, Offset, handling edge cases, and so on.
➤ Press Alt + F11 to open the VBA editor.
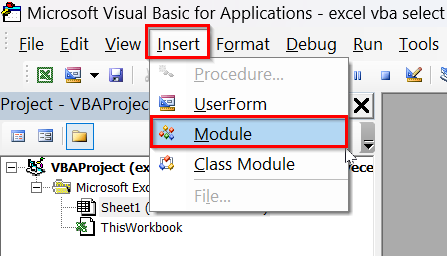
➤ In the VBA editor, go to Insert >> Module. It will add a new module in the editor.
➤ Insert the following VBA code in the new module of the VBA editor.
Sub SelectDownFromActiveCell()
    Range(ActiveCell, ActiveCell.End(xlDown)).Select
End Sub
➤ Place your active cell at the start of a column with data.
➤ Run the code.
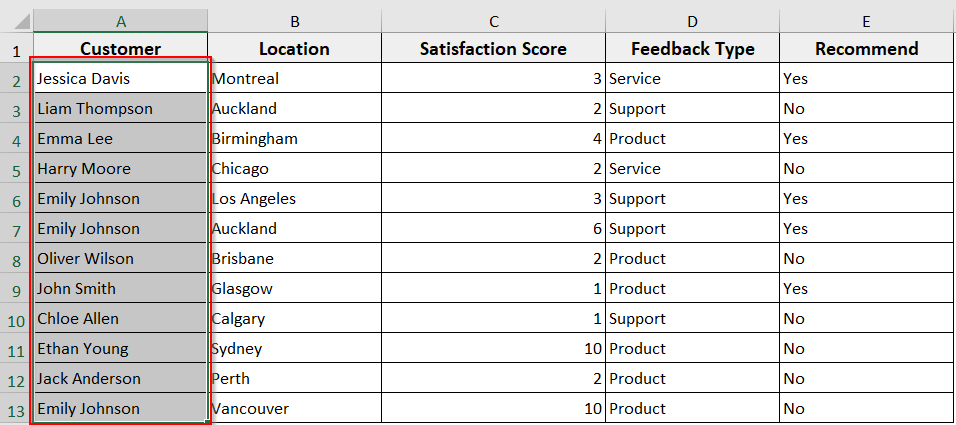
➤ The macro will select from the active cell (A2) down to the last filled cell (A13) in that column (column A).
➤ Change xlDown to xlUp, xlToRight, or xlToLeft to select a range from the active cell to the end in that direction instead.

Using Range with End (xlDown, xlUp, xlToRight, xlToLeft)
In Excel VBA, the Range.End property works just like pressing Ctrl + Arrow Key on your keyboard in a worksheet. When working with Excel VBA, when you need to select a range starting from the active cell to the end of your data, you can use this method to select cells in any direction. It is simple and widely used for columns or rows.
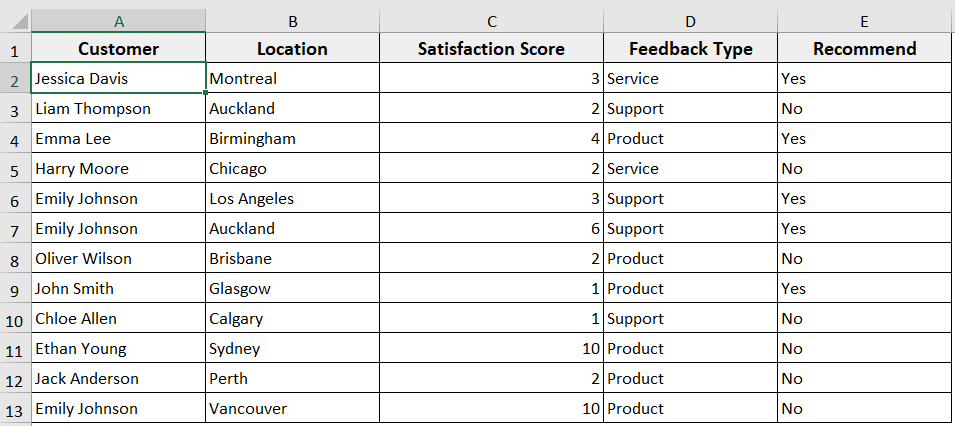
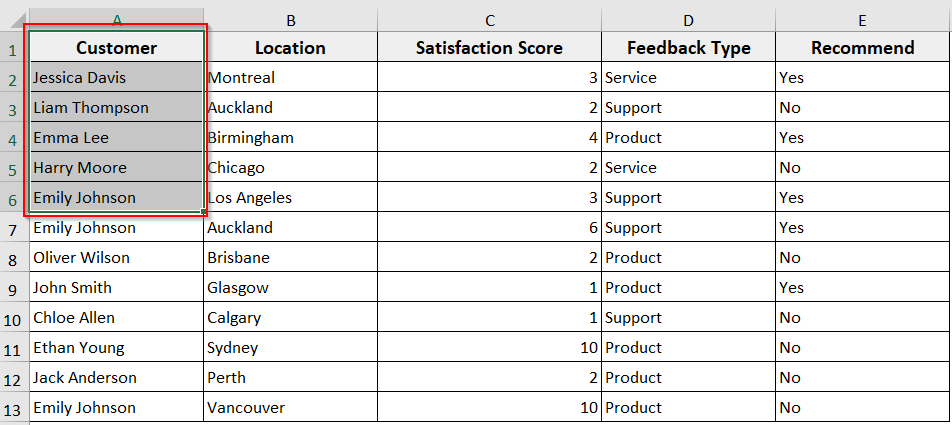
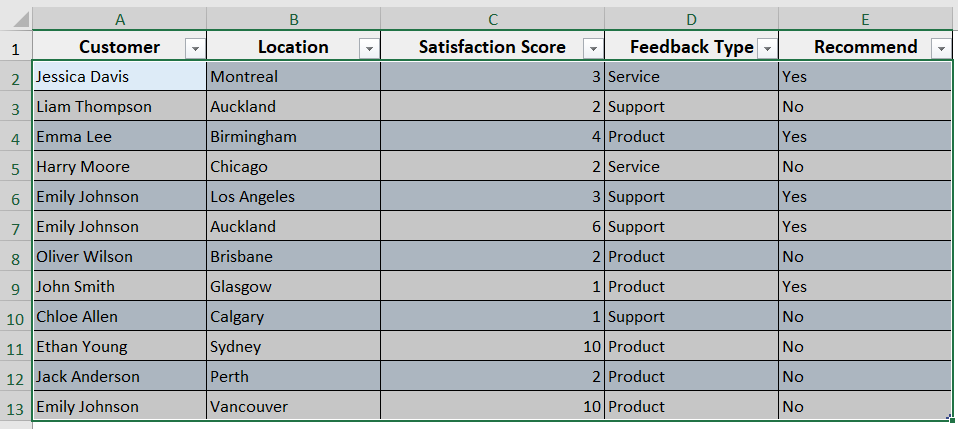
In the following Excel dataset, we have customer feedback. Now we will use the Range. End property in Excel VBA to select a range from the active cell to the end.
Steps:
➤ Press Alt + F11 to open the VBA editor.
➤ Go to the Insert >> Module to insert a new module in the VBA editor.
➤ In the new module, insert the following VBA code. You can just copy and paste the code.
Sub SelectDownFromActiveCell()
    Range(ActiveCell, ActiveCell.End(xlDown)).Select
End Sub
➤ Place your active cell at the start of a column with data.
➤ Run the code.
➤ The macro will select from the active cell (A2) down to the last filled cell (A13) in that column (column A).
➤ Now, if you change xlDown to xlUp, xlToRight, or xlToLeft, the macro will select cells in that direction instead.
➤ For instance, insert the VBA macro to select a range of cells in an upward direction to the end.
Sub SelectDownFromActiveCell()
    Range(ActiveCell, ActiveCell.End(xlUp)).Select
End Sub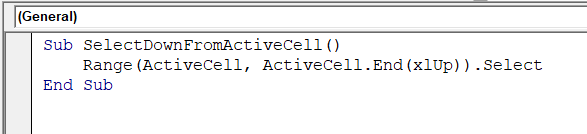
➤ Run the code after selecting an active cell. We have selected cell A6 in this regard.
➤ The code will select from the active cell (A6) up to the last filled cell (A1) in that column (column A).
➥ .Select: It highlights the defined range on the worksheet.
➥ You can replace xlDown with xlUp to select upwards, xlToRight to select rightwards, or xlToLeft to select leftwards.
Using Range.End Chained in Multiple Directions
In some cases, Excel data spans in both rows and columns, like in our sample dataset, and we need to select a full block of data starting from the active cell. In such cases, you can chain End properties in multiple directions. It lets you select a rectangular range of cells from active cells to end cells efficiently.
Steps:
➤ Open the VBA editor and insert a new module.
➤ In the new module, insert the following VBA code. In this code, you can also change the order of directions, use xlUp and xlToLeft depending on where your data is located.
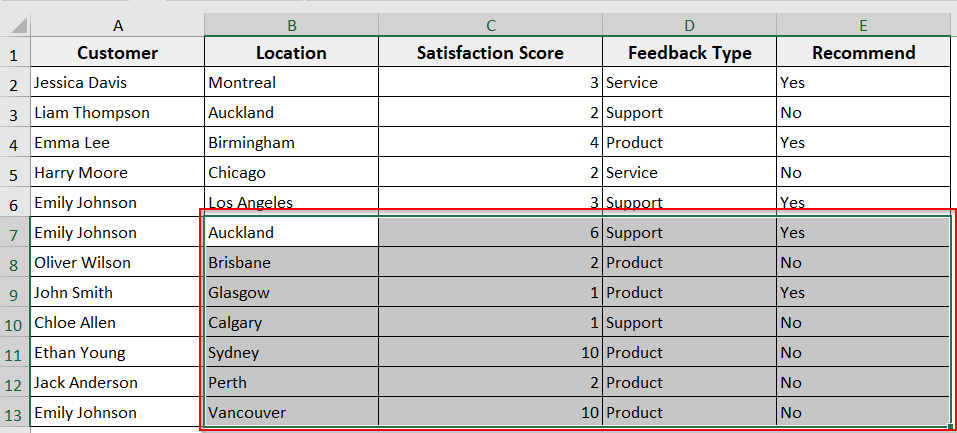
Sub SelectBlockFromActiveCell()
Range(ActiveCell, ActiveCell.End(xlToRight).End(xlDown)).Select
End Sub
➤ Run the code after selecting the active cell.
➤ It will select all cells from the active cell (B7) to the last filled cell downwards and to the right.
➥ .End(xlDown): It extends the selection downward from that last column.
➥ Range(ActiveCell, ...): It combines the starting cell and the end cell to define the rectangular range.
➥ .Select: It highlights the entire block of data.
Using ActiveCell.CurrentRegion
When you want to select a contiguous block of data around the active cell, CurrentRegion is the easiest method. It automatically selects all cells in a connected area and stops at any blank row or column.
It is a useful method when your data is organized in a table-like block without empty rows or columns. In this method, unlike Range.End, Excel automatically detects the full region.
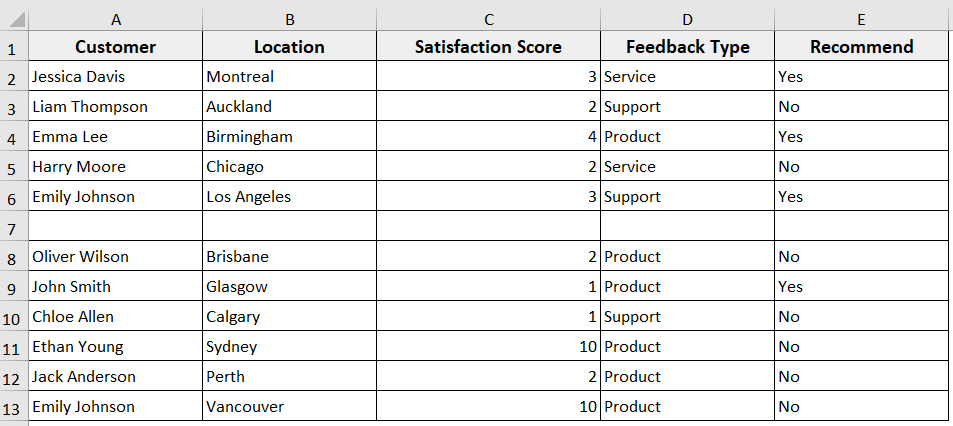
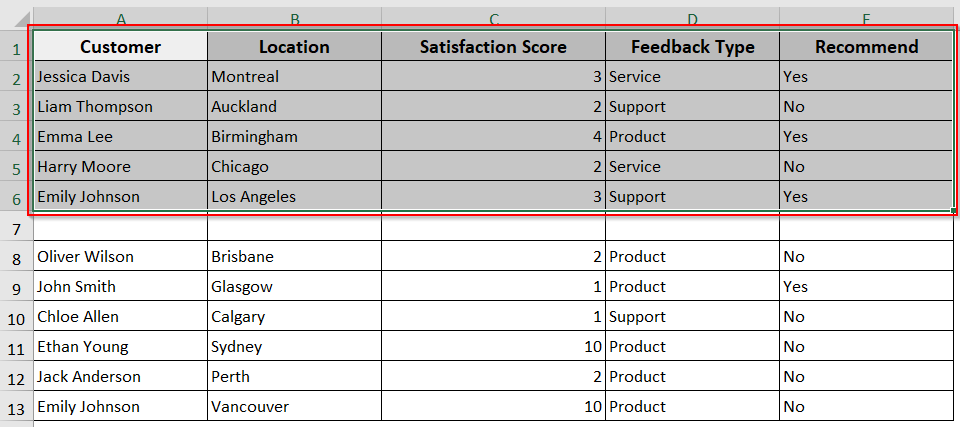
To let you know how this VBA method works, we have created an empty row in our sample dataset.
Steps:
➤ Open the VBA editor.
➤ Insert a new module.
➤ Insert the following VBA code in the new module.
Sub SelectCurrentRegion()
ActiveCell.CurrentRegion.Select
End Sub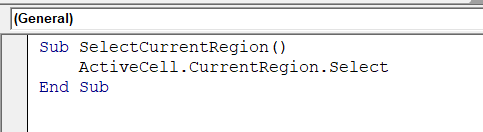
➤ Select your active cell anywhere inside a data block.
➤ Run the code.
➤ The code will select all connected cells around the active cell up to blank rows or columns.
➥ .Select: highlights the entire block on the worksheet.
➥ This method works best for well-structured data without blank rows or columns inside the block.
Using Cells(Rows.Count, col).End(xlUp) for Last Row
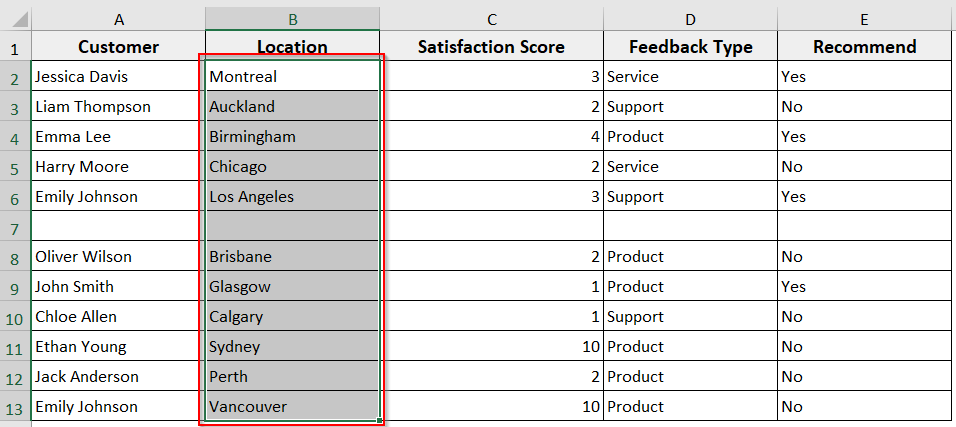
Sometimes, your column has blank cells, and you use ActiveCell.CurrentRegion will stop at the blank rows or columns. In such cases, if you want to select a range from the active cell to the end of the cells, Cells(Rows.Count, col).End(xlUp) method reliably finds the last used row in a column, even if there are empty cells above it.
It is a useful method when your dataset has intermittent blank cells and you need to ensure your selection always reaches the true last row.
Steps:
➤ After opening the VBA editor, insert a new module.
➤ In the module, insert the following VBA code.
Sub SelectToLastRow()
Dim lastRow As Long
lastRow = Cells(Rows.Count, ActiveCell.Column).End(xlUp).Row
Range(ActiveCell, Cells(lastRow, ActiveCell.Column)).Select
End Sub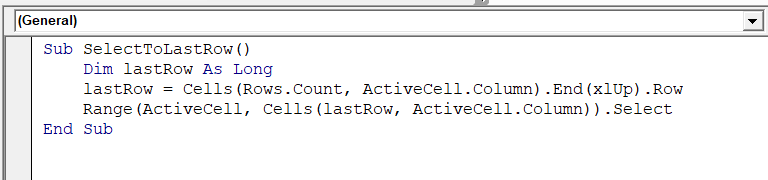
➤ Run the code.
➤ The code will select all cells from the active cell (B2) down to the last filled cell (B13) in that column, even if there are blank cells (B7) above the last row.
➥ .End(xlUp).Row: It moves upward to find the last filled cell and returns its row number.
➥ Range(ActiveCell, Cells(lastRow, ActiveCell.Column)): It defines the range from the active cell to the last used row.
➥ .Select: It highlights that range.
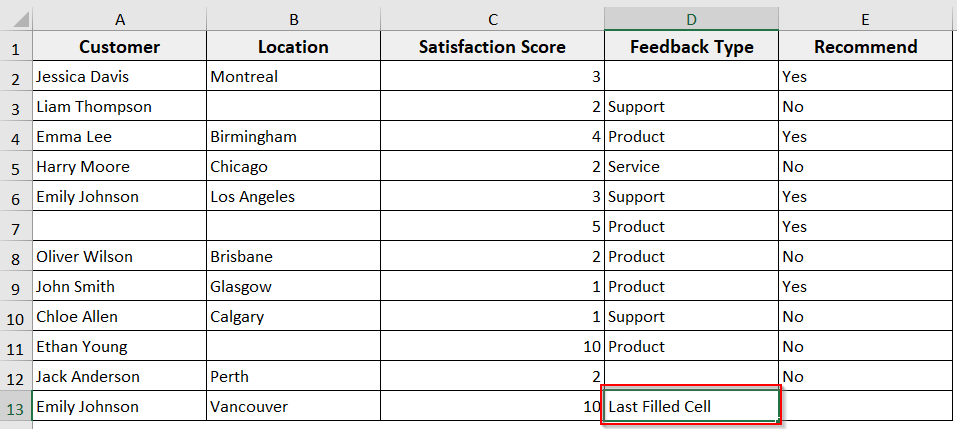
Using the Find Method to Get the Last Used Cell
When you are working with large datasets, sometimes it is critical to find the end or the last used cell. That’s especially if your data is scattered in different rows and columns. The Find method allows you to locate the last filled cell quickly and accurately, even when there are blanks in between.
That means the method works best when your data is in different rows and columns or contains blank cells, and you want your selection to reach the true last cell.
In our sample dataset, we have updated the D13 cell to Last Filled Cell to make it the last used cell. Now we will use this dataset to select a range using the Find method.
Steps:
➤ Open the VBA editor and insert a new module.
➤ Insert the following VBA code in the new module.
Sub SelectLastUsedCell()
Dim lastCell As Range
Set lastCell = Cells.Find("*", SearchOrder:=xlByRows, SearchDirection:=xlPrevious)
Range(ActiveCell, lastCell).Select
End Sub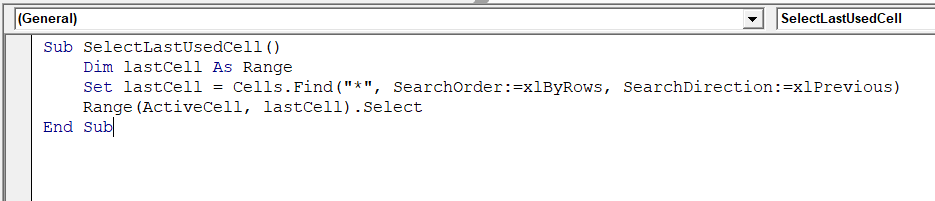
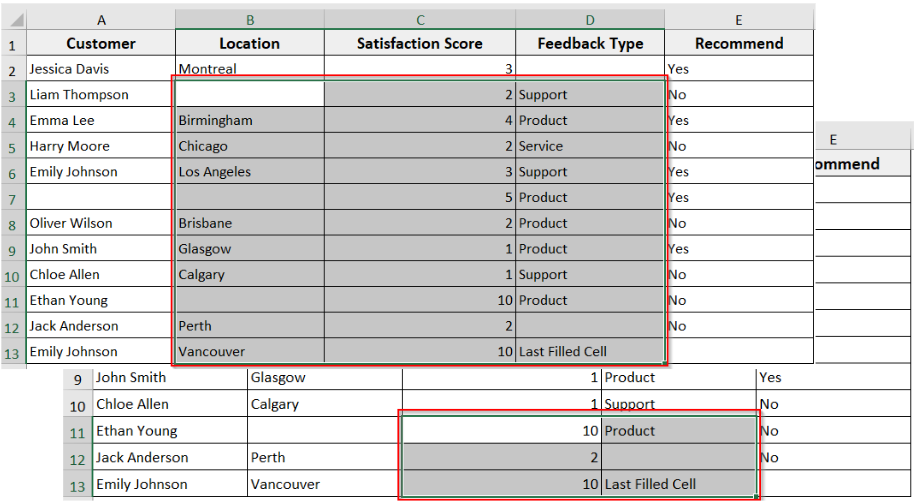
➤ Run the code, placing your active cell anywhere on the worksheet.
➤ The VBA macro will select all cells from the active cell to the last filled cell on the worksheet.
➥ SearchOrder:=xlByRows: searches row by row.
➥ SearchDirection:=xlPrevious: starts from the end of the worksheet and moves backward to find the last used cell.
➥ Range(ActiveCell, lastCell): defines the range from the active cell to the last used cell.
➥ .Select: highlights the selected range.
Using Excel Table (ListObject.DataBodyRange)
If your data is formatted as an Excel Table, selecting a range from the active cell to the end of the table is simple with the ListObject.DataBodyRange property. It allows you to select only the data part of the table, ignoring headers and totals.
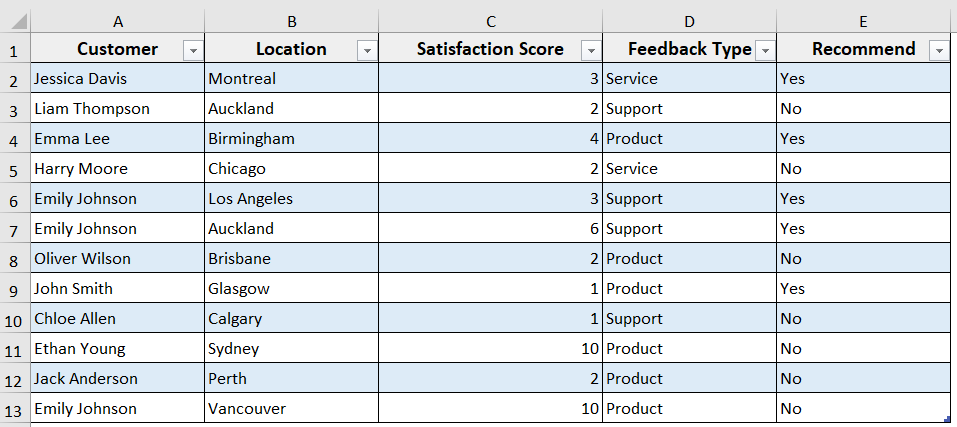
For this method, we have converted our sample Customer Feedback dataset to a structured table.
Steps:
➤ After inserting a new module in the VBA editor, insert the following VBA code.
Sub SelectTableData()
Dim tbl As ListObject
Set tbl = ActiveCell.ListObject
tbl.DataBodyRange.Select
End Sub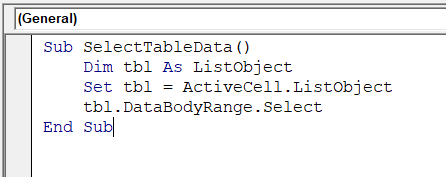
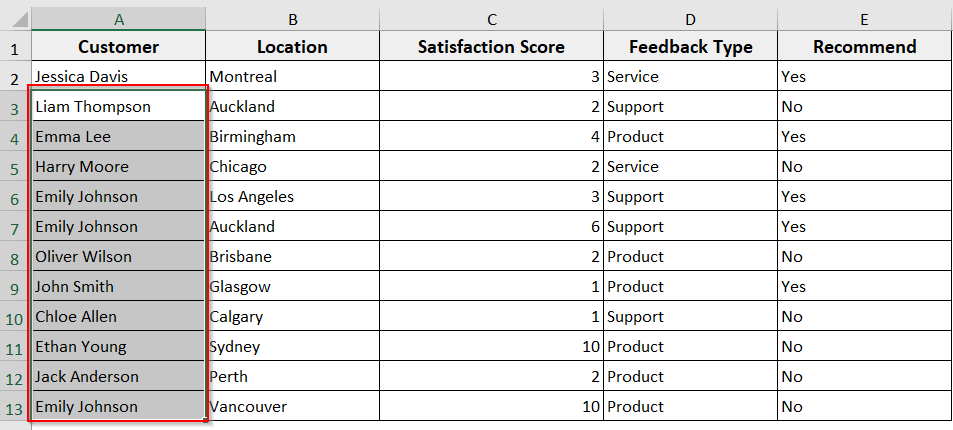
➤ Place your active cell anywhere inside an Excel Table.
➤ Run the macro. It will select all the data rows in that table, excluding headers and totals.
➥ tbl.DataBodyRange: references only the data part of the table (without headers).
➥ .Select: highlights the table’s data range.
Using Offset with End for Relative Selections
Sometimes, you may need to move from the active cell to the last cell in a direction and then adjust the selection relative to it. The Offset property works with End to shift your selection by rows or columns.
This is helpful when you don’t want to include the active cell itself or when you want to move further from the last filled cell.
Steps:
➤ Open the VBA editor.
➤ Insert the following VBA code in a new module.
Sub SelectUsingOffset()
Range(ActiveCell.Offset(1, 0), ActiveCell.End(xlDown)).Select
End Sub
➤ Place your active cell at the start of a column with data. For instance, cell A2.
➤ Run the macro.
➤ It will skip the active cell and select from the next cell down to the last filled cell in that column.
➥ ActiveCell.End(xlDown): It moves to the last filled cell in the column.
➥ Range(..., ...): It defines the range between the offset cell and the last cell.
➥ .Select: It highlights the defined range.
➥ You can adjust the numbers in Offset(row, col) to shift the selection in rows or columns as needed.
Handling Edge Cases (Blanks, Merged Cells, Hidden Rows)
When selecting a range from the active cell to the end, you may face problems if your dataset has blank rows, merged cells, or hidden rows. On top of that, normal End or CurrentRegion methods can stop too early or skip data.
To handle these situations, you can add conditions or use different properties like SpecialCells for visible data. This method is best if you are working with Excel datasets with blanks, merged cells, or filters.
Steps:
➤ Open the VBA editor.
➤ Insert a new module.
➤ Insert the following VBA code in a new module.
Sub SelectWithEdgeCases()
Dim lastRow As Long
lastRow = Cells(Rows.Count, ActiveCell.Column).End(xlUp).Row
Range(ActiveCell, Cells(lastRow, ActiveCell.Column)).SpecialCells(xlCellTypeVisible).Select
End Sub
➤ Place your active cell.
➤ Run the macro.
➤ It will select from the active cell to the last row, ignoring hidden rows.

➥ Range(ActiveCell, Cells(lastRow, ActiveCell.Column)): defines the range from the active cell to the last row.
➥ .SpecialCells(xlCellTypeVisible): skips hidden rows and selects only visible cells.
Frequently Asked Questions
How to select the range till the last row with VBA?
➤ To select the range till the last row with VBA, insert the following VBA code in the module.
Sub SelectToLastRow()
    Dim lastRow As Long
    lastRow = Cells(Rows.Count, ActiveCell.Column).End(xlUp).Row
    Range(ActiveCell, Cells(lastRow, ActiveCell.Column)).Select
End Sub
➤ Run the code.
➤ The code will select from the active cell down to the last filled cell in that column
How to reference a range of cells in Excel VBA?
You can refer to a range of cells in Excel VBA using the Range property for fixed ranges. For instance,
Sub SelectFixedRange()
    Range("A1:B10").Select
End Sub
This VBA code will select cells from A1 to B10.
How to loop through a range of cells in VBA?
You can use a For Each loop to loop through a range of cells in VBA.
➤ To do so, insert the following VBA code in the module.
Sub LoopThroughRange()
    Dim cell As Range
    For Each cell In Range("A1:A10")
        cell.Value = cell.Value * 2
    Next cell
End Sub
➤ Run the code.
➤ The code will multiply every value in A1:A10 by 2.
Wrapping Up
In this tutorial, we have learnt multiple methods to select a range from the active cell to the end using Excel VBA. These methods help you automate selections and manage large datasets with ease. Feel free to download the sample workbook and try out the VBA macros yourself. Let us know how these codes have simplified your Excel tasks.