When working with Excel, we often need to perform actions on multiple rows of data. Of course, doing so manually is time-consuming and prone to errors. That’s especially true for large datasets. In such cases, the For Each Row in Range loop in VBA lets you process each row automatically without worrying about row numbers or how many rows exist.
In this article, you’ll walk through what the For Each Row in Range loop is, its syntax, how it works, and practical examples.
➤ The For Each Row in Range loop processes every row in a range automatically.
➤ You can perform actions like formatting, copying, deleting, or checking values row by row.
➤ It works with both single-column ranges and multi-column datasets.
➤ The loop helps automate repetitive and condition-based Excel tasks efficiently.

What Is the For Each Row in Range Statement in Excel VBA?
The For Each Row in Range loop in Excel VBA goes through every row inside a specified range. Instead of manually handling row numbers, this loop automatically picks each row one by one. It’s useful when you want to apply the same action to multiple rows.
That means you don’t need to know in advance how many rows exist. The loop takes care of moving from the first row to the last row in the range. For actions like highlighting or deleting rows, the For Each Row in Range VBA checks each row and acts automatically until all rows are processed.
Syntax of the Statement
The basic syntax of the For Each Row in Range loop in Microsoft Excel is:
For Each row In Range("StartCell:EndCell").Rows
    'Your code here
Next row
Below is what each part means:
➥ For Each Row: It declares a loop variable that represents one row at a time.
➥ Range(“StartCell:EndCell”).Rows: It defines the set of rows within a given range.
➥ Next row: It moves the loop to the next row in the range.
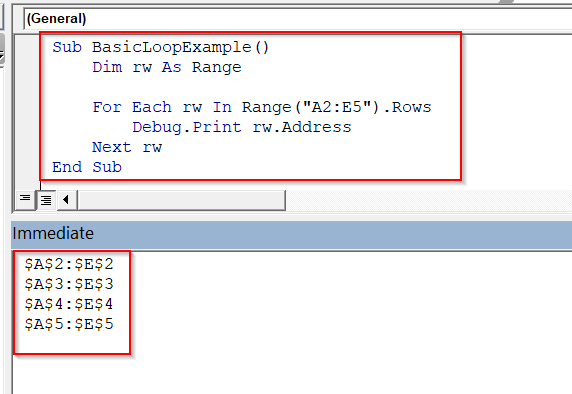
Here is a simple example of the For Each Row loop in Excel VBA.
Sub BasicLoopExample()
    Dim rw As Range
    For Each rw In Range("A2:E5").Rows
        Debug.Print rw.Address
    Next rw
End Sub
It starts at the first row in the range A2:E5 and loops through each row, one at a time. For every row, it prints the row’s address in the Immediate Window. The loop runs 4 times, one time for each row (rows 2 to 5).
Examples of For Each Row in Range Statement in Excel VBA
The For Each Row in Range loop in Excel VBA lets you process every row in a dataset automatically. It’s ideal for automating tasks like formatting rows, checking values, copying or deleting data, and applying conditional logic.
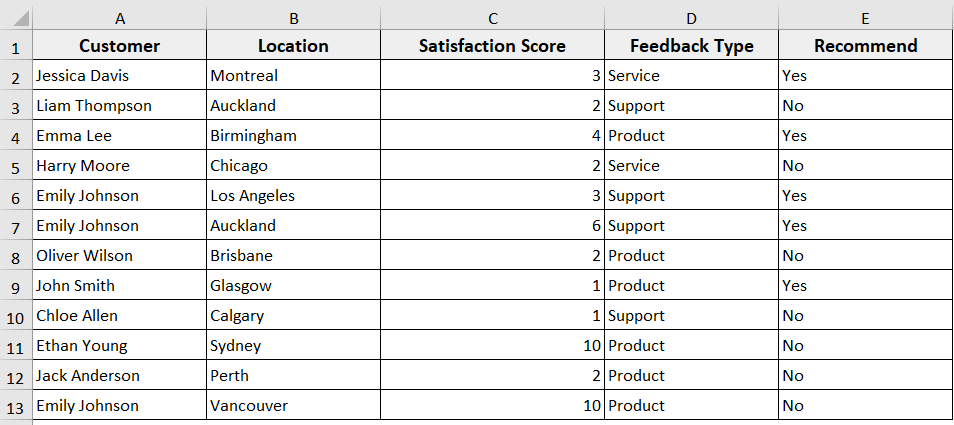
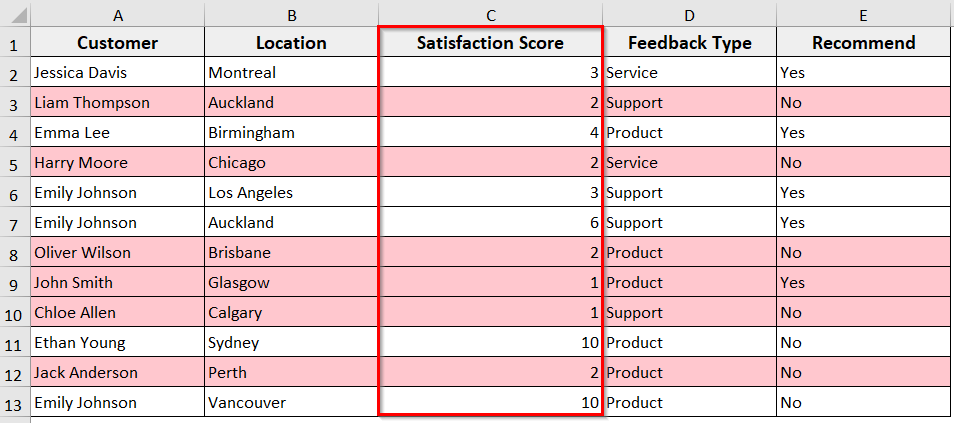
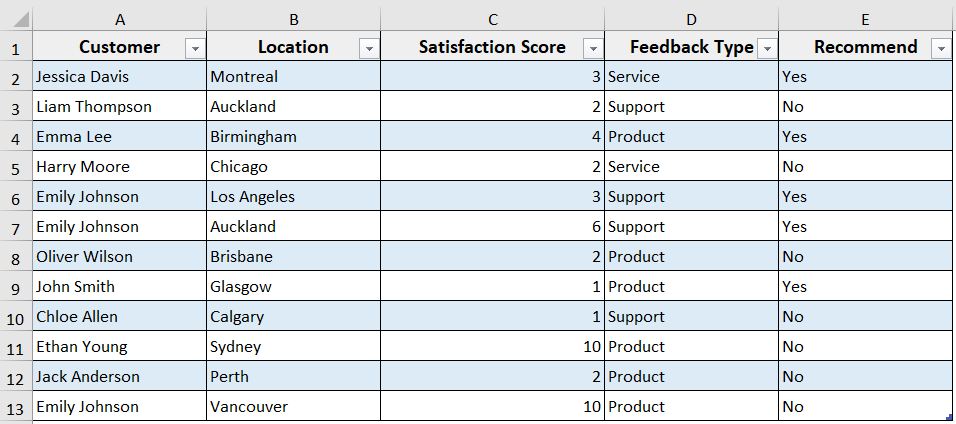
In the dataset below, we have a sample customer feedback dataset with customer names, satisfaction scores, feedback types, and recommendations. Now we are going to use For Each Row in Range loops to automate tasks like marking low scores for follow-up, highlighting rows, copying non-recommended customers, deleting irrelevant rows, and working with Excel Tables efficiently.
Example 1: Loop Through a Single-Column Range
In many Excel tasks, sometimes we need to scan through a single column of data and apply some logic. Here, the For Each Row in Range loop automatically moves through each row in the column, one by one, and applies the logic.
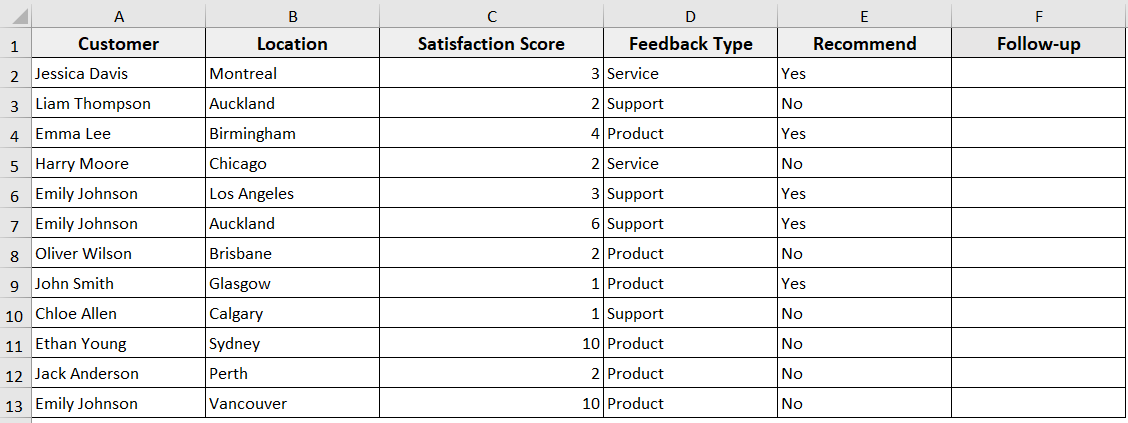
In this example, we’ll loop through the Customer column. For each customer, VBA will check their Satisfaction Score. If the score is less than 3, the code will mark that customer as “Follow-Up” in a new column F.
Steps:
➤ Press Alt + F11 to open the VBA editor.
➤ In the VBA editor, click Insert >> Module.

➤ Insert the following code in the new module.
Sub LoopSingleColumnRange()
Dim ws As Worksheet
Dim rng As Range
Dim cell As Range
'Set the worksheet
Set ws = ThisWorkbook.Sheets("Sheet1")
'Set the range to loop through (Customer column, excluding header)
Set rng = ws.Range("A2:A13") 'A2:A13 contains Customer names
'Loop through each cell in the range
For Each cell In rng
'Check if Satisfaction Score (Column C) is less than 3
If cell.Offset(0, 2).Value < 3 Then
cell.Offset(0, 5).Value = "Follow-Up" 'Write in Column F
End If
Next cell
End Sub
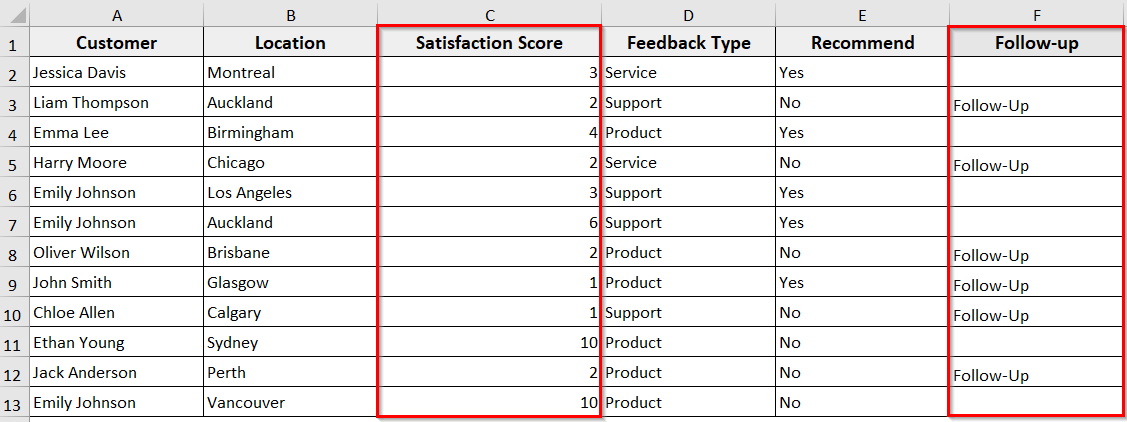
➤ Run the Code:
➤ The code will loop through all customers. For each customer with a Satisfaction Score less than 3, it writes “Follow-Up” in Column F.
➥ Dim rng As Range: It declares the range we will loop through.
➥ Dim cell As Range: It declares each cell in the range.
➥ Set ws = ThisWorkbook.Sheets("Sheet1"): It points to the sheet with your data.
➥ Set rng = ws.Range("A2:A13"): It defines the customer column range.
➥ For Each cell In rng: It loops through every cell in the Customer column.
➥ cell.Offset(0, 2).Value < 3: It checks if the Satisfaction Score in column C is less than 3.
➥ cell.Offset(0, 5).Value = "Follow-Up": It writes “Follow-Up” in Column F for that row.
➥ Next cell: It moves to the next row in the range.
Example 2: Loop Through a Multi-Column Range
When analyzing Excel data, if you need to check multiple columns together, you can use the For Each Row in Range loop. It will treat each row as a single object, letting you check all relevant cells in that row at once.
This method works by looping row by row. So VBA automatically moves to the next row after completing the actions for the current one.
In this example, we will loop through all rows in the dataset and mark customers with a Satisfaction Score ≤ 2 and Feedback Type = “Product” as “Immediate Action” in a new column F.

Steps:
➤ Open the VBA editor and insert a new module.
➤ Insert the following code in the module.
Sub LoopMultiColumnRange()
Dim ws As Worksheet
Dim rng As Range
Dim row As Range
'Set the worksheet
Set ws = ThisWorkbook.Sheets("Sheet1")
'Set the range to loop through (all columns, excluding header)
Set rng = ws.Range("A2:E13") 'A2:E13 contains all dataset rows
'Loop through each row in the range
For Each row In rng.Rows
'Check if Satisfaction Score ≤ 2 and Feedback Type = "Product"
If row.Cells(1, 3).Value <= 2 And row.Cells(1, 4).Value = "Product" Then
row.Cells(1, 6).Value = "Immediate Action" 'Write in Column F
End If
Next row
End Sub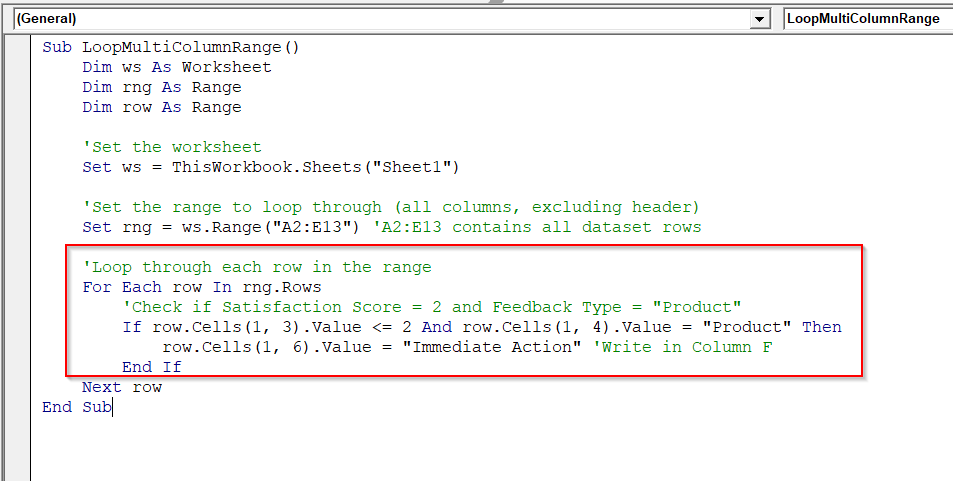
➤ Run the Code
➤ The code will loop through all rows in the dataset and write “Immediate Action” in Column F.

➥ Dim rng As Range: It declares the dataset range.
➥ Dim row As Range: It represents each row in the range.
➥ Set ws = ThisWorkbook.Sheets("Sheet1"): It points to the worksheet with your data.
➥ Set rng = ws.Range("A2:E13"): It defines the range covering all rows and columns.
➥ For Each row In rng.Rows: It loops through every row in the dataset.
➥ row.Cells(1, 3).Value <= 2: It checks Satisfaction Score in column C.
➥ row.Cells(1, 4).Value = "Product": It checks Feedback Type in column D.
➥ row.Cells(1, 6).Value = "Immediate Action": It writes the result in Column F.
➥ Next row: It moves to the next row in the range.
Example 3: Apply Formatting to Each Row
When working with Excel, highlighting or formatting specific rows makes data easier to read and analyze. A For Each Row in Range loop processes each row as a whole and applies formatting based on conditions without manually selecting cells.
In this example, we will loop through the dataset and highlight all rows with a Satisfaction Score ≤ 2 in light red.
Steps:
➤ Open the VBA editor and insert a new module.
➤ In the new module, insert the following VBA code.
Sub HighlightLowSatisfaction()
Dim ws As Worksheet
Dim rng As Range
Dim row As Range
'Set the worksheet
Set ws = ThisWorkbook.Sheets("Sheet1")
'Set the range to loop through (all dataset rows)
Set rng = ws.Range("A2:E13") 'A2:E13 contains all dataset rows
'Loop through each row
For Each row In rng.Rows
'Check if Satisfaction Score ≤ 2
If row.Cells(1, 3).Value <= 2 Then
'Highlight the entire row in light red
row.Interior.Color = RGB(255, 199, 206)
End If
Next row
End Sub
➤ Run the Code.
➤ The code will loop through all rows in the dataset, and any row with a Satisfaction Score ≤ 2 is highlighted in light red.
➥ Dim rng As Range: It declares the range variable for the dataset.
➥ Dim row As Range: It represents each row in the range.
➥ Set ws = ThisWorkbook.Sheets("Sheet1"): It references your worksheet.
➥ Set rng = ws.Range("A2:E13"): It defines the dataset range.
➥ For Each row In rng.Rows: It loops through every row.
➥ row.Cells(1, 3).Value <= 2: It checks Satisfaction Score in column C.
➥ row.Interior.Color = RGB(255, 199, 206): It applies a light red fill to the entire row.
➥ Next row: It moves to the next row in the range.
Example 4: Copy Data Row by Row
If you need to move or consolidate data from one sheet to another based on specific conditions, you can use the For Each Row in Range loop. It processes each row individually and copies only the relevant data without manually selecting rows.
In this example, we will copy all rows where “Recommend” = “No” to a new sheet named NotRecommended.
Steps:
➤ Open the VBA editor and insert a new module.
➤ In the new module, insert the following VBA code.
Sub CopyNotRecommendedRows()
Dim wsSrc As Worksheet, wsDst As Worksheet
Dim rng As Range, row As Range
Dim dstRow As Long
'Set the source worksheet
Set wsSrc = ThisWorkbook.Sheets("Sheet1")
'Check if destination sheet exists; create if not
On Error Resume Next
Set wsDst = ThisWorkbook.Sheets("NotRecommended")
On Error GoTo 0
If wsDst Is Nothing Then
Set wsDst = ThisWorkbook.Sheets.Add
wsDst.Name = "NotRecommended"
End If
'Clear previous data in the destination sheet
wsDst.Cells.Clear
'Copy header row first
wsSrc.Rows(1).Copy wsDst.Rows(1)
'Set range of dataset
Set rng = wsSrc.Range("A2:E13")
dstRow = 2 'Start past header
'Loop through each row in the dataset
For Each row In rng.Rows
If LCase(row.Cells(1, 5).Value) = "no" Then
row.Copy wsDst.Rows(dstRow)
dstRow = dstRow + 1
End If
Next row
MsgBox "Copied " & dstRow - 2 & " rows to '" & wsDst.Name & "'."
End Sub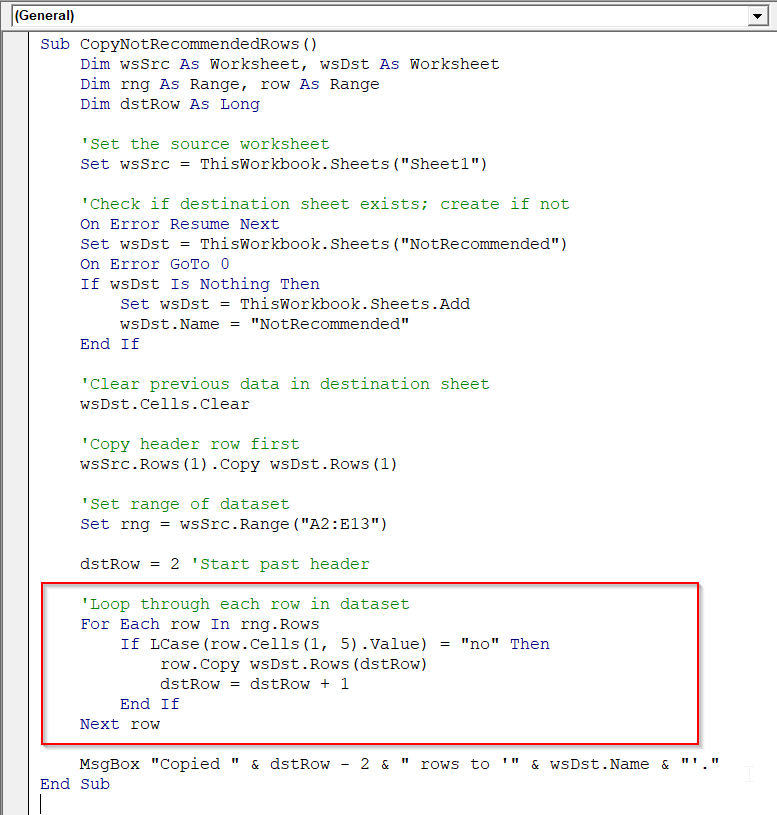
➤ Run the Code
➤ The code copies all rows where Recommend = “No” to a new sheet named NotRecommended, and a message box shows how many rows were copied.

Example 5: Delete Rows Based on Condition
Sometimes, your dataset contains rows that are irrelevant or need to be removed based on specific conditions. Using a For Each Row in Range loop allows you to check each row individually and delete it if it meets your criteria.
In this example, we’ll delete all rows where the “Satisfaction Score” is less than 3.
Steps:
➤ Open the VBA editor and insert a new module.
➤ In the new module, insert the following VBA code.
Sub DeleteLowSatisfactionRows()
Dim ws As Worksheet
Dim rng As Range, row As Range
'Set worksheet
Set ws = ThisWorkbook.Sheets("Sheet1")
'Set dataset range (without header)
Set rng = ws.Range("A2:E13")
'Loop backwards through each row
For Each row In rng.Rows
If row.Cells(1, 3).Value < 3 Then
row.Delete
End If
Next row
End Sub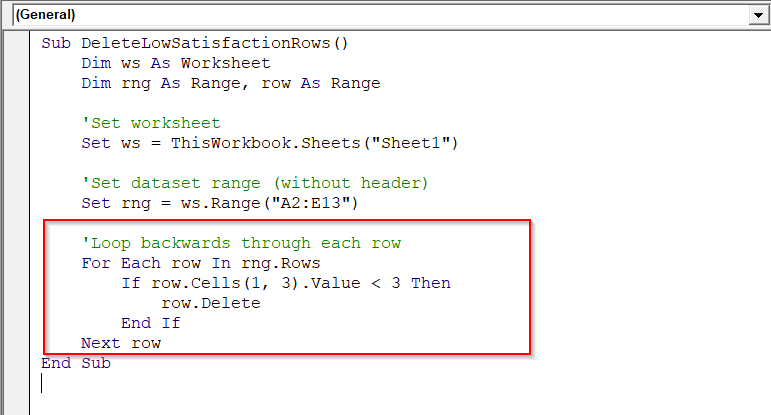
➤ Run the Code
➤ The code scans through all rows in your dataset and deletes any row where the Satisfaction Score < 3.

➥ Set rng = ws.Range("A2:E13"): It defines the dataset without headers.
➥ For Each row In rng.Rows: It loops through each row.
➥ If row.Cells(1, 3).Value < 3 Then: It checks column 3 (Satisfaction Score).
➥ row.Delete: It deletes the entire row if the condition is met.
➥ Loop runs until all rows are checked.
Example 6: Work with Excel Table Rows
When your dataset is formatted as an Excel Table, working with table rows directly is more structured and dynamic than using regular ranges. A For Each Row in Range loop allows you to process each table row. Using this approach ensures your code automatically adapts when rows are added or removed.
In this example, we have converted our dataset to a table named Table1 and will highlight customers who said “No” in the Recommend column with the loop.
Steps:
➤ Open the VBA editor and insert the following VBA code in the new module.
Sub HighlightNotRecommendedRows()
Dim ws As Worksheet
Dim tbl As ListObject
Dim rw As ListRow
'Set worksheet and table
Set ws = ThisWorkbook.Sheets("Sheet1")
Set tbl = ws.ListObjects("CustomerTable")
'Loop through each row in the table
For Each rw In tbl.ListRows
If LCase(rw.Range.Cells(1, 5).Value) = "no" Then
rw.Range.Interior.Color = RGB(255, 200, 200) 'Light red
End If
Next rw
End Sub
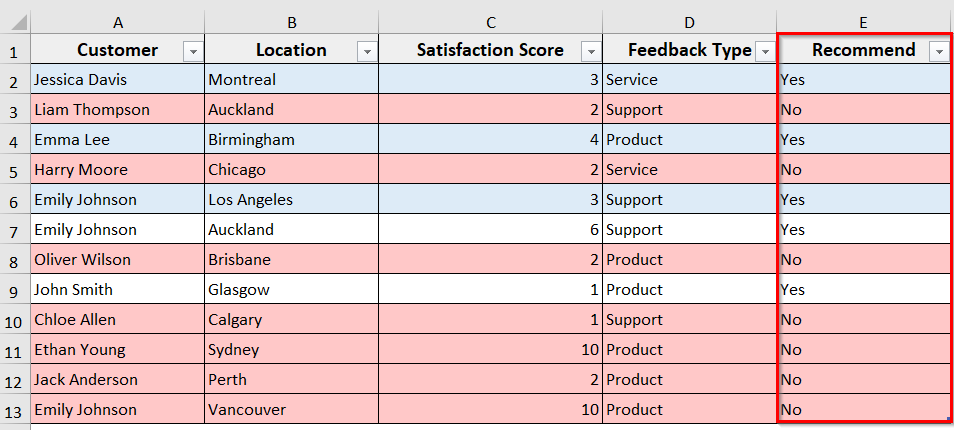
➤ Run the Code
➤ It will highlight in light red every row where Recommend = No.
➥ Set tbl = ws.ListObjects("CustomerTable"): It references the table by name.
➥ For Each rw In tbl.ListRows: It loops through each row in the table.
➥ rw.Range.Cells(1, 5).Value: It reads the Recommend column.
➥ rw.Range.Interior.Color = RGB(255,200,200): It highlights rows in light red.
Frequently Asked Questions
How to transpose multiple rows into multiple columns?
Insert the following VBA code to transpose multiple rows into multiple columns.
Sub TransposeRowsToColumns()
    Dim ws As Worksheet
    Dim srcRange As Range, dstRange As Range
    'Set worksheet
    Set ws = ThisWorkbook.Sheets("Sheet1")
    'Define source range (rows you want to transpose)
    Set srcRange = ws.Range("A1:D5") 'example: 5 rows × 4 columns
    'Define destination range (where transposed data will go)
    Set dstRange = ws.Range("F1")
    'Transpose rows into columns
    dstRange.Resize(srcRange.Columns.Count, srcRange.Rows.Count).Value = _
        Application.WorksheetFunction.Transpose(srcRange.Value)
    MsgBox "Rows transposed into columns successfully!"
End Sub
Run the code.
The code will take rows from A1:D5 and paste them transposed, starting from F1. Update rows according to your dataset.
How to cycle through a range in VBA?
You can cycle through a range in VBA using For Each…Next. For example, the following VBA code loops through ranges to update or format cells automatically.
Sub CycleRangeForEach()
    Dim cell As Range
    For Each cell In Range("A1:A10")
        Debug.Print cell.Value
    Next cell
End Sub
Which loop is faster in VBA?
In VBA, the For…Next loop is generally faster than the For Each…Next loop, especially when working with large ranges of cells. This happens because For…Next directly uses row and column indexes, while For Each creates object references for every cell, which takes more time.
Wrapping Up
In this guide, we have learnt how to use the For Each Row in Range loop in Excel VBA to automate tasks efficiently. You can apply this loop to process rows, check values, format data, copy or delete rows, and work with Excel Tables. You can also download the sample Excel dataset to practice the code examples shared in this article and see how exactly they work.