When managing a budget or making business decisions, it is important to see how different sets of inputs affect your results. That is where the Scenario Manager in Excel comes in. It lets you create and compare multiple what-if scenarios by changing several variables at once, like income, expenses, or costs, without modifying your original data. In this tutorial, we will show you how to use Scenario Manager in Excel through a step-by-step guideline using a monthly income and expense model.
To use Scenario Manager in Excel.
➤ Go to the Data tab, click What-If Analysis, and choose Scenario Manager.
➤ Click Add to create a new scenario, give it a name (e.g., Plan A), and select the changing cells (like expense categories).
➤ Enter the new values for the selected cells and click OK.
➤ Repeat this for other scenarios (Plan B, Plan C).
➤ Once all scenarios are added, click Show to view the result of any scenario in your worksheet.
➤ You can also click Summary to generate a comparison report of all scenarios side by side.
What Is a Scenario Manager in Excel?
Scenario Manager in Excel is a built-in tool used for what-if analysis. It allows you to create and compare multiple sets of input values to see how they affect your results. Instead of changing values manually, you can define different scenarios like Plan A, Plan B, Plan C, and switch between them with just a click. This helps you evaluate various possibilities quickly without altering your original data. Scenario Manager is especially useful in budgeting, forecasting, and decision-making, where you need to test different assumptions or plans.
Steps to Use Scenario Manager in Excel
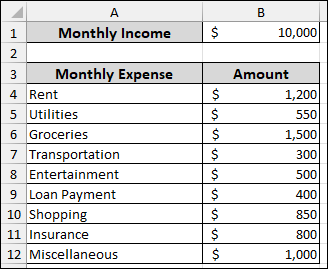
Here, we are explaining all the steps to use Scenario Manager in Excel. Suppose we have a dataset that includes Monthly Income in cell B1, for example, $10,000, Monthly Expense categories, and their respective Amounts. Now, we will calculate the total expense and savings, and create multiple scenarios to obtain a scenario summary.
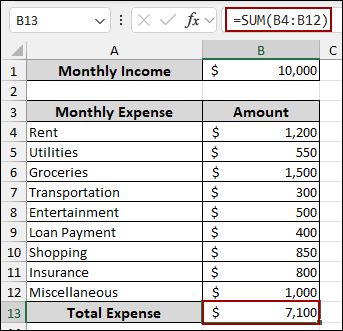
Step 1: Calculating Total Expense and Savings
First, we will calculate the Total Expense by summing up all the individual monthly expenses.
➤ In cell B13, write down the formula below.
=SUM(B4:B12)
As a result, the Total Expense will be calculated.
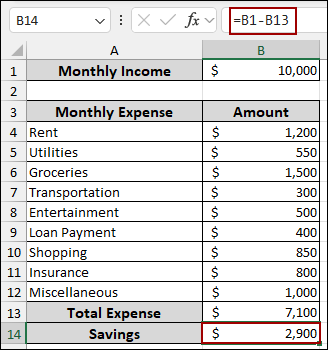
Next, we will determine the Savings by subtracting the Total Expense from the Monthly Income.
➤ In cell B14, put the formula below.
=B1-B13
Thus, your Savings will be displayed.
Step 2: Creating Multiple Scenarios
We will now utilize the Scenario Manager to analyze different budget scenarios for Monthly Expenses and observe their impact on Savings.
➤ Go to the Data tab in the Excel ribbon.
➤ In the Forecast group, click on What-If Analysis.
➤ Select Scenario Manager from the dropdown menu.
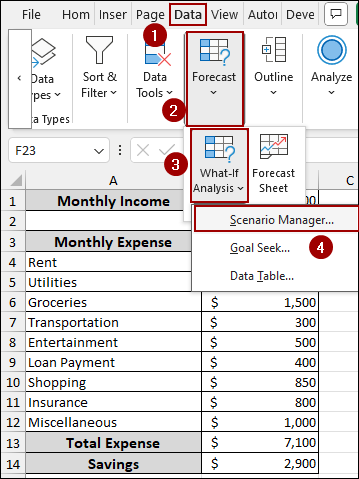
The Scenario Manager dialog box will appear.
➤ In the Scenario name field, type Plan A.
➤ In the Changing cells field, select the cells B6, B8, and B10.
These are the expense categories we want to vary: Groceries, Entertainment, Shopping.
➤ Click OK.
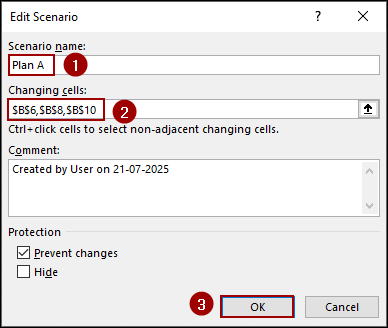
A Scenario Values dialog box will appear, showing the current values for the selected changing cells.
➤ Change the values (e.g., Groceries: 1000, Entertainment: 200, Shopping: 300) according to your wish.
➤ Click OK.

Finally, we have successfully created our scenario for Plan A.
➤ To check the scenario, select Plan A and click Show.
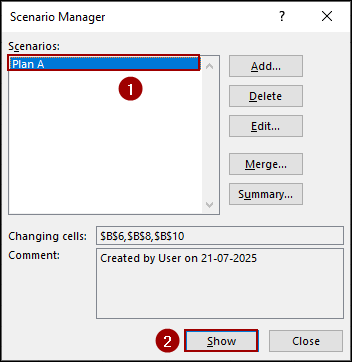
Thus, you will see the values changed according to the scenario (Plan A).

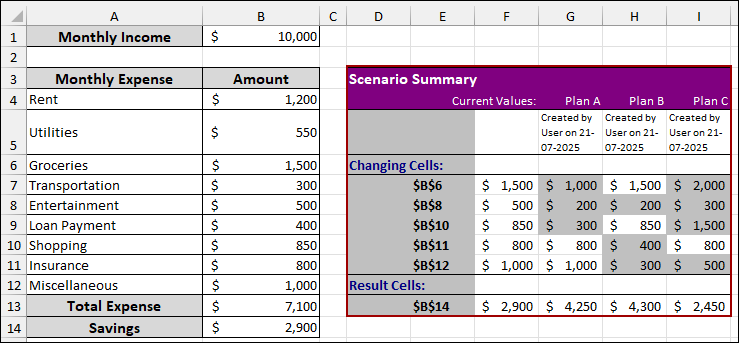
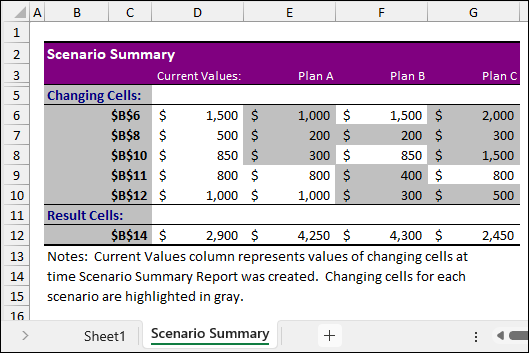
Step 3: Creating Scenario Summary
In this final part, we will add some more scenarios to create the scenario summary. Here, we have added some scenarios with a different set of expense adjustments.
For Plan B: B8 (Entertainment), type 200, B11 (Insurance), type 400, B12 (Miscellaneous), type 300.
For Plan C: B6 (Groceries), type 2000, B8 (Entertainment), type 300, B10 (Shopping), type 1500, B12 (Miscellaneous), type 500.
➤ After adding all the scenarios, click Summary from the Scenario Manager window.
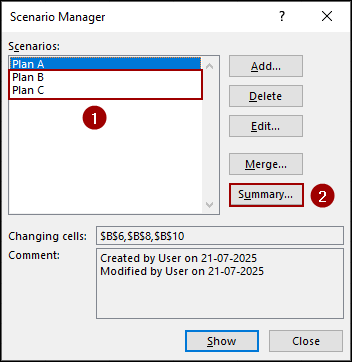
This will open the Scenario Summary dialog box.
➤ Choose Scenario summary for the Report type.
➤ In the Result cells field, specify the cell that contains the final outcome you want to track (e.g., B14 for “Savings”).
➤ Finally, click OK.

Thus, a new sheet named Scenario Summary will be generated, displaying a clear comparison of your different scenarios and their impact on your result cells.
Frequently Asked Questions
Does Scenario Manager update automatically if I change my original data?
No, scenarios store static values. If your original data changes, you need to manually update the scenario.
How many scenarios can I create in one worksheet?
Excel allows you to create up to 32 scenarios per worksheet.
What types of cells can I use as changing cells?
You can use any input cells that affect the outcome, as long as they are not part of an array or protected range.
Concluding Words
Above, we have explored how to use Scenario Manager in Excel to create and compare multiple what-if situations. This tool is especially helpful when you need to test different sets of input values and see how they affect your final result. If you have any questions, feel free to leave them in the comments below.