Creating and following a personal budget is a smart decision for any finance-literate person. A budget can help you track your income and expenses, and plan for the future. Excel, being a spreadsheet software, provides a lot of useful functions and formulas that make it easy to create a personal budget. In this article, we will learn how to create your personal budget in Excel. You will learn to create everything from scratch and prepare for your next financial period.
➤ Create two tables for revenues and expenses. Convert them to actual tables by pressing Ctrl + T .
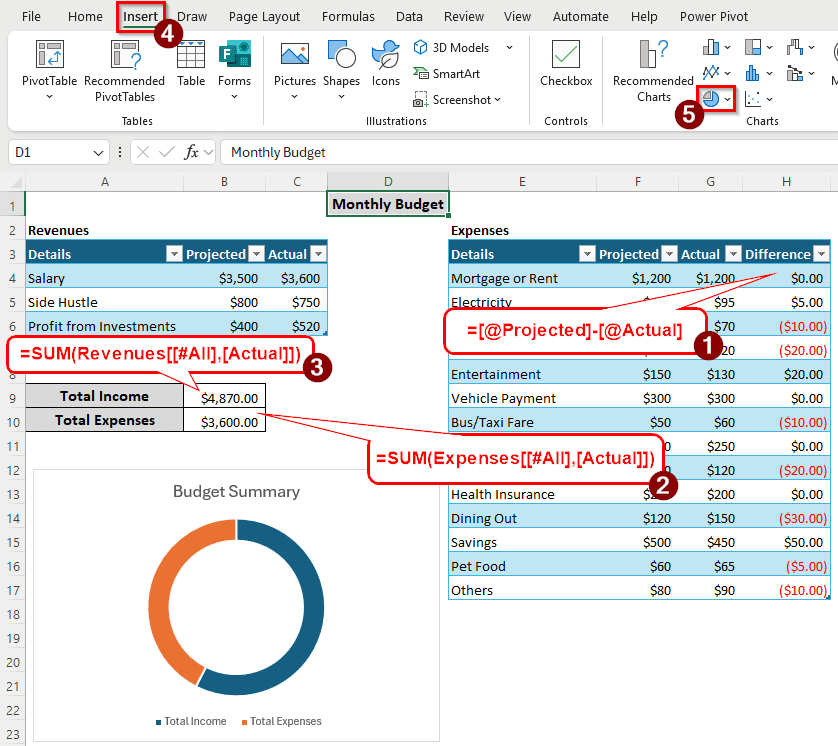
➤ Calculate the difference between the projected and actual expenses using the following formula:
=[@Projected]-[@Actual]
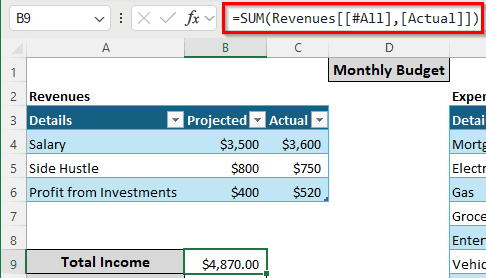
➤ Calculate the total income using the following formula:
=SUM(Revenues[[#All],[Actual]])
➤ Here, Revenues is the name of the revenues table.
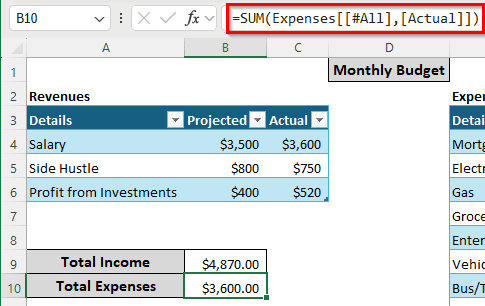
➤ Calculate the total expenses using the following formula:
=SUM(Expenses[[#All],[Actual]])
➤ In this formula, Expenses is the name of the table where the data is pulled.
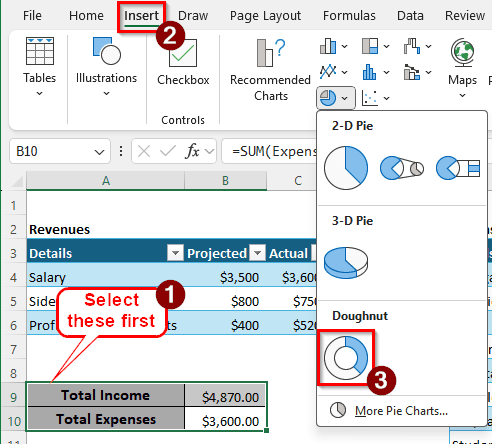
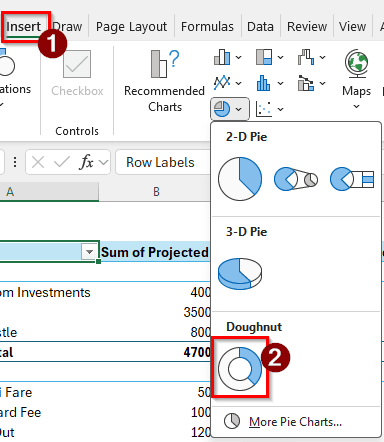
➤ Select the total income and expenses, then go to Insert > Charts and select the Doughnut chart to create a chart for the income and expenses.
In this article, we will go through the whole process of creating a personal budget in detail. Therefore, gather your monthly transactions, and get ready to prepare a budget.
Using Regular Tables to Create a Personal Budget in Excel
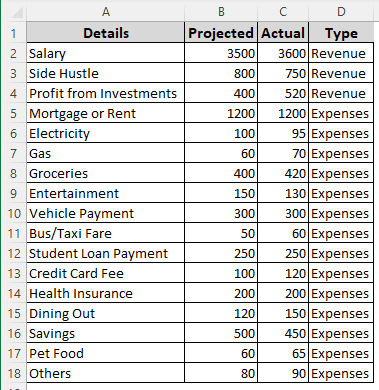
We have some raw data for revenues and expenses here. First, we will make two tables for the revenues and expenses, then calculate the total income and expenses, and finally, create a chart to show them visually.
Most people use regular data ranges to put data in Excel. However, creating a table has its benefits. When using a regular data range, if we have to add more entries, we need to change all of the formulas used in the sheet. But in tables, new data is automatically added to the table range. As formulas use table references instead of cell references, we don’t need to change anything else in the sheet for new entries.
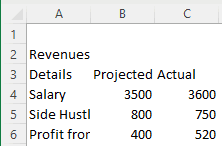
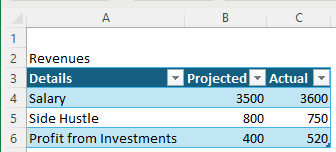
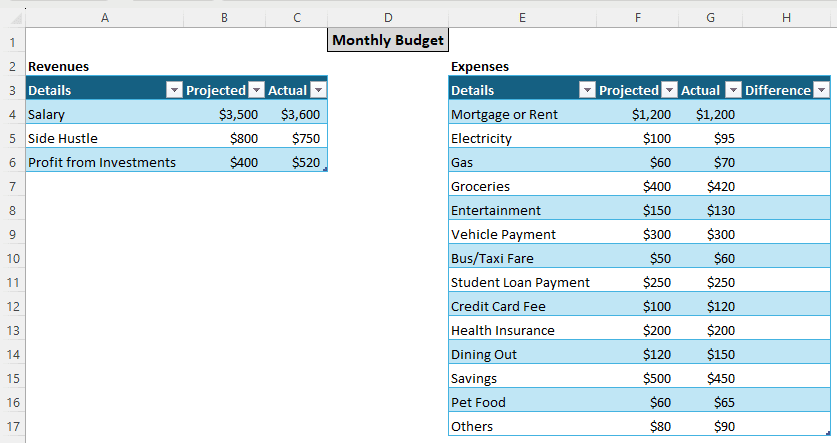
➤ Enter three column headers for the revenues: Details, Projected, Actual.
➤ Insert the entries for the revenues.
➤ Select A3:C6, and press Ctrl + T to create a table.
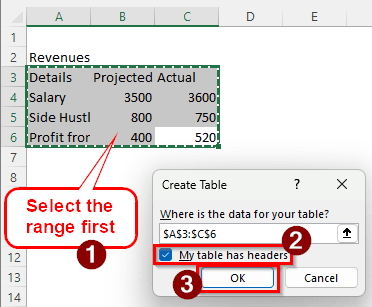
➤ Check the box that says My table has headers and press OK.
➤ Select the cell that has the title Revenues, and press Ctrl + B to make it bold.
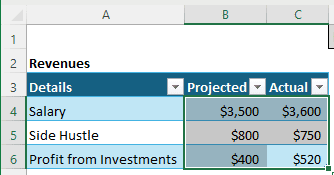
➤ Select B4:C6 (the cells with dollar values) and press Ctrl + Shift + 4 to convert their number formats to currency.
➤ In the D1 cell, insert the title Monthly Budget, and format it the way you like.

➤ Create another table for Expenses with the following headers:
Details, Projected, Actual, Difference.
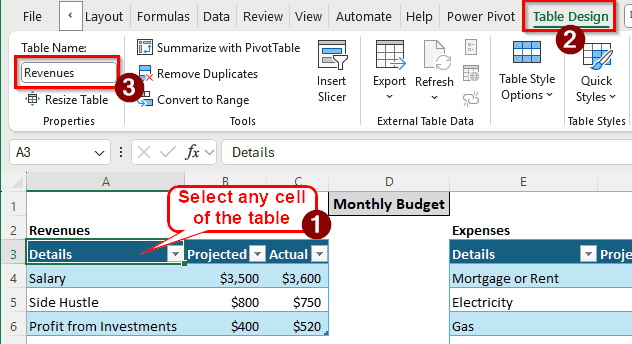
➤ Select any cell of the first table, go to the Table Design tab of the ribbon, go to Properties > Table Name, and rename the table to Revenues.
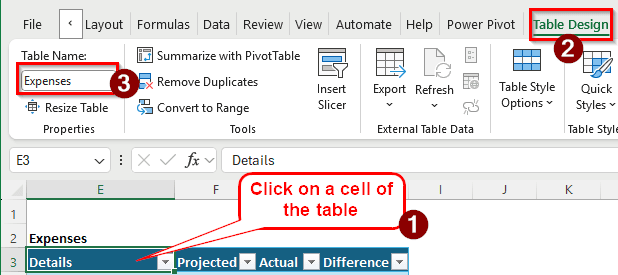
➤ Similarly, rename the Expenses table to Expenses.
➤ In the H4 cell (The first row of the Difference column), insert the following formula:
=[@Projected]-[@Actual]
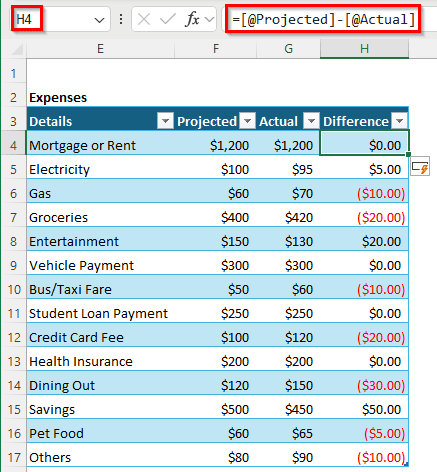
➤ Now, we can see that we spent more money than anticipated in red.
➤ Insert the following formula in the B9 cell to calculate the total income:
=SUM(Revenues[[#All],[Actual]])
➤ Similarly, calculate the Total Expenses in the B10 cell with the following formula:
=SUM(Expenses[[#All],[Actual]])
➤ Select A9:B10 and go to Insert > Charts > Doughnut.
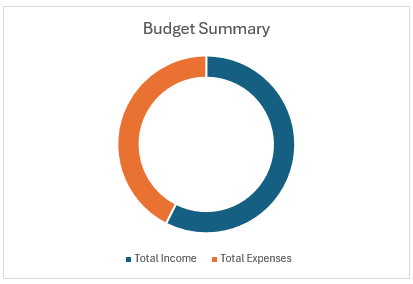
➤ Click on “Chart Title” and rename the chart to Budget Summary.
➤ You can add more entries to both of the tables to immediately reflect changes in the totals and the chart.
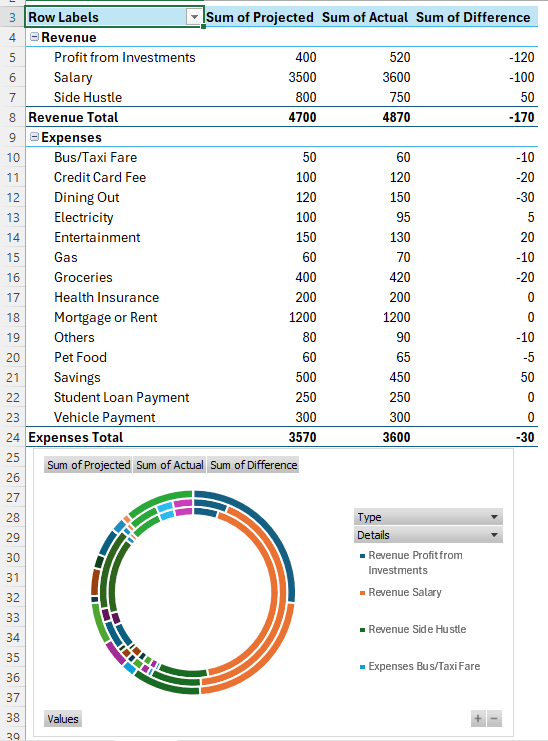
Making Use of a Pivot Table to Create a Personal Budget
A pivot table provides more flexibility to create the budget. Here is how to make use of that.
➤ Select the raw data and go to Insert > PivotTable. Press OK to create the table.

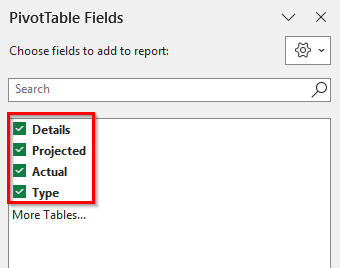
➤ In the new sheet, select all of the fields from the PivotTable Fields section.
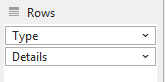
➤ In the Rows section, drag and drop Type to the top.
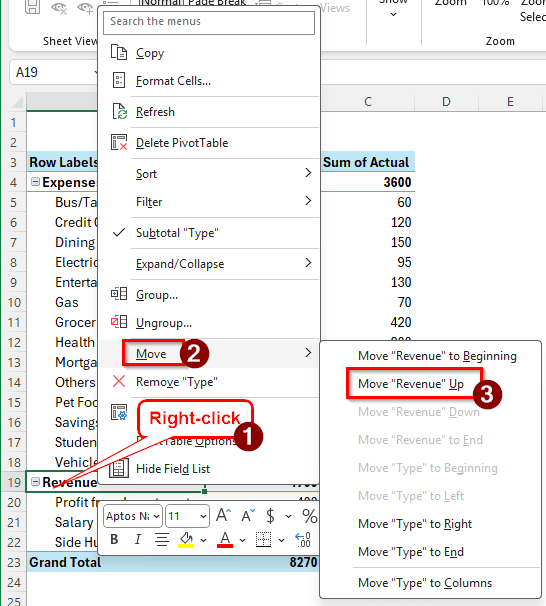
➤ In the pivot table, right-click on Revenue, and select Move > Move “Revenue” Up.
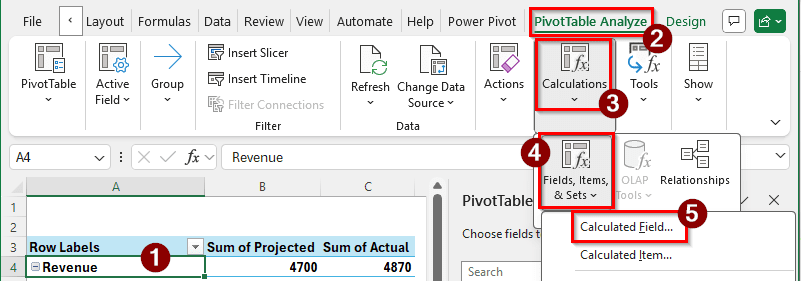
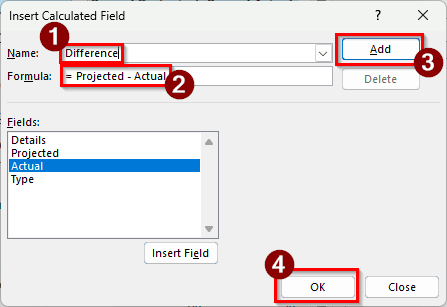
➤ Select a cell of the table, and go to the PivotTable Analyze tab of the ribbon. Then, head to Fields, Items, & Sets > Calculated Field.
➤ In the new window, write Difference in the Name field, and the following formula in the Formula field:
= Projected - Actual
Like the previous method, we are calculating the difference by subtracting the actual values from the projected ones.
➤ Press Add and OK to continue.
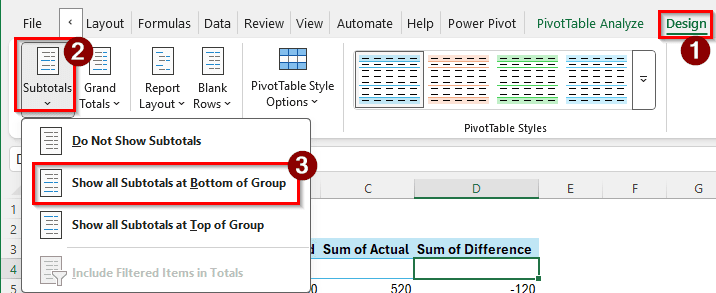
➤ Go to the Design tab of the pivot table, and select Subtotals > Show all Subtotals at Bottom of Group.
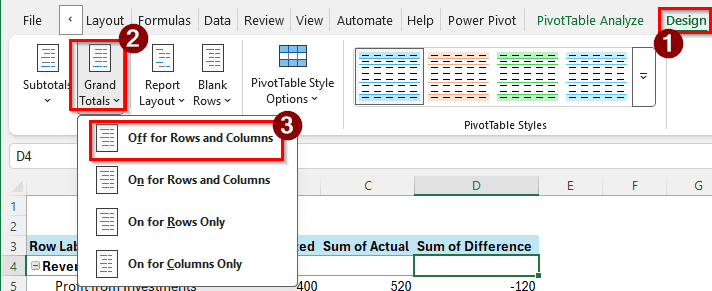
➤ From the same tab, select Grand Totals > Off for Rows and Columns.
➤ Finally, go to Insert > Charts, and select the Doughnut chart to create a pivot chart.
➤ Now, if you want to change any entries or add more, do it to the original dataset, and refresh the pivot table by pressing Alt + F5 to reflect the changes.
Frequently Asked Questions
What is the 50 30 20 rule in Excel?
The 50/30/20 rule for budgeting is that you should use 50% of your income for needs, 30% for wants, and 20% for savings. For example, needs include your rent and groceries, wants include dining out and a Netflix subscription, and savings are your DPS/FDR.
Is Excel good for personal budgeting?
Yes, Excel is probably the most popular software for budgeting. You probably use Excel for office work anyway, which makes you familiar with the application. Excel online is free for everyone, and you can use it for personal budgeting as well.
What is the 70-10-10-10 rule for money?
The 70-10-10-10 rule dictates that you should use 70% of your income for living expenses, 10% for short-term savings, such as keeping your money in a bank savings account, 10% for long-term investments, like FDs or stocks, and 10% for debt repayment, like student loans or mortgages.
Where can I find an Excel budget template?
Open Excel, and go to New > Search for online templates. Write “budget” and hit Enter. Microsoft Excel will show some ready-made budget templates that you can download and use for free.
Should I use Google Sheets or Excel for budgeting?
It is entirely up to you. If you have to share your budget with others, Google Sheets will be a better option for compatibility. If you are making a budget only for yourself, Excel provides more flexibility.
Wrapping Up
In this article, we have learned how to create a personal budget in Excel. The Excel file containing the budget is available for download, and you can use it as your budget template and fill in the items. Feel free to leave your feedback and questions in the comment section below. Until next time, stay tuned.