If you’re a regular Excel user, it’s almost impossible that you’ve never encountered an error. Let’s say you’re tracking sales data. You want to multiply the stock quantities and unit price. But suddenly, you found a #VALUE! error in a cell. Now, it’s essential to understand why this happens and how you can get rid of this error. Microsoft Excel provides the Trace Error option, a built-in tool to quickly trace and fix errors. This tool not only improves accuracy but also saves valuable time. This article demonstrates two easy ways to apply the Trace Error tool to trace the common errors in Excel with a real-life dataset.
To trace errors in an Excel cell, follow the steps below
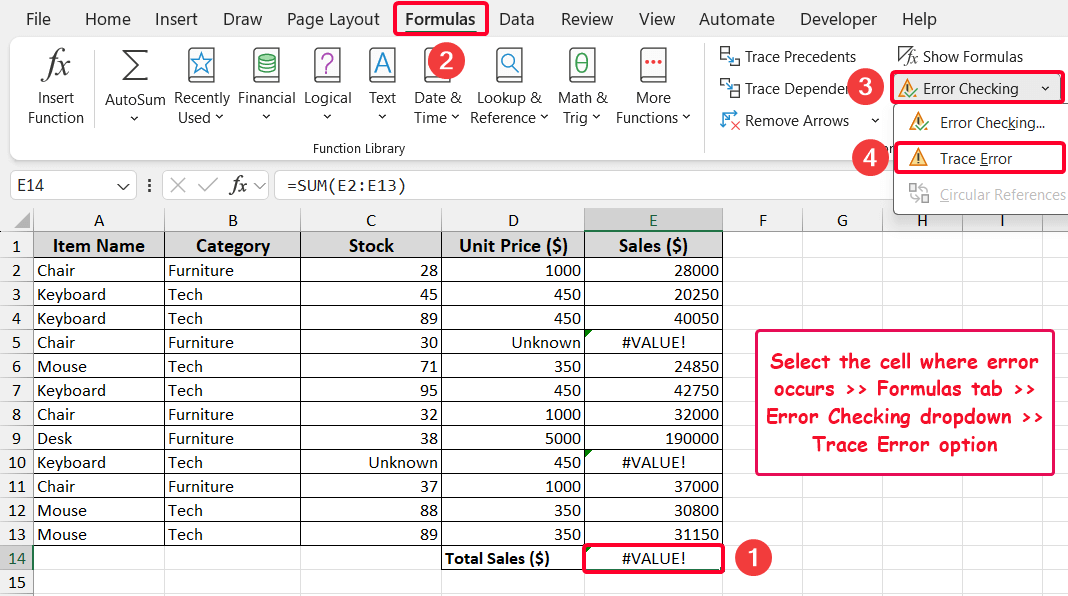
➤ First, select the cell where the error occurs (e.g., E14 cell);
➤ Go to the Formulas tab >> Formula Auditing >> Error Checking dropdown >> Trace Error.
Here are two simple methods to trace Excel errors, explained in this article.
Understanding Common Excel Errors
| Error | Meaning | When It Occurs? |
|---|---|---|
| #VALUE! | Wrong data type in formula | This occurs when a formula has an incorrect reference, operator, or uses text instead of numbers. |
| #DIV/0! | Division by zero | Happens if you divide a cell or number by 0 or a blank cell. |
| #DIV/0! | Numeric calculation problem | If the number inside a cell is too large or too small. |
| #DIV/0! | Invalid cell reference | Because of incorrect or missing references. |
| #N/A | Not Available | Conveys the message Not Available. |
| #NAME? | Excel doesn’t recognize text | Occurs due to wrong spelling or using unavailable table or range names. |
| #NULL! | Intersection error | When a specified range is invalid |
What is Trace Error Feature and What Are the Benefits of Using It?
The Trace Error feature is a built-in Excel tool to identify, locate, and understand formula errors within your data. When Excel detects an error in a cell (like #VALUE!, #DIV/0!, #NAME?, etc.), a small green triangle appears at the top-left corner of that cell. When you select the cell, a yellow triangle with an exclamation mark (also called “smart trace tag error”) appears next to the cell. Clicking the smart tag or from the ribbon, you can apply the Trace Error feature to understand the root cause of the error.
Benefits of Using Trace Error Feature:
- Quickly diagnose errors;
- Improves formula accuracy;
- Saves time in a large dataset;
- Simplifies troubleshooting;
- Enhances productivity;
Use Trace Error Option from the Context Menu
The Trace Error option in Excel appears when you click a cell with an error. Then you have to choose the option from the context menu to find the cause of the error easily.
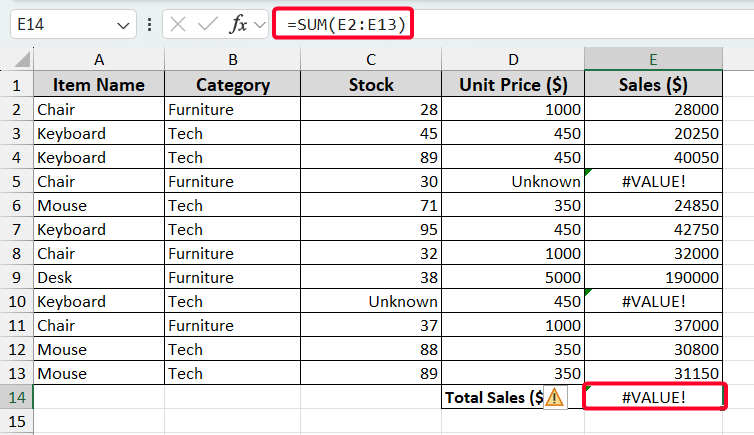
Let’s say we have sales data in A1:E13 cells for some items with stock and unit price. Later, we calculated sales by multiplying stock and unit price ($). After doing that, we found #VALUE! error in E5, E10, and E14.
Now we will trace the errors in those cells.
Steps:
➤ Go to the cell where the error occurs (e.g., E14 cell).
➤ A yellow triangle with an exclamation mark (one kind of smart tag) will be visible on the left side of the cell.
➤ Click the smart tag. You’ll see some options in the context menu.
➤ Choose the Trace Error option from the context menu.

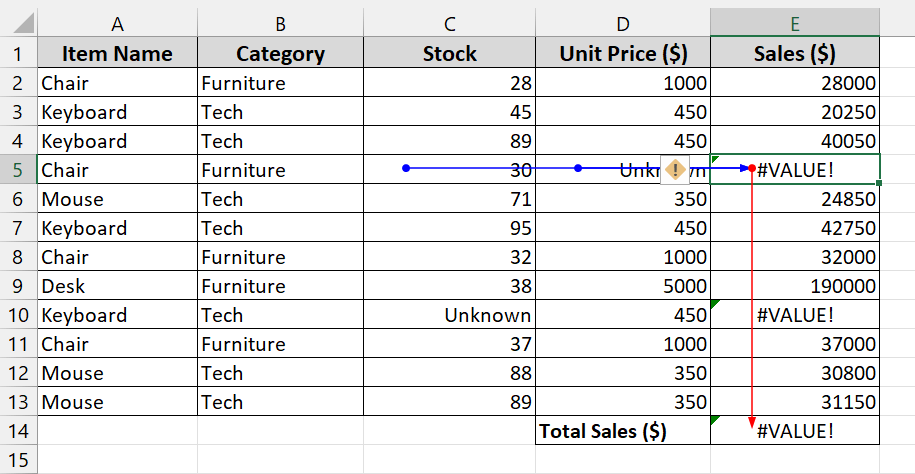
Meanwhile, you’ll see the output as shown below.
Note:
You’ll see the Trace Error option in the context menu only if the error cell is linked to other cells that also contain errors. That’s why we see this option in the case of the E14 cell, but you won’t get the option in the case of the E5 and E10 cells.
Use the Formulas Tab to Trace Errors in Excel
Another way to trace errors in Excel is using the Formulas tab. This method is applicable to any type of error, unlike the previous method. That means you can also use it for E5 and E10 cells.
Steps:
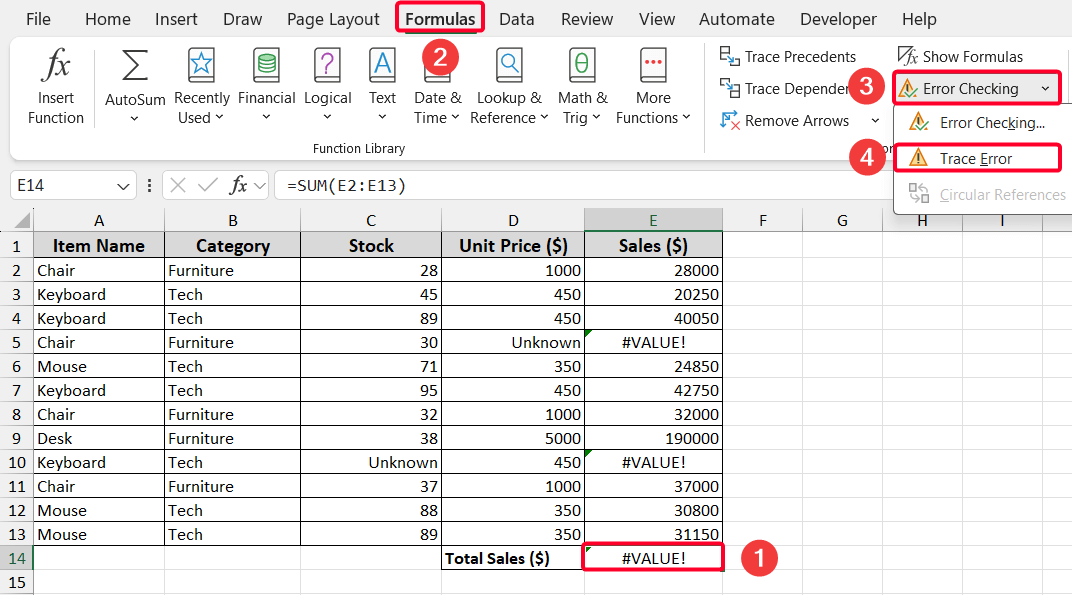
➤ Click the cell that displays an error (e.g., E14 cell).
➤ Go to the Formulas tab.
➤ In the “Formula Auditing” group, click Error Checking.
➤ Then select Trace Error.
You’ll see the same output as we found in the first method.

Now, try it on the E10 cell and apply the Trace Error option from the Formulas tab. You’ll see the blue arrows from the C10 to the E10 cell.

Frequently Asked Questions
How to Use Trace Precedents or Dependents to Trace Errors in Excel?
The Trace Precedents and Trace Dependents features are also helpful for tracing errors. Trace Precedents determines the cause of the error, while Trace Dependents finds the impact of the error. You can use these two features from the Formula Auditing ribbon group in the Formulas tab.
How Do I Trace Errors That Involve Multiple Sheets?
Select the cell containing the error >> go to the Formulas tab >> click Trace Precedents. If the formula references another sheet, Excel will display a black arrow pointing to a worksheet icon. Click the worksheet icon to open the source sheet and view the referenced cells. Repeat the process if the formula links to more sheets.
How to Remove Error Tracing Arrows in Excel
Go to the Formulas tab >> select Formula Auditing dropdown menu >> click Remove Arrows.
How Can I Prevent Errors in Excel Before They Happen?
You can prevent many common errors by using data validation, checking for blank cells before calculations, and protecting key formulas from accidental changes. Regularly using Excel’s Error Checking and Evaluate Formula tools also helps maintain clean and reliable data.
Wrapping Up
Tracing errors in Excel is essential for maintaining accuracy in data analysis and reporting. Using the Trace Error option, users can easily identify and correct mistakes in their worksheets. These features not only save time but also help ensure reliable results. Feel free to share your thoughts.