
A drop-down list in Microsoft Word lets you control what users can select in a document by offering a predefined set of choices. It helps maintain consistency and prevents typing errors in forms, reports, or templates. When this list is connected to Excel, you can manage all options in one place and update them easily whenever needed.
In this article, you’ll learn how to add a drop-down list in Word using data stored in Excel, along with a few alternative methods.
➤ Open your Word document and enable the Developer tab via File >> Options >> Customize Ribbon >> check Developer >> OK.
➤ Place the cursor where you want the drop-down list.
➤ On the Developer tab, click Drop-Down List Content Control >> Properties >> Add to your items one by one and click OK.
➤ Turn off Design Mode to lock the control.
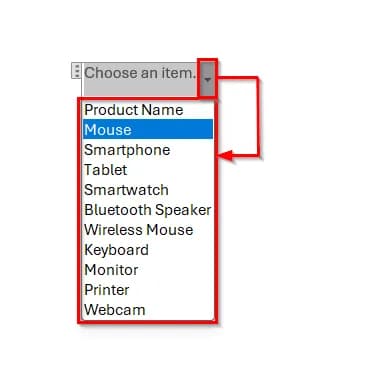
➤ Click inside the drop-down box to test it. Now, you’ll see all your product names listed, and you can select any item from the list.
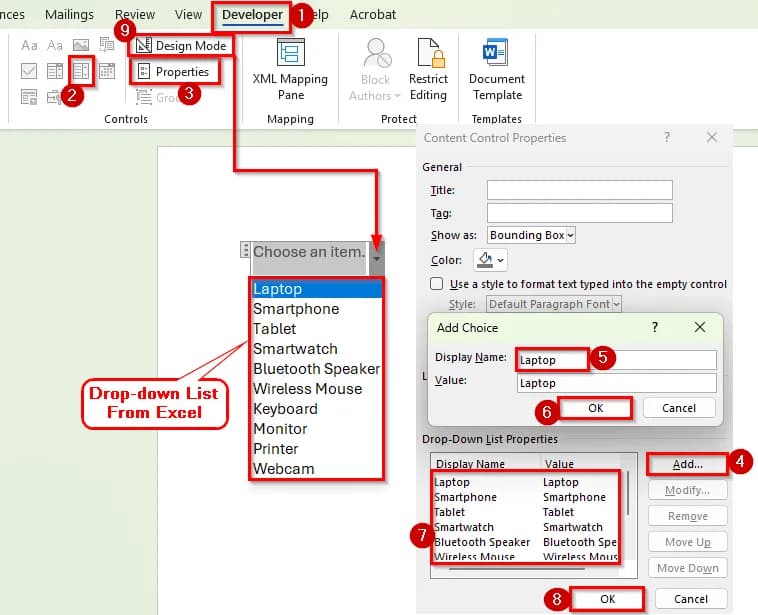
Using the Developer Tab to Create a Manual Drop-Down List in Word
In the following dataset, we have a simple product list stored in Excel. Column A contains the Product Names, which will be used to create a drop-down list in Word.
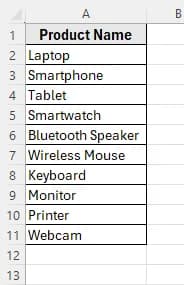
This Excel file will act as our data source, so whenever we update or add new products in Excel, the changes can be reflected in Word using the linking or VBA method.
The simplest way to add a drop-down list in Word is by using the Developer tab. This method lets you manually type your list items inside Word without depending on Excel. It’s best for short and rarely changing lists.
Here’s how to do it step by step:
➤ Open your Word document.
➤ Click on the File tab, then go to Options.
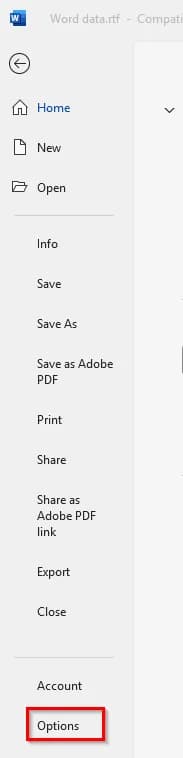
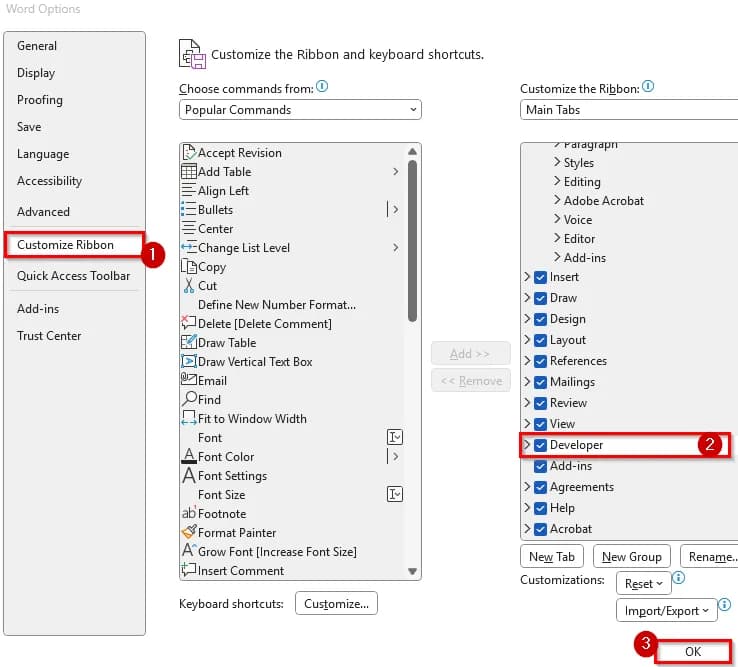
➤ In the Word Options window, select Customize Ribbon from the left panel.
➤ On the right side, check the box for Developer under the list of Main Tabs and click OK.
➤ You’ll now see a Developer tab added to the Word ribbon.
➤ Place your cursor where you want to insert the drop-down list.
➤ On the Developer tab, click Drop-Down List Content Control.
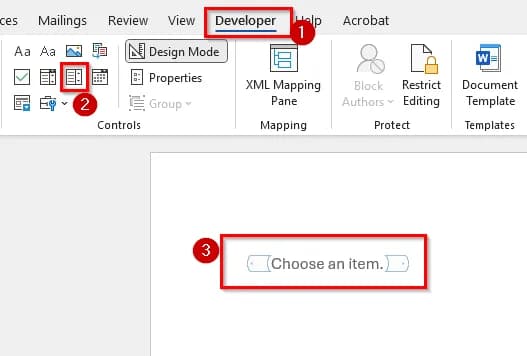
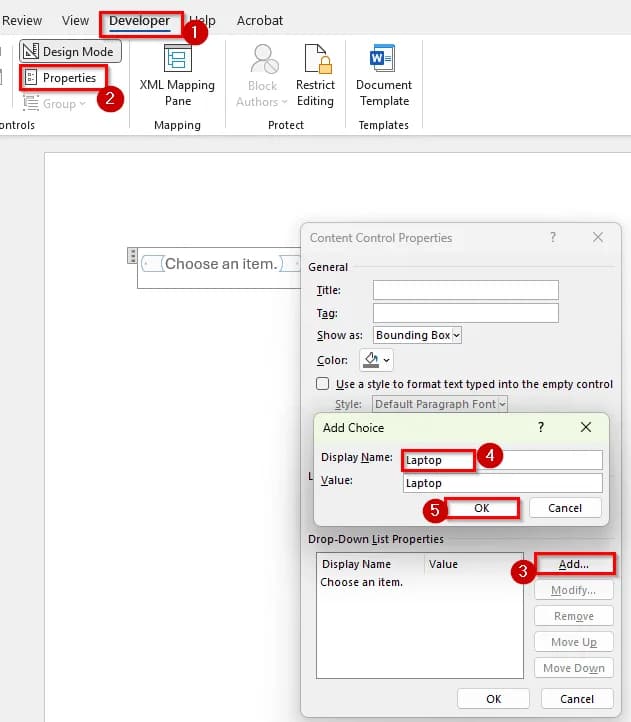
➤ With the control selected, click Properties in the Controls group.
➤ In the Content Control Properties window, click Add and type your first item, for example Laptop.
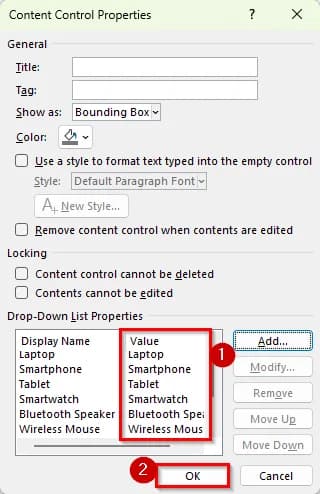
➤ Repeat this step to add all other items such as Smartphone, Tablet, up to Webcam.
➤ Once all items are added, click OK to close the window.
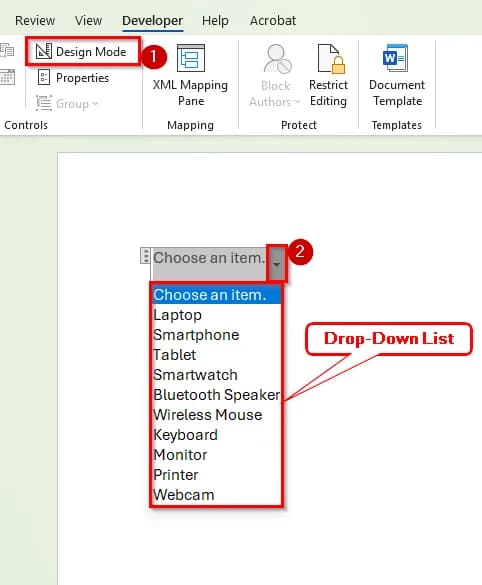
➤ Now, click on Design Mode in the Developer tab to turn it off. This will lock the drop-down control and make it ready for use.
➤ Click inside the drop-down box to test it. Now, you’ll see all your product names listed, and you can select any item from the list.
Linking an Excel List into Word Using Paste Special
If you already have a list prepared in Excel, you can link it directly into Word using the Paste Special feature. This method creates a live connection between both files, so when you make changes in Excel, the linked table in Word can update automatically. It’s a simple way to keep your Word document synchronized with your Excel data.
Here’s how to do it step by step:
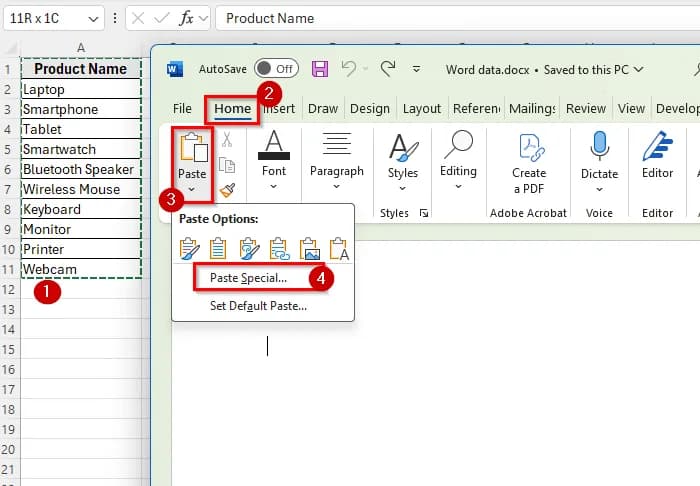
➤ Select the range of cells A1:A11 containing your list and press Ctrl + C to copy it.
➤ Open your Word document and place your cursor where you want the drop-down list or linked table to appear.
➤ Go to the Home tab, click the small arrow under Paste, and choose Paste Special.
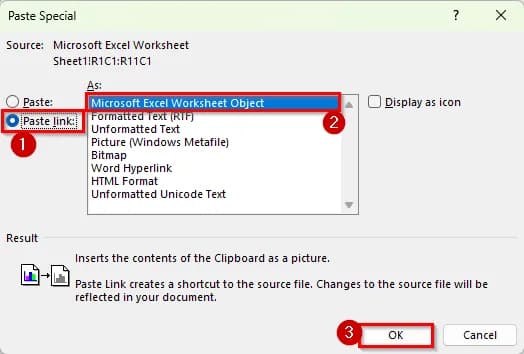
➤ In the Paste Special dialog box, select Paste Link, then choose Microsoft Excel Worksheet Object, and click OK.
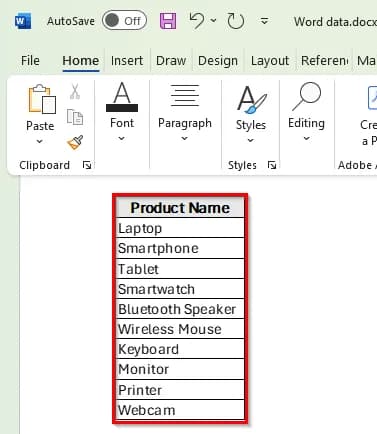
➤ The Excel list will now appear inside your Word document as a linked object.
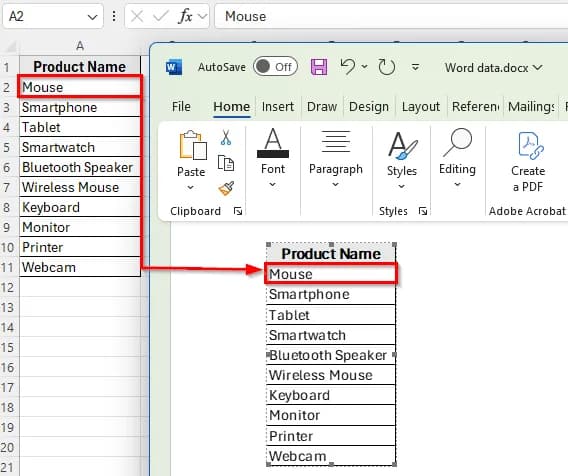
➤ To update the list, type Mouse in cell A2 in Excel.
➤ Go to the Word, right-click the table and choose Update Link.
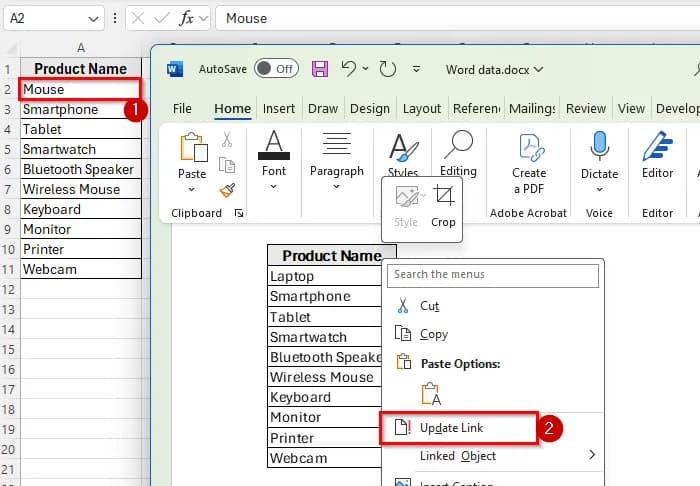
➤ The new changes in cell A2 made in Excel will now appear in your Word file.
Importing an Excel List into a Word Drop-Down Using VBA
If you want a real drop-down list inside Word that automatically loads items stored in Excel, you can use a simple VBA script. This method links your Excel file to Word so that every time you open the document, the drop-down list fills itself with the latest data from Excel.
Here’s how to do it step by step:
➤ First, save your Excel file on your computer and name it Spreadsheet Data.xlsx. Example Excel file path: D:\excel\Excel\Document\Spreadsheet Data.xlsx
➤ Open your Word document and go to the Developer tab.
➤ From the Controls group, click Combo Box Content Control. A drop-down box will appear in your document.
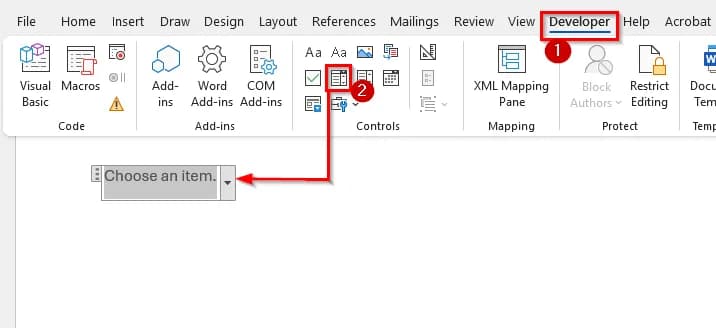
➤ Keep the cursor on the inserted combo box.
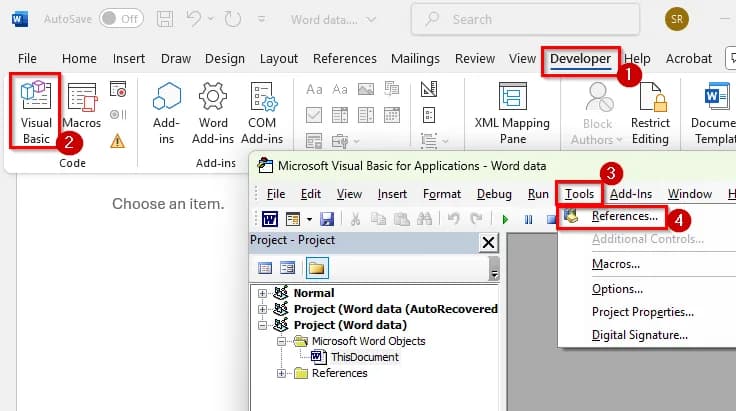
➤ On the Developer tab, click Visual Basic to open the VBA editor.
➤ In the VBA window, click Tools from the menu bar, then select References.
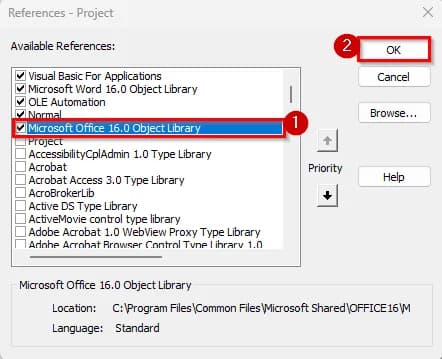
➤ In the References dialog box, check the option Microsoft Excel 16.0 Object Library, and click OK.
➤ Next, go to the Insert tab and choose Module.
➤ In the new module window, paste the following VBA code:
Sub DropDownListFromExcel()
    Dim exlApp As Object
    Dim xlWrkBok As Object
    Dim xlSheet As Object
    Dim wkbkName As String, sheetName As String
    Dim LRow As Long, i As Long
    Dim cc As ContentControl
    On Error Resume Next
    Set exlApp = CreateObject("Excel.Application")
    On Error GoTo 0
    If exlApp Is Nothing Then
        MsgBox "Excel could not be started.", vbExclamation
        Exit Sub
    End If
    wkbkName = "D:\excel\Excel\Document\Spreadsheet Data.xlsx"
    sheetName = "Sheet1"  'Change if needed
    If Dir(wkbkName) = "" Then
        MsgBox "Workbook not found: " & wkbkName, vbExclamation
        Exit Sub
    End If
    'Check for at least one content control
    If ActiveDocument.ContentControls.Count = 0 Then
        MsgBox "No drop-down control found in this document. Please insert one first.", vbExclamation
        Exit Sub
    End If
    Set cc = ActiveDocument.ContentControls(1)
    cc.DropdownListEntries.Clear
    Set xlWrkBok = exlApp.Workbooks.Open(FileName:=wkbkName, ReadOnly:=True)
    Set xlSheet = xlWrkBok.Worksheets(sheetName)
    LRow = xlSheet.Cells(xlSheet.Rows.Count, 1).End(-4162).Row  'xlUp
    For i = 1 To LRow
        cc.DropdownListEntries.Add Text:=Trim(xlSheet.Range("A" & i).Value)
    Next i
    xlWrkBok.Close SaveChanges:=False
    exlApp.Quit
    Set xlSheet = Nothing
    Set xlWrkBok = Nothing
    Set exlApp = Nothing
    MsgBox "Drop-down list added successfully from Excel!", vbInformation
End Sub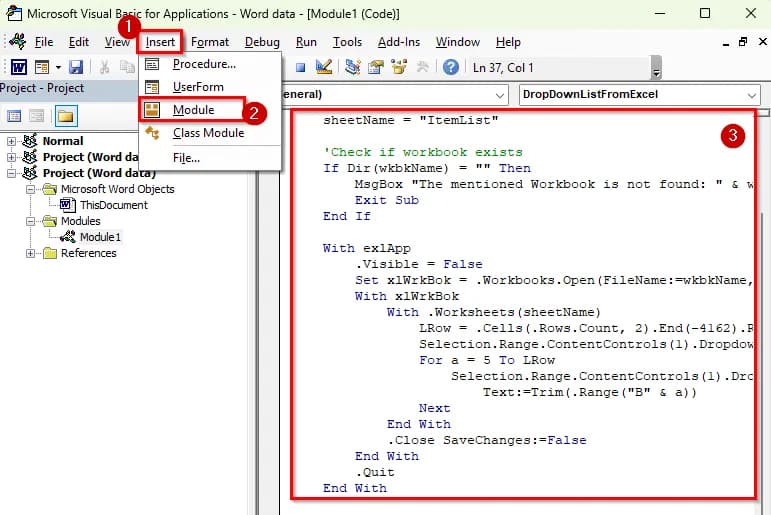
➤ Replace the file path with the actual location of your Excel file.
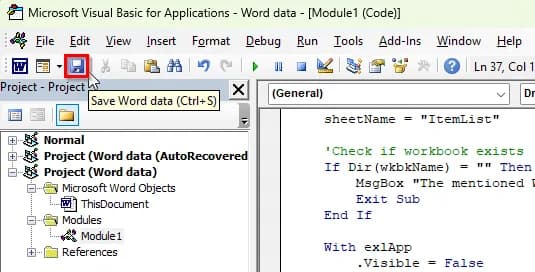
➤ Save the code by clicking the save icon.
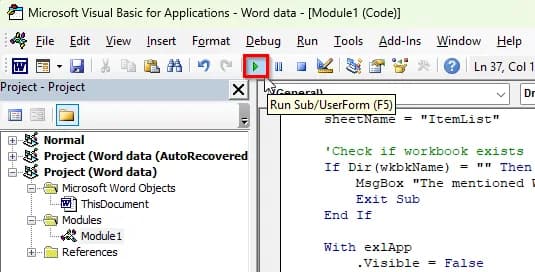
➤ In the VBA window, click the Run button to execute the code.
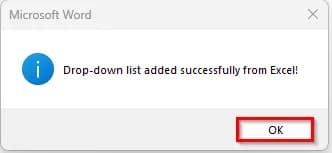
➤ A confirmation message will appear such as Drop-down list added successfully from Excel!
➤ After running the code, your Word combo box will automatically populate with all product names from your Excel file. Each time you update the Excel file and reopen the Word document, the list will refresh with the latest entries.
Downloadable Resources
Get our practice workbook or necessary files that we have worked with to prepare this article.
Export Dropdown List to Word.xlsx
Frequently Asked Questions
How do I link an Excel drop-down list to Word?
You can link Excel data to Word using the Combo Box Content Control and a short VBA script. The code reads the product list from your Excel sheet and automatically fills it into the Word drop-down box.
Can I update the drop-down list automatically when Excel changes?
No, not automatically. Each time you make changes in Excel, you’ll need to rerun the VBA code in Word to refresh the list.
What should I do if I get a Run-time Error 5941?
This error appears if the drop-down box is not selected or missing. Make sure you’ve inserted a Combo Box Content Control in Word and clicked inside it before running the VBA code.
Wrapping Up
A drop-down list in Word is useful when you want to keep data entry consistent and error-free. It helps ensure users select only valid options, which is especially helpful for forms, reports, and templates that rely on structured choices like product names, departments, or categories.
Using a linked Excel list makes updating easier since you can manage your items in one place and use them across multiple Word documents. The methods we showed earlier keeps your work organized, accurate, and efficient.