
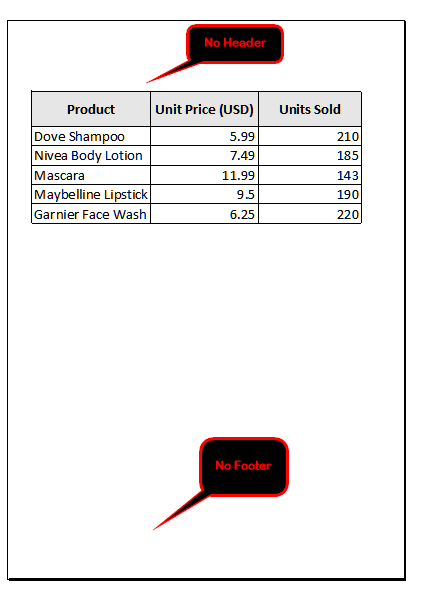
In Excel, we often prepare different data-based reports for both business and academic purposes. However, if headers and footers clutter the layout of our report, they can easily distract the audience from the main content. Thus, to make our document cleaner and give it a professional look, we need to remove the unnecessary Header and Footer from our dataset.
Suppose you are going to present a sales report dataset that includes headers and footers. The header and footer sections could include dates, file paths, and other information. However, this information is unnecessary for your report. Thus, before presenting and printing out, you need to remove them to deliver a clearer report.
In this article, we will explain three different methods to remove the header and footer in Excel using Page Layout View, the Page Setup dialog box, and a quick VBA method.
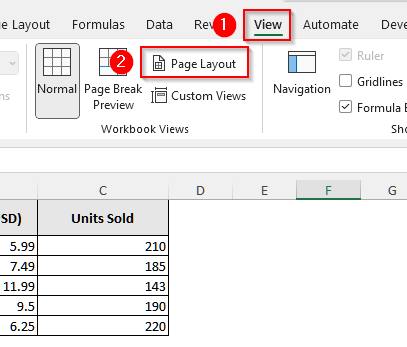
➤ First, go to the View tab from the upper menu bar.
➤ Then, select the Page Layout option from the tabs under the View tab.
➤ Now, at the top of your dataset, you will see Add header, and three boxes, left, center, and right. If any content is written in any of those boxes, you will see the content instead of the Add header.
➤ Click inside and delete the text or content manually by pressing Backspace or Delete.
➤ Then, scroll down to the bottom of the sheet and find the footer area. Similarly, if there is any text inside the left, center, or right footer boxes, you will see the text or the content and can delete it by pressing the Delete or Backspace button on your keyboard. However, if the footer area is empty, you will see the Add footer.
➤ Finally, after removing the texts or contents, click anywhere outside the header or footer area. Then, go to File, select Print, and in the print preview, you will see that no header or footer appears.
Remove Header And Footer in Excel With the Page Layout View
In Excel, the Page Layout View lets us see exactly how our worksheet will appear when printed, including the header and footer areas. So, if there is any unnecessary header or footer content in our file, we can easily remove it from this view.
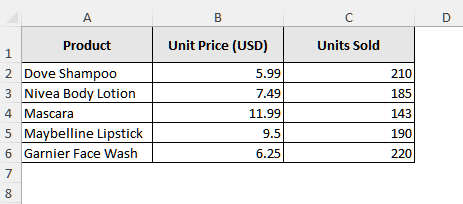
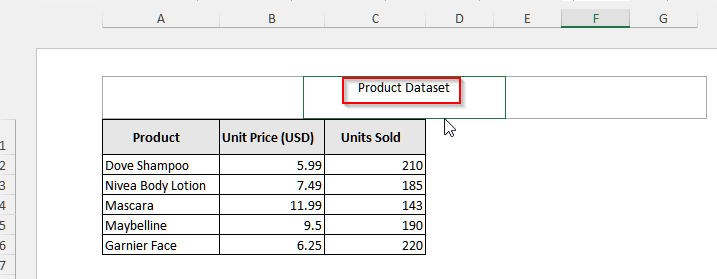
We will use the dataset below to explain how the Page Layout View helps us remove the header and footer directly from the Excel sheet.
Steps:
➤ First, go to the View tab from the upper menu bar.
➤ Then, select the Page Layout option from the tabs under the View tab.
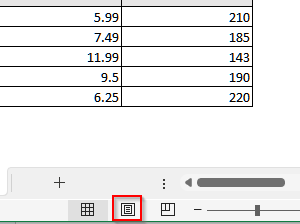
➤ Alternatively, you can also click the Page Layout icon located at the bottom-right corner of the Excel window beside the zoom slider.
➤ Now, at the top of your dataset, you will find an area that says Add header, and it has three boxes, left, center, and right. If any content is written in any of those boxes, you will see the content instead of the Add header.
➤ Click inside and delete the text or content manually by pressing Backspace or Delete. In our dataset, the Product Dataset header is written. So, we will delete it.
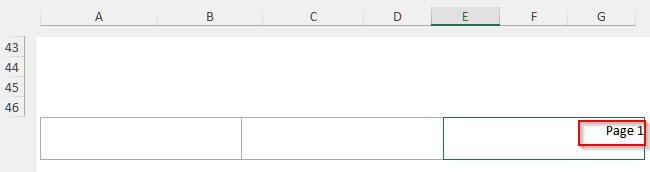
➤ Then, scroll down to the bottom of the sheet and find the footer area. Similarly, if there is any text inside the left, center, or right footer boxes, you will see the text or the content. However, if the footer area is empty, you will see the Add footer.
➤ In our dataset, in the right footer box, Page 1 is written. Now, click on the text, and then you can delete or remove the text manually by pressing the Delete or Backspace button on your keyboard.
➤ Finally, after removing the texts or contents, click anywhere outside the header or footer area. Then, go to File, select Print, and in the print preview, you will see that no header or footer appears.

Use Page Setup to Remove the Header And Footer in Excel
The Page Setup dialog box is an excellent option for customizing our worksheet in Excel. With its help, we can easily remove headers and footers from our dataset. Especially in cases where we need to work on multiple sheets, this feature can help us set up a clear format for all the pages.
Steps:
➤ First, go to the Page Layout tab from the top menu bar.
➤ Then, click on the small arrow icon at the bottom-right corner of the Page Setup group. It will open up the Page Setup dialog box.
➤ Now, in the new window, select the Header/Footer tab.
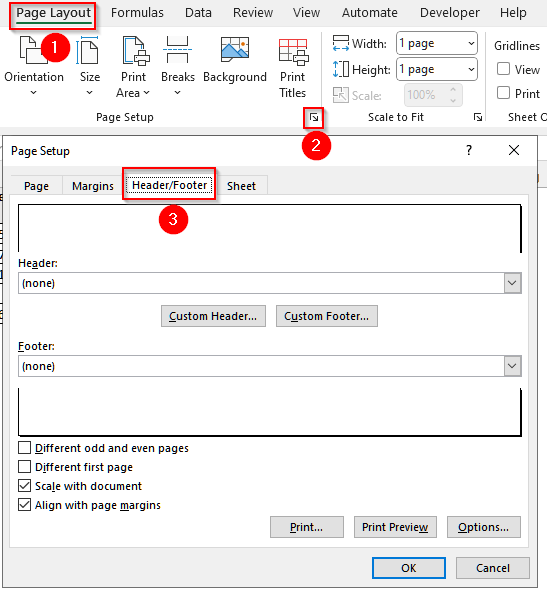
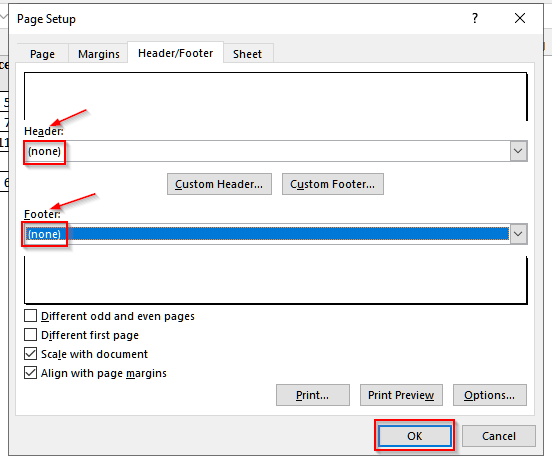
➤ There, you will see two dropdown menus, Header and Footer. Click on both of them and set them to (none) to remove any existing content.
➤ Finally, click OK to apply the changes.
➤ Now, if you switch to Page Layout View or go to Print Preview, you’ll see that the header and footer areas have been cleared completely.
Delete Header and Footer in Excel Using VBA
VBA helps us to perform many tasks in Excel in a very short time, including removing headers and footers from multiple sheets at once. Below, we will discuss the procedure to delete any header and footer from a dataset with this VBA.
Steps:
➤ First, press Alt + F11 to open the Visual Basic for Applications (VBA) editor.
➤ Then, right-click on the sheet name from the menu and click on Insert. A list of options will appear. Select Module from that list.
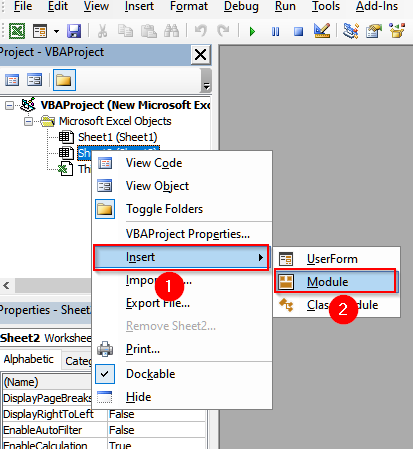
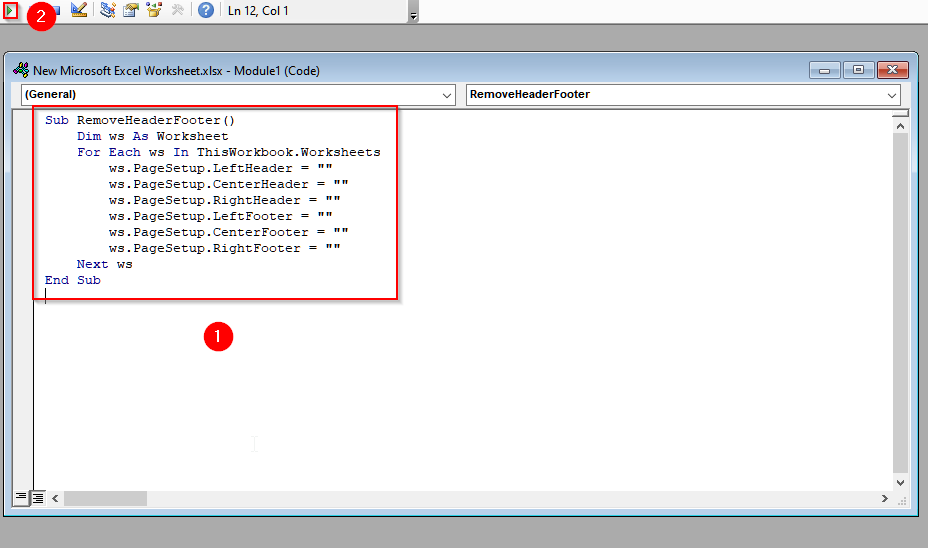
➤ Now, you will see a new module. Copy the following VBA code and paste it in that module.
Sub RemoveHeaderFooter()
    Dim ws As Worksheet
    For Each ws In ThisWorkbook.Worksheets
        ws.PageSetup.LeftHeader = ""
        ws.PageSetup.CenterHeader = ""
        ws.PageSetup.RightHeader = ""
        ws.PageSetup.LeftFooter = ""
        ws.PageSetup.CenterFooter = ""
        ws.PageSetup.RightFooter = ""
    Next ws
End Sub
➤ Now, to run the code, press F5 or select the small triangular run icon from the upper menu bar.
Frequently Asked Questions
Can I Remove Headers And Footers from Multiple Sheets in Excel at Once?
Yes, you can remove headers and footers from multiple sheets in Excel at once. First, you need to select all the sheets you want to edit. To do it, hold Ctrl and click on each sheet tab, or you can simply right-click on a tab and choose Select All Sheets. Then, go to Page Layout → click the small arrow in Page Setup → open the Header/Footer tab → set both Header and Footer to (none). After that, right-click any sheet tab and choose Ungroup Sheets to apply the changes to each selected sheet.
Can I Hide Header And Footer While Printing Without Deleting Them in Excel?
Absolutely! To hide headers and footers while printing without deleting them, first, go to File. Then, select Print and after that select Page Setup. You can also press Alt + P , S , P to open the Page Setup window. Now, go to the Header/Footer tab, and select (none) for both the Header and Footer. In this way, the header and footer remain saved in your sheet, but they won’t appear in the printed output.
Wrapping Up
In this article, we have discussed three easy ways to remove headers and footers in Excel, including the Page Layout View, the Page Setup dialog box, and a simple VBA script. With any of them, you can easily remove or hide any unwanted header or footer from your worksheet. Try these methods and feel free to share your queries or ask for guidance if you face any issues while working in Excel.