When working with an Excel dataset, sometimes you need to sort data in a specific range to keep your information structured. But sorting manually can be time-consuming. Moreover, there can be chances of error, especially for large datasets.
In such cases, Excel VBA helps to automate the sorting process. It makes the process faster and more accurate. That’s why in today’s article, we will walk you through seven practical methods to sort a range of data with Excel VBA.
It includes sorting in a specific range, multiple columns, dynamic range automatically, rows horizontally, by a custom order, by fill color, and sorting an Excel table by column name.
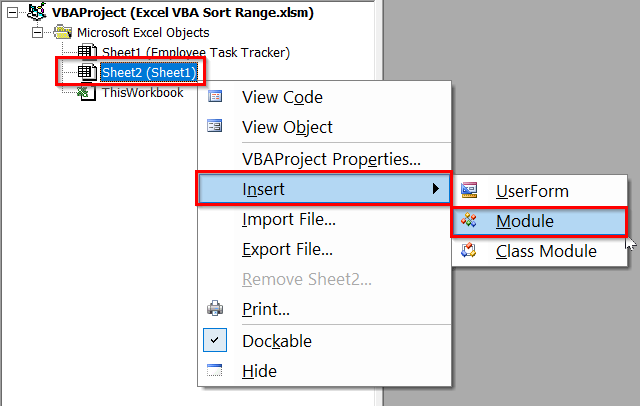
➤ Press Alt + F11 to open the VBA editor.
➤ In the Project Explorer, right click on your sheet name >> Insert >> Module
➤ Insert the following VBA code in the new module.
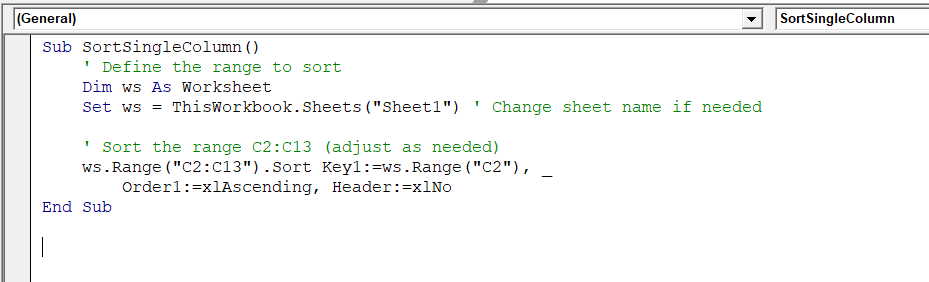
Sub SortSingleColumn()
    ' Define the range to sort
    Dim ws As Worksheet
    Set ws = ThisWorkbook.Sheets("Sheet1") ' Change sheet name if needed.
    ' Sort the range C2:C13 (adjust as needed)
    ws.Range("C2:C13").Sort Key1:=ws.Range("C2"), _
        Order1:=xlAscending, Header:=xlNo
End Sub
➤ Run the VBA code.
➤ The selected range (C2: C13) will be arranged in ascending order, and all the data in the same rows will remain aligned.
What Is Range Sorting in Excel?
In simple words, Sort Range in Excel means arranging a selected group of cells in a specific order. You can do it in ascending order, like A to Z or smallest to largest, or descending order, like Z to A or largest to smallest. When you sort a range, all data in the same rows remains intact as they move together with the sorted column.
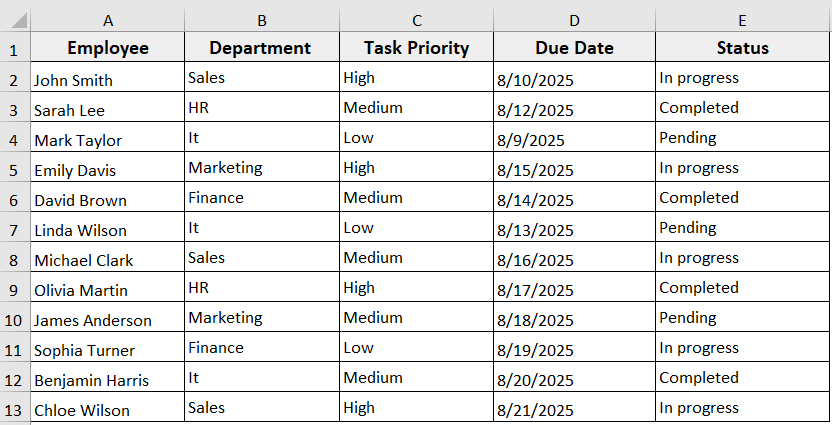
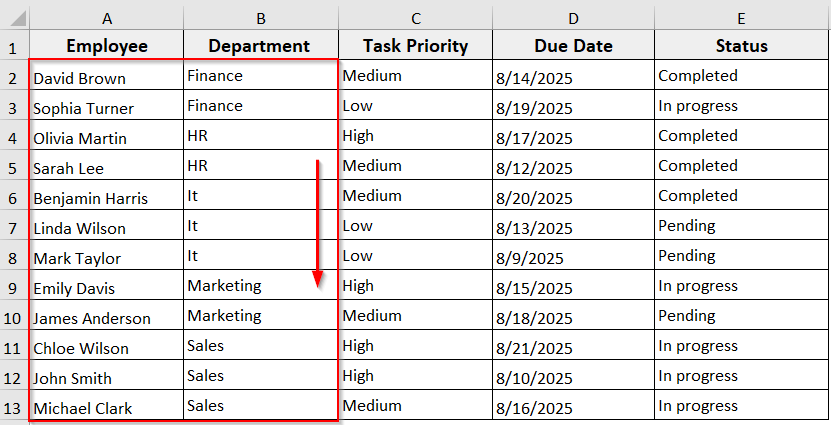
In the following dataset, we have employee task tracker information. Now we are going to sort the range in the dataset with Excel VBA in different scenarios.
Sort a Specific Range in Excel Using VBA
It is the most basic and commonly used VBA sorting method. The VBA code automatically sorts a selected range of cells in ascending or descending order. It is a useful method when you want to organize column data and all related data in the same rows, remaining aligned.
Steps:
➤ Press Alt + F11 to open the VBA editor.
➤ In the Project Explorer, right-click on your sheet name >> Insert >> Module.
➤ In the new module, insert the following code.
Sub SortSingleColumn()
    ' Define the range to sort
    Dim ws As Worksheet
    Set ws = ThisWorkbook.Sheets("Sheet1") ' Change sheet name if needed.

    ' Sort the range C2:C13 (adjust as needed)
    ws.Range("C2:C13").Sort Key1:=ws.Range("C2"), _
        Order1:=xlAscending, Header:=xlNo
End Sub
Note:
In the VBA code
➥ Replace Sheet1 with your worksheet name.
➥ Replace C2:C13 with the range you want to sort.
➥ Change Order1:=xlAscending to xlDescending for reverse order.
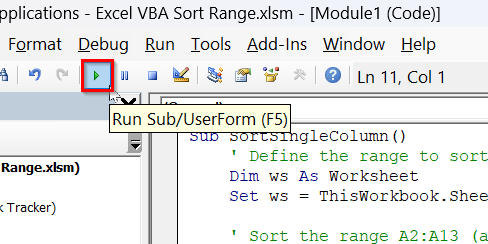
➤ Run the code.
➤ Your selected range will be arranged in ascending order
➤ All data in that range moves together to maintain row integrity.

Excel VBA to Sort Multiple Columns
This method sorts a range of data by more than one column. Here, the code sorts by the primary column you choose, then by the secondary column. It keeps all the rows intact as the data moves together to maintain the integrity. You can use the method when you have a dataset with multiple related columns and want to organize it based on priority.
Steps:
➤ Open the VBA editor
➤ Insert a new module.
➤ In the new module, insert the following VBA code.
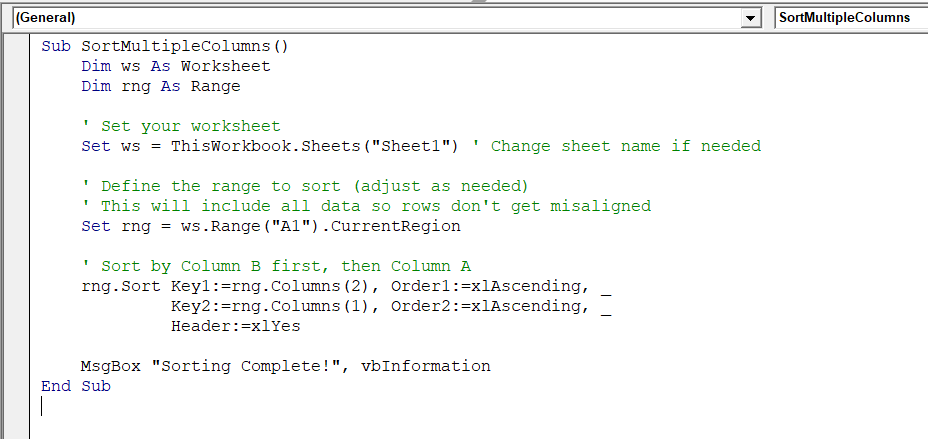
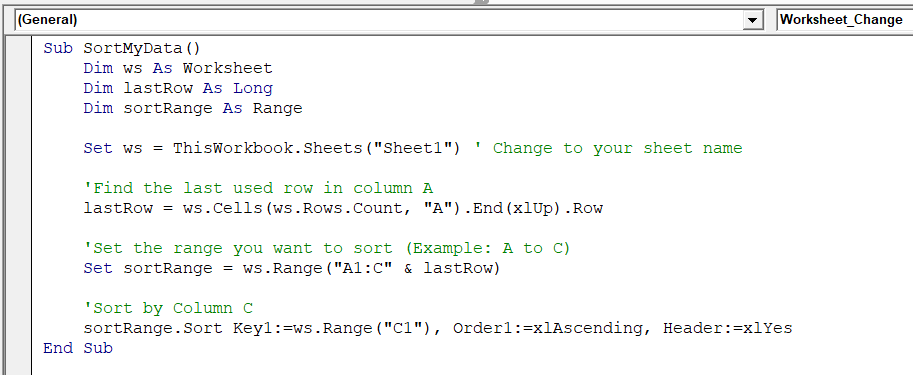
Sub SortMultipleColumns()
Dim ws As Worksheet
Dim rng As Range
' Set your worksheet
Set ws = ThisWorkbook.Sheets("Sheet1") ' Change sheet name if needed.
' Define the range to sort (adjust as needed)
' This will include all data, so rows don't get misaligned
Set rng = ws.Range("A1").CurrentRegion
' Sort by Column B first, then Column A
rng.Sort Key1:=rng.Columns(2), Order1:=xlAscending, _
Key2:=rng.Columns(1), Order2:=xlAscending, _
Header:=xlYes
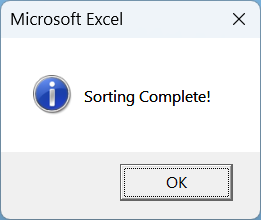
MsgBox "Sorting Complete!", vbInformation
End SubNote:
Here is what needs to change in the code.
➥ Replace Sheet1 with your worksheet name.
➥ Adjust rng.Columns(2) and rng.Columns(1) to the column numbers you want to sort by.
➥ Change Order1:=xlAscending or Order2:=xlAscending to xlDescending if needed.
➤ Run the code.
➤ In the Macros dialog box, select ‘SortMultipleColumns’ VBA >> Click Run.
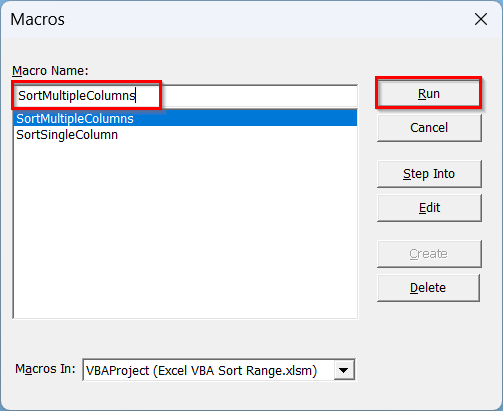
➤ After running the code, it shows a completion message.
➤ The data is sorted by primary column (Column B) in ascending order, then by the secondary column (Column A)
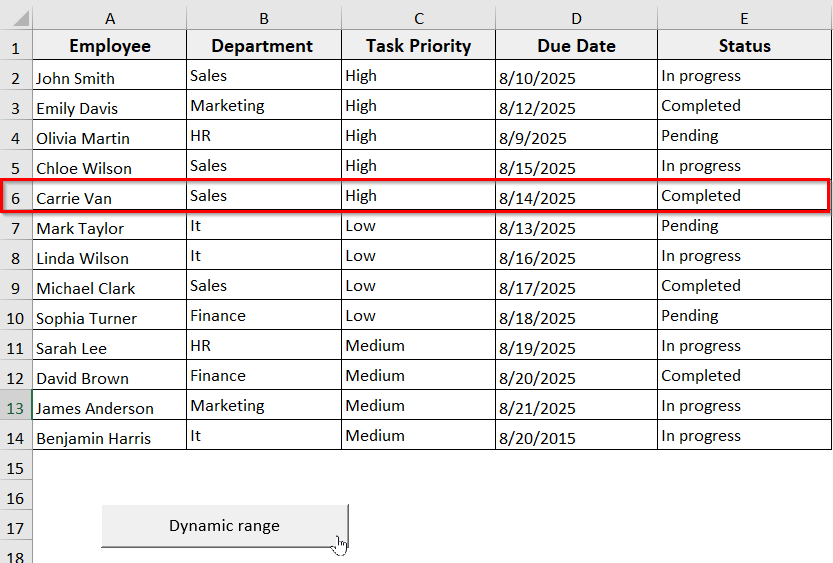
Sort a Dynamic Range Automatically
If you are working with a dataset where the data frequently changes, like adding new rows or removing old data, you can use this method. In this method, Excel sorts the updated data automatically. This ensures your sorting always covers new or removed data without manually adjusting the range.
Steps:
➤ Press Alt + F11 to open the VBA editor.
➤ Insert a new module.
➤ In the new module, insert the following VBA code.
Sub SortMyData()
    Dim ws As Worksheet
    Dim lastRow As Long
    Dim sortRange As Range
    Set ws = ThisWorkbook.Sheets("Sheet1") ' Change to your sheet name
    'Find the last used row in column A
    lastRow = ws.Cells(ws.Rows.Count, "A").End(xlUp).Row
    'Set the range you want to sort (Example: A to C)
    Set sortRange = ws.Range("A1:C" & lastRow)
    'Sort by Column C
    sortRange.Sort Key1:=ws.Range("C1"), Order1:=xlAscending, Header:=xlYes
End Sub
Note:
In the code,
➥ Replace Sheet1 with your worksheet name.
➥ Change A1:C to match the columns you want to sort.
➥ Change Key1:=ws.Range(“C1”) to the column you want to sort by.
➤ You can add a button to run the macro anytime.
➤ To dos so, go to Developer tab >> Insert >> Choose a button from From Controls.
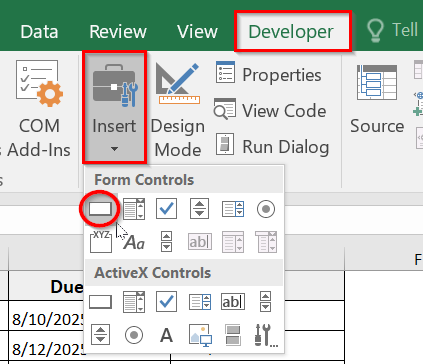
➤ Draw it in your sheet where you want to place the button.
➤ Assign ‘SortMyData’ macro to the button.
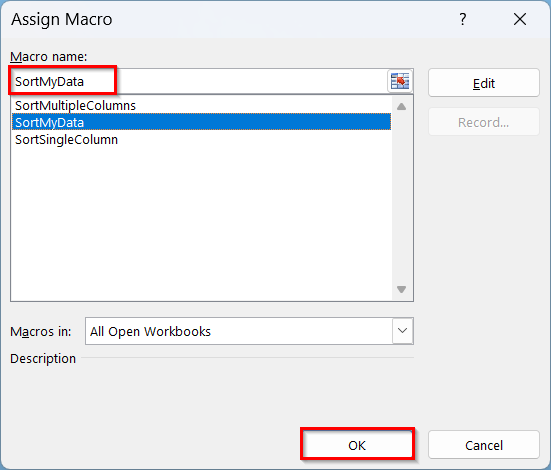
➤ When you click the button, it sorts the data in ascending order.
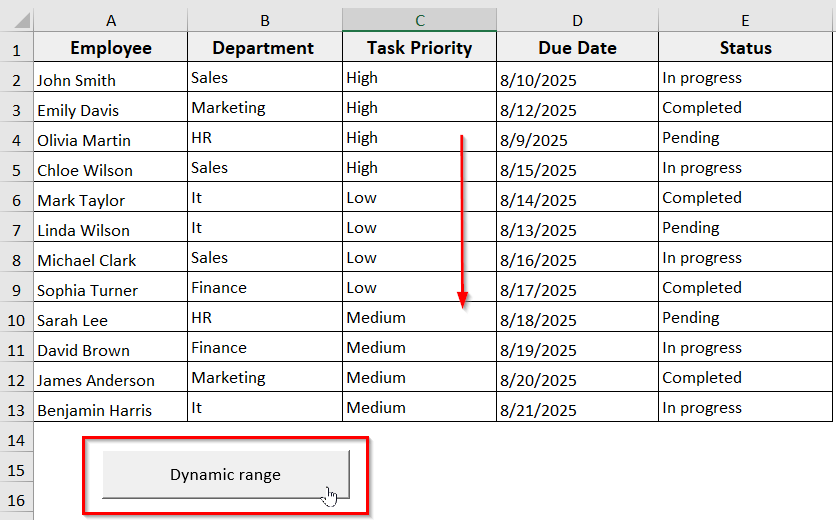
➤ Add a new column to the sheet to test the VBA code.
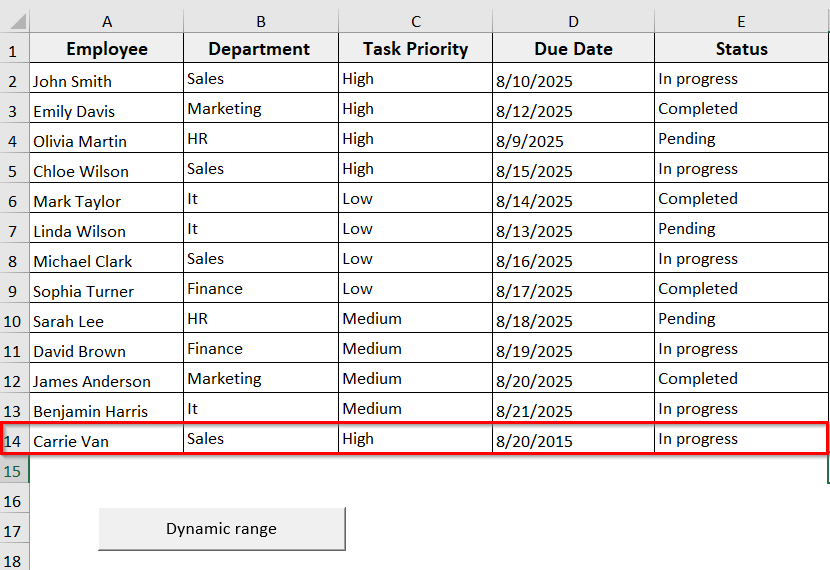
➤ Click the button.
➤ The macro will automatically sort the data in ascending order based on your specified column without opening the VBA editor.
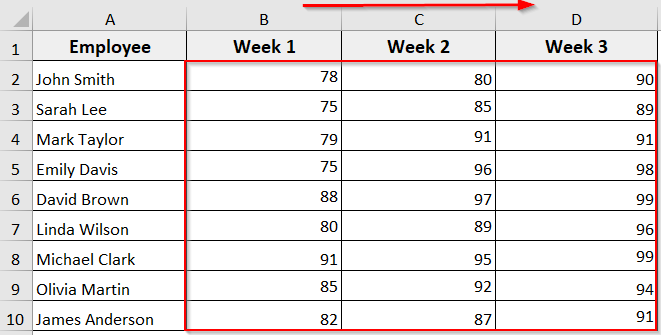
Sort Rows Horizontally (Change Orientation)
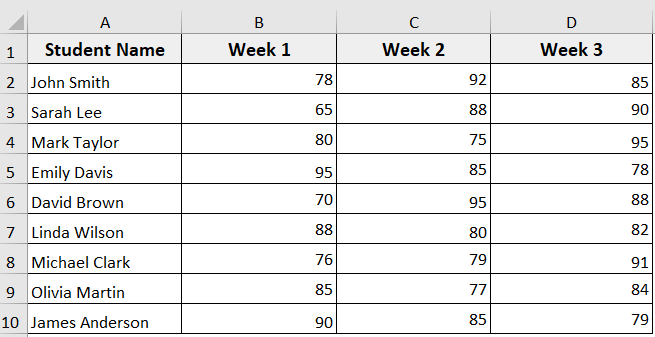
Now, if you need to sort data by row instead of column, you can consider this method. For instance, as scores, sales figures, or monthly data per row. The code will loop through each row and arrange the data left to right, keeping the columns intact.
In the following dataset, we have Employee Weekly Performance Scores. Now we are going to sort data by rows or horizontally using Excel VBA.
Steps:
➤ Open the VBA editor and insert a new module.
➤ In the new module, insert the following VBA code.
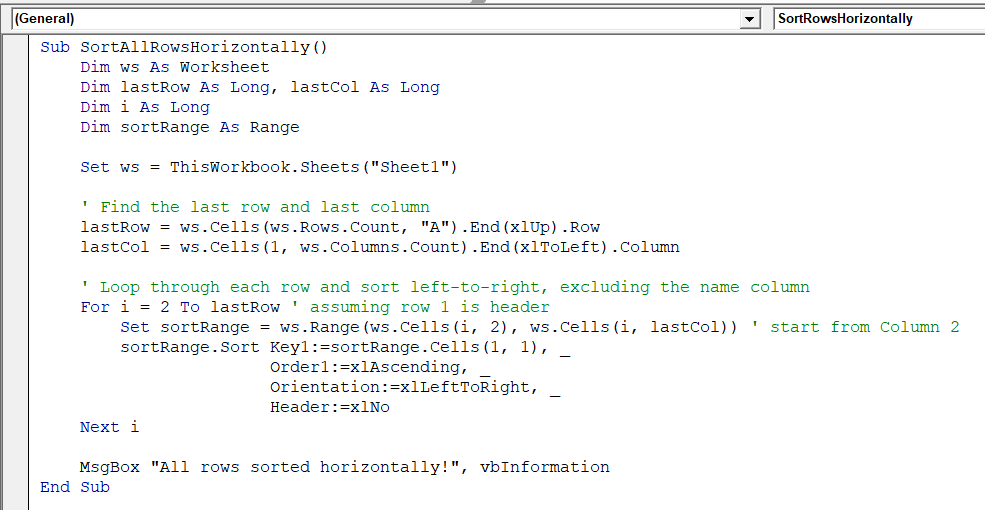
Sub SortAllRowsHorizontally()
Dim ws As Worksheet
Dim lastRow As Long, lastCol As Long
Dim i As Long
Dim sortRange As Range
Set ws = ThisWorkbook.Sheets("Sheet1")
' Find the last row and last column
lastRow = ws.Cells(ws.Rows.Count, "A").End(xlUp).Row
lastCol = ws.Cells(1, ws.Columns.Count).End(xlToLeft).Column
' Loop through each row and sort left-to-right, excluding the name column
For i = 2 To lastRow ' assuming row 1 is header
Set sortRange = ws.Range(ws.Cells(i, 2), ws.Cells(i, lastCol)) ' start from Column 2
sortRange.Sort Key1:=sortRange.Cells(1, 1), _
Order1:=xlAscending, _
Orientation:=xlLeftToRight, _
Header:=xlNo
Next i
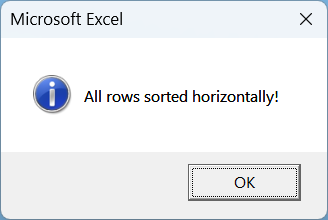
MsgBox "All rows sorted horizontally!", vbInformation
End SubNote:
In the code,
➥ Replace Sheet1 with your worksheet name.
➥ Adjust Cells(i, 2) if your data starts in a different column.
➥ Change Order1:=xlAscending to xlDescending for reverse order.
➤ Run the code.
➤ A confirmation message box appears when the sorting is complete.
➤ Here, each row is sorted from left to right based on the selected range, and the fixed column (Employee name) remains unchanged.
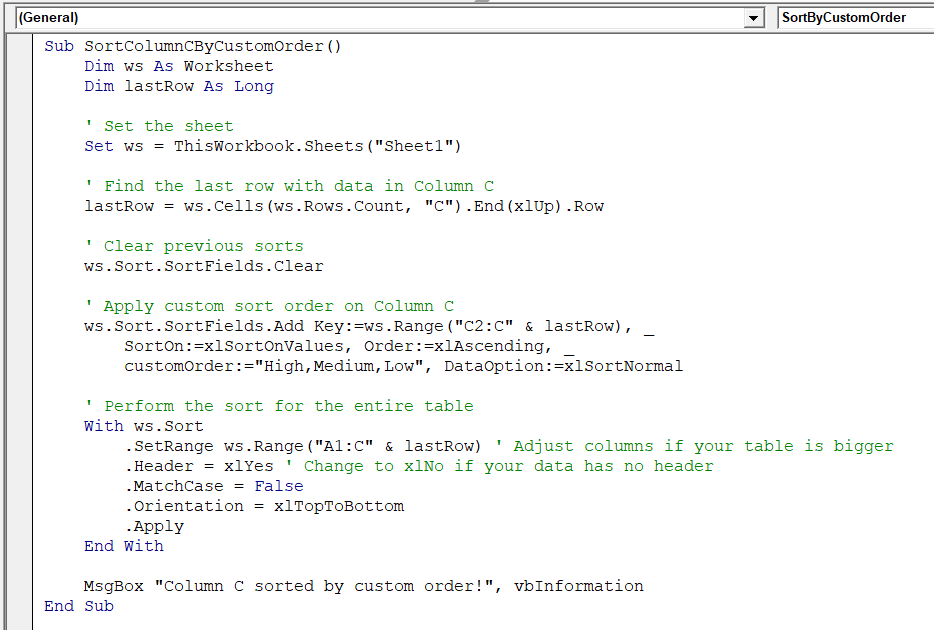
Sort Data by a Custom Order with VBA
This VBA code sorts a column based on a custom order you define instead of ascending or descending order. You can use this method when you want to sort your data in a specific order. For instance, High priority → Medium priority → Low priority.
Steps:
➤ Open the VBA editor.
➤ Insert the new module.
➤ Copy and paste the following VBA code.
Sub SortColumnCByCustomOrder()
    Dim ws As Worksheet
    Dim lastRow As Long
    ' Set the sheet
    Set ws = ThisWorkbook.Sheets("Sheet1")
    ' Find the last row with data in Column C
    lastRow = ws.Cells(ws.Rows.Count, "C").End(xlUp).Row
    ' Clear previous sorts
    ws.Sort.SortFields.Clear
    ' Apply custom sort order on Column C
    ws.Sort.SortFields.Add Key:=ws.Range("C2:C" & lastRow), _
        SortOn:=xlSortOnValues, Order:=xlAscending, _
        CustomOrder:="High,Medium,Low", DataOption:=xlSortNormal
    ' Perform the sort for the entire table
    With ws.Sort
        .SetRange ws.Range("A1:C" & lastRow) ' Adjust columns if your table is bigger
        .Header = xlYes ' Change to xlNo if your data has no header
        .MatchCase = False
        .Orientation = xlTopToBottom
        .Apply
    End With
    MsgBox "Column C sorted by custom order!", vbInformation
End Sub
Note:
In the code, here is what you need to change.
➥ Replace Sheet1 with your worksheet name.
➥ Change C2:C to the column you want to sort.
➥ Replace CustomOrder:=”High,Medium,Low” with the specific sequence you want your data sorted by.
➥ Change .SetRange ws.Range(“A1:C” & lastRow) to include all relevant columns.
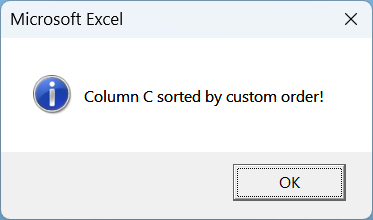
➤ Run the code.
➤ A completion message box appears.
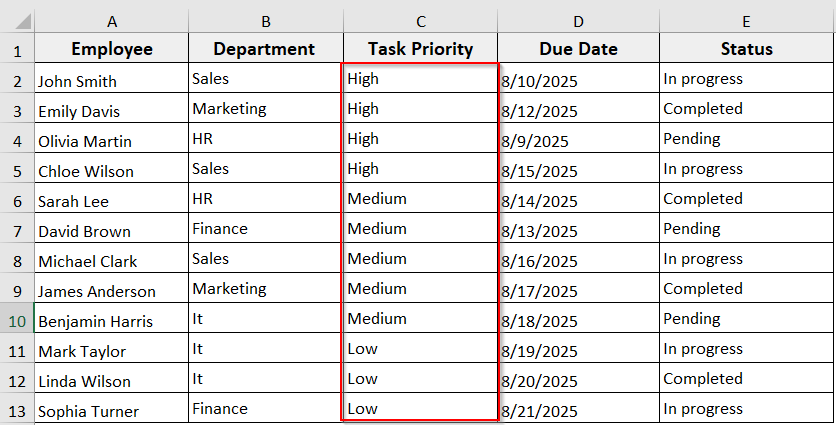
➤ Your specified column (Column C) will be sorted based on your custom sequence (High → Medium → Low)
Excel VBA to Sort Cells by Fill Color
When working with an Excel dataset, sometimes we need to organize rows based on cell colors instead of cell values. This VBA code sorts your data according to the fill color of a specific column.
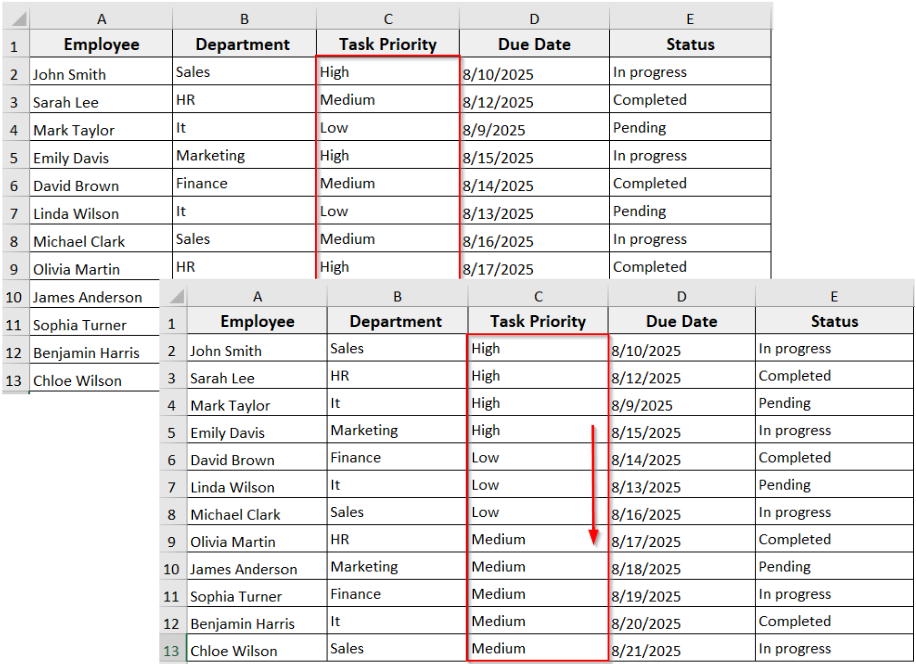
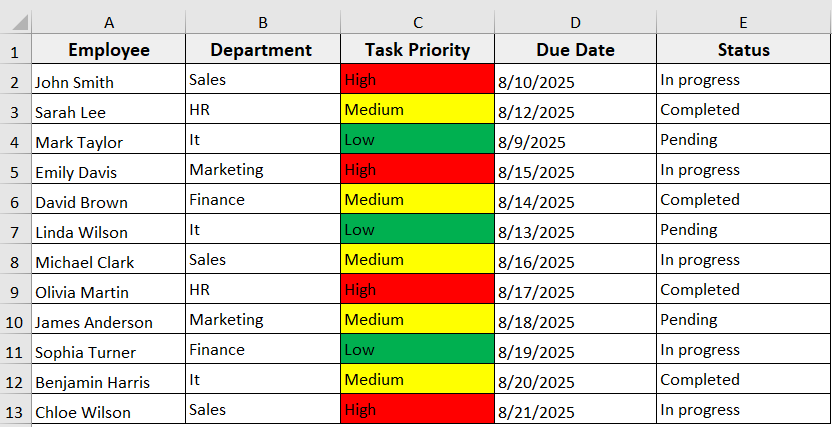
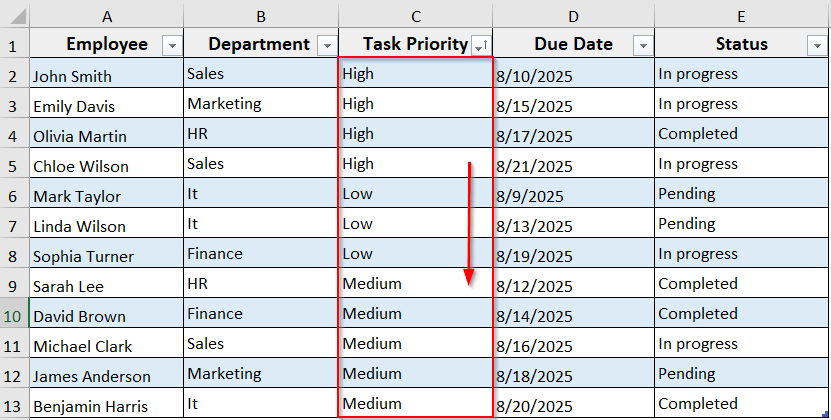
In the same Employee task tracker dataset, we have highlighted the high task priority in red, medium task priority in yellow, and low task priority in green. Now we are going to sort the data based on column C by fill color.
Steps:
➤ Open the VBA editor.
➤ Insert a new module.
➤ In the new module, insert the following VBA code.
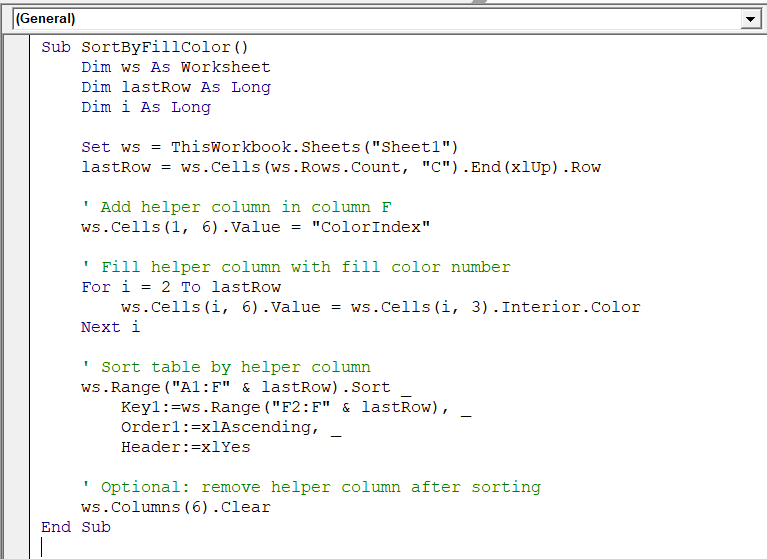
Sub SortByFillColor()
    Dim ws As Worksheet
    Dim lastRow As Long
    Dim i As Long
    Set ws = ThisWorkbook.Sheets("Sheet1")
    lastRow = ws.Cells(ws.Rows.Count, "C").End(xlUp).Row
    ' Add helper column in column F
    ws.Cells(1, 6).Value = "ColorIndex"
    ' Fill helper column with fill color number
    For i = 2 To lastRow
        ws.Cells(i, 6).Value = ws.Cells(i, 3).Interior.Color
    Next i
    ' Sort table by helper column
    ws.Range("A1:F" & lastRow).Sort _
        Key1:=ws.Range("F2:F" & lastRow), _
        Order1:=xlAscending, _
        Header:=xlYes
    ' Optional: remove helper column after sorting
    ws.Columns(6).Clear
End Sub
Note:
In the code,
➥ Replace Sheet1 with your worksheet name.
➥ Change the column in ws.Cells(i, 3).Interior.Color the column you want to sort by color.
➥ Change ws.Range(“A1:F” & lastRow) to include all relevant columns in your table.
➤ Run the code.
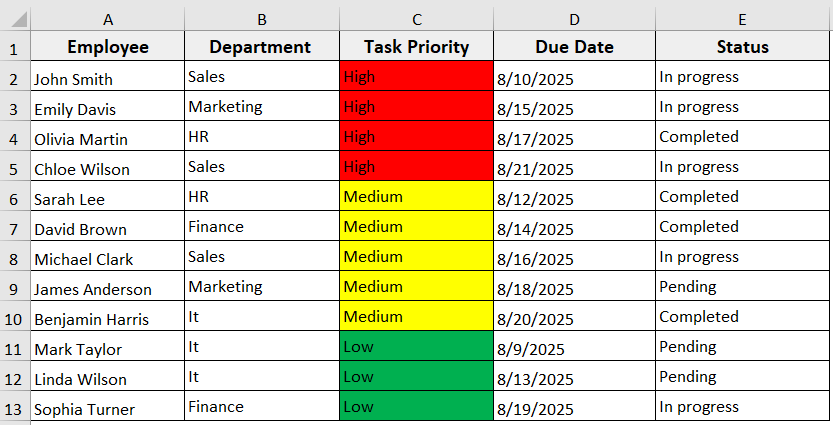
➤ The data will be sorted based on cell fill colors.
➤ All the other rows stay aligned, keeping your data intact.
Sort an Excel Table by Column Name
If you need to sort data based on a specific column in an Excel table, you can use this method. The VBA code works with structured tables and keeps all rows and table formatting intact. You can sort in ascending or descending order based on the column header you choose.
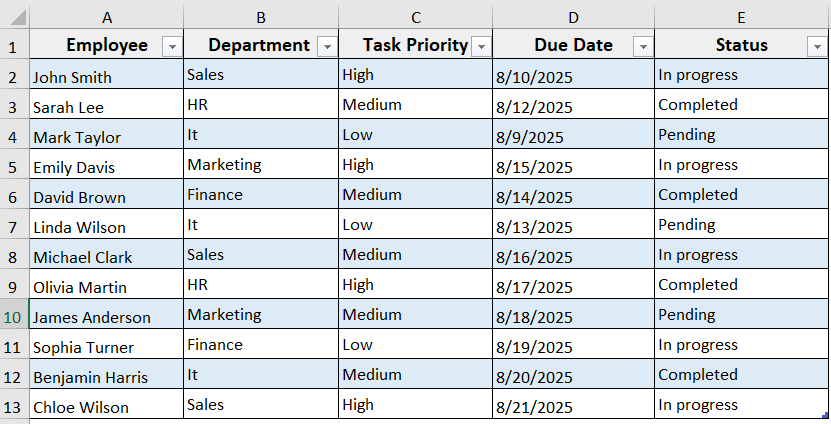
To demonstrate how the VBA code actually works, we have converted the same Employee Task Tracker dataset into a table with the default name Table1. Now we are going to sort data in an Excel table by column name (Task Priority) with VBA.
Steps:
➤ Open the VBA editor and insert a new module.
➤ Insert the following VBA code in the new module.
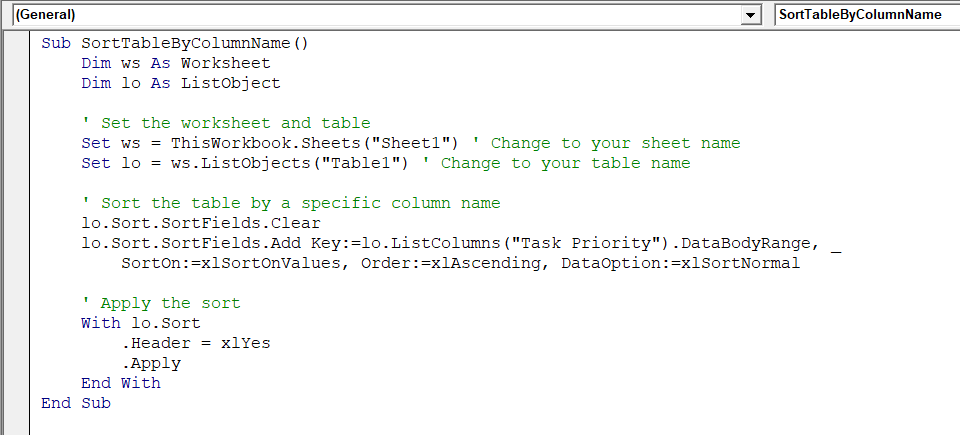
Sub SortTableByColumnName()
    Dim ws As Worksheet
    Dim lo As ListObject
    ' Set the worksheet and table
    Set ws = ThisWorkbook.Sheets("Sheet1") ' Change to your sheet name
    Set lo = ws.ListObjects("Table1") ' Change to your table name
    ' Sort the table by a specific column name
    lo.Sort.SortFields.Clear
    lo.Sort.SortFields.Add Key:=lo.ListColumns("Task Priority").DataBodyRange, _
        SortOn:=xlSortOnValues, Order:=xlAscending, DataOption:=xlSortNormal
    ' Apply the sort
    With lo.Sort
        .Header = xlYes
        .Apply
    End With
End Sub
Note:
In the VBA code, here is what you need to change.
➥ Change Sheet1 to your worksheet name.
➥ Change Table1 to your table name.
➥ Replace “Task Priority” with the column header you want to sort by.
➥ You can change Order:=xlAscending to xlDescending for reverse order.
➤ Run the code
➤ The table is sorted based on the specified column header (Task Priority).
Frequently Asked Questions
What does range() do in VBA?
In VBA, Range() is used to refer to a specific cell or a group of cells in a worksheet. For example, Range(“A1”) refers to cell A1, while Range(“A1:C10”) refers to all cells from A1 to C10
How do I add a custom sort list in Excel VBA?
➤ Open the VBA editor.
➤ Insert the following VBA code in the module.
ws.Sort.SortFields.Add Key:=ws.Range("C2:C10"), _
    SortOn:=xlSortOnValues, Order:=xlAscending, _
    CustomOrder:="High,Medium,Low", DataOption:=xlSortNormal
➤ Run the code
➤ The code will sort the specified range in Column C according to your custom sequence.
How do I sort a range by date in Excel VBA?
➤ Open the VBA editor.
➤ Insert this code in a module.
ws.Sort.SortFields.Add Key:=ws.Range("B2:B20"), _
    SortOn:=xlSortOnValues, Order:=xlAscending, _
    DataOption:=xlSortNormal
ws.Sort.Apply
➤ Run the code.
➤ The range in Column B will be sorted from the earliest to the latest date.
Wrapping Up
In this quick tutorial, we have learnt how to sort ranges of data in Excel with VBA in different scenarios. The VBA methods help you automate sorting easily and accurately. Feel free to download our sample workbook and try these macros yourself. Let us know how these VBA solutions have made managing and organizing your Excel data faster and more efficient.