Sorting is one of the most common tasks in Excel when dealing with data. The basic sort option lets you simply arrange values in ascending or descending order. Sometimes, though, you need more control. For example, you might want to organize records by more than one column, apply a custom order, or sort based on cell color or font color.
This is where Advanced Sorting in Excel becomes useful. It helps you structure data in a way that highlights key information and makes your reports easier to understand.
In this article, we’ll learn how to use advanced sorting in Excel step by step with practical examples.
Here’s how to use advanced sorting in Excel with multiple levels:
➤ Open your dataset in Excel.
➤ Select the dataset range A1:C11.
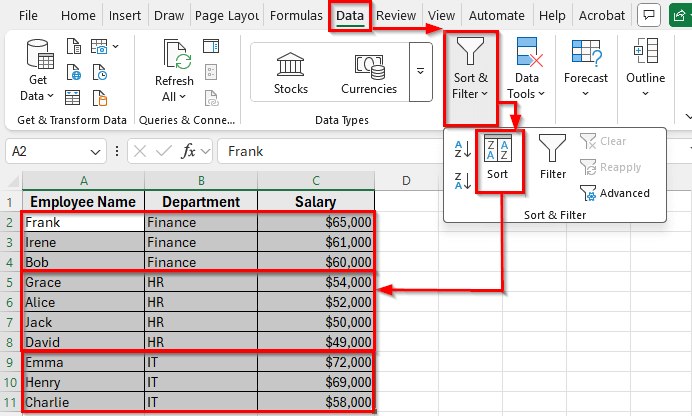
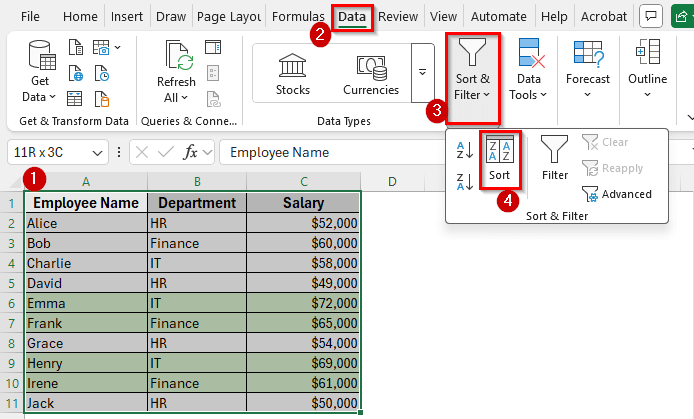
➤ Go to the Data tab on the Ribbon and click on Sort in the Sort & Filter group.
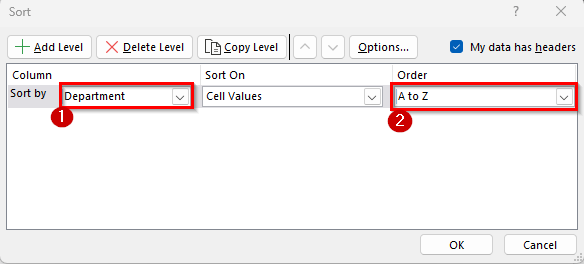
➤ The Sort dialog box will appear. In the first Sort by dropdown, select Department. In the Order dropdown, choose A to Z so departments appear alphabetically.
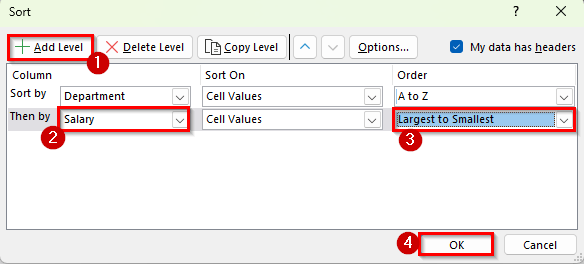
➤ Now click on Add Level. In the new Then by dropdown, choose Salary. In the Order dropdown, select Largest to Smallest so higher salaries come first.
➤ Click OK to apply the sorting.
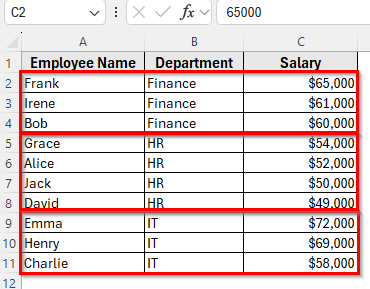
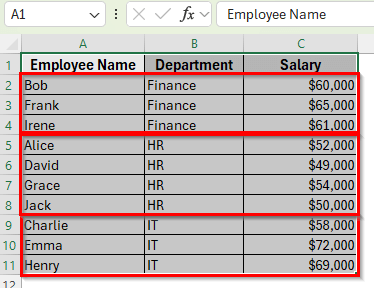
➤ Your dataset will now be organized by the Department in alphabetical order. Within each department, employees will be listed according to their salaries, with the highest earners at the top.
Sort by Multiple Columns in Excel
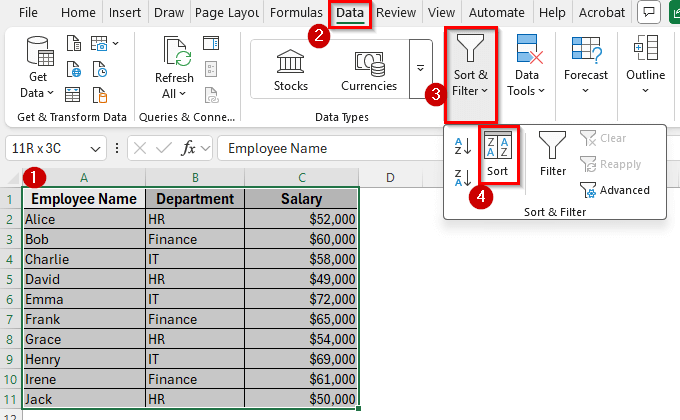
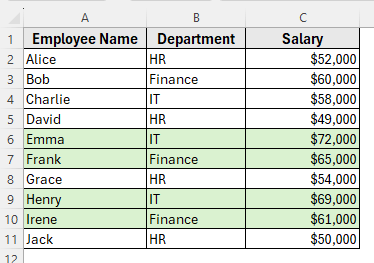
In the following dataset, we have a small employee table with 10 rows. Column A lists Employee Names, Column B shows the Department, and Column C contains the Salary.
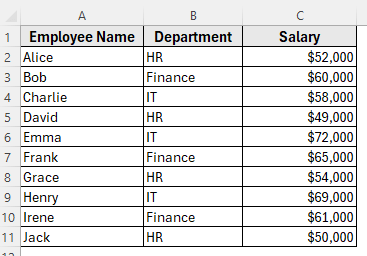
We’ll use this dataset to demonstrate different ways of advanced sorting in Excel.
In many situations, sorting by a single column is not enough. For example, you may want to organize employees by their department first and then arrange their salaries within each department. This is where sorting by multiple columns helps.
Here’s how to apply it step by step:
➤ Open your dataset in Excel.
➤ Select the dataset range A1:C11.
➤ Go to the Data tab on the Ribbon and click on Sort in the Sort & Filter group.

➤ The Sort dialog box will appear. In the first Sort by dropdown, select Department. In the Order dropdown, choose A to Z so departments appear alphabetically.
➤ Now click on Add Level. In the new Then by dropdown, choose Salary. In the Order dropdown, select Largest to Smallest so higher salaries come first.
➤ Click OK to apply the sorting.
➤ Your dataset will now be organized by the Department in alphabetical order. Within each department, employees will be listed according to their salaries, with the highest earners at the top.
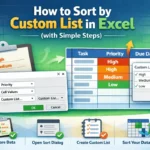
Sort Using Custom Lists in Excel
Excel normally sorts text alphabetically, which works in most cases. But sometimes you need a specific order that does not follow the alphabet. For example, you might want to see all employees in Finance first, then HR, and finally IT. This is not possible with a normal A to Z sort, but you can do it with a custom list.
Here’s how to apply it step by step:
➤ Open your dataset in Excel.
➤ Select the dataset range A1:C11.
➤ Go to the Data tab on the Ribbon and click Sort in the Sort & Filter group.
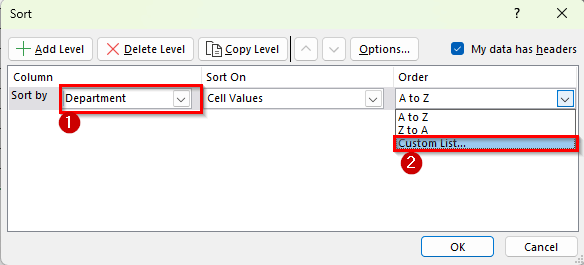
➤ In the Sort dialog box, choose Department in the Sort by dropdown.
➤ In the Order dropdown, select Custom List.
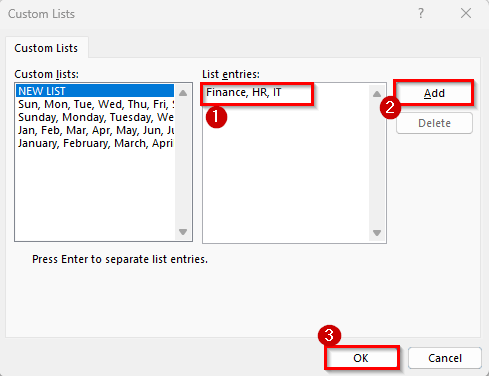
➤ The Custom Lists dialog box will appear. In the List entries box, type Finance, HR, IT in the exact order you want them sorted.
➤ Then click Add and press OK.
➤ Back in the Sort dialog box, press OK again to apply the custom order.
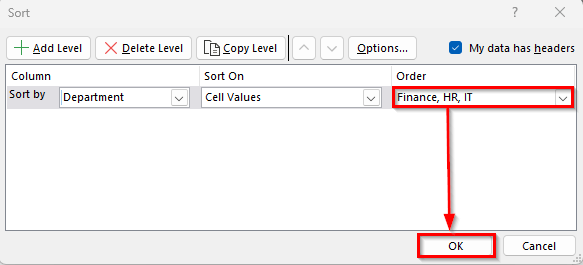
➤ Now your dataset will display all Finance employees first, followed by HR employees, and then IT employees, regardless of alphabetical order.
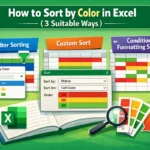
Sort by Cell Color or Font Color in Excel
Sometimes data is highlighted with different colors to make it easier to review. For example, salaries above $60,000 might be highlighted in green, or specific employees may be marked in red. With advanced sorting, you can bring these highlighted rows to the top or push them to the bottom of your dataset.
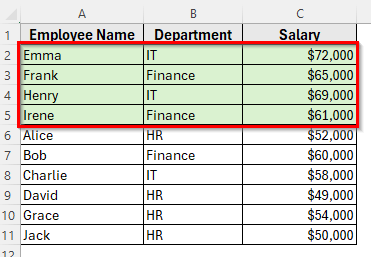
In this method, we have highlighted salaries above $60,000 in green in our dataset. We’ll now use advanced sorting to bring those rows to the top.
Here’s how to apply it step by step:
➤ Open your dataset in Excel.
➤ Select the dataset range A1:C11.
➤ Go to the Data tab and click Sort.
➤ In the Sort dialog box, choose the column where the colors are applied. For example, select Salary if you highlighted high salaries with a cell color.
➤ In the Sort On dropdown, change the option from Values to Cell Color or Font Color.
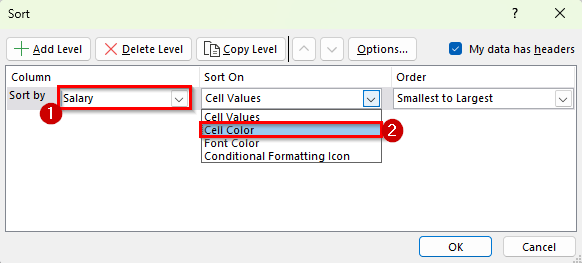
➤ A new dropdown No Cell Color will appear to let you choose which color you want to sort by. Pick the color you used. For example, choose green.
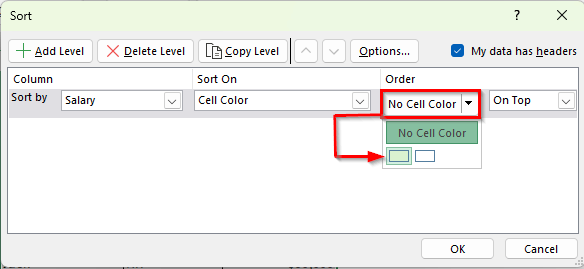
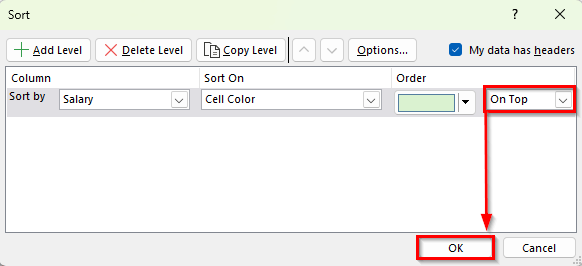
➤ In the Order dropdown, decide if you want rows with that color to appear On Top or On Bottom. For example, select On Top.
➤ Press OK to complete the sorting.
➤ Now your dataset will show all highlighted rows grouped together, making them easier to review.
Sort by Values with a Custom Rule in Excel
Sometimes you don’t just want to sort numbers in ascending or descending order. Instead, you may want to group them into categories such as High, Medium, and Low. Excel doesn’t have this grouping by default, but you can create it with a helper column and then apply advanced sorting.
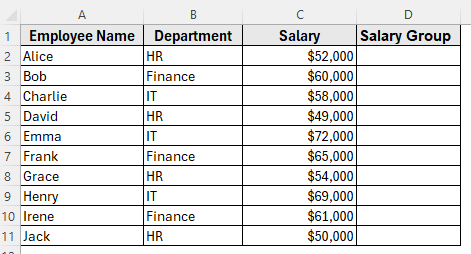
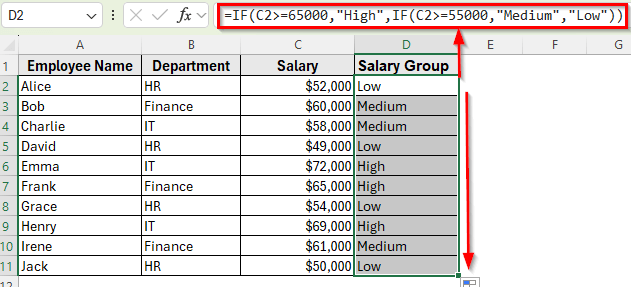
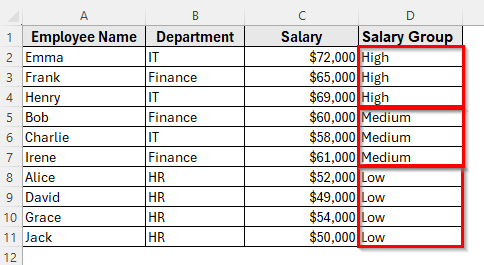
First, insert a new column next to Salary and name it Salary Group.
Here’s how to apply it step by step:
➤ Open your dataset in Excel.
➤ In cell D2, enter the following formula to categorize salaries:
=IF(C2>=65000,"High",IF(C2>=55000,"Medium","Low"))

➤ Press Enter, then drag the fill handle down to apply the formula to the rest of the rows. Each employee will now have a salary group of High, Medium, or Low.
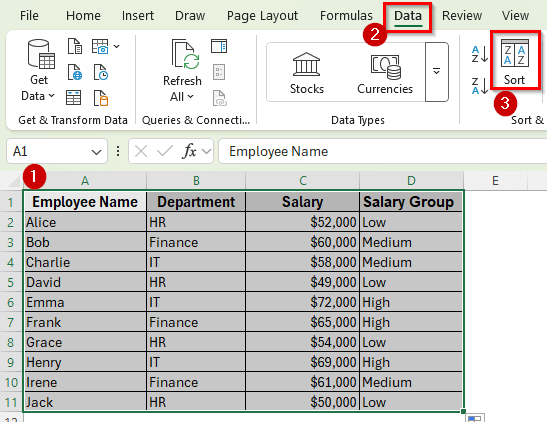
➤ Select the dataset range A1:D11.
➤ Go to the Data tab and click Sort.
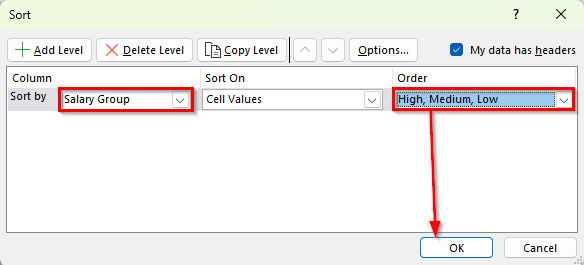
➤ In the Sort dialog box, choose Salary Group as the column to sort by.
➤ In the Order dropdown, click Custom List.
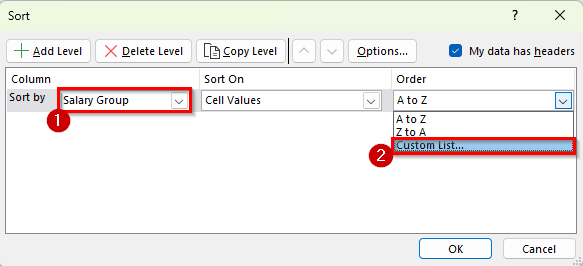
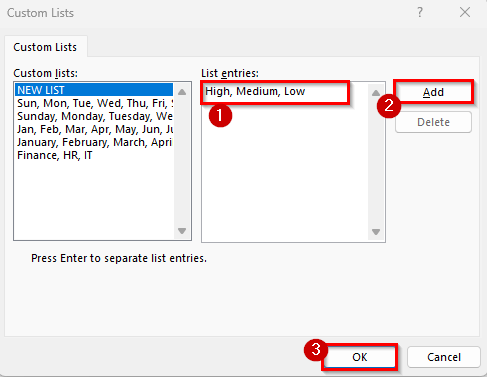
➤ In the Custom Lists dialog box, type High, Medium, Low in the order you want. Then click Add and press OK.
➤ Press OK again to apply the sorting.
➤ Your dataset will now display all High-salary employees first, followed by Medium, and then Low.
Frequently Asked Questions
What is advanced sorting in Excel?
Advanced sorting lets you organize data in more flexible ways compared to the basic sort feature. You can sort by multiple columns, apply custom lists, or arrange rows based on cell color, font color, or custom rules.
How to get an advanced Sort in Excel?
You can access advanced sort by going to the Data tab and clicking on Sort in the Sort & Filter group. This opens the Sort dialog box, where you can add multiple levels, use custom lists, or sort by colors.
How to sort data in Excel in ascending or descending order?
Select the column you want to sort, go to the Data tab, and click either the A to Z button for ascending order or the Z to A button for descending order. For more control, you can open the Sort dialog box and choose the order directly.
Wrapping Up
Advanced sorting in Excel makes it easier to arrange data in meaningful ways. You can sort by multiple columns, create your own custom lists, or even organize rows based on colors or categories. These options give you more control over how your information is displayed and help you analyze patterns quickly.
Once you start using advanced sorting, you’ll find it much easier to manage larger datasets and highlight the exact details you need for reports or decision-making.