Manually typing product codes and SKUs feels no less like the 2000s. Not only is it tiring, but it is also prone to errors. Imagine scanning the product codes to get their latest info! You get faster checkouts, no errors, and smooth inventory tracking. That’s what barcodes are for. Among all the barcode types, the most common one is Code 39. It is beginner-friendly with simple steps. All you need is a helper formula and a free downloaded font to get that.
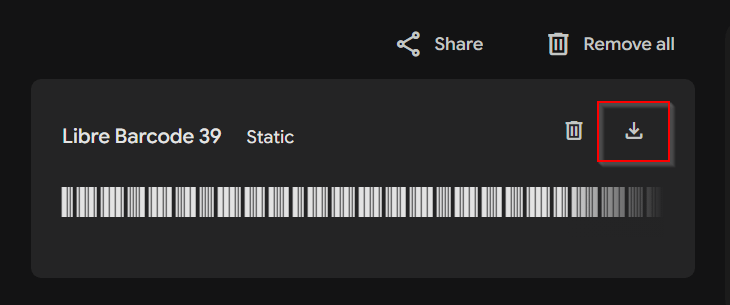
➤ Make sure to download Libre Barcode 39 and extract the .ttf extension file.
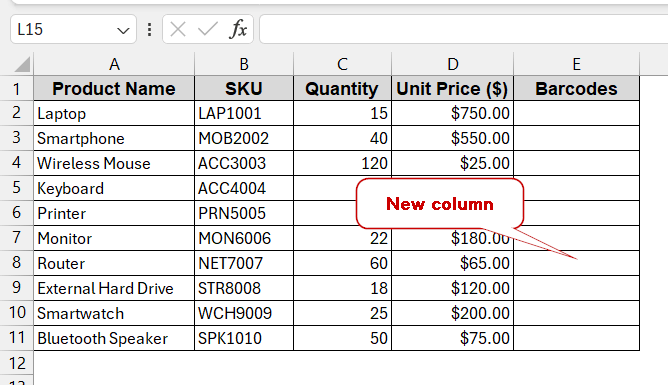
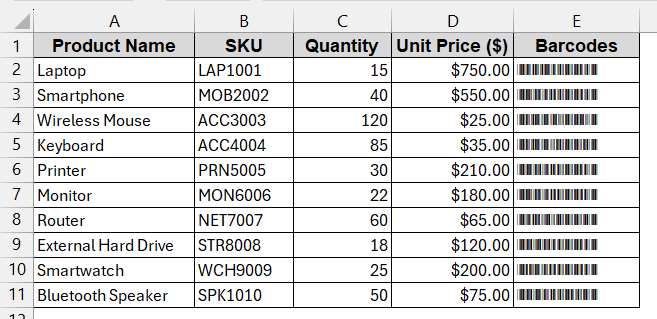
➤ Open the dataset and create a new column for storing the barcodes.
➤ In the barcode column, write the following formula –
=”*” & B2 & “*”
This adds an asterisk (*) before and after the value of B2.
➤ Drag and fill the rest of the column with the same formula.
➤ Go to Fonts, select Libre Barcode 39, and press Enter.
➤ This will convert the new column with the barcodes from the values of column B.
So, that’s just the beginning. This guide will help you learn how to create a Code 39 barcode font in Excel. Helping you download basic fonts of Code 39 to use VBA to generate strings, you will also see the extended Code 39 barcodes. We will also walk you through the check digits of the barcodes of Code 39 if you’re interested. All in all, with all these foolproof methods, you can transform your Excel into a fully barcode-enabled spreadsheet.
Install and Apply the Free Code 39 Font in Excel
The easiest way to create the Code 39 barcode is to download the fonts from any trusted website. Once you have downloaded and installed the .ttf extension file, you are good to go. The best part is that it works for both Windows and macOS.
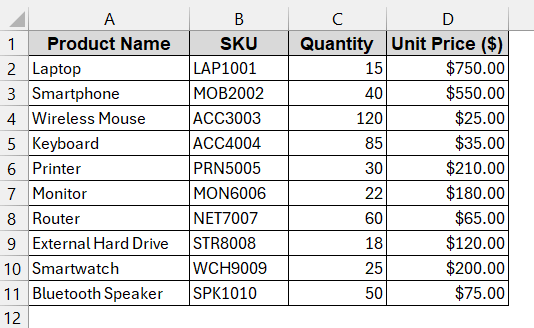
Here, we will create barcodes for each of the products based on their unique SKU.
Steps (Installing Free Code Font):
➤ Search Libre Barcode 39 free font version
➤ You can also visit any trusted websites like Google Fonts or IDAutomation.
➤ Download the zip file from the website by clicking the download icon.
➤ Extract it and find a LibreBarcode39-Regular file with the extension .ttf.
➤ Open it to install the fonts by clicking the Install button at the top of it.
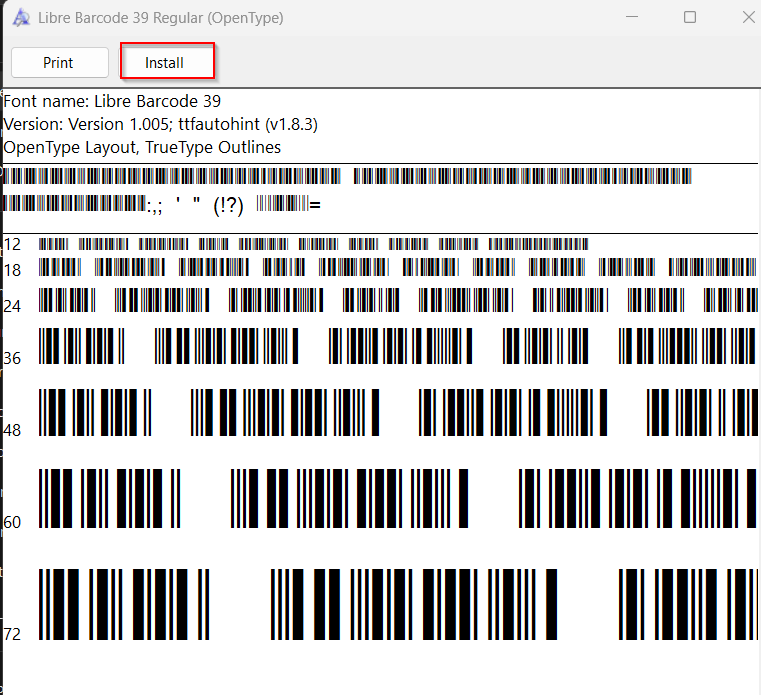
➤ After successful installation, you’ll see the new font to your Excel Fonts section.
➤ Restart Excel if it was opened during the installation time.
Steps (Creating Code 39 Barcode):
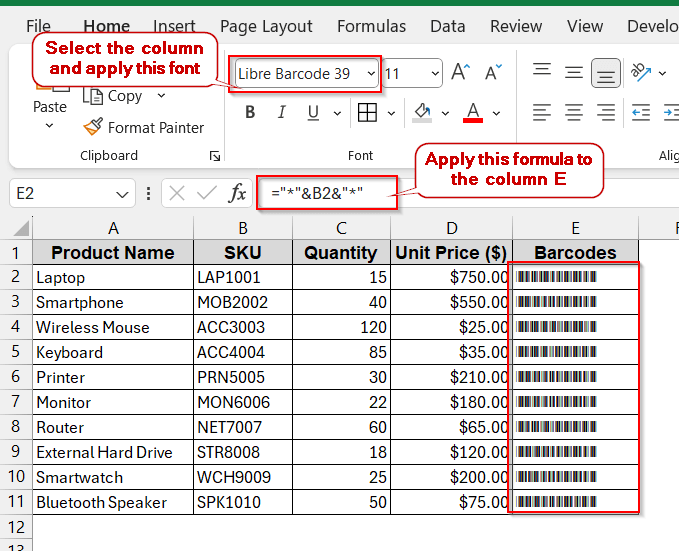
➤ Open the dataset and create a new column to store the barcodes.
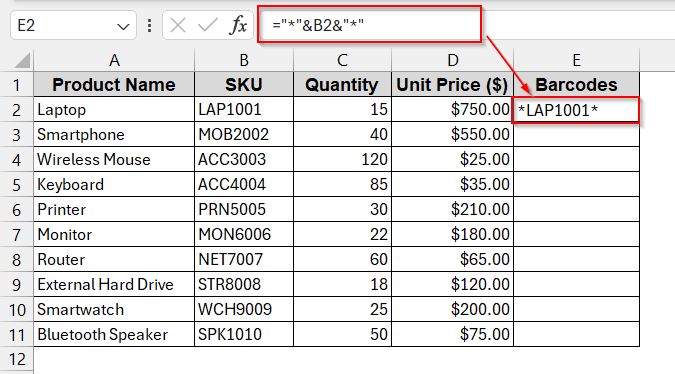
➤ In the first cell of the new column, write the formula below –
=”” & B2 & “*”
Here, the B2 is the first cell of the SKU column, which is surrounded by the asterisks (*).
➤ Press Enter to get the result in the selected cell.
➤ Drag the cells to Autofill the rest of the column in the same formula –

➤ Go to the Fonts and search for Libre Barcode 39.
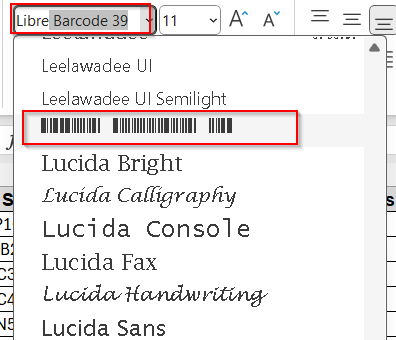
➤ Press Enter to apply the Code 39 barcode font.
➤ Adjust the font size to 16 to 24 pts to make it scanner-friendly.
Notes:
➧ Use the UPPER function if your code does not already contain it in uppercase.
➧ Leave spaces between the left and right margins of the barcode. Otherwise, it interferes with the code while scanning.
Create Code 39 Font with VBA Automation
For large datasets, you may need a faster and automated approach. Adding strings to the value, dragging and filling the column, and applying the font afterwards, is not feasible enough. Luckily, you can use VBA tools to automate the barcode strings. Without errors and hassles, you can actually properly format the text barcode ready.
Steps:
➤ Open the dataset and create a new column to store the dataset.
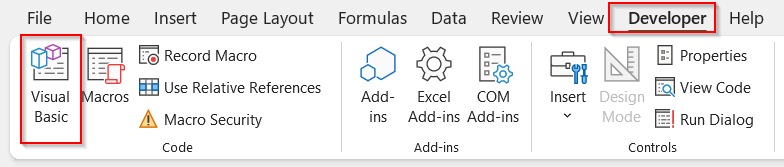
➤ Go to the Developers tab -> Visual Basic.
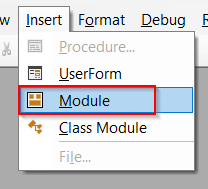
➤ In the new VBA editor window, click the Insert tab and select Module.
➤ In the blank space, paste the below VBA code for encoding strings-
Function EncodeCode39(ByVal txt As String) As String
    ' Clean and prepare input for Code 39
    Dim i As Integer
    Dim ch As String
    Dim allowed As String
    ' Allowed characters in Code 39
    allowed = "ABCDEFGHIJKLMNOPQRSTUVWXYZ0123456789-. $/+%"
    txt = UCase(Trim(txt)) ' Force uppercase & trim spaces
    ' Validate input (remove unsupported chars)
    For i = Len(txt) To 1 Step -1
        ch = Mid(txt, i, 1)
        If InStr(allowed, ch) = 0 Then
            txt = Left(txt, i - 1) & Mid(txt, i + 1)
        End If
    Next i
    ' Add start/stop characters
    EncodeCode39 = "*" & txt & "*"
End Function

➤ Save the VBA code by Ctrl + S and close the window.
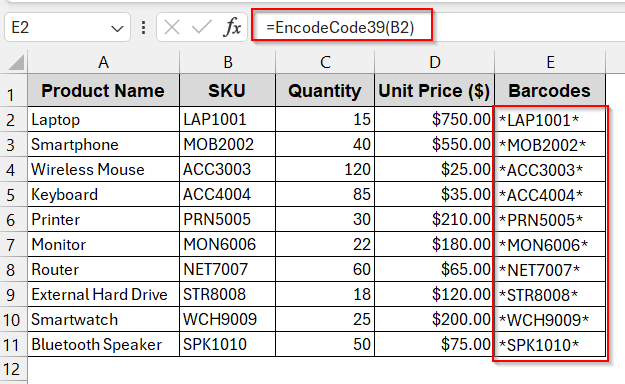
➤ Go to your worksheet’s new column and use your new VBA formula –
=EncodeCode39(B2)
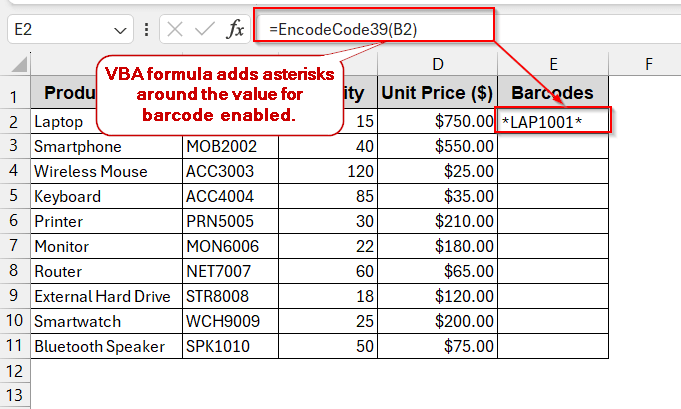
➤ Autofill to apply the same formula for the entire column.
➤ Select the entire column and go to the Fonts Section. Choose Libre Barcode 39 and press Enter.
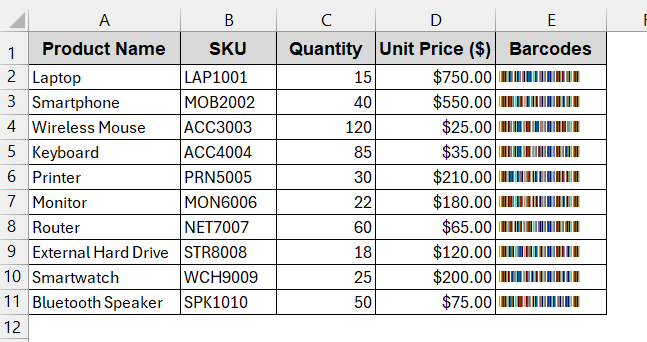
➤ Change the barcode font size as required for proper scanning.
Note:
The Code 39 font must be installed to use this method.
Generate Code 39 Barcodes with Excel’s IMAGE Function & API
Without installing or using VBA, you can also generate Code 39 fonts using the IMAGE function. The IMAGE function, available in Excel, can help you create the barcode image based on the product code with the simple API. This solution is the holy grail for users who just want to plug-and-play and enjoy the rest.
Steps:
➤ Open the dataset and create a new column for barcodes.
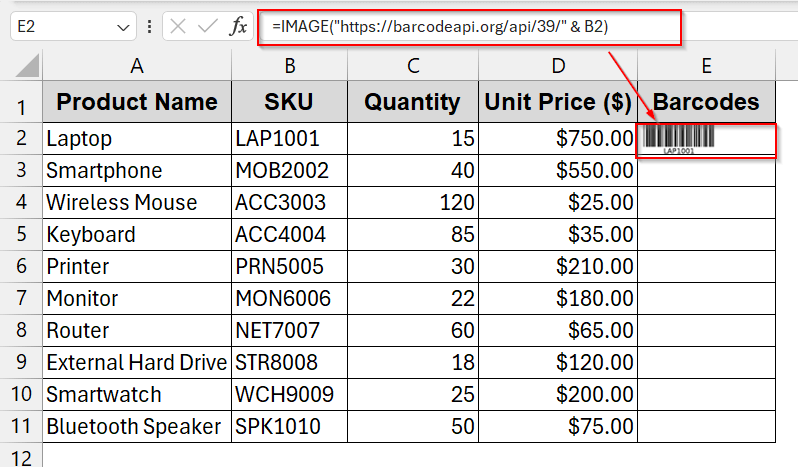
➤ In the first column, write the following formula of IMAGE–
=IMAGE("https://barcodeapi.org/api/39/" & B2)
where B2 is the cell of the SKU that is converted to a barcode.
➤ Press Enter to get the barcode for the cell.
➤ Drag the cells or use the Fill Handle to generate the barcode for all the cells.

Notes:
➧ An internet connection is required for the web API to work.
➧ The IMAGE function is only available to Excel 365 users.
Using Check Digit by MOD 43 (Optional)
By default, Code 39 does not require any check digit – so you can skip this method. This is one of the reasons for this code’s popularity. However, if you are working in industry, you need to maintain some security protocols, which means you might need to require a check digit for added reliability. Also, there are many scanners with specific documentation suggesting the use of Code 39 with check digits.
To check a digit, we mainly use the MOD 43 method. It means you need to assign 0 to 42 values to each of the numbers (0-9), alphabet (A-Z), and characters (-,., space,$,/,+, and %) in this sequence. Then, for each character of the product code, we assign numbers and sum them up.
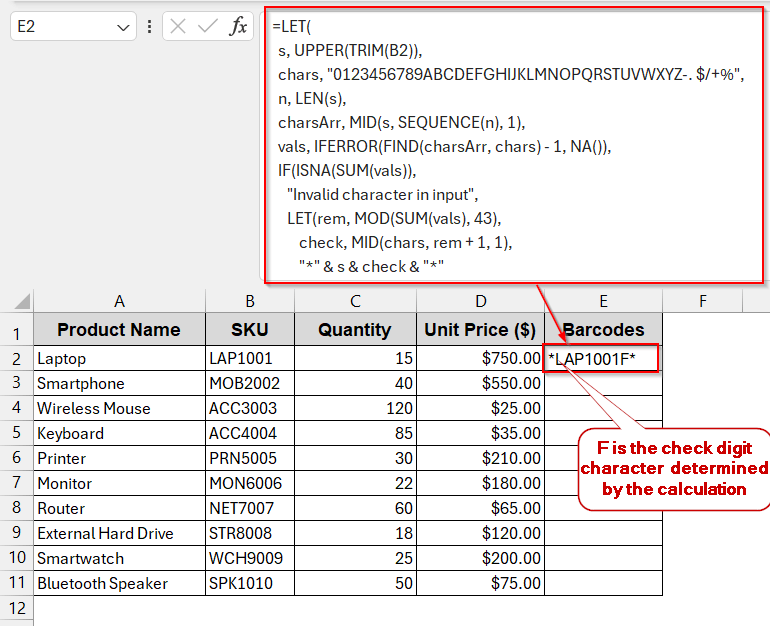
For example, for the SKU ‘LAP1001’, we assign a value in this way –
L – 21
A – 10
P – 25
1 – 1
0 – 0
0 – 0
1- 1
Adding them up gives us the value of 58. Afterwards, we need to divide this number by 43 and find the remainder. The remainder here is 15. So, according to the values, 15 belongs to F. Therefore, for the code ‘LAP1001’, the check digit is F. You can assign these values to each cell of the column with some easy formulas.
How to Use the MOD 43 Check Digit by LET and SEQUENCE
To check a digit using MOD 43, you can use various approaches. Among them, LET+SEQUENCE is common. It is minimal, user-friendly, and helpful for assigning individual values to the alphabet, numbers, and symbols. The steps are simple, as you only need one additional formula instead of adding an asterisk.
Steps:
➤ Open the dataset and create a new column for the barcodes.
➤ In the first cell of the column, write the following formula –
=LET(s, UPPER(TRIM(B2)),chars, "0123456789ABCDEFGHIJKLMNOPQRSTUVWXYZ-. $/+%",n, LEN(s),charsArr, MID(s, SEQUENCE(n), 1),vals, IFERROR(FIND(charsArr, chars) - 1, NA()),IF(ISNA(SUM(vals)),"Invalid character in input",LET(rem, MOD(SUM(vals), 43),check, MID(chars, rem + 1, 1),"*" & s & check & "*")))
Here, cell B2 contains the SKU. This formula alone handles the assigning of the values, summing, and finding the remainder to compare with the assigned character.
➤ Press Enter to generate the asterisk and the check digit around the value.
➤ Drag and fill the rest of the cells of the column.
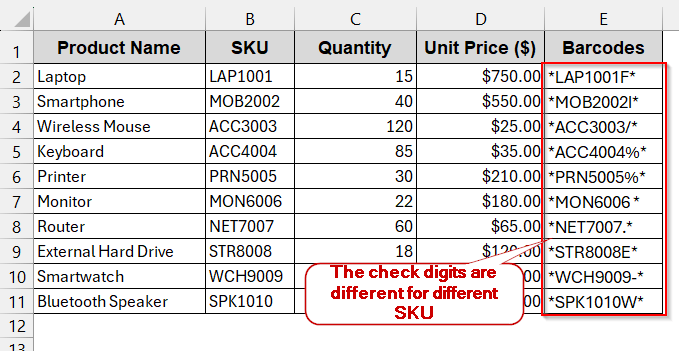
➤ Apply the Libre Barcode 39 font in this column to generate the barcode with check digits.
Note:
You can also use SUMPRODUCT, VBA, or other functions to assign values and find the check digits.
Frequently Asked Questions (FAQs)
Do I always need the asterisks to include in Code 39?
Yes, the Code 39 always requires the start and stop characters. The asterisk works as the start and stop character in this case. Without these characters, the scanner cannot read the value of the barcode.
What characters are allowed in Code 39?
The characters of Code 39 allow a total of 43 alphanumeric and symbols. You can use 0-9, A-Z, and symbols like -,., space, $, /, +, and %. Also, it only supports uppercase characters, so lowercase might give you an error.
Do I need a check digit in Code 39?
Check digits are optional in Code 39. Most scanners have the functionality to detect errors without one. But, in professional use, or depending on the scanner, you might need to include a check digit in the barcode.
Why won’t my prints scan the barcodes?
Your barcodes might not get printed or scanned due to the font being too small or scaling incorrectly. Also, ensure there are quiet zones around the barcodes. As a matter of fact, do not forget to check your printer resolution.
What is the ratio of the Code 39 barcodes?
The ideal ratio of the Code 39 barcodes is 2:1 or 3:1. In Excel, we do not need to set these ratios. By default, the ratio is fixed to 3:1. However, it is better to check the documentation for label printing.
Concluding Words
Creating Code 39 barcodes in Excel does not require high-end skills and complexity. You can choose from either free Libre Barcode 39 fonts, a VBA function to generate start and end string, or even Web API combined with the IMAGE function. Again, if you want the security of Code 128 with the easy manipulation of Code 39, you can also use optional check digits by MOD 43. So, with the right setup and steps, you can easily use these methods to convert your plain Excel into a lightweight inventory system.