Although Notepad is great for basic editing and modifications of text files, it doesn’t have any advanced formatting features like Excel. Therefore, if you want to import a Notepad file in Excel without losing its basic format, you can do so in not one but several different ways.
Depending on which method you’ve chosen to create column data, select any of the following methods:
➤ Open Excel, go to File and click on Open. Navigate through the folders to locate the Txt file and press Open.
➤ From the Text Import Wizard dialog box, choose Delimited if you used tabs or commas to create columns; otherwise, select Fixed Width if you used spaces at equal distances for each column.
➤ Similarly, choose Tab/Semicolon/Comma/Space from the next box depending on what you used to define your columns in Notepad. Press Next, select General, and click on Finish to sort your text data in Excel columns.
Apart from this quick technique, there are several other ways to sort text data into columns. Whether you’re using commas, spaces, or tabs to create columns in Notepad, read on as we’ll guide you to turn each format in your desired Excel setup.
How Excel Recognizes Text Columns from Notepad?
As Notepad doesn’t have any column, row, and header formatting options, you must use specific delimiters-characters like tabs, commas, spaces, or custom symbols to separate your data fields.
Therefore, when you import or paste data from Notepad, Excel either automatically detects these delimiters or prompts you to specify them using the Text Import Wizard feature. To make sure Excel can correctly split the data into columns, do the following:
- Use a consistent delimiter throughout your Notepad file. You can use equal spaces, commas, tabs, and semicolons as Excel instantly recognizes them.
- You can also use other delimiters like hyphens or pipes, but you must specify them manually during the import from Notepad to Excel.
Copy and Paste Notepad Data to Excel
When you have only a few columns with basic data, you might be able to directly copy them as columns in Excel. Although it doesn’t always work, start by giving it a try by following these steps:
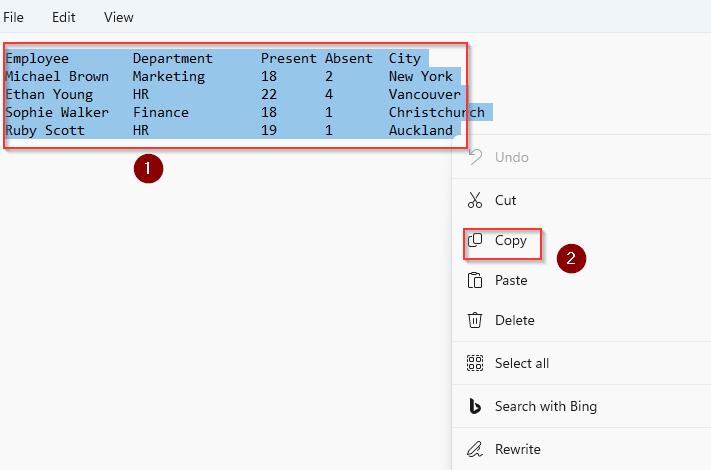
➤ Open the Txt file in Notepad and select all the existing column data with your mouse or use the keyboard shortcut CTRL + A .
➤ To copy the data, press CTRL + C or right-click on your mouse and select Copy.
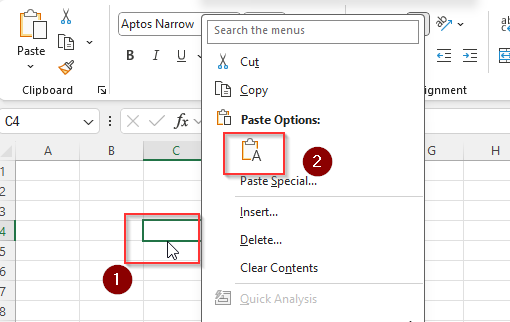
➤ Create a blank Excel workbook and select your preferred cell from where you want to start the columns. For example, if you want to create columns from the C4 cell as shown in the picture below, click on it and press CTRL + V or right-click on your mouse and select Paste.
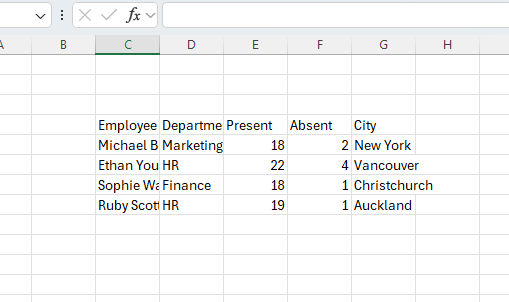
➤ If this method works, the final result should look like this picture:
Directly Open the Text File in Excel
As Excel doesn’t allow you to export direct data in .txt format, it uses the Text Import Wizard feature to modify it. You can use it in either of the following ways:
For Text with Delimiters
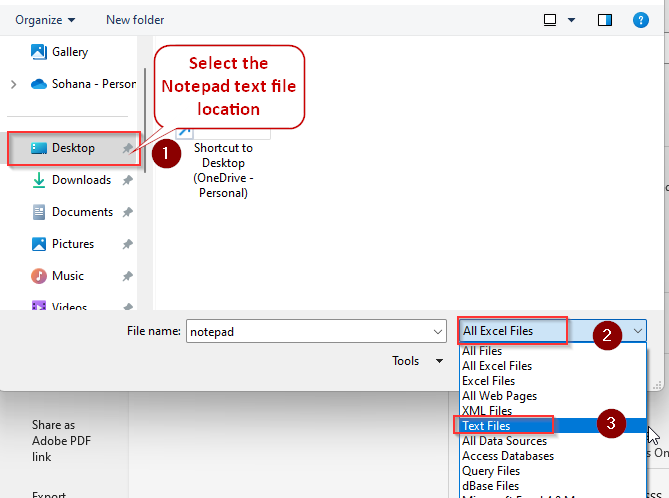
➤ Open a new workbook and click on the File tab. Select Open and navigate through your files to find the Txt file. Make sure to change the filter from Excel Files to Text Files. Once you find it, click on Open.
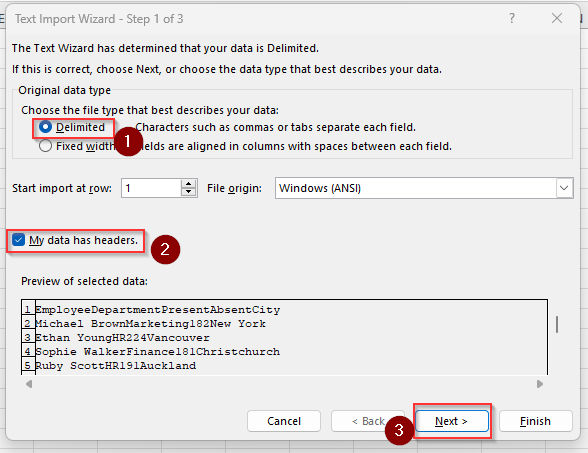
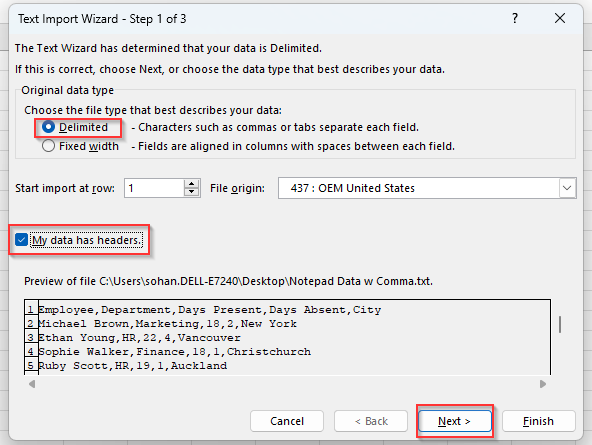
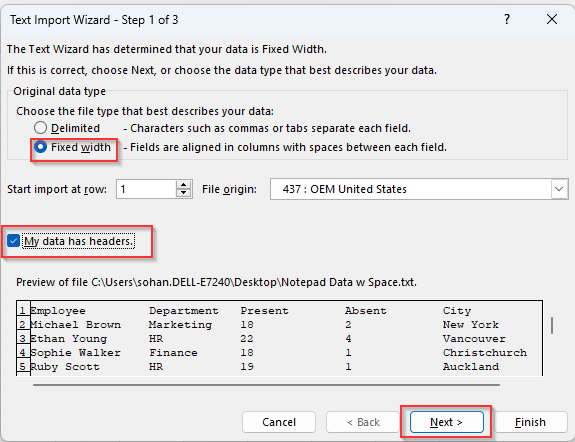
➤ As the new dialog box Text Import Wizard appears, choose Delimited from the Original Data Type group if you’ve used commas, tabs, colons, or semicolons to define columns.
➤ Now, check the My Data Has Headers box and click Next.
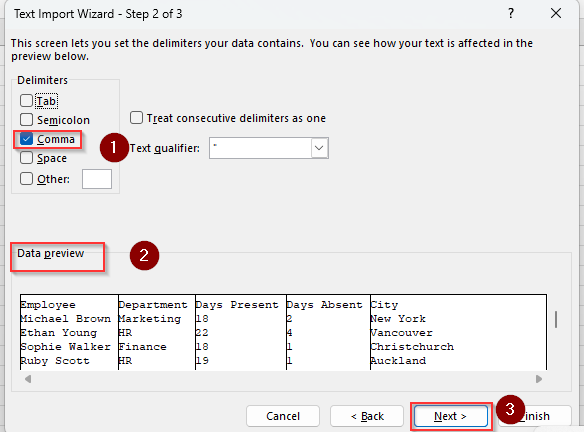
➤ Select Tab/Semicolon/Comma/Space based on what you used in the Notepad data and check out the Data Preview box to see if the columns are sorted correctly.
➤ Click Next to proceed.
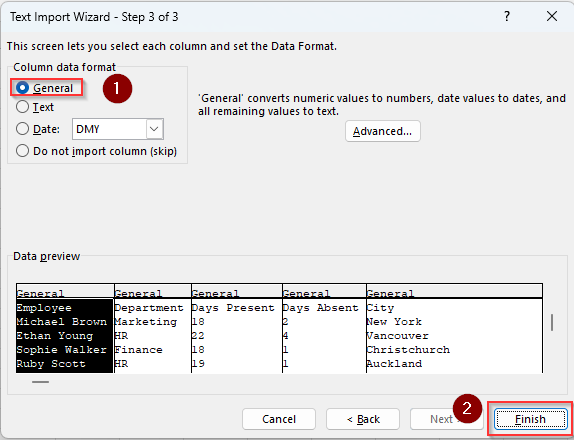
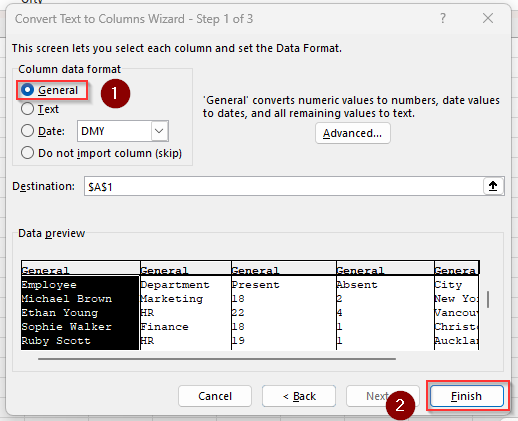
➤ From the Column Data Format group, choose General and click Finish. Now, the Excel file should sort your data into columns.
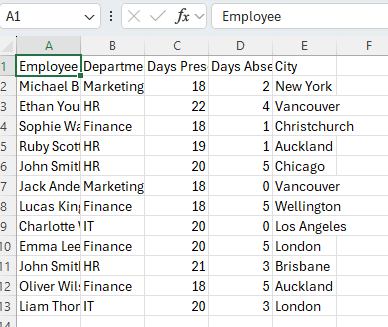
➤ The final result should look like this:
For Text with the Same Length and Spaces
In case you’ve separated the data sets with spaces and each column features data sets of the same length, the process will be slightly different as given below:
➤ After following the first step mentioned above, when the Text Import Wizard appears, select Fixed Width as shown in the picture below:
➤ Now, inspect the Data Preview box to see if the data is sorted correctly in each column. The vertical lines with arrows represent column breaks.
➤ You can drag the arrow to move it or double-click to completely remove it. More related instructions will appear in the dialog box.
➤ When you’re done, click Next.

➤ Just like before, choose General from the new page and press Finish.
Use Text Import Wizard to Copy Notepad Data
While the previous method works, its one drawback is that you can’t select specific cells to place your data. To be able to do this, you can follow these steps instead:
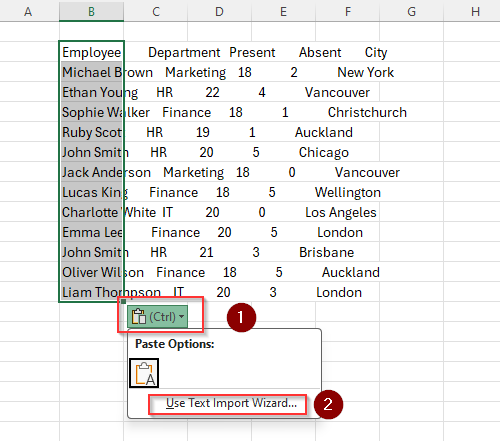
➤ Open a new workbook and select the cell you want to start your first column. Copy your Notepad data and paste it into the selected cell in Excel.
➤ As you can see, the data is scattered and not arranged in columns. To fix this, click on the small Clipboard icon and select the Use Text Import Wizard… option.
➤ The next steps are the same as the previous method. Click Delimited or Fixed Width >> press Next >> select Tab/Semicolon/Comma/Space >> click Next >> choose General >> press Finish.
Import with Text to Column Feature
If you can’t find the clipboard option after pasting your data, you can choose the Text to Column feature instead. For this, follow these steps:
➤ Copy and paste Notepad data on a new Excel sheet. Click on the first cell and drag to select the entire column. From the top ribbon, open the Data tab.
➤ Locate the Sort & Filter group and click on Text to Columns. As the Convert Text to Columns Wizard box appears, follow the same steps described in the previous methods to turn the copied data into columns.

Format with the Power Query Feature
Excel’s Power Query feature allows you to apply advanced formatting to a text file before importing it into a worksheet. It’s the most effective Txt to Xlsx conversion method for large text files with a huge number of columns and data.
While we’ll use comma-delimited columns for this method, you can use any other format by following the steps given below:
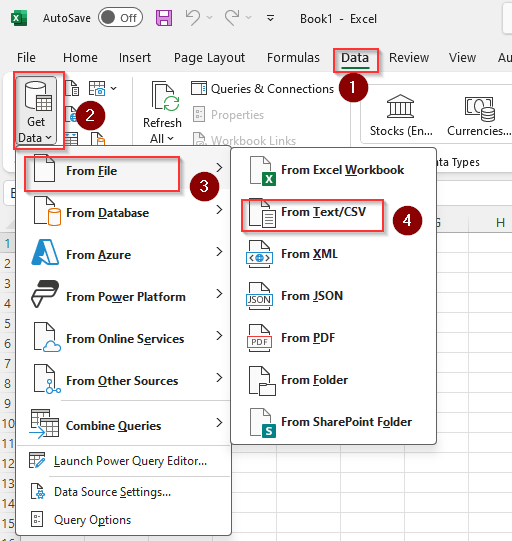
➤ Open a blank worksheet, click on Data, and select Get Data from the Get & Transform Data group. From the drop-down menu, choose From File and click From Text/CSV.
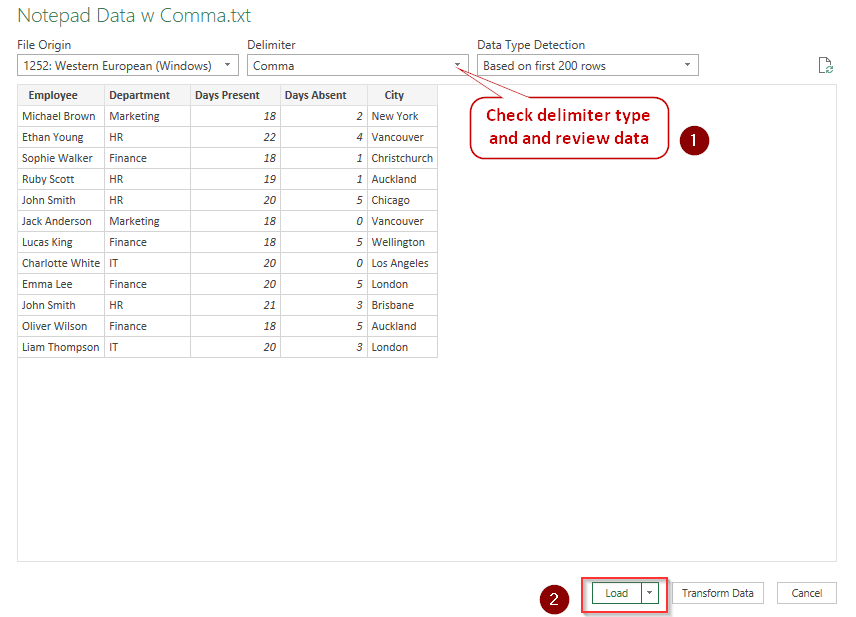
➤ Browse through your files and open the Txt file you want to convert. As a new dialog box arrives with your data sorted in columns, you can review it and change the delimiter if needed. Press Load and the Power Query Editor box will open.
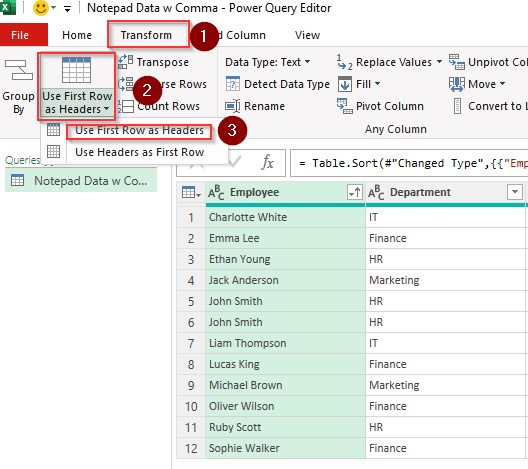
➤ Here, you can make any advanced changes to the columns and data such as removing, adding, and moving columns. You can also sort them in ascending or descending orders alphabetically and numerically.
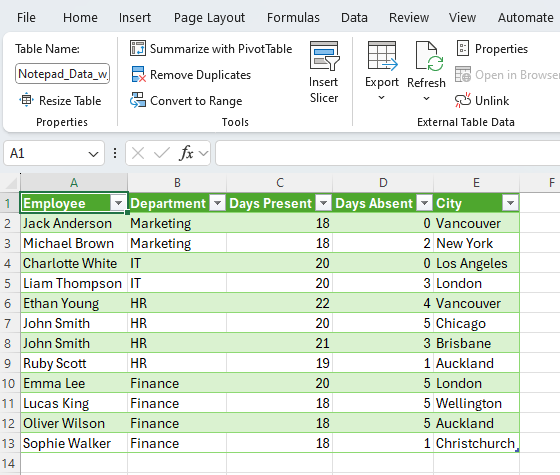
➤ Take the following picture, for example, where we used the Transform tab to select the first row as a header for the columns by clicking Use First Row As Headers twice.
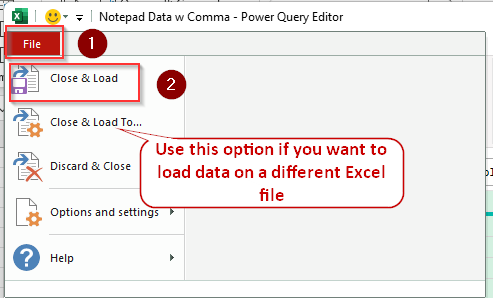
➤ When you’re done editing and formatting, click on File and choose Close & Load to import the data to the workbook you’re currently working with. If you want to import in a different Excel file, select Close & Load To… instead and pick your preferred file.
➤ As we formatted the header, the final result looks like this:
Frequently Asked Questions
How can I specify a custom delimiter in Excel?
To specify a custom delimiter, open the text data in Excel and select Text to Columns from the Data tab. As the Text Import Wizard box appears, choose Delimited from the first page and Other from the second. In the blank field, type your special delimiter and follow the next steps as usual.
Can Excel format columns with decimal points correctly from Notepad to Excel?
Yes, Excel correctly recognizes decimal points as long as you specify them while importing. In the third step of the Text to Columns Wizard, choose the Advanced option to select a period (.) or comma (,) as your decimal separator, depending on what you used in your Notepad data.
How do I specify column location when converting Notepad files to Excel?
To specify the specific cell where you want to start the first column, open the Text Wizard Import box and select accordingly to reach Step 3. Click on the destination box and type the cell number you prefer. For example, enter $B$2 to start columns from the B2 cell.
Final Words
While choosing any method, consider the length and complexity of the data you want to transform. Copying and using the Import Wizard converter works well for small to medium-sized files with less than 100 rows. For larger files, use the Power Query feature for better results.
Although there are third-party tools, Python, and VBA coding available for Notepad text-to-Excel conversion, these can be complex, time-consuming, and even unsafe for your device.