Mail merge is a powerful feature in Microsoft Word that lets you import data from Excel. However, sometimes the connection between Word and Excel does not work properly. Instead of smoothly importing the data, you may see blank fields, formatting errors, or Word refusing to recognize your Excel file.
Mail merge issues usually happen due to reasons like incorrect Excel formatting, incompatible file types, column headers not being recognized, or hidden characters inside the dataset.
In this article, we’ll explore the common reasons why Word Mail Merge may not work with Excel and show you exactly how to fix them.
Here’s how to fix the most common Mail Merge issue when Word doesn’t read Excel data correctly:
➤ Open your dataset in Excel.
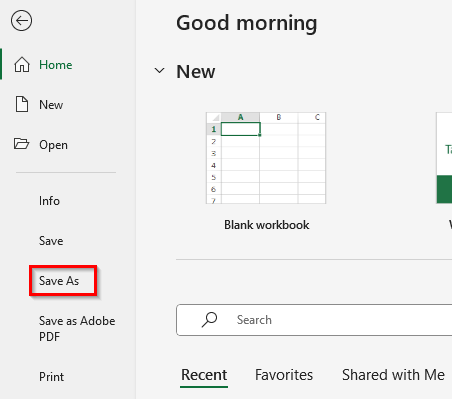
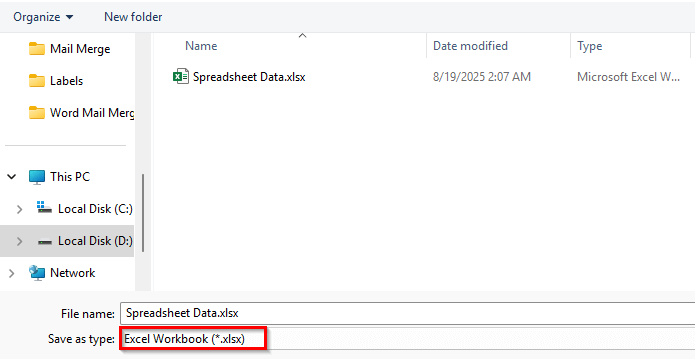
➤ Go to the File menu and click Save As.
➤ In the Save as type dropdown, select Excel Workbook (*.xlsx).
➤ Save the file as Spreadsheet Data (*.xlsx) and close Excel.
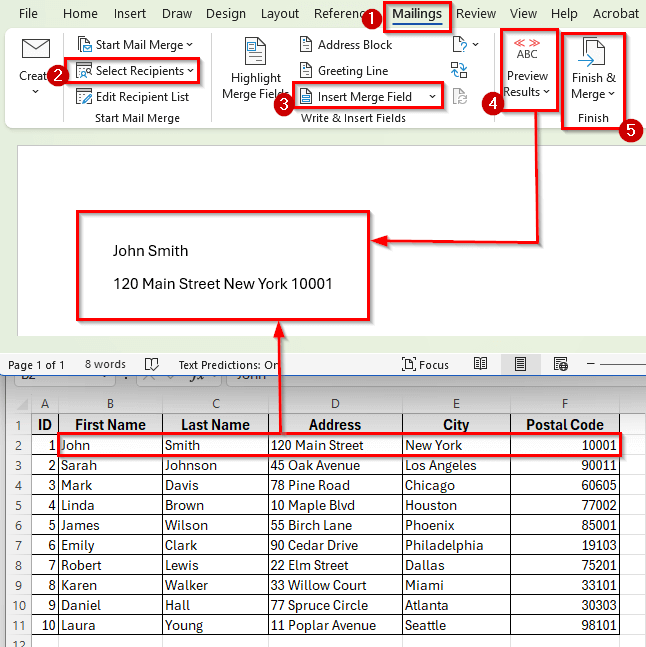
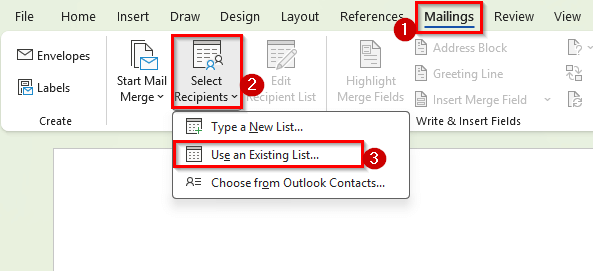
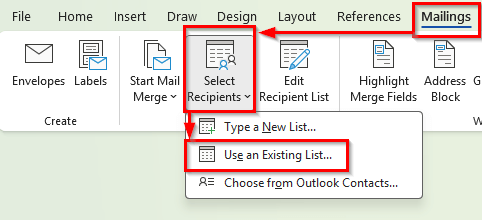
➤ Now, in Word, go to Mailings >> Select Recipients >> Use an Existing List.
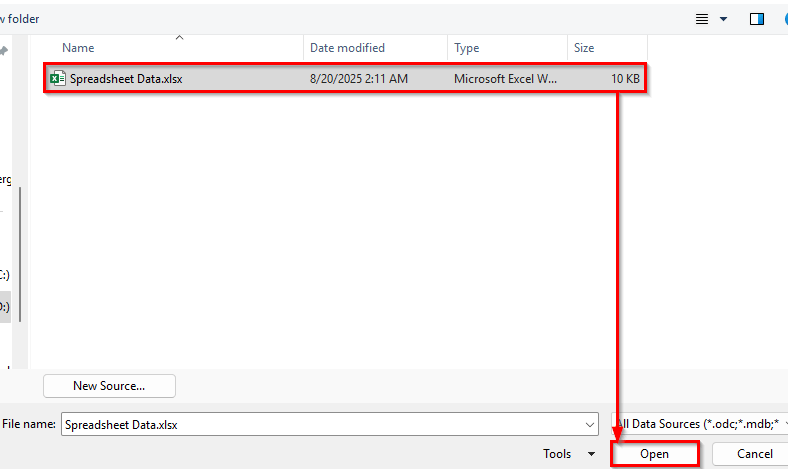
➤ Browse and select your newly saved .xlsx file.
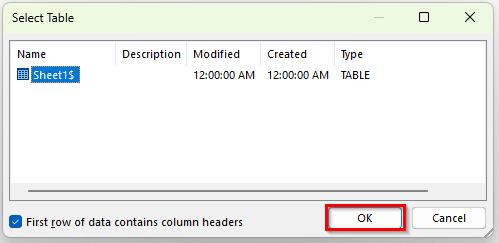
➤ When prompted, choose the correct sheet (the one with your mailing list).
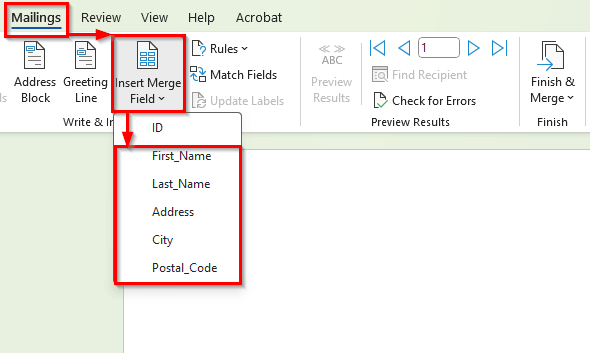
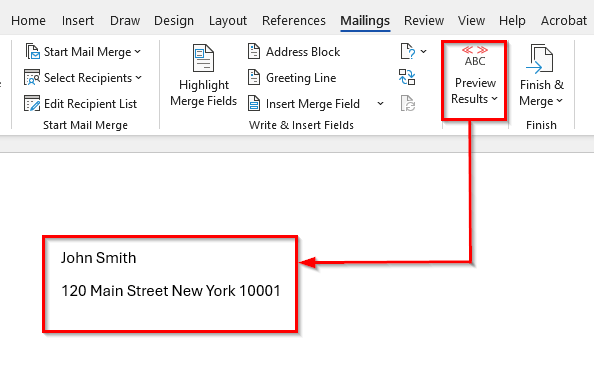
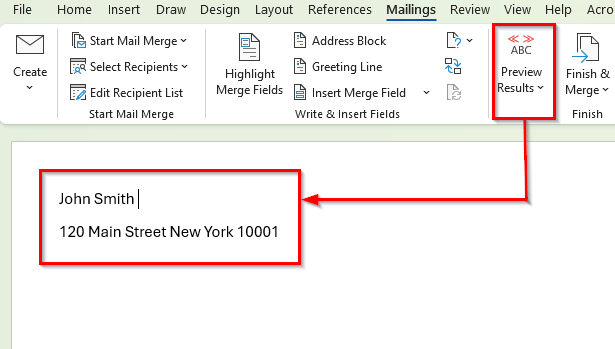
➤ Click Insert Merge Fields and select the order. For example, it will look like this
<<First_Name>> <<Last_Name>>
<<Address>> <<City>> <<Postal_Code>>.
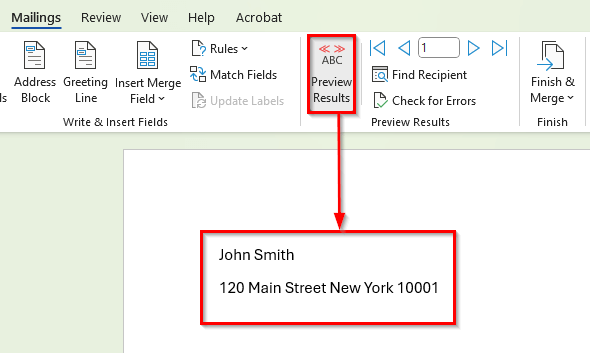
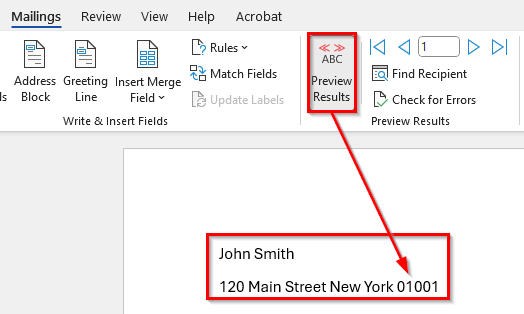
➤ Next, click Preview Results.
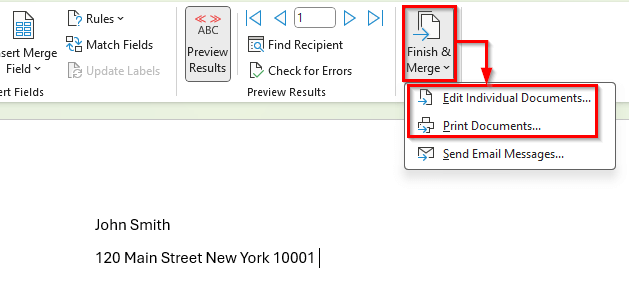
➤ Finally, click Finish & Merge and choose whether to print the documents directly or edit them individually.
Common Reasons and How to Fix Them
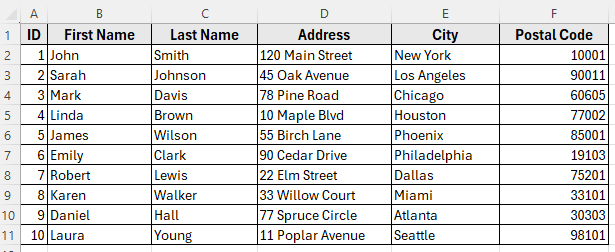
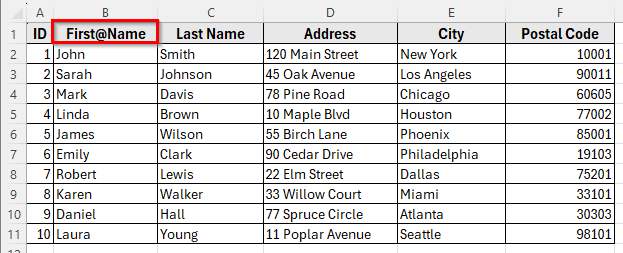
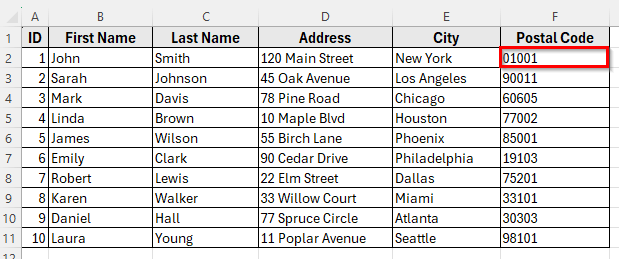
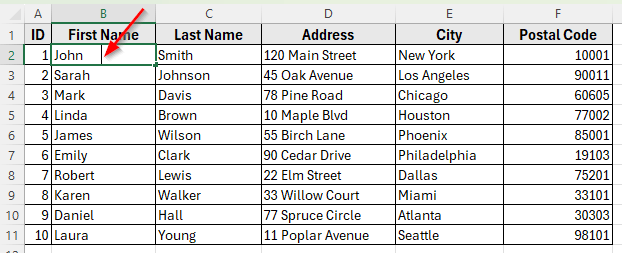
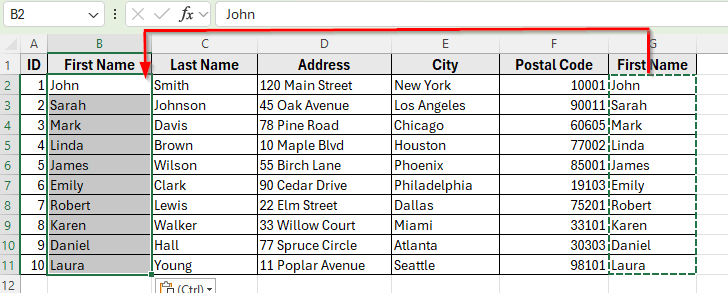
In the following dataset, we have a simple mailing list that contains recipient details for a mail merge. Column A lists the ID numbers, Column B contains the First Names, Column C shows the Last Names, Column D holds the Street Addresses, Column E includes the City names, and Column F has the Postal Codes.
We’ll use this dataset in Excel to demonstrate the common issues that can cause Word mail merge to fail and how to fix them. This will help ensure that every merged document displays the correct recipient information.
Excel File Format Not Supported
One of the most common reasons Word fails to perform a mail merge with Excel is because of the file format. If your dataset is saved as a CSV or contains macros, Word may not recognize the file correctly. This often results in blank records or Word refusing to connect at all.
Steps to fix this issue:
➤ Open your dataset in Excel.
➤ Go to the File menu and click Save As.
➤ In the Save as type dropdown, select Excel Workbook (*.xlsx).
➤ Save the file as Spreadsheet Data (*.xlsx) and close Excel.
➤ Now, in Word, go to Mailings >> Select Recipients >> Use an Existing List.
➤ Browse and select your newly saved .xlsx file. Click Open.
➤ When prompted, choose the correct sheet and click Ok.
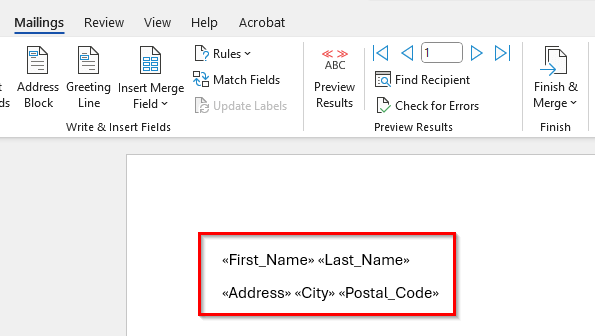
➤ Click Maillings >> Insert Merge Fields and select the order.
➤ You can use space between Labels to make them look more readable. For example, it will look like this:
<<First_Name>> <<Last_Name>>
<<Address>> <<City>> <<Postal_Code>>.
➤ Next, click Preview Results.
➤ Finally, click Finish & Merge and choose whether to print the documents directly or edit them individually.
Column Headers Missing or Misaligned
Another common reason Word mail merge doesn’t work with Excel is when the column headers are missing or set up incorrectly. Word relies on the first row of your Excel sheet to identify field names like First Name, Last Name, Address, etc.
If your dataset starts with blank cells, merged headers, or unusual characters in the first row, Word won’t know what fields to display. As a result, the merge fields may not show up at all, or you might see confusing names like Column1, Column2 instead of clear labels.
In our dataset, if Row 1 was left blank or if the header First Name was written as First@Name, Word would fail to recognize it properly during the merge.
Steps to fix this issue:
➤ Open your dataset in Excel.
➤ Make sure the first row contains simple, descriptive headers such as First Name, Last Name, Address, City, and Postal Code.
➤ Remove any merged cells, blank rows, or special characters from the header row.
➤ Save the workbook after making these corrections.
➤ Go back to Word, click Mailings >> Select Recipients >> Use an Existing List, and re-link your Excel file.
➤ Insert the merge fields again.
➤ Now, when you insert fields in Word, you’ll see clear options like First_Name, Last_Name, Address, City, and Postal_Code.
➤ Next, click Preview Result. Each merged document will then correctly display the recipient’s information.
Numbers or Postal Codes Display Incorrectly
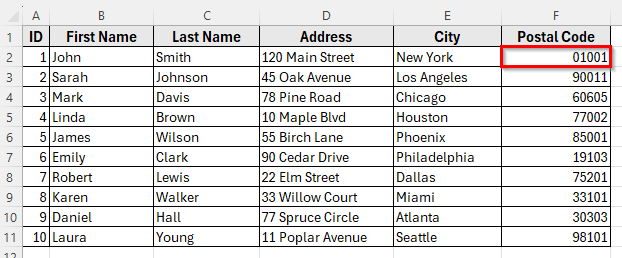
Sometimes Word imports numbers or postal codes from Excel incorrectly. This happens most often with leading zeros (like 01234), which Excel treats as a number instead of text. When the data is merged into Word, the zero disappears, and the postal code shows up as 1234 instead of 01234.
This issue can also occur with long numbers such as phone numbers, where Excel automatically shortens them into scientific notation, for example, 1.23E+09. If you left it unfixed, the merged letters or labels will show the wrong values.
In our dataset, if the Postal Code column is formatted as Number, Word will merge 01001 as 1001, which is not correct.
Steps to fix this issue:
➤ Open your Excel dataset.
➤ Select the entire Postal Code column.
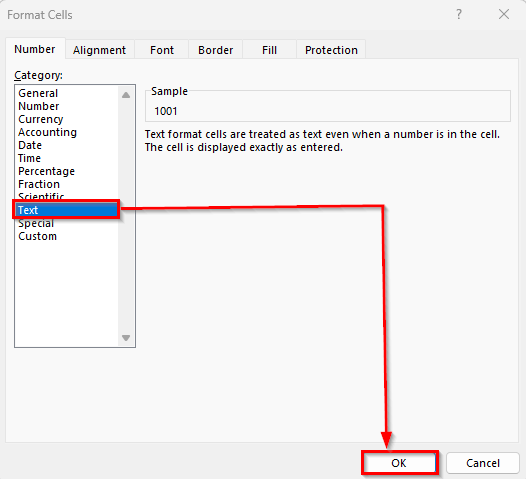
➤ Right-click and choose Format Cells.
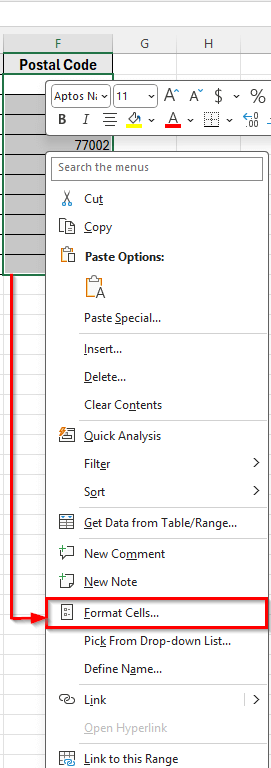
➤ In the Format Cells dialog box, select Text and click OK.
➤ Re-enter any values with missing leading zeros to correct them.
➤ Save the Excel file.
➤ Go back to Word and restart the mail merge process by selecting the corrected Excel file.
➤ Now, when you insert the Postal Code field in Word, it will appear exactly as entered in Excel, preserving all leading zeros and preventing formatting errors.
Hidden Characters or Blank Rows in Excel
Blank rows or hidden characters inside your Excel sheet can also cause Word mail merge to misbehave. When Word encounters an empty row, it often generates a blank letter, label, or envelope. Similarly, hidden spaces or non-printable characters in your data may prevent fields from displaying correctly.
In our dataset, if a cell in the First Name column contains hidden spaces, the merged result might look misaligned.
Steps to fix this issue:
➤ Open your dataset in Excel.
➤ Look for and delete any unnecessary blank rows within the data.
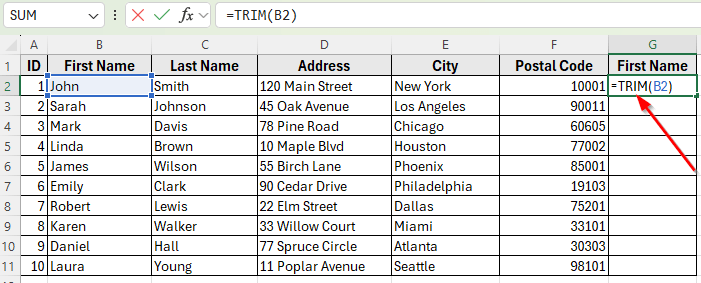
➤ Use the TRIM function to remove hidden spaces. For example, in a new column enter:
=TRIM(B2)
➤ This will clean extra spaces from the First Name in cell B2.
➤ Next, drag the fill handle down to copy the formula for the rest of the rows.
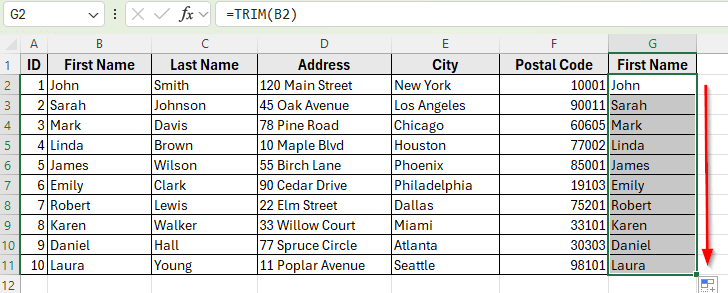
➤ Select cell G2 to G10 with cleaned values, press Ctrl + C and paste them back into the original column.
➤ Right-click on cell B2 and paste it as Paste Values.
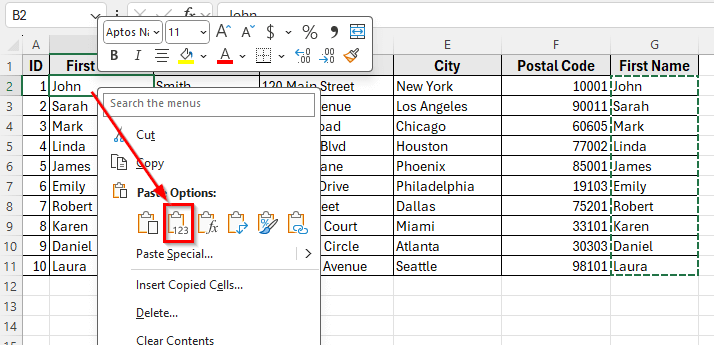
➤ You’ll see all the clean values from Column G are transferred to Column B.
➤ Now, you can delete Column G to avoid duplicate labels. Repeat this for other columns if necessary.
➤ Save your Excel file after cleaning the data.
➤ Return to Word, re-select your dataset, and insert the merge fields again.
➤ After cleaning hidden spaces, your mail merge will run smoothly, and you won’t get empty or incorrect records in your final document.
Frequently Asked Questions
Why is Word not recognizing my Excel file for mail merge?
This usually happens when the Excel file is not saved in a compatible format. Make sure your workbook is saved as .xlsx or .xls and not as CSV or macro-enabled files. Also, check that your first row contains clear column headers.
How can I fix postal codes or numbers showing incorrectly in Word?
Format the corresponding Excel columns as Text. This preserves leading zeros and prevents Excel from converting long numbers into scientific notation.
Can I use CSV files for a Word mail merge?
While CSV files can be used, they often cause problems with special characters, formatting, and number fields. It’s better to use an Excel Workbook (.xlsx) for a smooth mail merge.
Why do blank rows appear in my merged documents?
Extra blank rows or hidden spaces in your Excel sheet can create empty letters or labels. Delete unnecessary rows and use the TRIM function to remove hidden spaces in your data.
What should I do if merge fields don’t appear in Word?
Check that you’ve linked the correct Excel sheet, your column headers are clear, and the Excel file is saved in a supported format. Re-inserting the merge fields usually resolves this issue.
Wrapping Up
Word mail merge may not work with Excel for a few common reasons, such as wrong file formats, missing headers, number formatting issues, blank rows, or selecting the wrong sheet. These small issues can prevent your letters, labels, or envelopes from displaying correctly.
In this article, we’ve shown step-by-step how to fix each problem. By saving your Excel file as .xlsx, using clear headers, cleaning blank rows, formatting numbers correctly, and selecting the right sheet, you can ensure your mail merge works smoothly.
Once you apply these fixes, Word will pull the correct data from Excel, and your merged documents will display all names and addresses accurately. Following these tips will save you time and prevent errors in your mail merge projects.