Creating a price list in Excel is one of the simplest ways to organize product information and calculate totals automatically. Instead of maintaining a manual list, you can use Excel features such as Data Validation, lookup formulas, and VBA automation to build a smart template that updates instantly when you select a product.
In this article, you’ll learn how to make a price list in Excel step by step. We’ll insert company details, create dropdowns for product codes, use formulas to fetch prices and VAT, and finally, automate the process with VBA to save and reset the template.
Steps to create a price list in Excel:
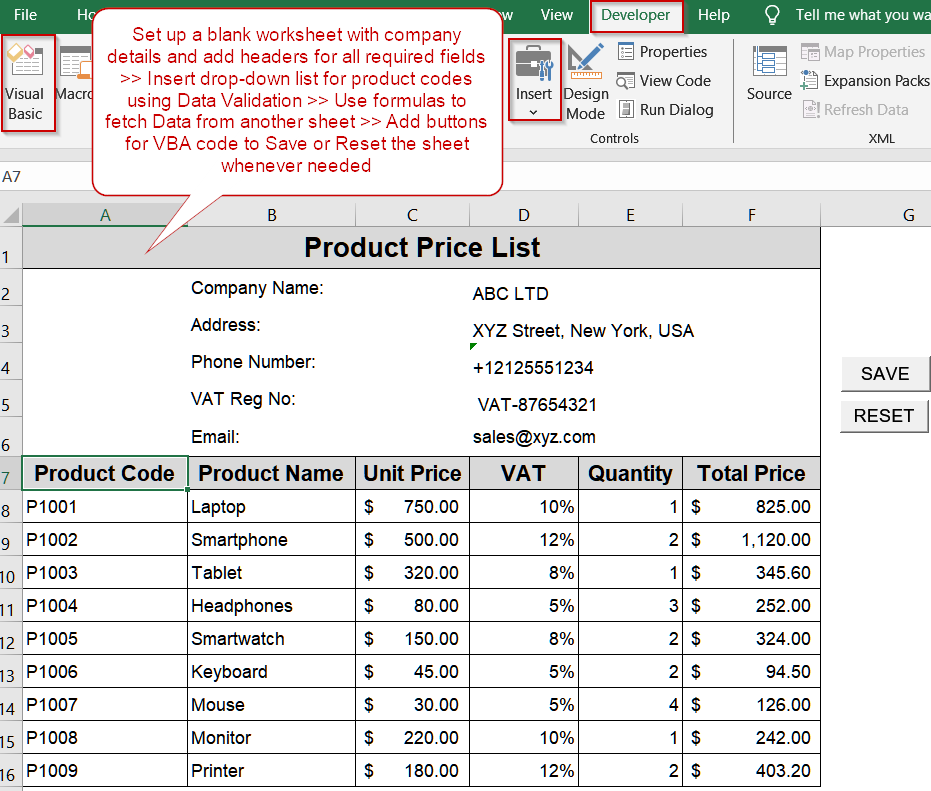
➤ Create a worksheet with company information and set up a price list table with proper headers.
➤ Add dropdowns for Product Codes using Data Validation.
➤ Apply VLOOKUP (or XLOOKUP in newer Excel) to bring product details such as Name, Price, and VAT.
➤ Insert formulas to calculate totals with and without VAT.
➤ Write simple VBA macros to save the price list as PDF and reset fields for new entries.
Steps to Create a Price List in Excel
A price list in Excel is one of the most efficient ways to manage and share product or service pricing. To follow along with this tutorial, we’ll use a small sample dataset containing product IDs, names, unit prices and VAT rates. You can replace these with your own business data.
For this demonstration, we’ll use the following sample dataset:

Step 1: Build the Price List Outline in Excel
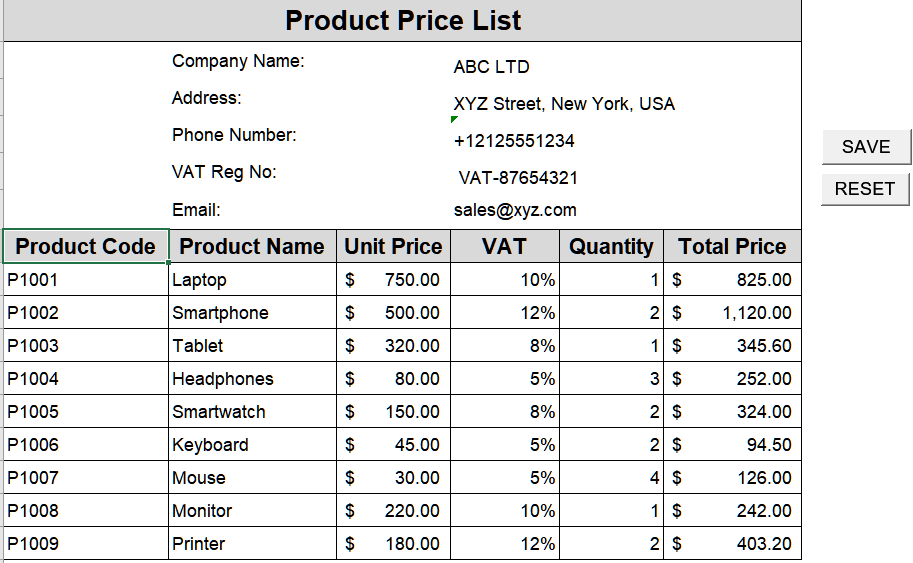
Before jumping into formulas, we need a structured outline for the price list. A well-organized template ensures clarity for both you and your customers. By setting up company details at the top, the sheet doubles as an official document ready for sharing. The table structure underneath gives a consistent format where product details and totals can be filled automatically.
Steps:
➤ Create a new worksheet and name it PriceTemplate.
➤ At the top, type in company information like Company Name, Address, Phone Number, VAT Reg No and Email.
➤ Format them accordingly using the Font and Alignment groups from the Home tab. For example, apply your desired font, adjust font size and merge the title row by selecting respective cells.
➤ Skip columns to create blank space in the template and apply cell borders when necessary.
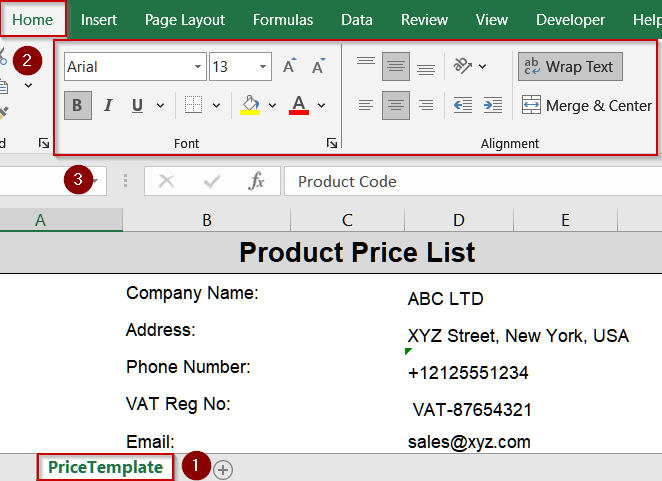
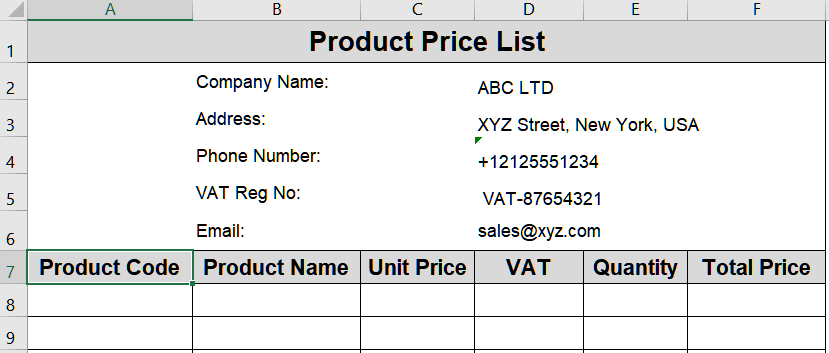
➤ Below this, set up a table with the headers Product Code, Product Name, Unit Price, VAT, Quantity, and Total Price.
Step 2: Insert Dropdowns for Product Codes Using Data Validation
Typing product codes manually can lead to errors and inconsistencies. To avoid this, we’ll add dropdown lists that let you pick from valid product codes only. This makes the sheet more user-friendly and prevents mistakes. The dropdowns will pull data from a separate sheet where you maintain your product catalog.
Steps:
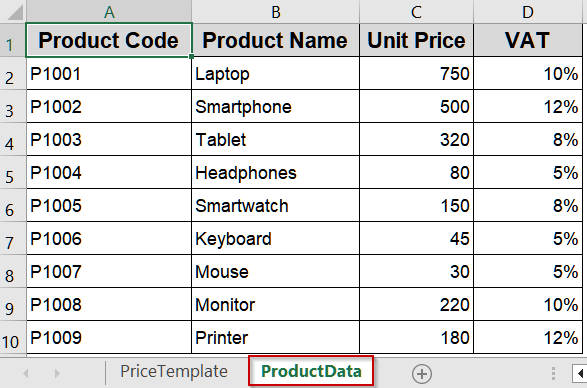
➤ In the same workbook, create a sheet named ProductData.
➤ In columns A to D, list your product codes, product names, unit prices, and VAT rates (e.g., A2:D10).
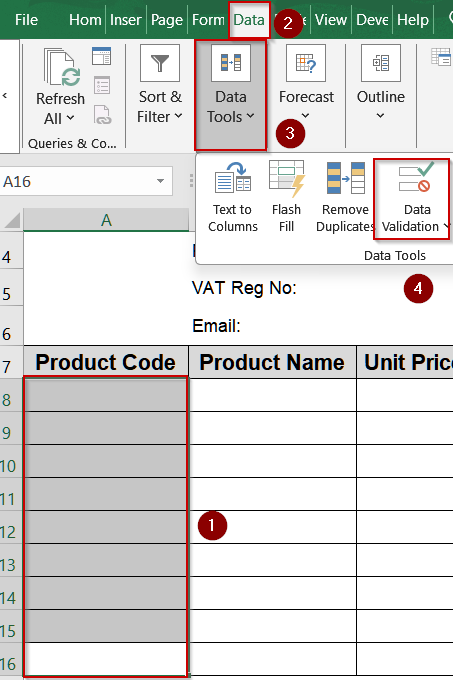
➤ Return to the PriceTemplate sheet.
➤ Select the cells in the Product Code column where you want the dropdowns such as A8:A16.
➤ Go to the Data tab >> Click on Data Validation under Data Tools.
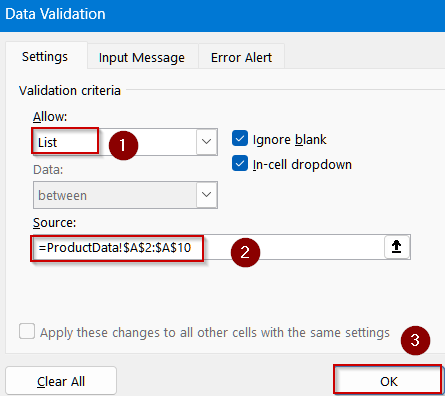
➤ In the dialog box, choose List as the validation type.
➤ In the Source box, enter:
=ProductData!$A$2:$A$10
➤ Click OK.
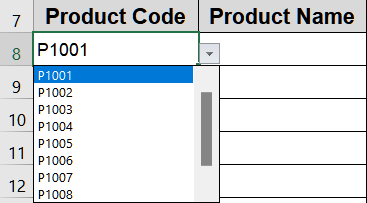
Now each cell in the Product Code column contains a dropdown with all available product codes.
Step 3: Use Formulas to Fill Product Details
Instead of retyping names and prices, we’ll link everything to the product data sheet using lookup formulas. Once a product code is selected, Excel will instantly bring in the product name, unit price, and VAT rate. Then, with a simple formula, it will also calculate the total price including tax.
Steps:
➤ In the Product Name column, enter the following formula (starting in row 8):
=IFERROR(VLOOKUP($A8,ProductData!$A$2:$D$10,2,FALSE),"")
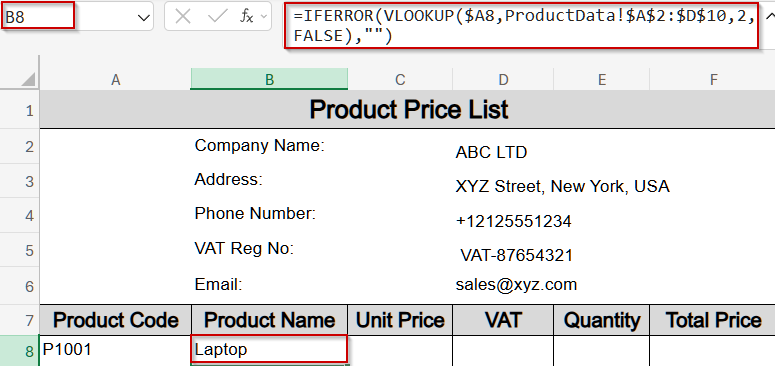
This returns the product name from the dataset.
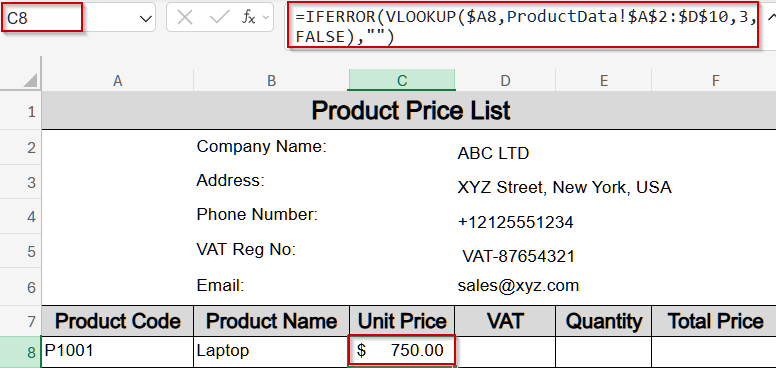
➤ For the Unit Price column, use the following formula:
=IFERROR(VLOOKUP($A8,ProductData!$A$2:$D$10,3,FALSE),"")
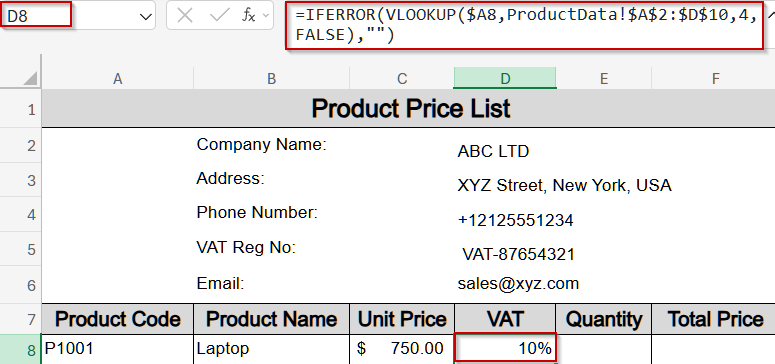
➤ For the VAT column, use:
=IFERROR(VLOOKUP($A8,ProductData!$A$2:$D$10,4,FALSE),"")
➤ Then, fill in the Quantity column.
➤ In the Total Price column, enter this formula:
=C8*E8*(1+D8)
➤ Drag these formulas down to apply them to all rows in the list.
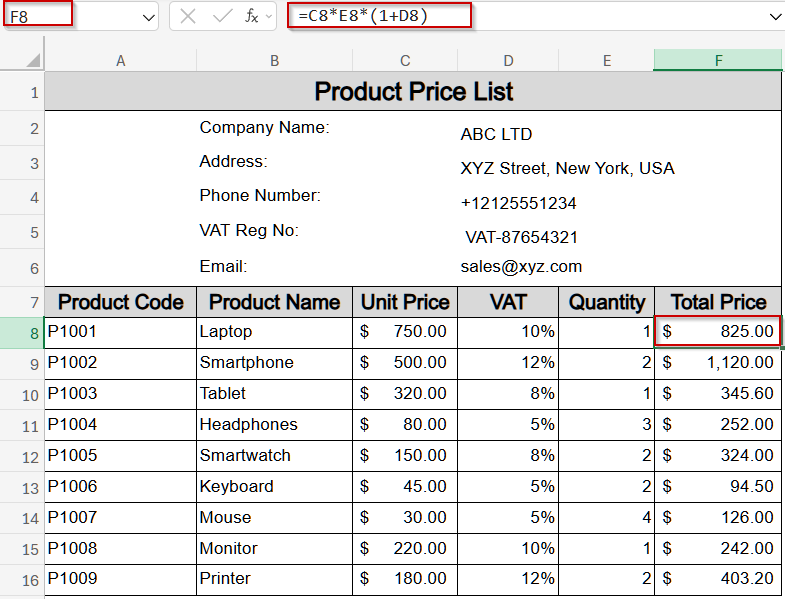
Now, whenever you pick a Product Code, Excel will auto-fill the product details and calculate totals.
Step 4: Automate with VBA by Adding Save and Reset Buttons
Once the price list is ready, you’ll often want to save it as a PDF for sharing or reset it for new entries. Instead of doing this manually, we’ll add two simple VBA macros that let you click a button to perform these tasks instantly. This makes your template much more professional and efficient.
Steps:
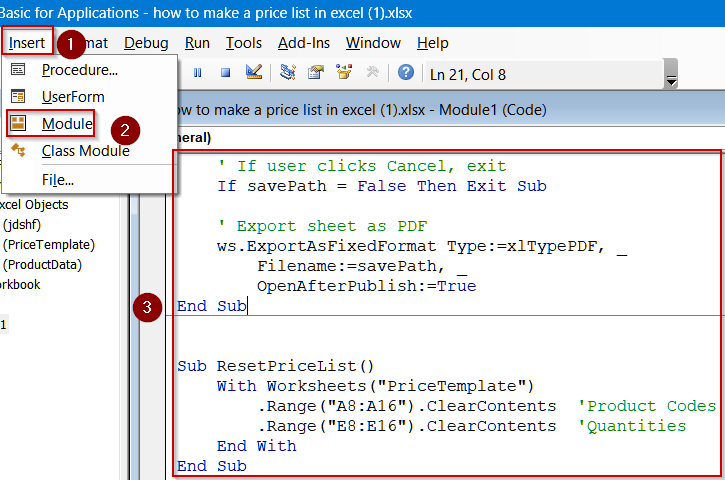
➤ Press Alt + F11 to open the VBA editor and insert a new Module.
➤ Paste the following code to save the price list as PDF:
Sub SavePriceListPDF()
    Dim ws As Worksheet
    Dim savePath As Variant

    ' Set worksheet
    Set ws = ThisWorkbook.Worksheets("PriceTemplate")

    ' Ask user for location and name (defaults to Downloads folder if it exists)
    savePath = Application.GetSaveAsFilename( _
        InitialFileName:=Environ("USERPROFILE") & "\Downloads\PriceList_" & Format(Date, "yyyymmdd") & ".pdf", _
        FileFilter:="PDF Files (*.pdf), *.pdf", _
        Title:="Save Price List As PDF")

    ' If user clicks Cancel, exit
    If savePath = False Then Exit Sub

    ' Export sheet as PDF
    ws.ExportAsFixedFormat Type:=xlTypePDF, _
        Filename:=savePath, _
        OpenAfterPublish:=True
End Sub
➤ Add another macro to clear input fields:
Sub ResetPriceList()
    With Worksheets("PriceTemplate")
        .Range("A8:A16").ClearContents  'Product Codes
        .Range("E8:E16").ClearContents  'Quantities
    End With
End Sub
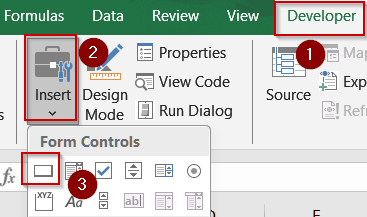
➤ Go back to the sheet, insert two buttons (Developer >> Insert >> Button).
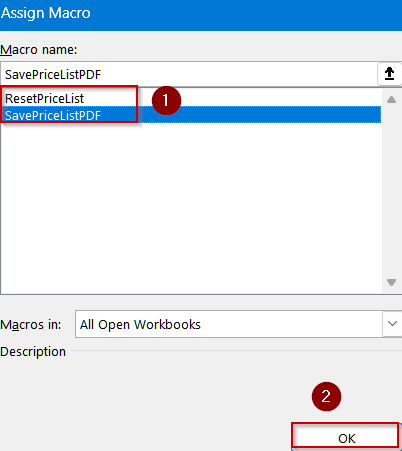
➤ Assign SavePriceListPDF to one (rename it “SAVE”), and ResetPriceList to the other (rename it “RESET”) and click OK.
Now, you can click SAVE to export the template as a PDF and RESET to clear fields for new data entry.
Frequently Asked Questions
What is a price list in Excel?
A price list in Excel is a structured table showing items, categories, and prices. It helps businesses organize product information, manage inventory, and quickly update costs for customers or sales teams.
How do I format a price list in Excel?
You can format a price list by applying table styles, adjusting column widths, and using currency formatting for the price column. Borders and bold headers also make the list more professional and clear.
Can I add formulas to my price list?
Yes, formulas can calculate discounts, taxes, or totals automatically. For example, you can add a formula to show a 10% discount or apply VAT, making your price list more dynamic and useful.
How can I make my price list easy to search?
You can enable filters in Excel so users can search by product name, category, or price range. Adding a search box with formulas or using VBA also makes the list more user-friendly.
Can a price list in Excel update automatically?
Yes, if your price list links to a database or inventory sheet, changes in source data will update automatically. You can also refresh Power Query connections for real-time price adjustments.
Wrapping Up
In this tutorial, we walked through how to make a price list in Excel. We created a clean template, added dropdowns for product codes, used lookup formulas to auto-populate details, and built VBA macros to save and reset the sheet easily. This kind of template is useful for small businesses, shops, or individuals who need to manage product pricing dynamically. Feel free to download the practice file and share your feedback.