Copying and pasting data manually from multiple workbooks into a single master sheet is a repetitive and time-consuming task. Fortunately, Excel offers tools such as Power Query and VBA to automate this task. This allows you to quickly and accurately consolidate data from many different workbooks. In this article, we will show you how to use these methods to consolidate data from multiple workbooks in a single worksheet.
To consolidate data from multiple workbooks in a single worksheet:
➤ Place all the source workbooks in a single folder.
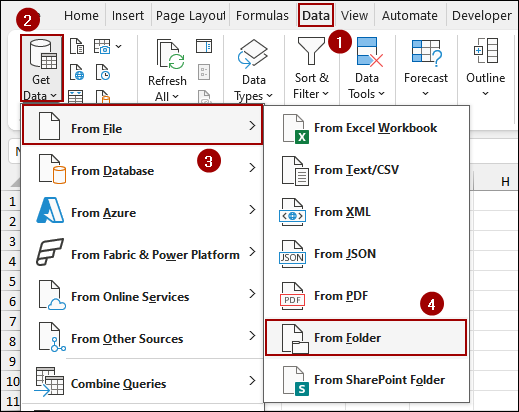
➤ Go to Data > From File > From Folder.
➤ Select the folder, choose Combine and Load.
➤ Click OK, and all the workbook data from the folder will be consolidated in the sheet.

Using Power Query to Consolidate Data from Multiple Workbooks
Power Query is a data connection tool built into Excel that can pull in data from many different sources, including entire folders. This method is highly recommended because you can easily refresh the consolidated data whenever your source files are updated.
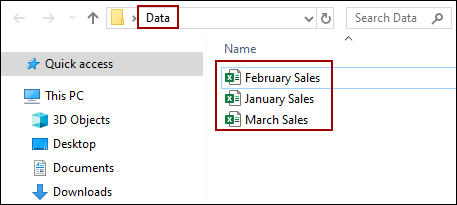
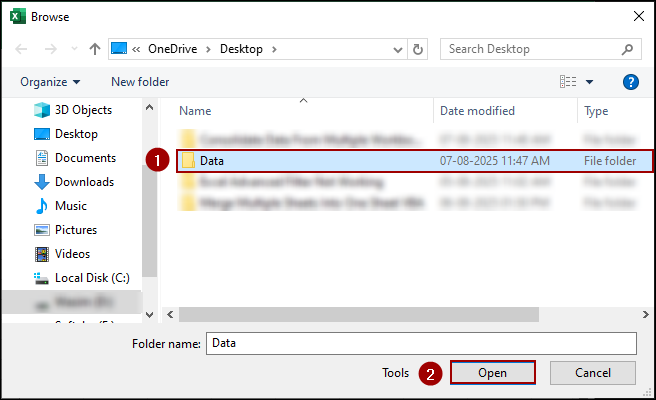
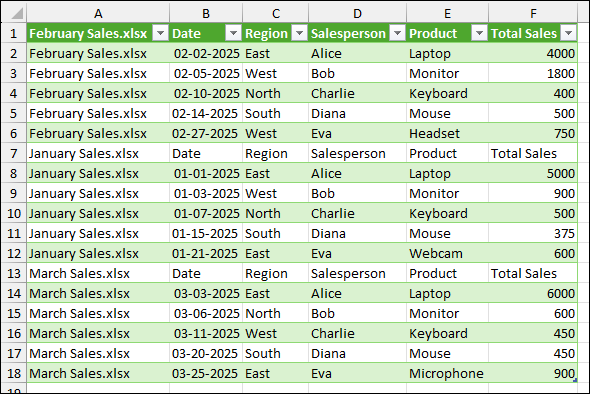
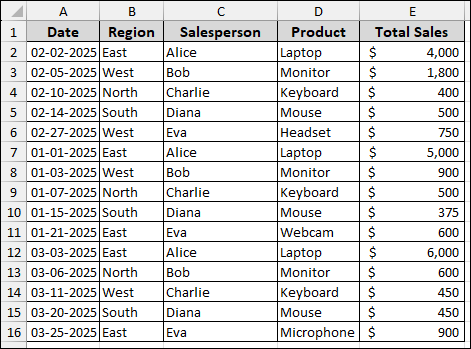
Imagine all the workbooks you want to consolidate are placed inside a single folder. For this example, we have a folder named “Data” containing three monthly sales files.
Combining Tables with Same Headings
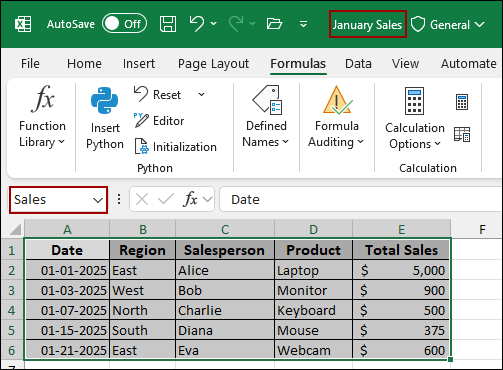
Here, we will combine tables containing the same headings. If your source files contain data within a formatted Excel table that has the same column headers, Power Query can combine them instantly. For our example, each of our monthly sales files has its data set as a table named “Sales”.
January Sales Sheet: Containing sales data for multiple dates where the table name is set as “Sales”.
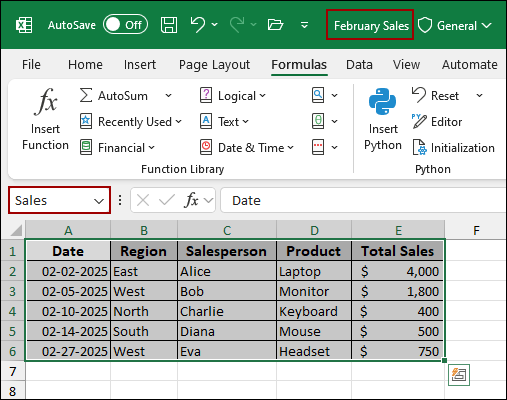
February Sales Sheet: Containing sales data for February, where the table name is also set as “Sales”.
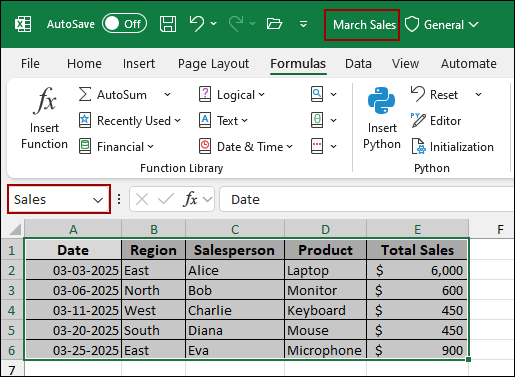
March Sales Sheet: This workbook also has different sales data for March, and the whole table is named “Sales”.
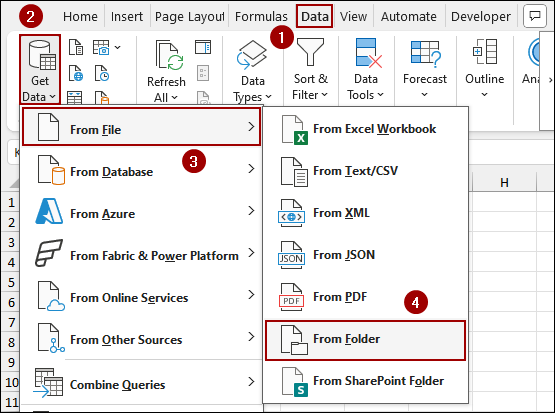
➤ Now, go to the Data tab on the Excel ribbon.
➤ Click on Get Data > From File > From Folder.

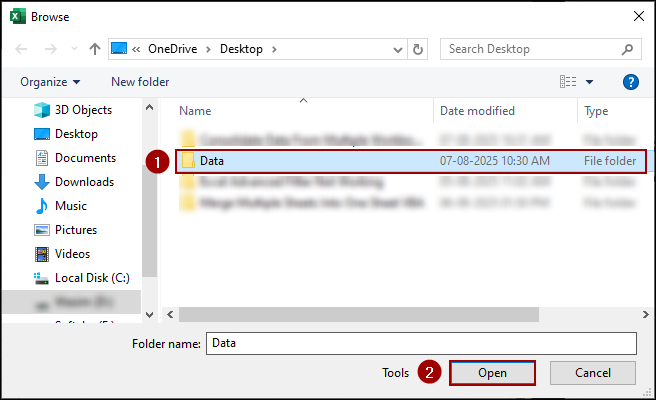
➤ Select your folder, then click Open.

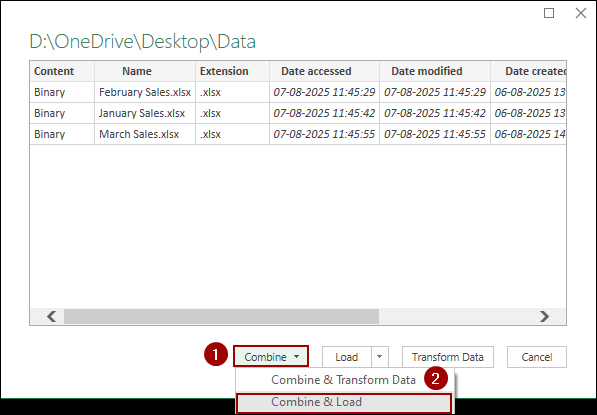
A new window will appear showing a list of files in your folder.
➤ Click the arrow next to the Combine button, then select Combine & Load.
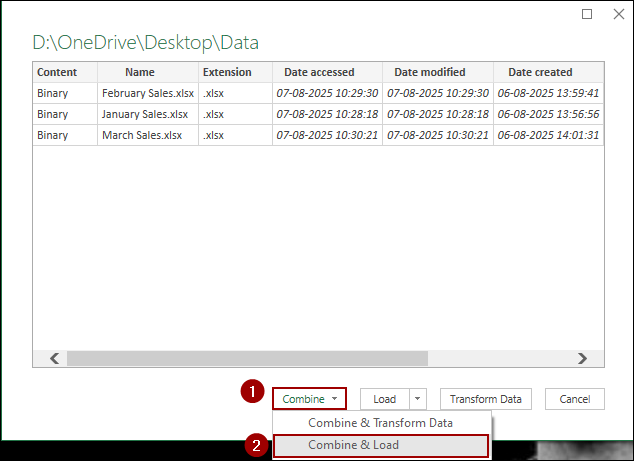
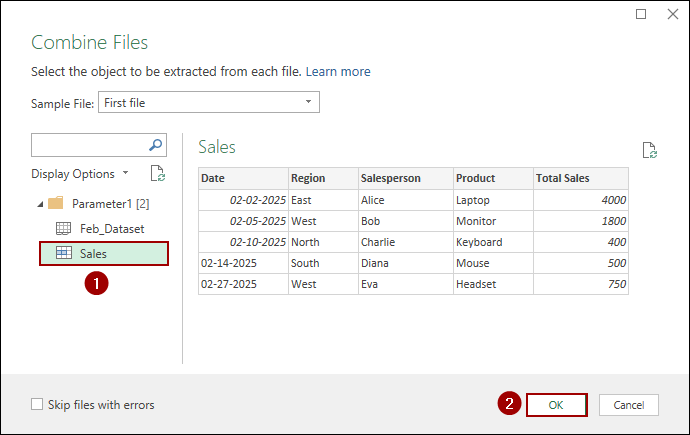
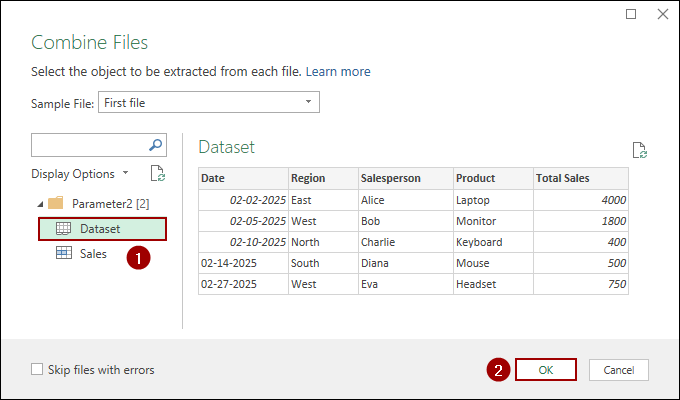
Power Query will open the Combine Files dialog box.
➤ Select one of the tables from the list and click OK.
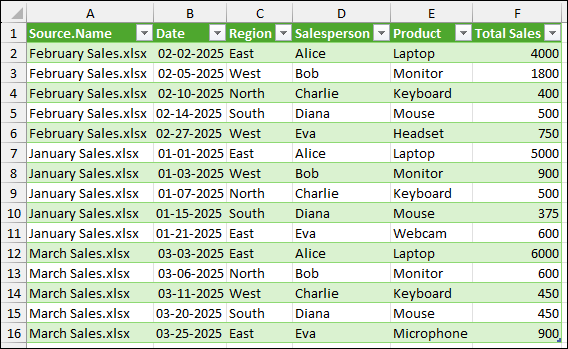
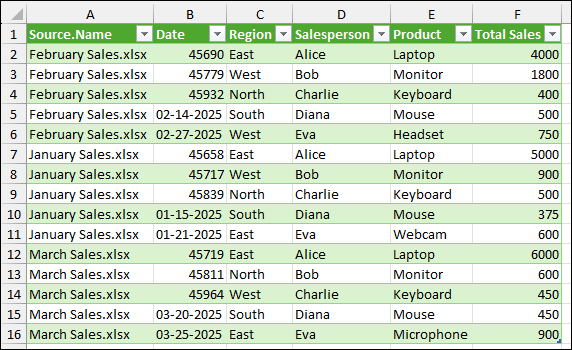
As a result, a new worksheet will be created with a single, consolidated table. This table includes all the data from your workbooks stacked one after another, with an additional column showing the source file name.
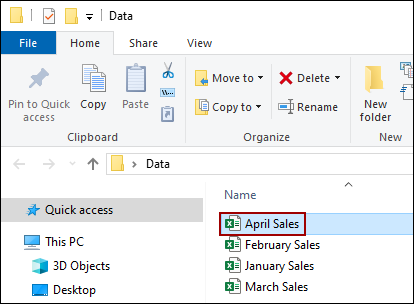
The great advantage of Power Query is its ability to handle changes. If you add a new file to the folder (“April Sales”), you can easily update the consolidated sheet. Here, we will add a new sales workbook for the month of April and refresh the master sheet to update the sales data for April. Suppose we have another workbook named “April Sales” in the same folder “Data”.
➤ Go to the Data tab.
➤ Click the Refresh All button from the drop-down menu.
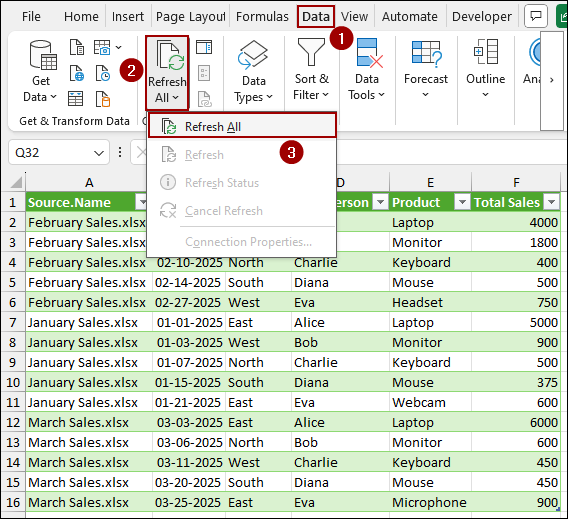
The new data will be automatically added to the consolidated table, keeping your master sheet updated.

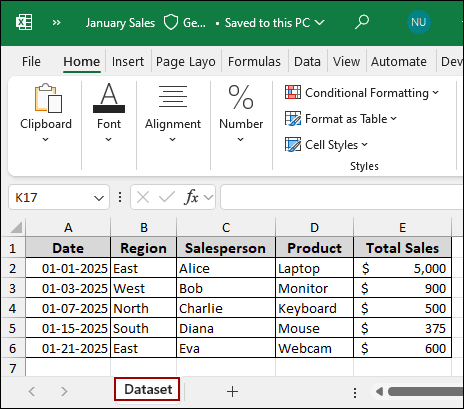
Joining Worksheets That All Have the Same Name
If your data table is not named but is on a worksheet that has the same name across all workbooks, you can use a similar Power Query method. Here, we have the sheet name set as “Dataset” for all the workbooks (January Sales, February Sales, and March Sales). Now, we will merge all the data in a master sheet using the Power Query tool.
➤ Go to Data > Get Data > From File > From Folder.
➤ Select your folder and click Open.
➤ Click Combine & Load from the Combine drop-down list.
➤ Now, choose Dataset (as all our worksheet is named as “Dataset”) and click OK.
Finally, all the data will be consolidated containing the same worksheetinto a single worksheet.
Gathering Data When Sheet or Table Names Are Different
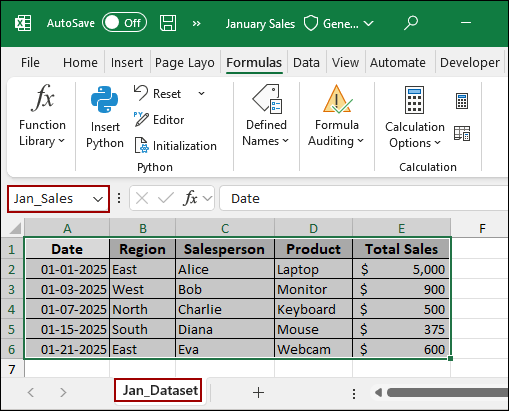
Sometimes, the data you need to consolidate might not have a consistent table or sheet name across all your workbooks. In one workbook, the data might be in a table named “Jan_Sales” and in another, it might be on a sheet named “Feb_Dataset”. Here, we will use Power Query to handle these variations, providing a flexible way to combine your data.
Suppose we have the same workbooks in the Data folder. The January Sales workbook consists of table named “Jan_Sales” and sheet named “Jan_Dataset”. Similarly, for the February Sales and March Sales workbook.
➤ Go to the Data tab and select Get Data > From File > From Folder.
➤ Select your folder and click Open.
➤ Click the Transform Data button to open the Power Query Editor.
Once in the Power Query Editor, we will perform a series of steps to consolidate the data from the differently named sheets.
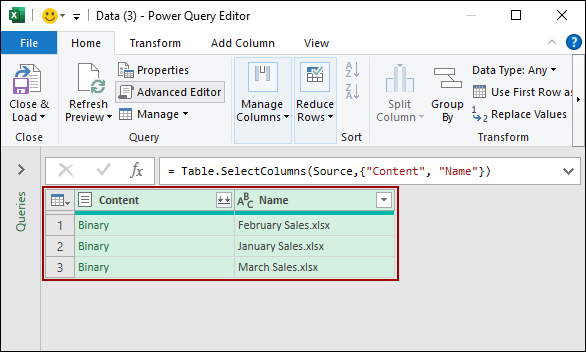
➤ Choose Content and Name column.
➤ Right-click to get the context menu and select Remove Other Columns.
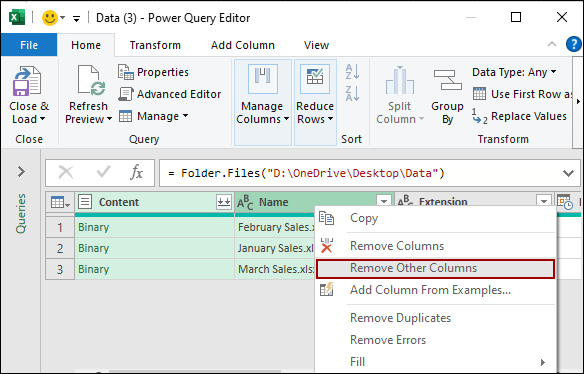
Thus, the other columns, except the Content and Name column, will be removed.
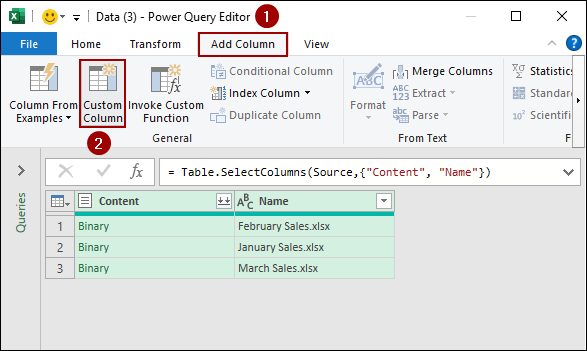
➤ Now, click the Add Column tab and select Custom Column.
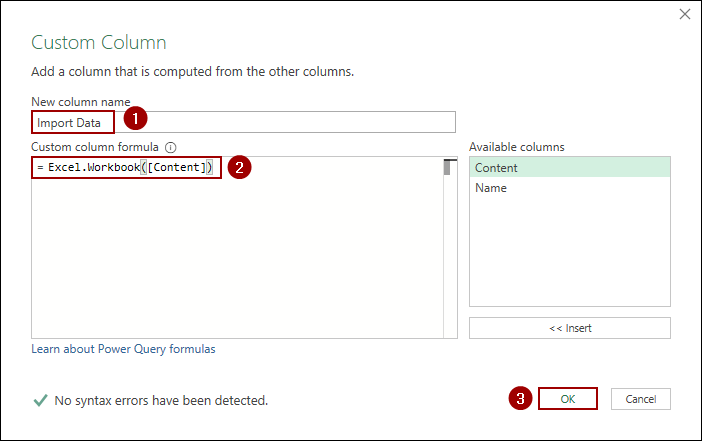
➤ Name your new column Import Data, and in the formula box, write down the formula.
=Excel.Workbook([Content])
➤ Then click OK.
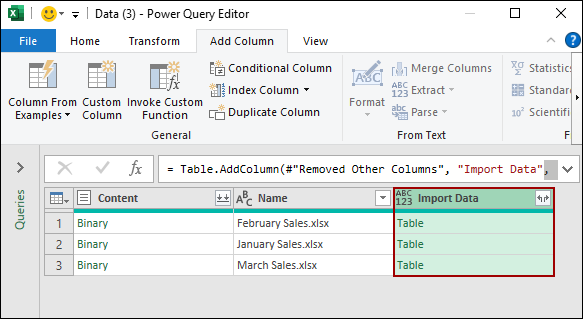
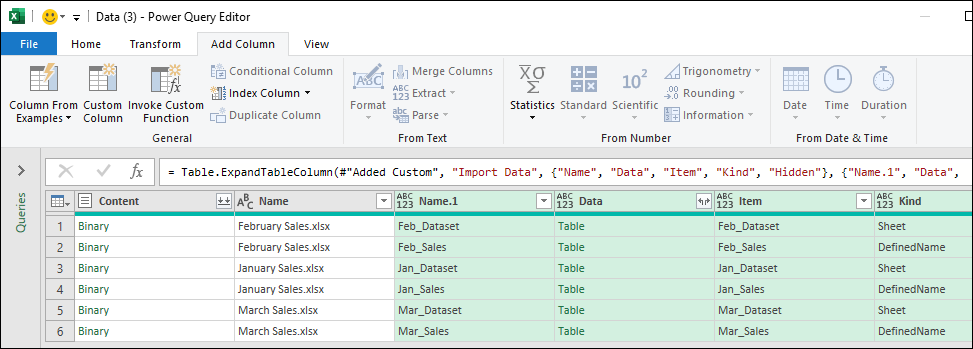
As a result, a new column named “Import Data” will be created with a Table value for each file.
Next, we will expand this new column. For that,
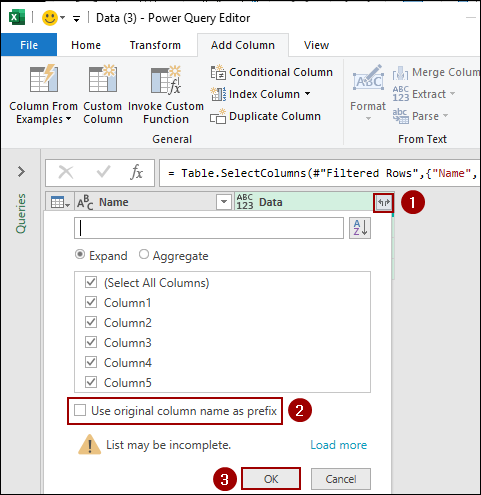
➤ Click the expand icon on the Import Data column header.
➤ In the dialog box, uncheck Use original column name as prefix and click OK.
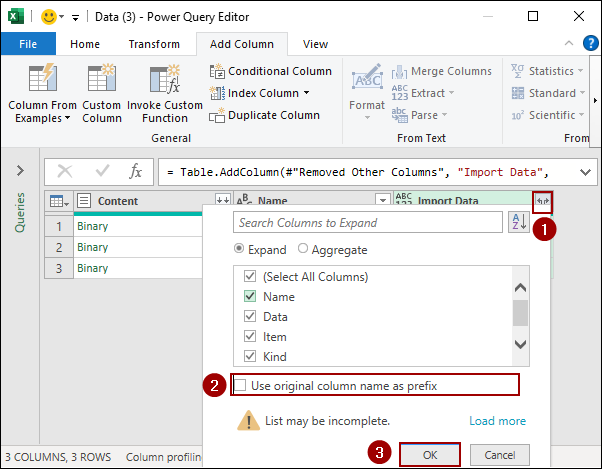
Thus, all the columns will expand in the Power Query Editor.
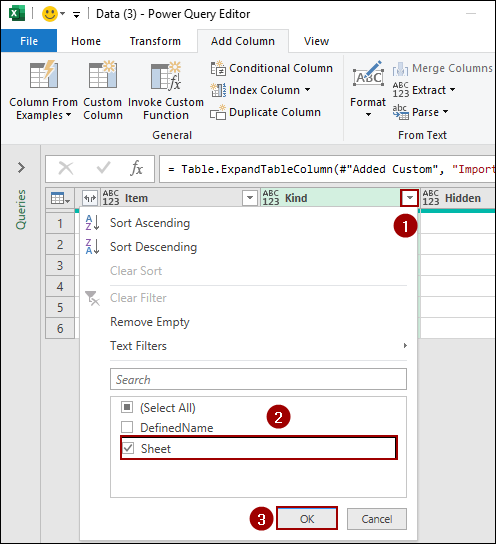
➤ Now, checkmark the “Sheet” option under the Kind filter and click OK.
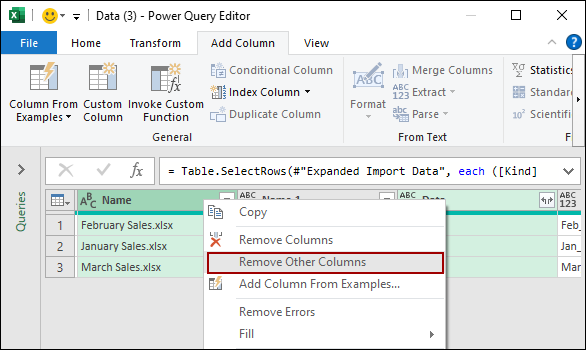
➤ Choose the Name and Data column and right-click to open the context menu.
➤ Select Remove Other Columns to remove extra data.
➤ Now, click on the Data column’s expand icon.
➤ Uncheck Use original column name as prefix and click OK.
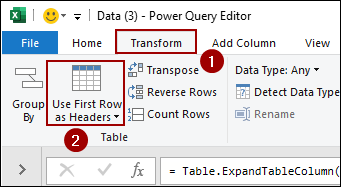
➤ Go to the Transform tab and click on Use First Row as Headers.
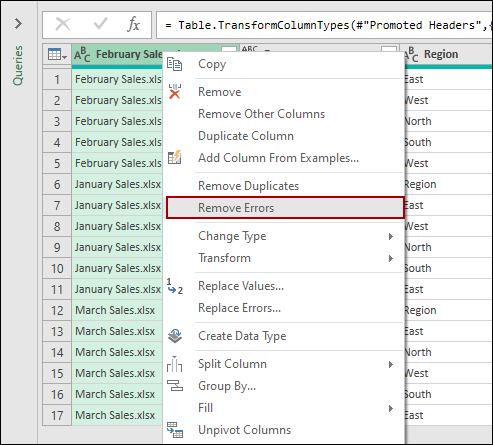
➤ Right-click on the table column and select Remove Errors to ensure your data is clean.
After completing these steps, your data will be correctly consolidated. To load it back into Excel:
➤ Go to the Home tab.
➤ Click the arrow next to Close & Load and select Close & Load.
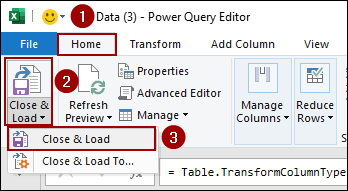
As a result, a new worksheet will be created, containing the data from all the workbooks.
Applying VBA Code
Power Query is one of the best tools for connecting data, but using a VBA macro, you can consolidate data easily with just a single click.
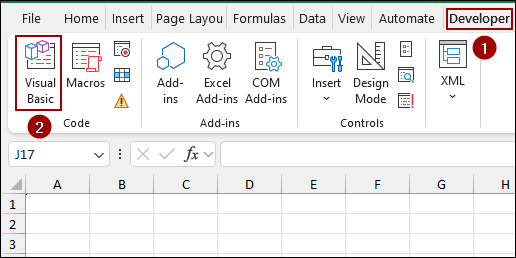
➤ First, open your Excel file and click Visual Basic from the Developer tab.
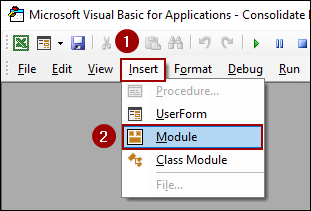
➤ In the VBA editor, go to Insert > Module.
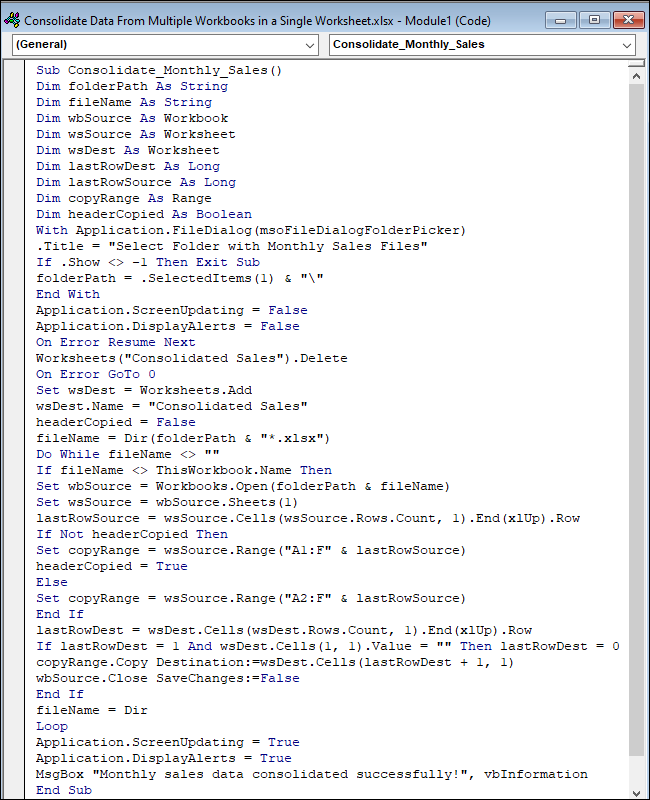
➤ Copy and paste the following code into the new module and hit Run.
Sub Consolidate_Monthly_Sales()
Dim folderPath As String
Dim fileName As String
Dim wbSource As Workbook
Dim wsSource As Worksheet
Dim wsDest As Worksheet
Dim lastRowDest As Long
Dim lastRowSource As Long
Dim copyRange As Range
Dim headerCopied As Boolean
With Application.FileDialog(msoFileDialogFolderPicker)
.Title = "Select Folder with Monthly Sales Files"
If .Show <> -1 Then Exit Sub
folderPath = .SelectedItems(1) & "\"
End With
Application.ScreenUpdating = False
Application.DisplayAlerts = False
On Error Resume Next
Worksheets("Consolidated Sales").Delete
On Error GoTo 0
Set wsDest = Worksheets.Add
wsDest.Name = "Consolidated Sales"
headerCopied = False
fileName = Dir(folderPath & "*.xlsx")
Do While fileName <> ""
If fileName <> ThisWorkbook.Name Then
Set wbSource = Workbooks.Open(folderPath & fileName)
Set wsSource = wbSource.Sheets(1)
lastRowSource = wsSource.Cells(wsSource.Rows.Count, 1).End(xlUp).Row
If Not headerCopied Then
Set copyRange = wsSource.Range("A1:F" & lastRowSource)
headerCopied = True
Else
Set copyRange = wsSource.Range("A2:F" & lastRowSource)
End If
lastRowDest = wsDest.Cells(wsDest.Rows.Count, 1).End(xlUp).Row
If lastRowDest = 1 And wsDest.Cells(1, 1).Value = "" Then lastRowDest = 0
copyRange.Copy Destination:=wsDest.Cells(lastRowDest + 1, 1)
wbSource.Close SaveChanges:=False
End If
fileName = Dir
Loop
Application.ScreenUpdating = True
Application.DisplayAlerts = True
MsgBox "Monthly sales data consolidated successfully!", vbInformation
End Sub➧ Set wsDest = Worksheets.Add: This creates a new sheet named "Consolidated Sales" where all the data will be merged.
➧ Do While fileName <> "": This loop goes through every Excel file (.xlsx) in the selected folder.
➧ If Not headerCopied Then...Else...: This is a crucial If statement. For the very first file, it copies the entire range, including headers. For all subsequent files, it copies the data starting from the second row, ensuring you do not get duplicate headers.
➧ copyRange.Copy Destination:=...: This line copies the data from each source workbook and pastes it into the "Consolidated Sales" sheet.
➧ wbSource.Close SaveChanges:=False: After copying the data, the macro closes each source workbook without saving any changes.
➧ MsgBox "Monthly sales data consolidated successfully!": A message box appears once the process is complete.
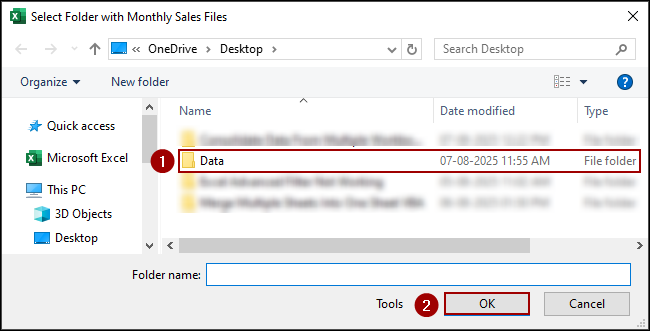
The macro will then prompt you to select the folder containing your workbooks.
➤ Select the folder and click OK.
Thus, the data from all files in that folder will be automatically consolidated into a new sheet.
Frequently Asked Questions
Can I consolidate workbooks if they are in different folders?
Yes, using Power Query, you can point to multiple folders or specify file paths manually.
Will formulas from the source workbooks be preserved after consolidation?
No, Power Query imports values only. If you need the formulas, you will need to copy them manually or link the cells instead of importing them.
Is there a file size limit for consolidation?
There is no fixed Excel limit, but large datasets may slow performance or exceed the worksheet’s row limit (1,048,576 rows). In such cases, you need to split the data or use a database tool.
Concluding Words
Above, we have explored several scenarios to consolidate data from multiple workbooks into a single worksheet, using Power Query and VBA. Whether your files share similar table names, have the same worksheet names, or vary in both sheet and table formats, these methods can help you bring everything together efficiently. If you have any questions, feel free to share them in the comment section below.