When working with dates in Excel, it’s really helpful to have them in a consistent form like YYYYMMDD. It makes your data easier to read, sort, filter, or export. So, instead of changing the formats manually, it’s a lot easier to use VBA and automate the process.
On top of that, formatting dates to YYYYMMDD using VBA is very simple and efficient. In this article, we will guide you through two practical and easy methods to format date YYYYMMDD with the help of VBA. The methods include using NumberFormat to format dates in cells and using the Format() function.
➤ Insert the VBA code in the VBA code to format a single cell date YYYYMMDD:
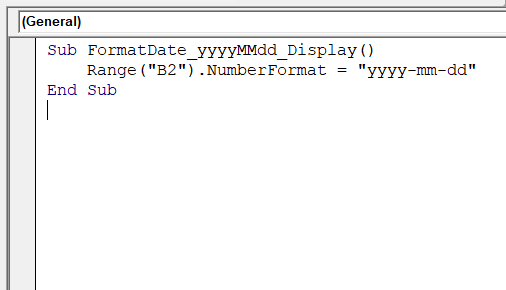
Sub FormatDate_yyyyMMdd_Display()
    Range("B2").NumberFormat = "yyyy-mm-dd"
End Sub
➤ Use the VBA code to format dates YYYYMMDD in a range of cells:
Sub FormatDateRange()
    Range("B2:B11").NumberFormat = "yyyy-mm-dd"
End Sub
➤ The code will change the display format of the date in the specified cell or range to yyyy-mm-dd
Using NumberFormat to Format Dates in Cells
In Excel VBA, the NumberFormat property lets you control how dates appear in worksheet cells. That’s even without changing the underlying date values. That means you can display your dates in your preferred format, like yyyymmdd. It will change how the date looks in Excel but will keep the original date value intact.
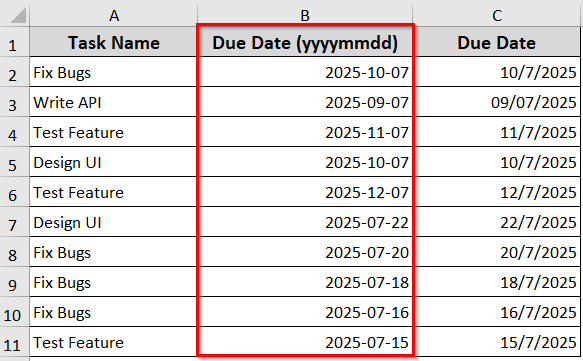
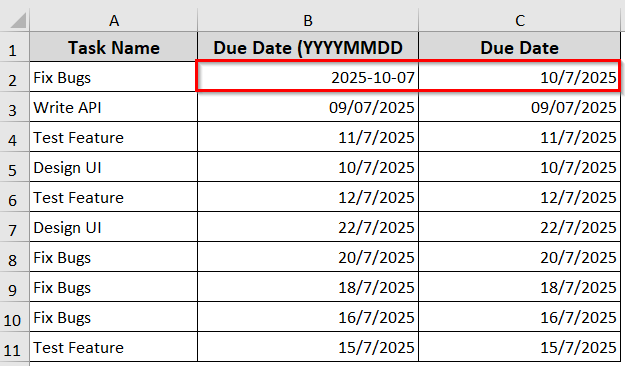
In the following dataset, we’ve project tasks data with their due dates. Now, we are going to change the appearance of the due dates in column B using the NumberFormat property. To show you the difference how exactly it works, we have copied the due dates in column C.
Steps:
➤ Open the VBA Editor by pressing Alt + F11 .
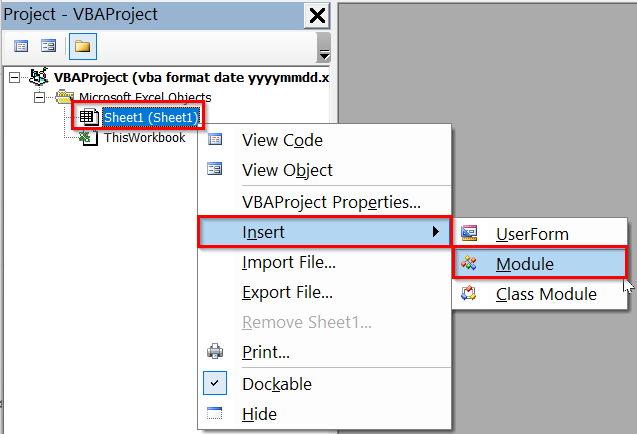
➤ Right click on your sheet name >> Choose Insert >> Module.
➤ Insert the following VBA code in the VBA Editor.
Sub FormatDate_yyyyMMdd_Display()
    Range("B2").NumberFormat = "yyyy-mm-dd"
End Sub
Note:
➥ The code targets cell B2.
➥ Update the Range(“B2”) part in the code to your target cell. For example: Range(“D5”) or Range(“C10”).
➤ Run the code.
➤ It has changed the date display from 10/7/2025 to yyyymmdd format 2025-10-07.
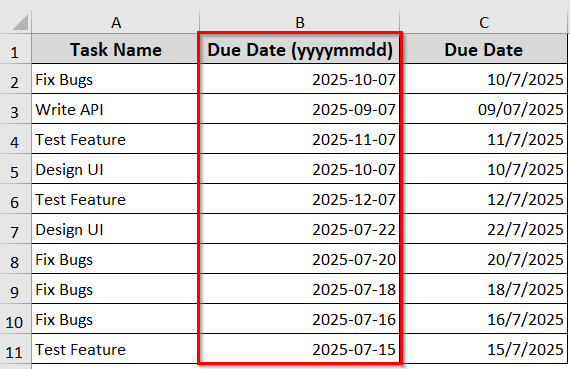
➤ Similarly, we’ve applied the same yyyy-mm-dd format with the following VBA code for the other cells in column B.
Sub Date_Format_YYYYMMDD()
    Range("B2").NumberFormat = "yyyy-mm-dd"
    Range("B3").NumberFormat = "yyyy-mm-dd"
    Range("B4").NumberFormat = "yyyy-mm-dd"
    Range("B5").NumberFormat = "yyyy-mm-dd"
    Range("B6").NumberFormat = "yyyy-mm-dd"
    Range("B7").NumberFormat = "yyyy-mm-dd"
    Range("B8").NumberFormat = "yyyy-mm-dd"
    Range("B9").NumberFormat = "yyyy-mm-dd"
    Range("B10").NumberFormat = "yyyy-mm-dd"
    Range("B11").NumberFormat = "yyyy-mm-dd"
End Sub
➤ The code has changed the format of the date to yyyymmdd from B2 to B11 cells.

Apply NumberFormat to a Range of Cells
Now, if you want to apply NumberFormat to a range of cells instead of doing one by one, you can also do so easily by specifying the range. It lets you format many dates at once with just a few lines of code.
Steps:
➤ Before applying the NumberFormat, ensure your dates are recognized as real dates by Excel.
➤ Insert the below VBA code into the VBA module of your sheet. Change the range as needed.
➤ Run the code.
Sub ConvertToProperDates()
    Dim rng As Range
    Dim cell As Range
    Set rng = Range("B2:B11")  ' Change range as needed.
    For Each cell In rng
        If IsDate(cell.Value) Then
            cell.Value = CDate(cell.Value)  ' Convert text to real date
        End If
    Next cell
End Sub
➤ Now again right click on your sheet name >> Insert >> Module
➤ Insert the below VBA code into the VBA editor.
➤ Modify the range of cells according to your worksheet.
Sub FormatDateRange()
    Range("B2:B11").NumberFormat = "yyyy-mm-dd"
End Sub
➤ It will change the display format of all dates in cells from B2 to B11.
Format Date YYYYMMDD Using VBA Format Function
The Format function in VBA is the most powerful way to format a date YYYYMMDD in Excel. The function converts the dates into your desired date format. The method is especially useful for exporting data or for consistent data storage.
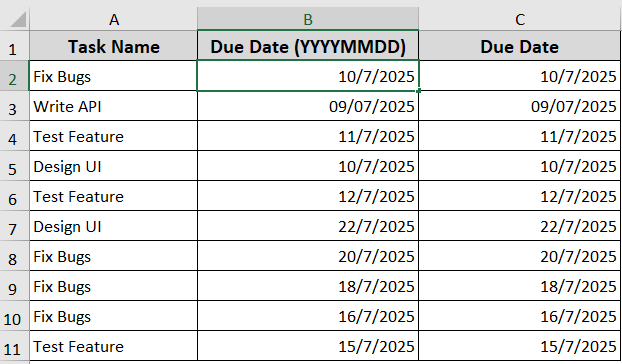
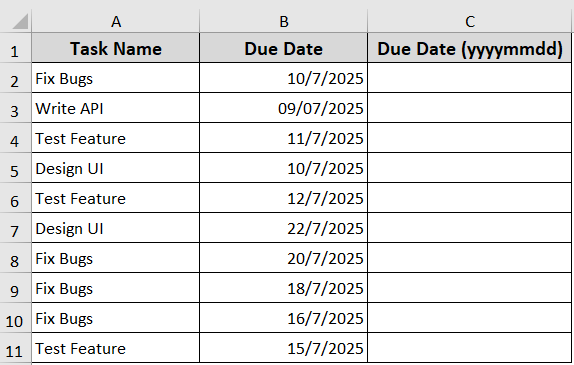
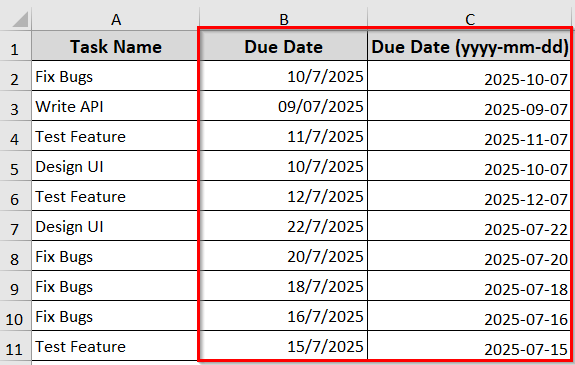
In the following dataset, we have the same project tasks information with their due dates. Here, we are going to use the Format function to format the due dates of column B and show the results in column C to make it easy to understand.
Steps:
➤ Press Alt + F11 to open the VBA editor.
➤ Right click on your worksheet name >> Insert >> Module
➤ Insert the following VBA code into the VBA editor. You can just copy and paste it.
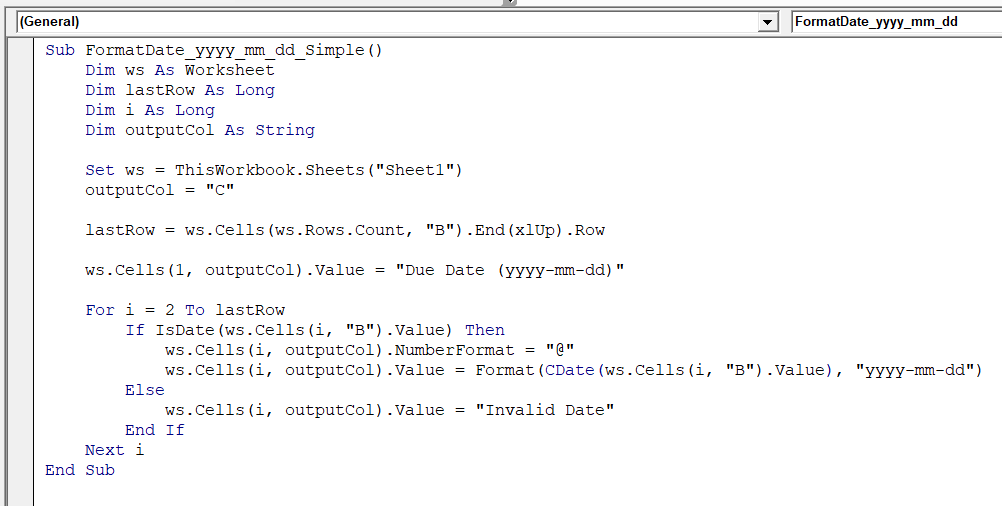
Sub FormatDate_yyyy_mm_dd_Simple()
    Dim ws As Worksheet
    Dim lastRow As Long
    Dim i As Long
    Dim outputCol As String
    Set ws = ThisWorkbook.Sheets("Sheet1")  ' Change sheet name
    outputCol = "C"                         ' Change output column letter
    lastRow = ws.Cells(ws.Rows.Count, "B").End(xlUp).Row
    ws.Cells(1, outputCol).Value = "Due Date (yyyy-mm-dd)"
    For i = 2 To lastRow
        If IsDate(ws.Cells(i, "B").Value) Then
            ws.Cells(i, outputCol).NumberFormat = "@"
            ws.Cells(i, outputCol).Value = Format(CDate(ws.Cells(i, "B").Value), "yyyy-mm-dd")
        Else
            ws.Cells(i, outputCol).Value = "Invalid Date"
        End If
    Next i
End Sub
Note:
➥ The code works for both numeric and written dates like July 10, 2025.
➥ Change the Sheet1 in this line according to your actual sheet name.
Set ws = ThisWorkbook.Sheets(“Sheet1”)
➥ Replace “B” in these lines according to your column containing dates.
lastRow = ws.Cells(ws.Rows.Count, “B”).End(xlUp).Row
IsDate(ws.Cells(i, “B”).Value)
CDate(ws.Cells(i, “B”).Value)
➥ Change “C” to the column letter where you want the formatted dates to appear.
outputCol = “C”
➤ Run the code.
➤ It will convert the due dates formatted as yyyy-mm-dd and place the results in column C.
Frequently Asked Questions
How do you get the current date and time as a string in Excel VBA?
➤ You can use the Now() function with the Format() function to get the current date and time as a string in Excel VBA.
➤ Insert the VBA in the VBA editor.
Dim currentDateTime As String
currentDateTime = Format(Now, "yyyy-mm-dd hh:mm:ss")
MsgBox currentDateTime
➤ It will show the current date and time “yyyy-mm-dd hh:mm: ss” format. For example, the result will be like this: “2025-07-12 15:30:45”
How to convert a date to text in Excel using VBA?
➤ Open the VBA editor by pressing Alt + F11 .
➤ Right click on your sheet name >> Choose Insert >> Module.
➤ Copy and paste the following VBA code in the Module.
Sub Convert_Date_to_Text()
Dim c As Range
For Each c In Selection
c.Value = “‘” & Format(c.Value, “dd-mm-yyyy”)
Next c
End Sub
➤ It will convert all the selected dates into text formatted as “dd-mm-yyyy”
What is the VBA function for the current date?
➤ The VBA DATE() function is the VBA function for the current date. It does not require any argument and returns the current date.
➤ For example:
Dim date_1 As Date
date_1 = Date()
Debug.Print date_1  ' Prints the current date in the Immediate Window
➤ It will store today’s date in the variable date_1
How to use DateValue in VBA?
➤ DateValue converts the date text string to an Excel date.
➤ Insert the following VBA to use the DateValue function.
Sub UseDateValue()
    Dim MyDate
    MyDate = DateValue("February 12, 1969")  ' Returns a valid date
    MsgBox MyDate
End Sub
➤ The DateValue function converts the text “February 12, 1969” into an Excel date like 12/02/1969 or 2/12/1969.
Wrapping Up
In today’s quick guide, we have two very simple ways to format dates to YYYYMMDD using VBA. Both methods help you effectively display dates in an easy-to-read format. Feel free to download the sample Excel worksheet and let us know how these techniques have enhanced your data handling and workflow.