Finding and managing multiple occurrences of a specific value or pattern is one of the most common challenges while working in Excel, especially if you have a large volume of data. You might need to extract rows that meet a specific criterion, change particular values, highlight cells that include a keyword, or locate every instance of a name in Excel. It can take a lot of effort to accomplish this manually or using the built-in Excel “Find” function every time. The FindNext function is used in these cases to locate the next matches without having to start the search over.
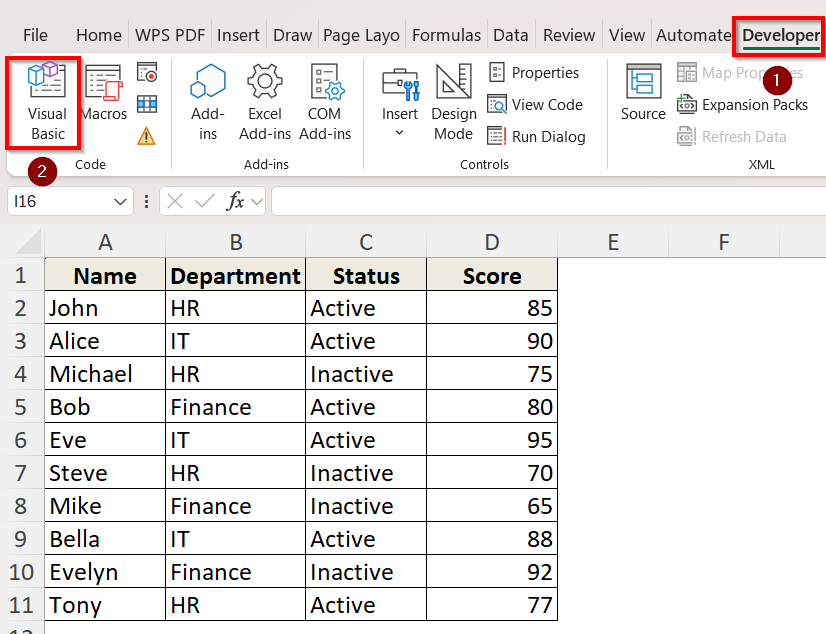
➤ Go to the Developer tab and click on Visual Basic to open the VBA Editor.
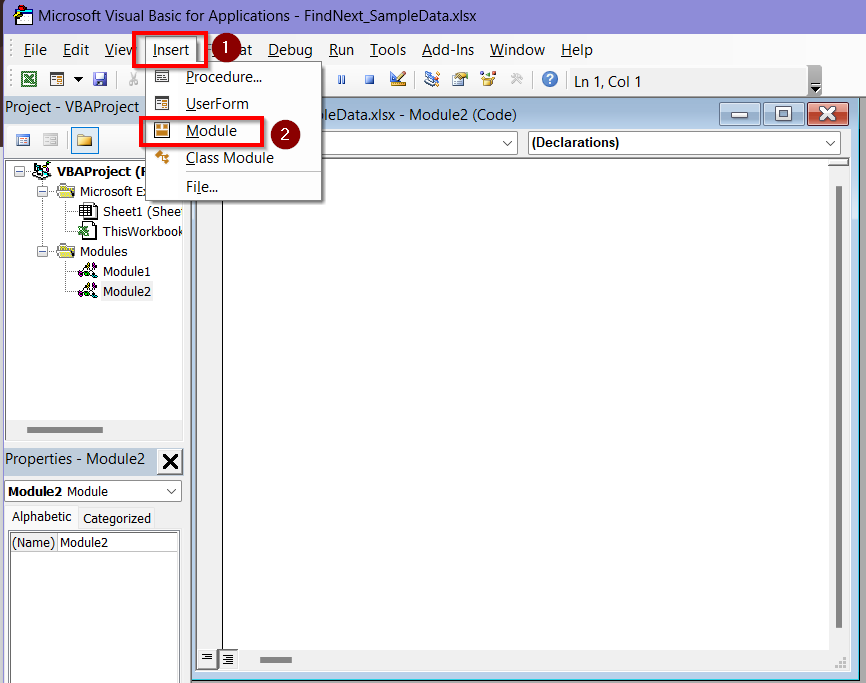
➤ Select Insert > Module.
➤ Copy and paste the following code in the module. Input your desired word in place of the word Active in the code.
Sub FindAllSimple()
    Dim ws As Worksheet
    Dim c As Range, firstAddress As String
    Dim result As String
    Set ws = ThisWorkbook.Sheets("Sheet1")
    With ws.UsedRange
        Set c = .Find("Active", LookIn:=xlValues, LookAt:=xlWhole)
        If Not c Is Nothing Then
            firstAddress = c.Address
            Do
                result = result & c.Address & vbCrLf
                Set c = .FindNext(c)
            Loop While Not c Is Nothing And c.Address <> firstAddress
        End If
    End With
    If result <> "" Then
        MsgBox "Cells containing 'Active':" & vbCrLf & result
    Else
        MsgBox "'Active' not found in the sheet."
    End If
End Sub
➤ Click on Run. A box containing all the cell values of the desired word will be displayed.
In this guide, you will get to know everything about the FindNext method, starting from how it works and how to use it. We have explained how to get the occurrences one by one, altogether, highlight them and count them using FindNext method along with a step by step guide.
What is The FindNext Method in Excel VBA?
The Range.Find method in VBA lets you find the first cell that fits your search parameters. However, if your sheet has several appearances of the same value, FindNext method can automate this search.
The FindNext method moves from one matching cell to the next until all similar results have been detected. To put it another way, the Find method starts the search, and FindNext method continues it until you’ve gone through each match.
When automating processes that require looking through a worksheet for every occurrence of a particular value, formula, or property, this is really helpful. So, it is perfect for large datasets and high-performance automation scripts.
How Does the FindNext Method Works in Excel VBA?
To use the FindNext method, you have to deploy the Range.Find method in Excel VBA first. Without the Range.Find method, the FindNext method does not work. Excel looks over the designated range and returns the first cell that meets your criteria when you run the .Find function. After that, by using .FindNext, you continue from the last cell you found to find the next matched cell.
After Excel reaches the end of the search range, it loops back to the beginning and continues searching until it reaches the first cell it found.
Only then does the loop come to an end and you have all the results of the similar values.
Find All Occurrences of a Word Using FindNext Method
Suppose, this is our sample dataset:
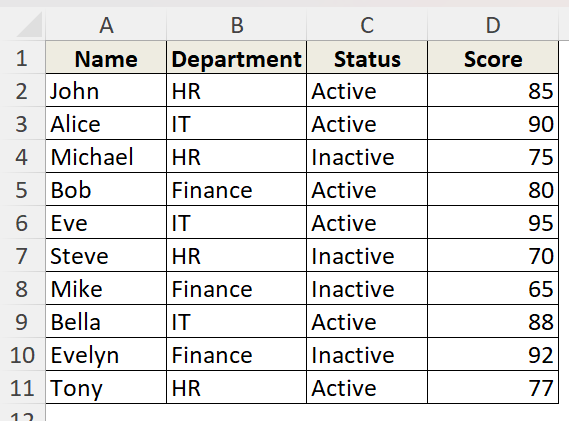
Here, we have to find the word Active to figure out the active employees in a company using FindNext in Excel VBA. we will deploy .FindNext along with the .Find method and find the cell values where the word Active is located one by one.
Steps:
➤ Go to the Developer tab.
➤ Click on Visual Basic to open the VBA Editor.
➤ Click on Insert and select Module. A new module in the VBA Editor window will open.
➤ Enter the following code in the module.
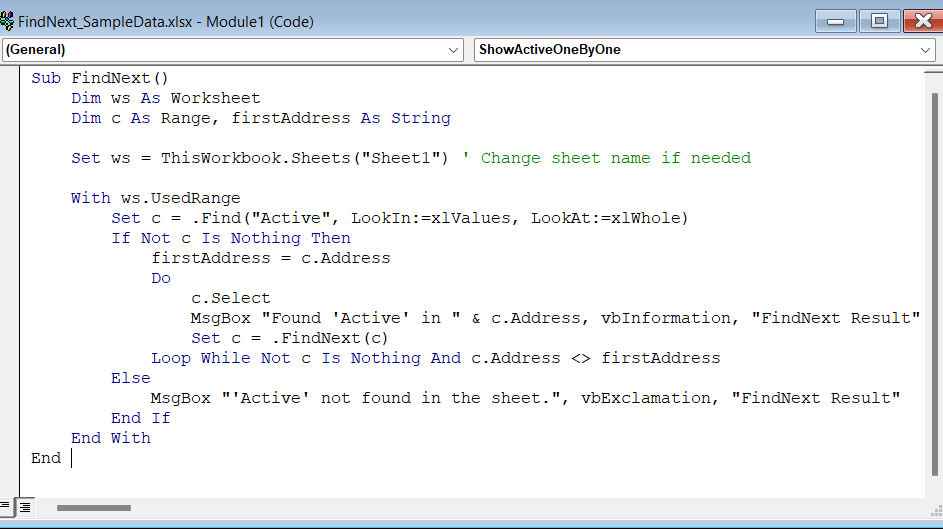
Sub FindNext()
    Dim ws As Worksheet
    Dim c As Range, firstAddress As String
    Set ws = ThisWorkbook.Sheets("Sheet1") ' Change sheet name if needed
    With ws.UsedRange
        Set c = .Find("Active", LookIn:=xlValues, LookAt:=xlWhole)
        If Not c Is Nothing Then
            firstAddress = c.Address
            Do
                c.Select
                MsgBox "Found 'Active' in " & c.Address, vbInformation, "FindNext Result"
                Set c = .FindNext(c)
            Loop While Not c Is Nothing And c.Address <> firstAddress
        Else
            MsgBox "'Active' not found in the sheet.", vbExclamation, "FindNext Result"
        End If
    End With
End Sub
➥ .c.Select moves Excel’s selection to that matching cell so you can see it visually.
➥ MsgBox “Found ‘Active’ in ” & c.Address shows a message box with the cell’s address. You need to click OK to continue to the next match.
➥ Set c = .FindNext(c) finds the next cell that matches “Active”.
➥ Loop While Not c Is Nothing And c.Address <> firstAddress keeps looping the code until the search returns to the first cell found and there are no more matches.
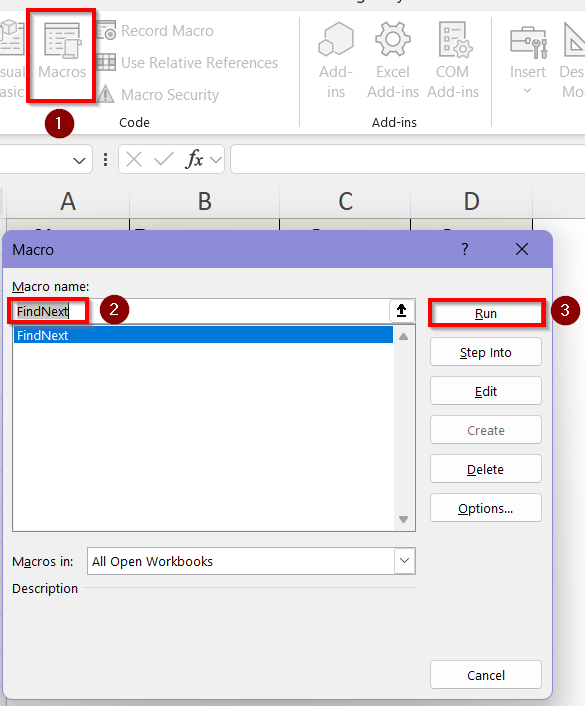
➤ Go back to the Excel worksheet and click on Macros > FindNext > Run.
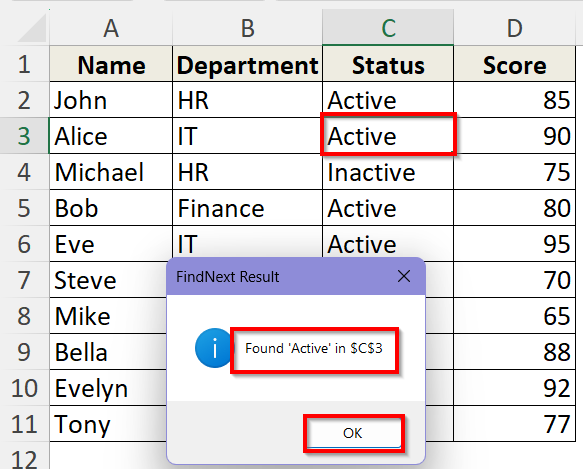
➤ The first result of the word will be shown in a box which is in cell C2. Click OK to get the next occurrence of the word.

➤ The next occurrence can be seen in cell C3. Click OK again to get the next one. Thus, you have to continue until you get to the last cell.
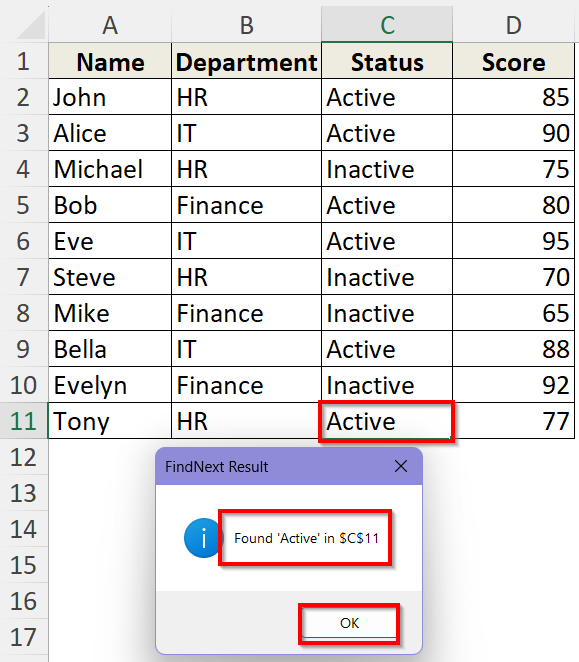
➤ The last occurrence is found in cell C11. Now, when you click OK, the loop will go back to the first word and the search will be finished.
Find and Show Cell Values of All Occurrences Together Using FindNext Method
The previous use of the FindNext method only gets you the cell values one by one which can be tedious and time consuming for larger datasets. So, we can use the method to display all the cell values containing the same word altogether. It is more reasonable and quick.
Steps:
➤ Go to the Developer tab.
➤ Click on Visual Basic to open the VBA Editor.
➤ Click on Insert and select Module.
➤ Enter the following code in the module.
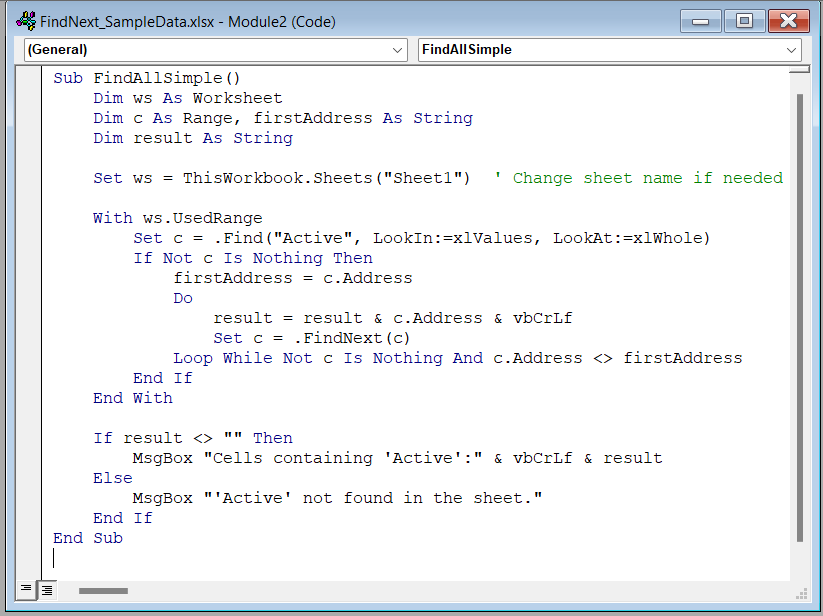
Sub FindAllSimple()
    Dim ws As Worksheet
    Dim c As Range, firstAddress As String
    Dim result As String
    Set ws = ThisWorkbook.Sheets("Sheet1")
    With ws.UsedRange
        Set c = .Find("Active", LookIn:=xlValues, LookAt:=xlWhole)
        If Not c Is Nothing Then
            firstAddress = c.Address
            Do
                result = result & c.Address & vbCrLf
                Set c = .FindNext(c)
            Loop While Not c Is Nothing And c.Address <> firstAddress
        End If
    End With
    If result <> "" Then
        MsgBox "Cells containing 'Active':" & vbCrLf & result
    Else
        MsgBox "'Active' not found in the sheet."
    End If
End Sub
➥ LookIn:=xlValues looks at the cell’s actual displayed value.
➥ LookAt:=xlWhole finds exact matches only.
➥ Do…Loop While repeats through all matching cells using .FindNext(c) until it cycles back to the first word match.
➥ result = result & c.Address & vbCrLf builds a list of all cell addresses containing the word “Active,” separated by line breaks.
➥ MsgBox “Cells containing ‘Active’:” & vbCrLf & result displays a message box listing all the cell locations containing the word that was found.
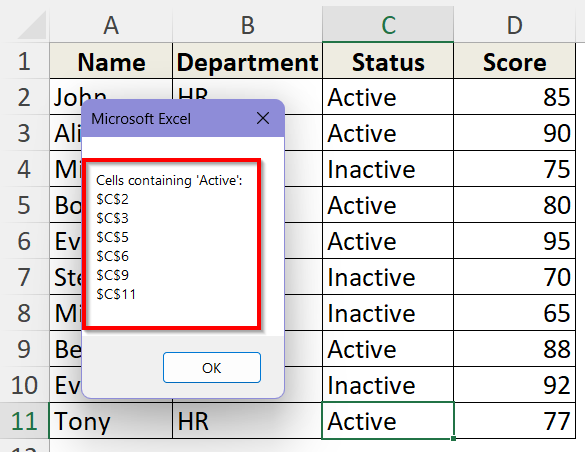
➤ Go back to the Excel worksheet and click on Macros > FindAllSimple > Run.
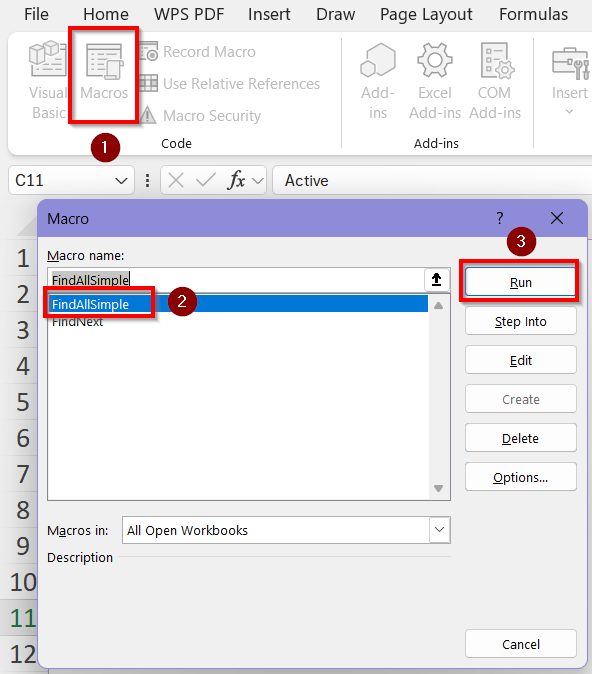
➤ You will now see a box which contains all the cell numbers where the word “Active” is located.

Find and Highlight All Same Words Using FindNext
When you need to visually identify all occurrences of a specific entry, you can use the FindNext method to highlight the same words in the worksheet. This method will help you spot key information across large datasets in seconds by making them stand out.
Steps:
➤ Go to the Developer tab.
➤ Click on Visual Basic to open the VBA Editor.
➤ Click on Insert and select Module.
➤ Enter the following code in the module.
Sub HighlightActive()
    Dim ws As Worksheet
    Dim c As Range, firstAddress As String
    Set ws = ThisWorkbook.Sheets("Sheet1")
    With ws.UsedRange
        Set c = .Find("Active", LookIn:=xlValues, LookAt:=xlWhole)
        If Not c Is Nothing Then
            firstAddress = c.Address
            Do
                c.Interior.Color = vbYellow
                Set c = .FindNext(c)
            Loop While Not c Is Nothing And c.Address <> firstAddress
        Else
            MsgBox "'Active' not found in the sheet.", vbInformation, "Find & Highlight"
        End If
    End With
End Sub
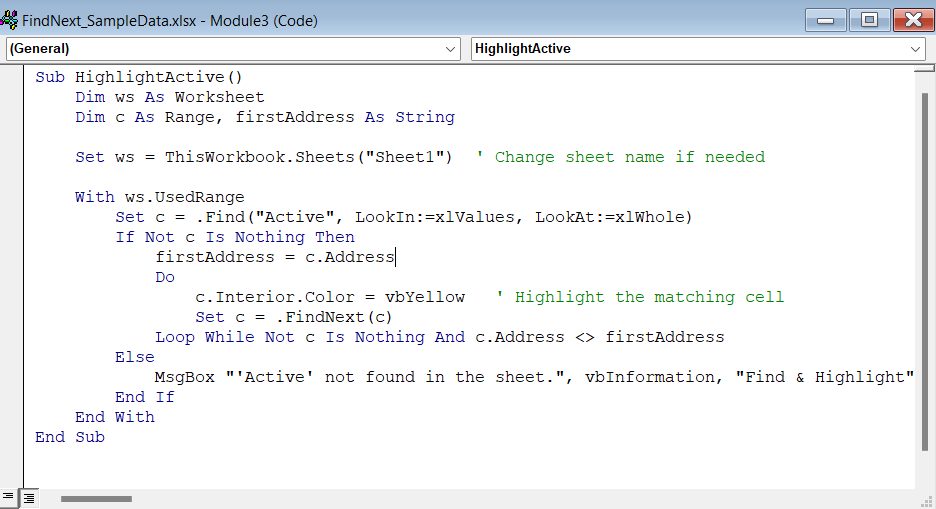
➥ c.Interior.Color = vbYellow highlights the current found cell in yellow. You can put the colour of your choice as the highlight colour here.
➥ Set c = .FindNext(c) tells VBA to continue the search from the current cell and find the next matching cell.
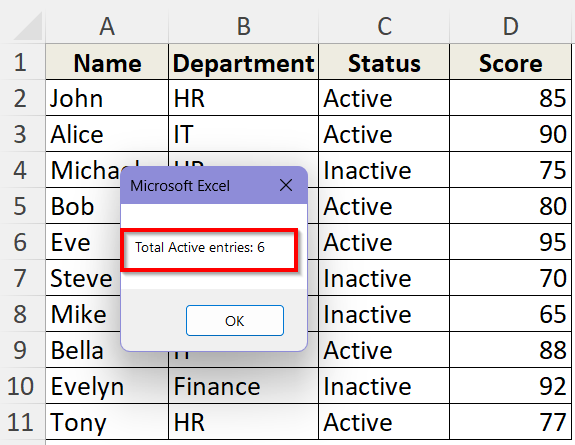
➤ Go back to the Excel worksheet and click on Macros > CountActive > Run.
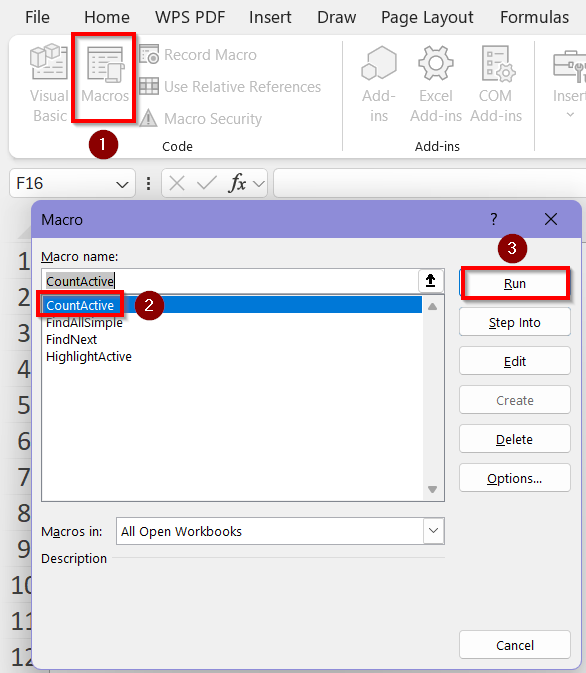
➤ Now, the number of cells containing the desired word will be displayed in a box. Here, we get the result “Total active entries: 6”. So, the word Active was in 6 of the cells in the worksheet.
Frequently Asked Questions (FAQs)
What Is the Difference Between Find and FindNext in Excel VBA?
Find locates the selected range’s first match of a desired word within a worksheet. FindNext starts scanning the next cell and searches for more matches until it reaches the first match. When the loop is over, the search is over as well.
Can I Search the Entire Worksheet Without Selecting a Range?
Yes. You can use the UsedRange property to automatically search all cells that contain the same data. Use ws.UsedRange in the VBA code after selecting the worksheet so you don’t have to manually define or select a range.
Can I Manually Search A Specific Row or Column For the Same Value Using FindNext?
Instead of searching the whole worksheet, sometimes we need to check for specific words within a specific row or column. Use ws.Range(“C:C”) where you can input the specific column numbers in the “ “. Similarly, ws.Range(“R:R”) can be used to specify a range of rows.
How Can I Search for a Different Word Each Time?
Instead of hardcoding a search term directly into the VBA, (like “Active”), we can use an input box. For which, add this line to your VBA code:
searchWord = InputBox("Enter the word to search:")You also need to replace the word “Active” with searchWord in your .Find and .FindNext statement.
Wrapping Up
VBA’s Find and FindNext techniques offer a strong and effective means of locating and processing Excel data. You can automate complicated search activities with a few lines of code and obtain exact control over repetitive data by learning how FindNext picks up where Find left off with the search.
You can program Excel to find, count, or highlight each instance of a value in a matter of seconds rather than having to manually go through rows of data. Combining Find and FindNext saves time, cuts down on errors, and improves the intelligence and efficiency of your Excel automation. So let’s get familiar with it from today!