Excel’s advanced filter is a tool that allows you to extract specific data from a larger dataset based on specific criteria. The advanced filter offers more flexibility, letting you apply multiple criteria to different columns and even copy filtered data to a different location. Sometimes, the advanced filter might not work properly. In this article, we will look at common reasons why Excel’s advanced filter is not working and show you easy steps to fix it.
Follow the steps to make advanced filter work effectively in Excel:
➤ Verify that the headers in your criteria range exactly match the headers in your data table.
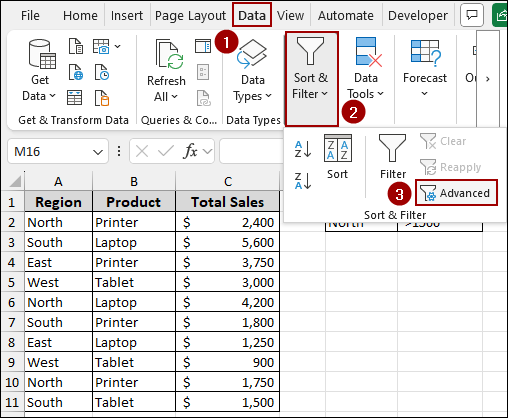
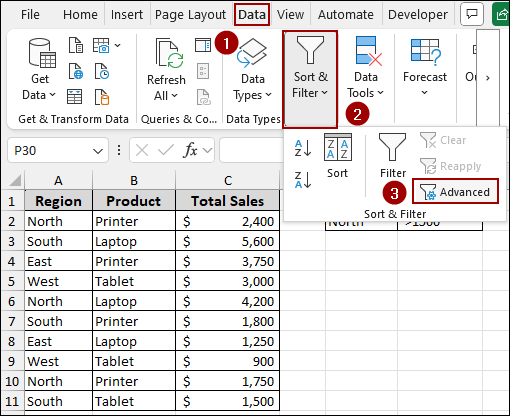
➤ Go to Data > Sort & Filter > Advanced.
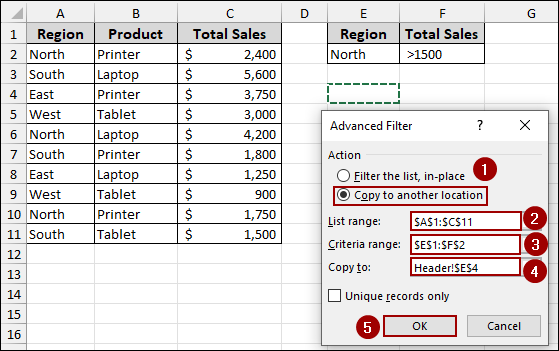
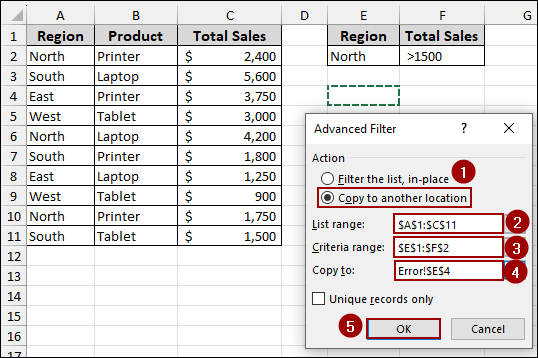
➤ From the Advanced Filter dialog box, select the Copy to another location button.
➤ In the List range field, select your entire data table (e.g., A1:C11).
➤ In the Criteria range field, select your criteria (e.g., E1:F2).
➤ In the Copy to field, select the cell where you want your filtered data to appear (e.g., E4).
➤ Click OK.
What is an Advanced Filter in Excel?
The advanced filter in Excel provides you with access to filter a list of data based on criteria that you specify in a separate criteria range. This tool offers more control and flexibility than the standard auto filter. With the advanced filter, you can:
- Filter data instantly, hiding rows that don’t meet the criteria.
- Copy the filtered results to another location on the same worksheet or a different worksheet.
- Use complex criteria, including multiple conditions (AND/OR), wildcard characters, and even calculated criteria based on formulas.
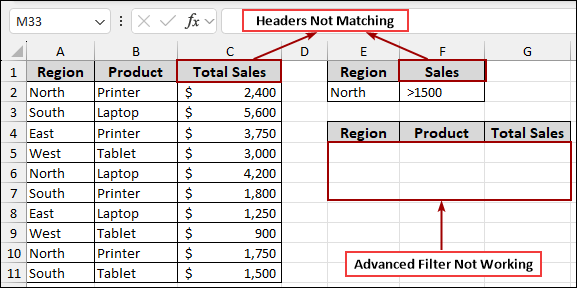
Advanced Filter Will Not Work with Mismatched Headers
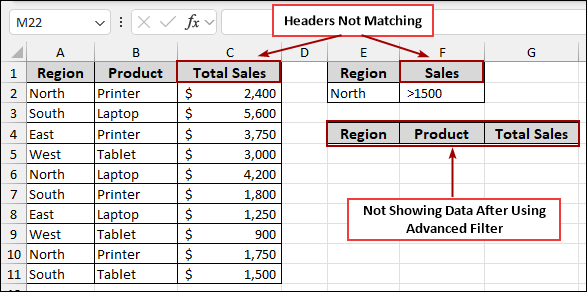
One of the most common reasons an advanced filter fails is due to mismatched headers between your main data range and your criteria range. If there is even a slight difference, Excel will not recognize the column you are trying to filter.
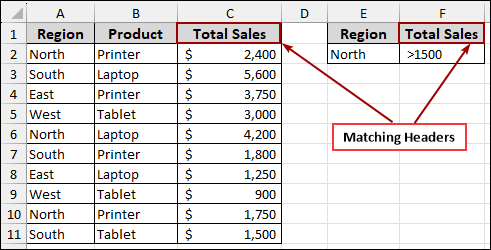
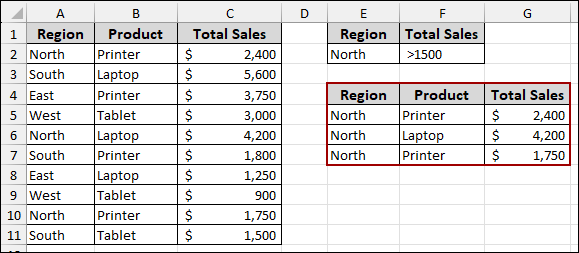
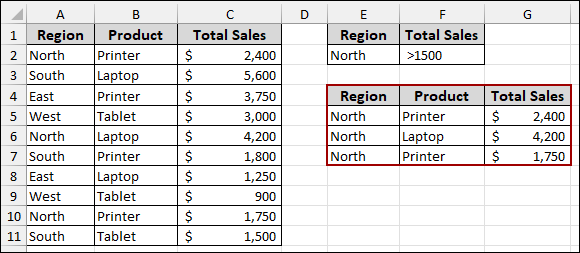
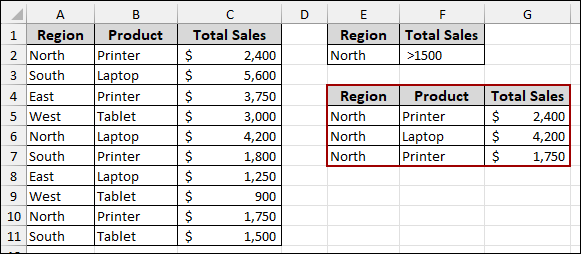
Suppose we have our main data with headers “Region”, “Product”, and “Total Sales”. Here, we set up a criteria range with headers “Region” and “Total Sales”. After using the advanced filter, we got the filtered data according to the criteria. Now, using this dataset, we will explore reasons why the advanced filter is not working in Excel.
Here, the criteria range uses “Sales” while the data has “Total Sales”. When you try to run the advanced filter, it won’t find any matching data for the “Sales” criteria because the header is incorrect. The output area will remain blank, or the filter will simply not apply correctly.
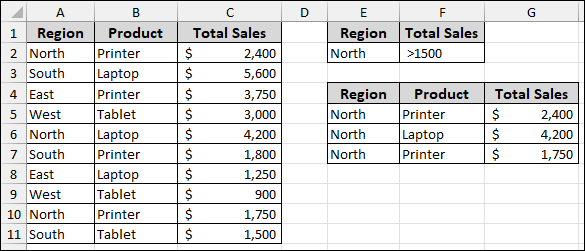
To fix this, ensure the header in your criteria range is similar to the header in your data.
Once the headers match, you can proceed with setting up your advanced filter:
➤ Go to Data tab, click Sort & Filter, and then select Advanced.
➤ From the Advanced Filter dialog box, select the Copy to another location button.
➤ In the List range field, select your entire data table (e.g., A1:C11).
➤ In the Criteria range field, select your criteria (e.g., E1:F2).
➤ In the Copy to field, select the cell where you want your filtered data to appear (e.g., E4).
➤ Click OK.
Thus, with the correct header (“Total Sales”), the advanced filter will successfully extract the data that meets your criteria.
Having a #DIV/0! Error in the Data That Prevents Filtering
If the filter encounters an error like #DIV/0!, #N/A, or #VALUE! in a cell within the “List range”, it might stop processing or return incomplete results.
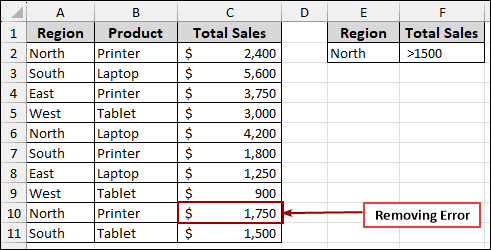
Consider a scenario where one of your “Total Sales” values results in a #DIV/0! Error. When you attempt to apply the advanced filter on this data, you might find that the filtered output is either empty or does not contain all the expected records. This is because the error disrupts the filtering process for that particular row or even the entire column.

To resolve this, you can replace the error values with appropriate data.
After removing the error:
➤ Following the previous method, go to Data > Sort & Filter >Advanced.
➤ From the Advanced Filter dialog box, select the Copy to another location button.
➤ In the List range field, select your entire data table (e.g., A1:C11).
➤ In the Criteria range field, select your criteria (e.g., E1:F2).
➤ In the Copy to field, select the cell where you want your filtered data to appear.
➤ Click OK.
As the error is resolved, the advanced filter will work correctly and display all matching records.
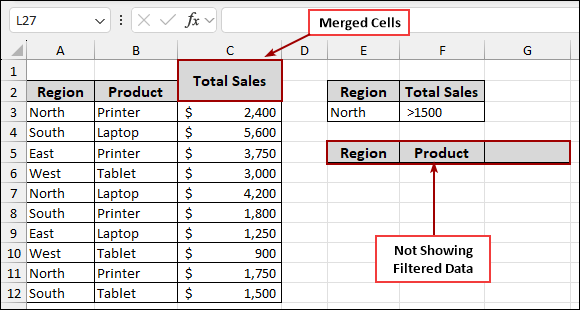
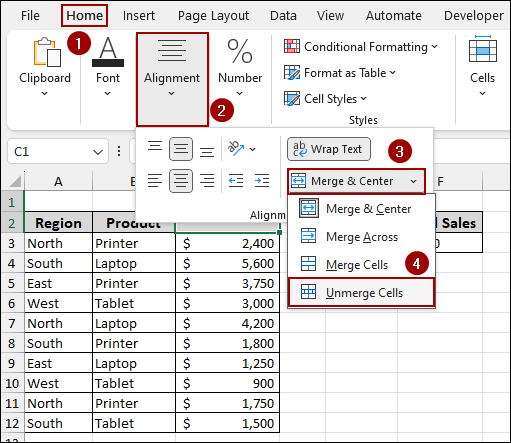
Advanced Filter Not Working Because of Merged Cells
Merged cells can cause significant problems with Excel’s advanced filter. When cells are merged, Excel treats them as a single cell, which can confuse the filter’s ability to accurately identify and process individual data points within a range.
Imagine you have merged the header “Total Sales” across multiple cells.
If you apply the advanced filter with merged cells in the data range, it will not produce the correct filtered output. The filter might return no results or an incomplete list.
To fix this, the simplest solution is to unmerge any cells within the data range that are involved in the filtering process.
➤ Select the merged cell.
➤ Go to the Home tab from the menu bar.
➤ In the Alignment group, click the Merge & Center dropdown button.
➤ Select Unmerge Cells.
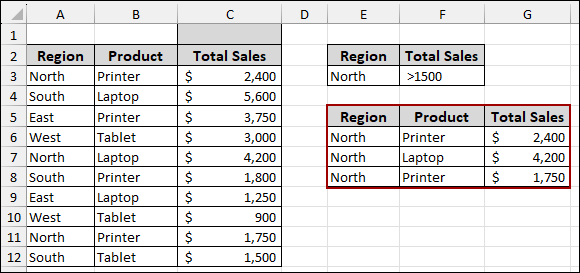
After unmerging, your header will look like the following.

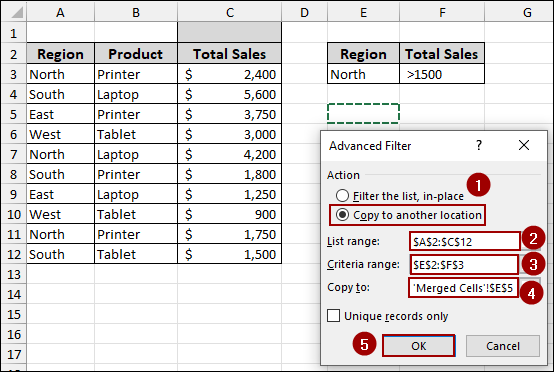
➤ Following the previous method, go to Data > Sort & Filter >Advanced.
➤ From the Advanced Filter dialog box, select the Copy to another location button.
➤ In the List range field, select your entire data table (e.g., A1:C12).
➤ In the Criteria range field, select your criteria (e.g., E2:F3).
➤ In the Copy to field, select the cell where you want your filtered data to appear.
➤ Click OK.
With the merged cells resolved, your advanced filter will now work correctly, displaying the expected filtered data.
Filtering Blocked Due to Hidden Rows
Hidden rows in your dataset can sometimes lead to unexpected behavior with the advanced filter, breaking the continuity of your data range. If you have hidden rows within the selected range, it can cause the filter to skip data.
Consider a scenario where rows in your data table are hidden. Thus, the filtered output might be incomplete or absent, as the filter might not correctly process the data that is visually cut off.
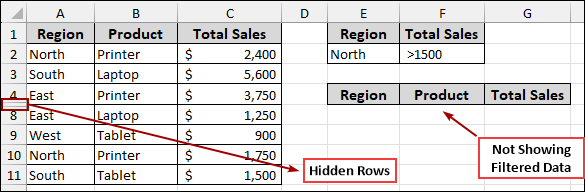
To ensure the advanced filter works properly, you can unhide all rows within your data range.
➤ Select the rows surrounding the hidden rows (e.g., select row 4 and row 8).
➤ Go to the Home > Cells > Format > Hide & Unhide.
➤ Then, choose Unhide Rows from the sub-menu.
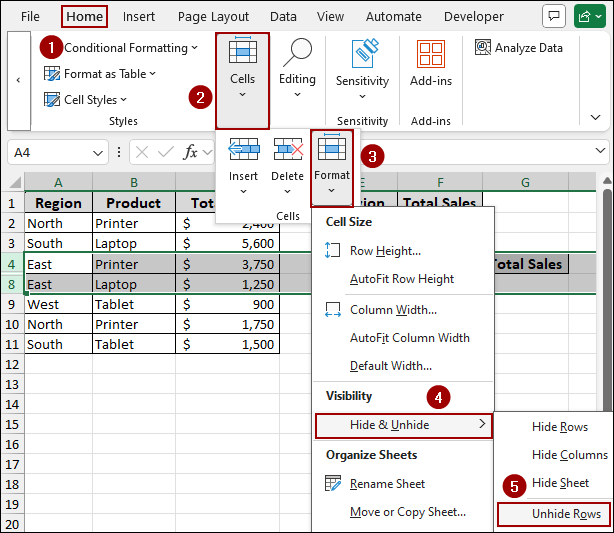
Now, when you run the advanced filter, it will correctly filter all data within the specified range.
Missing Data Breaks the Filter Selection
The advanced filter relies on a continuous and properly defined “List range” (main data table). If there are completely blank rows within the data range, Excel might automatically assume that the data range ends at the last populated row before the blank row. This breaks the data selection, preventing the advanced filter from processing all your records.
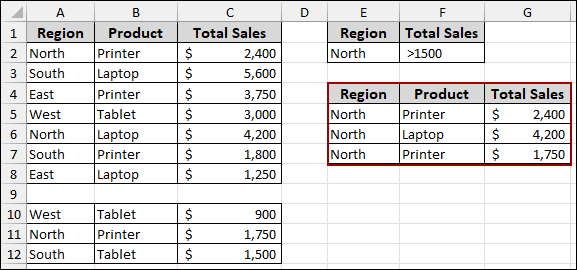
Let’s look at an example where there’s a blank row within the data set.
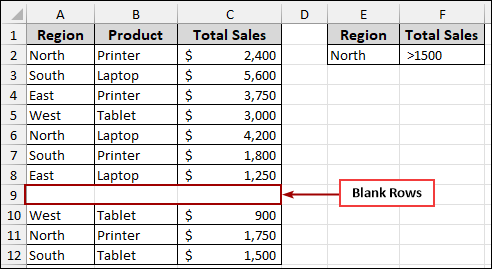
If we let Excel automatically detect the “List range”, the advanced filter can miss the data below the blank row. As a result, the filtered output will only include data from above the blank row, leading to an incomplete result.
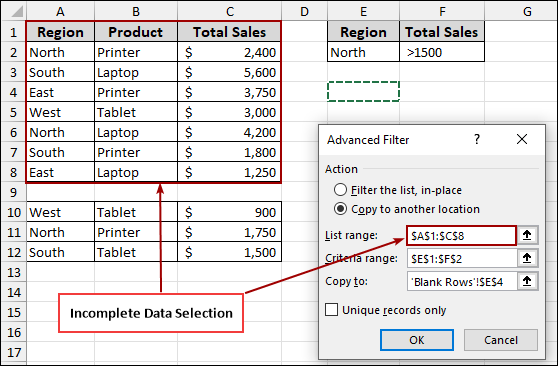
To overcome this, you must select the entire data range, including any blank rows within the dataset. Here, we have selected the full range (e.g., A1:C12), which includes the blank row, confirming that Excel considers all the data for filtering.
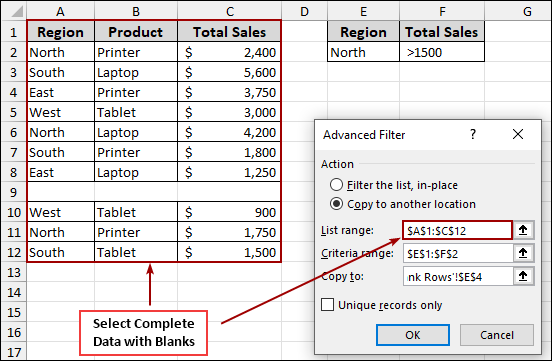
After ensuring the entire data range is selected, the advanced filter will then successfully process all the records, regardless of blank rows, and provide the complete filtered output.
Frequently Asked Questions
My filter is not showing all the data. What should I check?
This usually happens when other filters are still active on different columns. The quickest fix is to go to the Data tab and click the Clear button. This removes all existing filters so you can start fresh and see the complete dataset again.
Can special characters or spaces affect filtering?
Yes, hidden characters like trailing spaces or special symbols can cause filters to behave unpredictably. You can use Excel’s TRIM function to remove spaces and the CLEAN function to remove non-printable characters before filtering.
Is filtering multiple tables in the same sheet a problem?
Yes, it can be. If you have used filters on several tables in one worksheet, Excel may slow down or not respond well. Try removing filters from the tables you are not actively using to speed things up and reduce confusion.
Concluding Words
Above, we have explored various common reasons why your Excel advanced filter might not be working and provided detailed solutions for each reason. By solving issues such as mismatched headers, data errors, merged cells, hidden rows, and incomplete data selections, you can ensure your advanced filters always deliver accurate and complete results. If you have any questions, feel free to leave them in the comments below.