Managing multiple checkboxes in Excel can be time-consuming, especially when you need to select or deselect all of them one by one. However, with a simple VBA macro, you can automate this process using a single “master” checkbox that controls all other checkboxes on your sheet.
In this article, we’ll show you exactly how to create a master checkbox that can check or uncheck all other checkboxes with a single click. You’ll learn how to insert checkboxes, link them to cells, write the VBA code, and assign the macro to your master checkbox. Let’s get started.
Steps to check or uncheck all checkboxes with a single checkbox in Excel:
➤ Insert a master checkbox using the Developer tab.
➤ Insert other checkboxes for your list items.
➤ Optionally, link each checkbox to a corresponding cell to store TRUE/FALSE values excluding the master checkbox.
➤ Write a VBA macro that loops through all checkboxes and sets their values.
➤ Assign the macro to the master checkbox and save the file as a Macro-Enabled Workbook (.xlsm).
Steps to Check or Uncheck All Checkboxes With a Single Checkbox in Excel
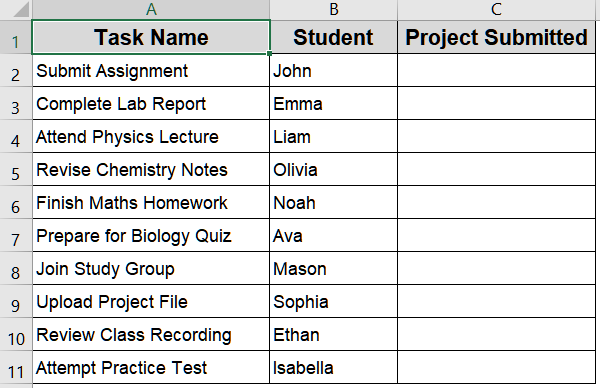
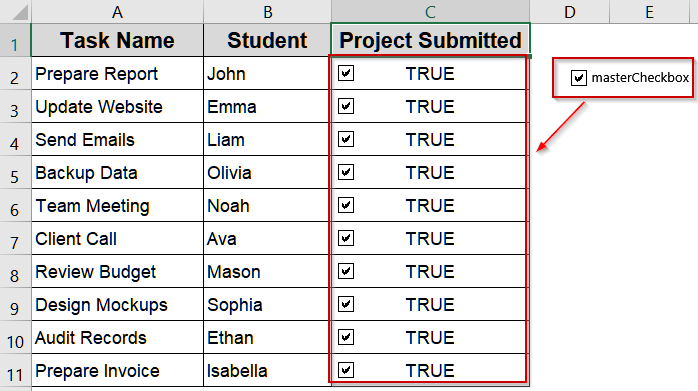
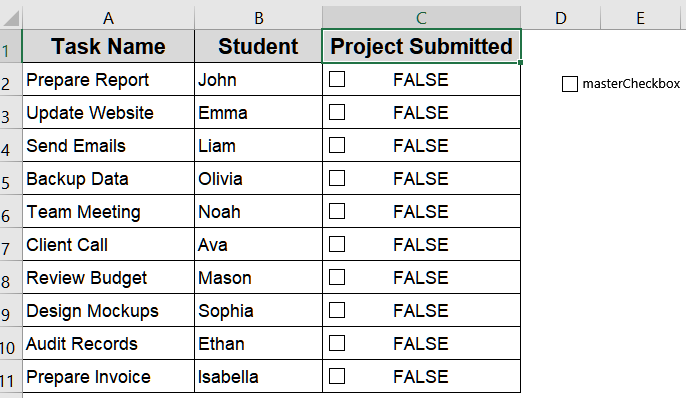
Managing multiple checkboxes individually can be time-consuming. Using a single master checkbox, you can quickly check or uncheck all related checkboxes at once which simplifies task tracking and improving workflow efficiency. We’ll use the dataset below for demonstration:
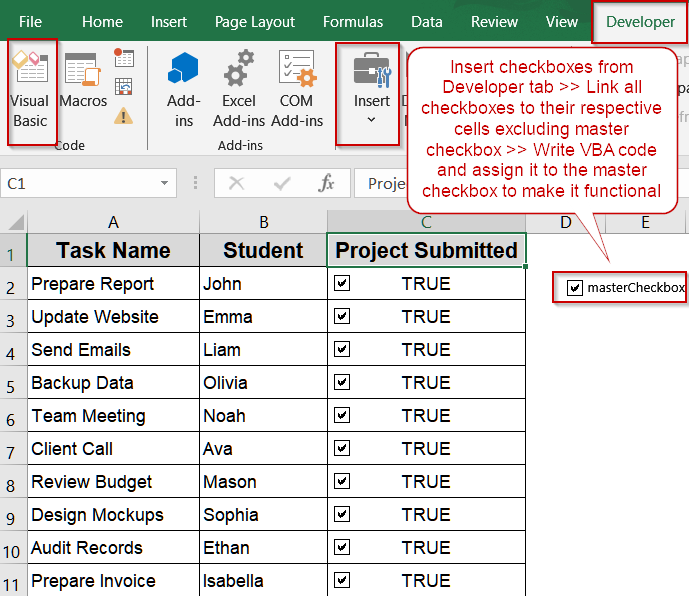
Step 1: Insert Checkboxes in Excel
Before automating the check/uncheck process, you first need to set up the checkboxes on your worksheet. This includes one master checkbox that will control all others, and several sub-checkboxes that represent individual tasks, items, or entries. Think of the master checkbox as a “Select All” switch and it will instantly toggle the state of every checkbox you’ve placed. Setting up this structure first ensures that your macro can reference and manipulate them accurately later.
Steps:
➤ Go to the Developer tab on the Excel ribbon.
➤ Click Insert under the Controls group.
➤ Choose Checkbox (Form Control).
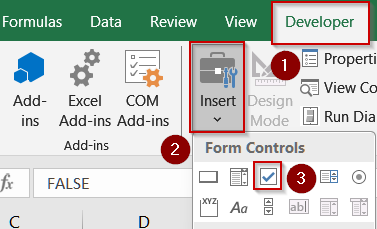
➤ Draw your first checkbox and this will act as your master checkbox.
➤ Then, insert other checkboxes for your list items (e.g., one per row).
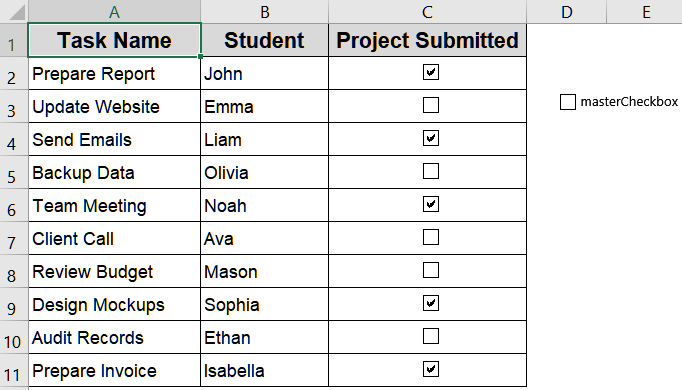
This setup allows you to visually manage multiple checkboxes on your sheet.
Step 2: Link Checkboxes to Cells (Optional)
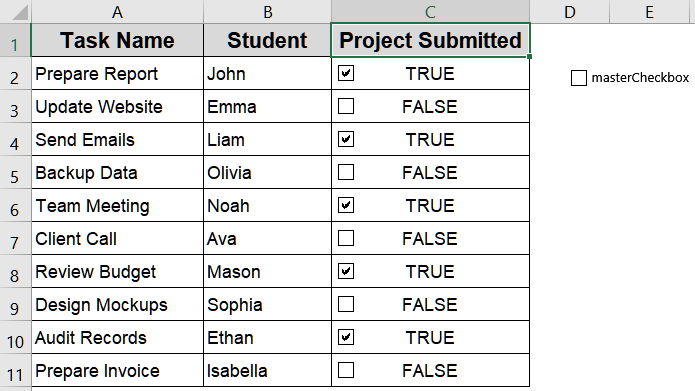
While linking checkboxes to cells is optional, it’s a highly recommended best practice. Doing so allows Excel to record each checkbox’s state (TRUE when checked, FALSE when unchecked) in a nearby cell. This not only makes debugging easier but also enables integration with formulas, conditional formatting, and dashboard logic later on. Even though your macro can function without links, adding them gives you more flexibility and insight into checkbox behavior.
Steps:
➤ Right-click on a checkbox (not the master one) and select Format Control.
➤ Go to the Control tab.
➤ In the Cell link box, choose a nearby cell or existing cell.
➤ Click OK.
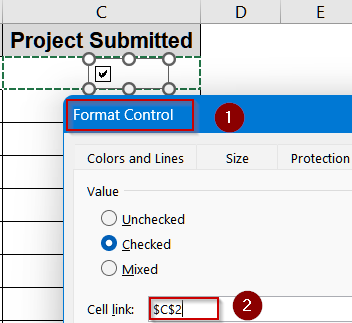
Repeat for each checkbox. This step ensures each checkbox has a dedicated linked cell.
Step 3: Write the VBA Macro
Now that your checkboxes are in place, it’s time to bring automation into play. By writing a simple VBA macro, you can control all the sub-checkboxes with one master checkbox. The macro works by reading the master checkbox’s linked cell value and applying that same TRUE/FALSE state to every other checkbox on the worksheet.
Steps:
➤ Press Alt + F11 to open the Visual Basic for Applications (VBA) editor.
➤ Click on Insert tab >> Module.
➤ Copy and paste the following code:
Option Explicit
Sub SelectAllCheckboxes()
    Dim ws As Worksheet
    Dim masterName As String
    Dim masterState As Long
    Dim gotState As Boolean
    Dim cb As CheckBox
    Dim ole As OLEObject
    Dim shp As Shape
    Set ws = ActiveSheet               ' or ThisWorkbook.Sheets("Sheet1")
    masterName = "masterCheckbox"      ' the name your master checkbox must have
    gotState = False
    ' --- Try Form Control via CheckBoxes collection ---
    On Error Resume Next
    masterState = ws.CheckBoxes(masterName).Value
    If Err.Number = 0 Then gotState = True
    Err.Clear
    ' --- Try Shape.ControlFormat (form control stored as a Shape) ---
    If Not gotState Then
        For Each shp In ws.Shapes
            If shp.Name = masterName Then
                On Error Resume Next
                masterState = shp.ControlFormat.Value
                If Err.Number = 0 Then gotState = True
                Err.Clear
                Exit For
            End If
        Next shp
    End If
    ' --- Try ActiveX (OLEObjects) ---
    If Not gotState Then
        On Error Resume Next
        If Not ws.OLEObjects(masterName) Is Nothing Then
            If TypeName(ws.OLEObjects(masterName).Object) = "CheckBox" Then
                masterState = IIf(ws.OLEObjects(masterName).Object.Value = True, 1, -4146)
                gotState = True
            End If
        End If
        Err.Clear
    End If
    If Not gotState Then
        MsgBox "Could not find a control named '" & masterName & "'. " & _
               "Select your master checkbox and run the RenameSelectedToMaster macro (see instructions).", vbExclamation
        Exit Sub
    End If
    ' --- Apply masterState to Form Control checkboxes (CheckBoxes collection) ---
    For Each cb In ws.CheckBoxes
        If cb.Name <> masterName Then
            cb.Value = masterState
        End If
    Next cb
    ' --- Apply masterState to Shapes that are form controls (safety) ---
    For Each shp In ws.Shapes
        On Error Resume Next
        Dim tmp As Variant
        tmp = shp.ControlFormat.Value    ' will error if not a form control
        If Err.Number = 0 Then
            If shp.Name <> masterName Then shp.ControlFormat.Value = masterState
        End If
        Err.Clear
    Next shp
    ' --- Apply masterState to ActiveX CheckBoxes ---
    For Each ole In ws.OLEObjects
        On Error Resume Next
        If TypeName(ole.Object) = "CheckBox" Then
            If ole.Name <> masterName Then
                If masterState = 1 Then
                    ole.Object.Value = True
                Else
                    ole.Object.Value = False
                End If
            End If
        End If
        Err.Clear
    Next ole
End Sub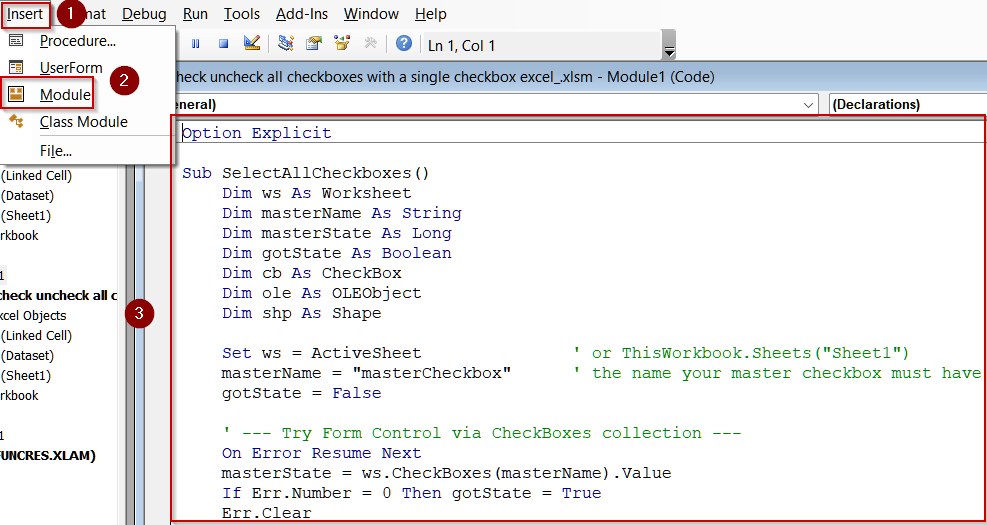
This macro checks whether your master checkbox is selected, then loops through all checkboxes and updates their values accordingly.
Step 4: Assign the Macro to the Master Checkbox
Writing the macro is just half the job. To make it run automatically when the master checkbox is clicked, you need to assign the macro directly to that checkbox. Without this link, the macro won’t trigger when you toggle the master. This step ensures full interactivity so that each time you click the master checkbox, Excel instantly checks or unchecks every related checkbox without needing manual execution from the Developer tab.
Steps:
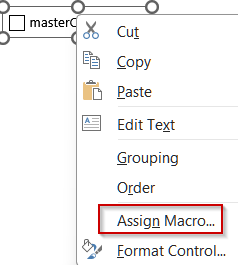
➤ Return to your Excel sheet.
➤ Right-click on the master checkbox.
➤ Select Assign Macro…
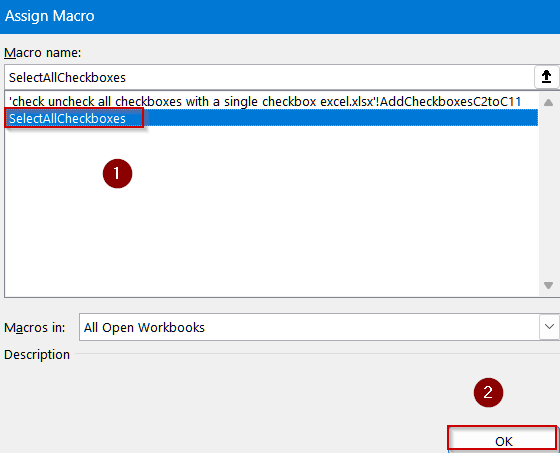
➤ Choose SelectAllCheckboxes from the list.
➤ Click OK.
Your master checkbox is now fully functional. When you check or uncheck it, all other checkboxes will follow suit.
Step 5: Save as a Macro-Enabled Workbook
Before closing or sharing your workbook, it’s crucial to save it in the correct format. Standard Excel files (.xlsx) don’t retain VBA code, meaning your automation will disappear after saving. By saving as a Macro-Enabled Workbook (.xlsm), you preserve the macro, ensuring it works every time the file is opened. This format also alerts Excel to enable VBA functionality, keeping your checkbox automation active and ready to use.
Steps:
➤ Click File >> Save As.
➤ In the Save as type dropdown, select Excel Macro-Enabled Workbook (*.xlsm).
➤ Choose a location and click Save.

Now your master checkbox automation will remain intact every time you open the file.
Frequently Asked Questions
What is the purpose of creating a master checkbox in Excel?
A master checkbox simplifies management by allowing you to check or uncheck all related checkboxes at once. It’s ideal for dashboards, task trackers, attendance lists, or bulk selection tools in Excel.
Do I need VBA to create a master checkbox system?
Yes. Excel doesn’t support group checkbox selection natively, so VBA is required. The macro loops through all checkboxes automatically, syncing their states with the master checkbox’s linked cell value (TRUE/FALSE).
What happens if I rename or delete a checkbox accidentally?
If a checkbox is renamed or deleted, the macro may skip or fail to toggle it. Reinsert or rename the checkbox properly, ensuring consistency with your sheet structure before running again.
Is saving as .xlsm necessary for the macro to work later?
Yes. VBA macros only persist in Macro-Enabled Workbooks (.xlsm). If saved as .xlsx, your code will be removed permanently, and the check/uncheck functionality will no longer work upon reopening the file.
Wrapping Up
In this tutorial, we explored how to check or uncheck all checkboxes with a single checkbox in Excel using VBA. By inserting a master checkbox, linking it to a cell, writing a short macro, and assigning the macro to it, you can quickly manage all checkboxes on your sheet with one click. Try implementing it in your next checklist or dashboard to simplify your Excel workflow.