When working with Excel forms, surveys, or task trackers, a simple Yes/No option can make your sheet more interactive and user-friendly. Whether you’re tracking approvals, marking completion, or collecting responses, Excel gives you multiple ways to set up Yes/No options starting from visual checkboxes to dropdown lists or even formulas.
In this article, you’ll learn three effective methods to add a Yes/No checkbox in Excel using the Option Button method, Data Validation drop-down, and VBA automation. Let’s get started.
Steps to add a yes or no checkbox in Excel:
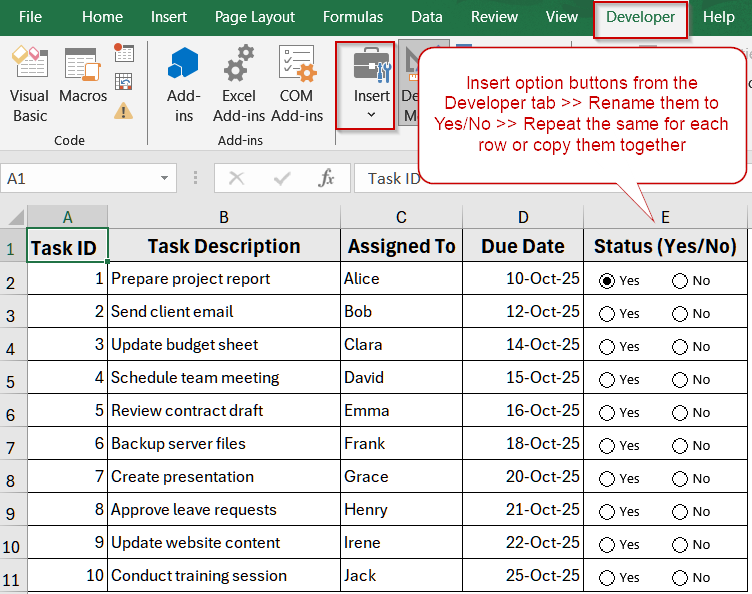
➤ Go to the Developer tab >> Click Insert under the Controls group.
➤ In the Form Controls section, select Option Button.
➤ Click in your worksheet to insert the first option button, then rename it to Yes.
➤ Insert another option button beside it and rename it to No.
➤ Repeat the same for other cells.
Create Yes/No Checkboxes by Grouping Option Buttons
Instead of using checkboxes (which allow multiple selections), Option Buttons (Radio Buttons) ensure that selecting one option automatically deselects the other. This method is ideal when you want users to choose only one option between Yes and No which is similar to survey-style questions. This is perfect for clean, single-choice data collection.
We’ll use the following dataset:

Steps:
➤ Go to the Developer tab >> Click Insert under the Controls group.
➤ In the Form Controls section, select Option Button.

➤ Click in your worksheet to insert the first option button, then rename it to Yes.
➤ Insert another option button beside it and rename it to No.
➤ Repeat the same for other cells.

Now you have a professional Yes/No selection system that prevents multiple responses and keeps your data clean and readable.
Create a Yes/No Drop-Down List with Data Validation
If you prefer a simple, no-code approach that works in all Excel versions, this method is ideal. By using Data Validation, you can create a dropdown list that restricts the cell’s value to either Yes or No, ensuring clean and consistent data entry. This approach is great for data entry forms, HR records, or approval sheets where you want to prevent typos and maintain uniform responses.
Steps:
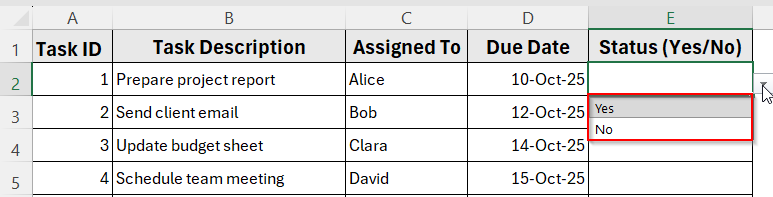
➤ Select the range where you want Yes/No options (E2:E11).
➤ Go to the Data tab on the Ribbon.
➤ In the Data Tools group, click Data Validation.

➤ Under the Settings tab, choose List from the Allow dropdown.
➤ In the Source box, type: Yes,No
➤ Click OK.

You’ll now see a small drop-down arrow in each cell. Click it to select Yes or No as needed.
Generate Yes/No Outputs Based on Checkbox Input with VBA
If you need to insert multiple checkboxes quickly across a range, VBA can save you significant time. This method automatically adds checkboxes and links them to their respective cells so you can toggle Yes/No dynamically with formulas. This is especially useful for large lists or automated dashboards, where manually inserting checkboxes would be tedious.
Steps:
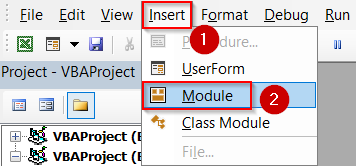
➤ Press Alt + F11 to open the VBA editor.
➤ Go to Insert >> Module.
➤ Paste the following code:
Sub CreateYesNoCheckboxes()
    Dim ws As Worksheet
    Dim lastRow As Long
    Dim i As Long
    Dim cb As Shape
    Set ws = ActiveSheet
    lastRow = ws.Cells(ws.Rows.Count, "A").End(xlUp).Row
    ' Remove existing checkboxes in column E
    For Each cb In ws.Shapes
        If Not Intersect(cb.TopLeftCell, ws.Range("E:E")) Is Nothing Then cb.Delete
    Next cb
    ' Add checkboxes and link them
    For i = 2 To lastRow
        With ws.CheckBoxes.Add(ws.Cells(i, "E").Left + 2, ws.Cells(i, "E").Top + 2, 15, 15)
            .LinkedCell = ws.Cells(i, "E").Address
            .Caption = ""
        End With
    Next i
    MsgBox "Yes/No Checkboxes Added Successfully!"
End Sub

➤ Press F5 to run the macro.
This will insert checkboxes in column E (E2:E11). Each will show TRUE/FALSE when checked.

➤ Optionally, If you want to display “Yes” and “No” instead of TRUE/FALSE, enter this formula in column F:
=IF(E2=TRUE,"Yes","No")
➤ Copy it down to F11 for all rows.

Frequently Asked Questions
How do I link a checkbox to a cell in Excel?
To link a checkbox, right-click on it, choose Format Control, and under the Control tab, specify a Cell Link. That cell will automatically display TRUE when the checkbox is ticked, and FALSE when it’s cleared.
How can I show “Yes” or “No” instead of TRUE or FALSE?
Excel checkboxes return TRUE/FALSE by default, but you can use a formula like =IF(E2=TRUE,”Yes”,”No”) to convert those values. This makes your sheet cleaner and easier for non-technical users to understand.
Should I use a checkbox or a dropdown for Yes/No options?
Checkboxes are perfect for quick visual tracking, like task completion. Dropdowns, however, ensure data consistency when working with forms or databases. Your choice depends on whether you value visual clarity or structured data entry more.
Why isn’t my checkbox appearing inside the cell after inserting it?
Checkboxes are floating objects, not cell contents. If they look misplaced, drag them manually into the correct cell, or adjust alignment using Format Control. Remember, the linked cell stores the actual value.
Can I automate the creation of Yes/No checkboxes with VBA?
Yes, VBA can instantly add multiple checkboxes across your dataset and link them to cells. It’s a time-saver for large sheets where manually inserting checkboxes would be tedious and error-prone.
Wrapping Up
In this tutorial, you learned three easy ways to add a Yes or No checkbox in Excel using the Option Button method, a Data Validation dropdown, and a VBA macro. Whether you want a visual toggle, a simple dropdown, or automated setup, each method serves a different need. Feel free to download the practice file and share your feedback.