Sending a large number of emails can be a tough job. Fortunately, apps from Microsoft 365 make the process easier. From a list of emails from excel, you can send tons of personalized emails to your clients. In this article, we will show you the best way to mail merge from excel to outlook.
➤ Create an Excel file with your mailing list.
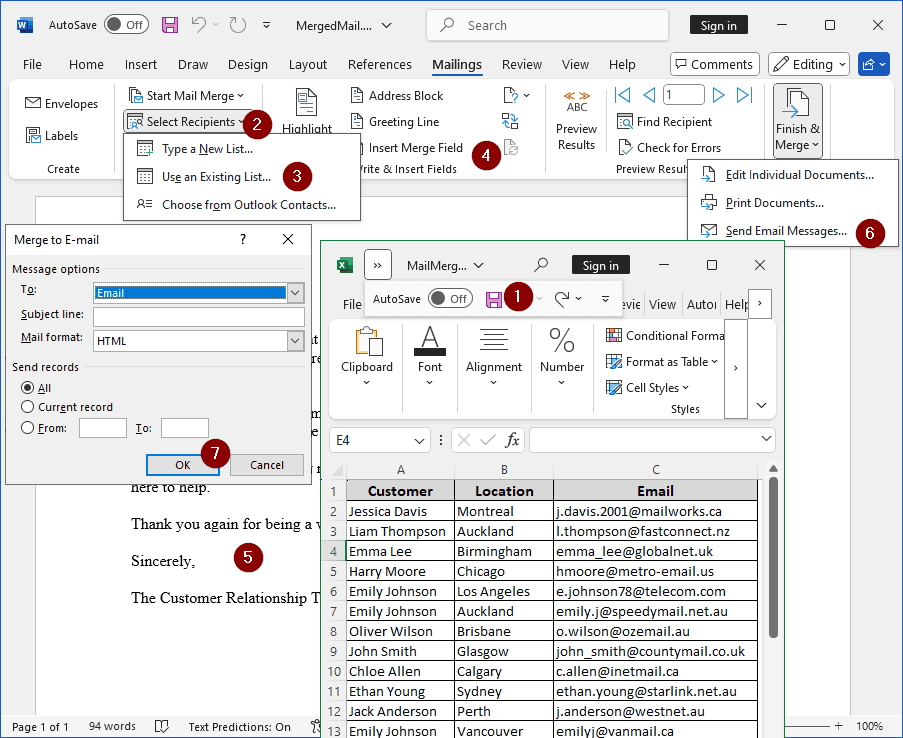
➤ Create a word file, and head to Mailings > Start Mail Merge > E-mail Messages.
➤ Write the email you want to merge
➤ Go to Select Recipients > Use an Existing List and import the excel file
➤ Set the variables in place from Insert Merge Field
➤ Start merging email by going to Finish & Merge > Send Email Messages
➤ Set your subject line and customize other options to complete the merger. The emails will be automatically sent from outlook.
I am sure that takeaway was confusing. If you are willing to spend a bit more time, we will explain the whole process in detail. Therefore, stick around, and keep reading to clearly understand how to mail merge from excel to outlook.
Download Practice WorkbookWhat is Mail Merging?
Businesses sometimes need to send personalized emails to a large number of clients. Mail merging allows the user to create one email and send it to many recipients while automatically customizing the email for each recipient.
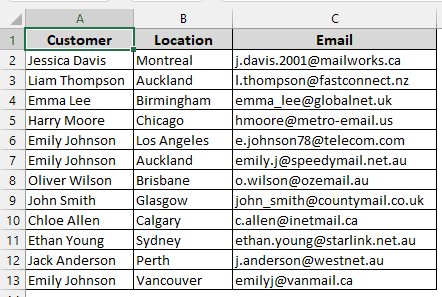
In the dataset we are working with here, there are Customer name, Location, and Email. These are the customers the company has done business with and wants to send a thank-you note as a gesture. However, sending customized emails to every single one of the customers is tedious.
In the sample, we only have 12 names. But in the real world, there could be thousands. Nevertheless, there is a way to send each of them a personalized email with a few clicks. Here is how to do that.
Steps to Mail Merge from Excel to Outlook
Step 1: Create an Excel Sheet
First of all, you should have an excel sheet containing all of the details of the customers. We have already done that part. You must have the variables in separate headings. For example, here we have customer names, locations, and emails. The Email part is mandatory as those are the addresses you will be sending your emails to.
Step 2: Create a Word Document
We need a word document in order to write the email. Follow these steps:
➤ Open word, and go to the Mailings
➤ Click on Start Mail Merge and select E-mail Messages.
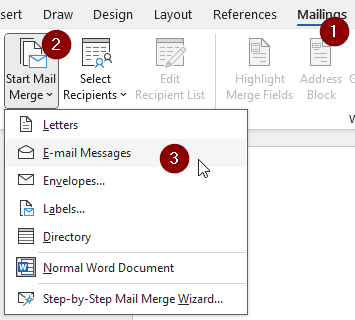 ➤ Write the email
Step 3: Import the Excel File
Now we have to import the excel file to insert the variables from. Here is how to do that:
➤ From the Mailings tab, go to Select Recipients > Use an Existing List…
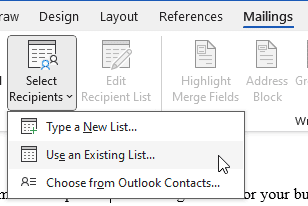 ➤ Import the excel workbook you have created earlier
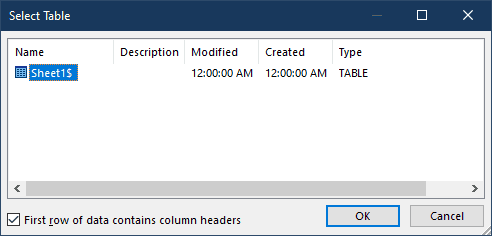
➤ Select the sheet where you have the information. We have the information on the first sheet, so we are selecting that one. Press OK to confirm.
Step 4: Merging Fields
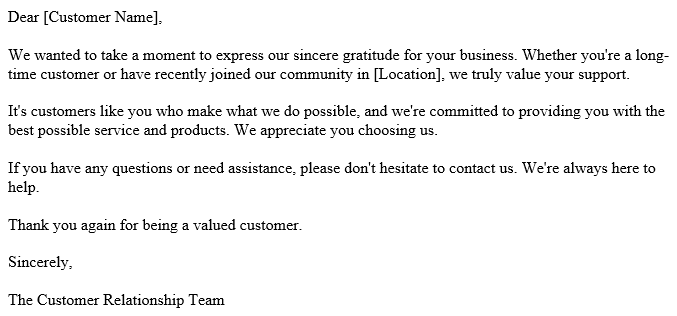
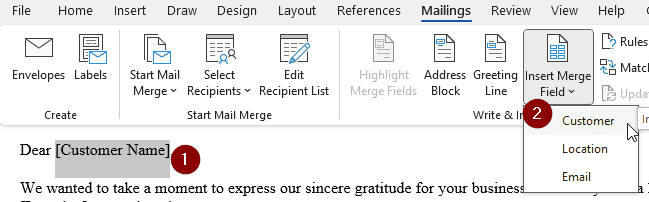
Now we have to remove the variables from the mail and insert merge fields. In this document, we have [Customer Name] and [Location] as variables that we have to replace with customer names and their locations from the excel sheet. Follow these steps to do that:
➤ Select the variable, in this example [Customer Name], with your mouse and press backspace to delete it.
➤ Go to Insert Merge Field, click the small arrow to open the dropdown menu, and select the excel heading (Customer in the example).
➤ [Customer Name] should be replaced with «Customer», which indicates that the excel heading is in place.
➤ Do that for all other variables, like Location here.
Step 5: Finishing the Job
Now it is time to send the emails via outlook. Follow the steps below when you are ready:
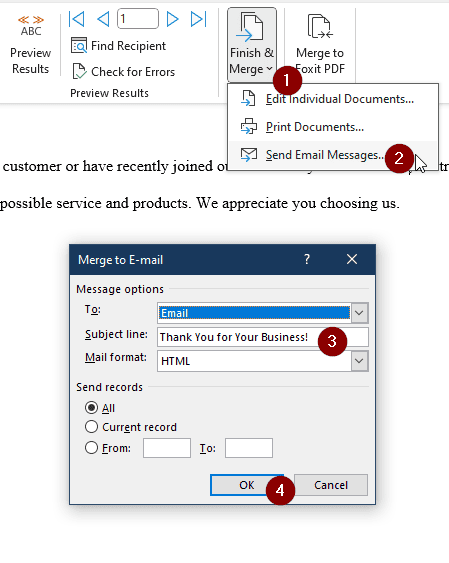
➤ Go to Finish & Merge, and open the dropdown menu. From there, select Send Email Messages…
➤ Write your subject line. We have written “Thank You for Your Business!” here.
➤ Click OK to start sending the emails
Note:
Microsoft Word should automatically fill the “To:” field with the email from the excel sheet. If it does not, you should do it yourself.
Frequently Asked Questions
How do I transfer data from Excel to Outlook?
Save your excel workbook as a CSV file. From the File menu in outlook, go to Open & Export > Import/Export, and select Import from another program or file from the wizard to import the excel workbook.
How do I embed an Excel spreadsheet into Outlook email?
Go to the Insert tab and click the Table icon. Then select Excel Spreadsheet to import the excel spreadsheet into outlook email.
How to send bulk email?
Start composing your email. Then, in the CC field, write as many email addresses as you want. If you don’t intend the recipients to know who else got that same email, write the addresses in the BCC field.
How do I create a link to Outlook in Excel?
In excel, go to the Insert tab, and go to Link > Insert Link > E-mail Address. Then add the text that should be displayed on the email link in the Display Text field, and the outlook email address in the E-mail address field. You can also add the Subject line if you have to.
Can Excel pull data from emails?
Yes, it can. To do that, you need to export the emails from outlook as a CSV file. Then you can open that file using excel, and the data will be there.
Wrapping Up
Although it was a long process, we believe that you have learned how to mail merge from excel to outlook. Despite being a long process, it is a lot better than sending every email one by one manually. The practice files can be downloaded for your convenience. Share the process with your work friends so that they know how to do this as well.