Sharing a workbook in Excel allows multiple users to collaborate on the same file simultaneously. While Excel’s older “Share Workbook (Legacy)” feature is still available, Microsoft now recommends using OneDrive and co-authoring for real-time collaboration. However, there are scenarios especially in older Excel versions or for specific automation needs where the legacy sharing feature is still useful.
In this article, we’ll cover different ways to enable workbook sharing in Excel, including both the legacy method and modern alternatives. Whether you’re using Excel 2016 or 365, we’ve got you covered with step-by-step guides.
Steps to enable sharing workbook:
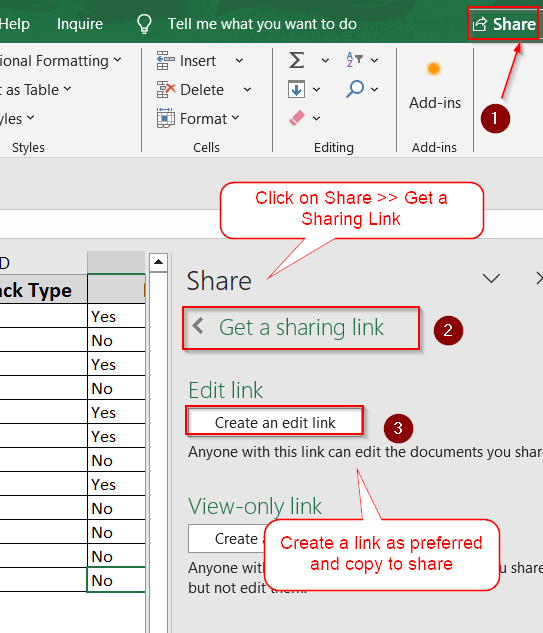
➤ At the top right corner, click Share and select Share from the drop-down.
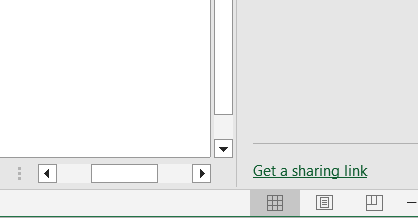
➤ Choose Get a Sharing Link and Create an edit link.
➤ Copy the link and send it to your desired user.
What Does Sharing a Workbook in Excel Mean?
Sharing a workbook in Excel means allowing more than one person to view or edit the same Excel file. This is useful when you’re working with a team and need others to add data, make updates, or review information.
There are two main ways to share a workbook. In newer Excel versions, you can save the file to OneDrive or SharePoint and work with others at the same time. In older versions, you can use the legacy “Share Workbook” feature, which lets multiple people make changes but has some limitations. Sharing helps everyone stay on the same page and avoids the confusion of sending files back and forth.
Enable Legacy Share Workbook Feature (Review Tab)
This method enables the old-style “Shared Workbook” option that allows multiple users to edit a file at the same time. Though deprecated in modern Excel versions, it’s still available via options.
Steps:
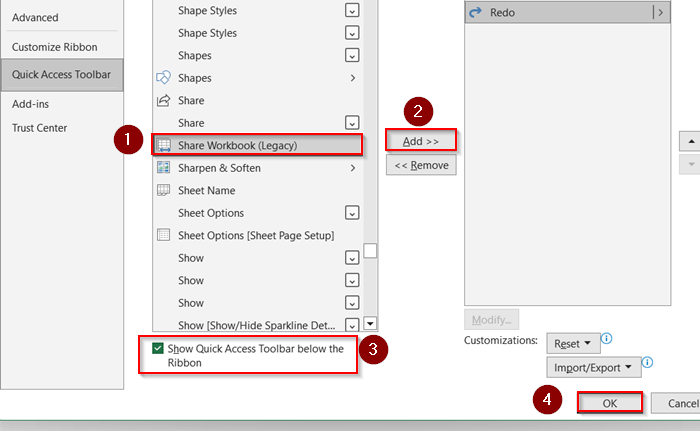
➤ Go to File >> Options.

➤ Select Quick Access Toolbar.
➤ In the dropdown, choose All Commands.
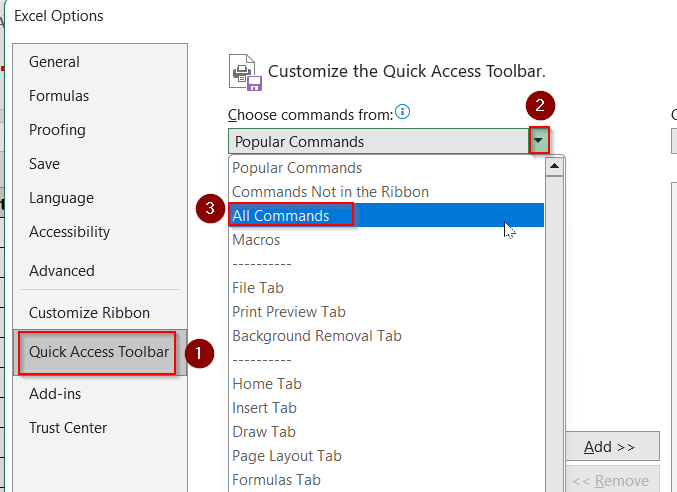
➤ Find and add Share Workbook (Legacy) to the toolbar.
➤ Check Show Quick Access Toolbar below the Ribbon.
➤ Click OK.
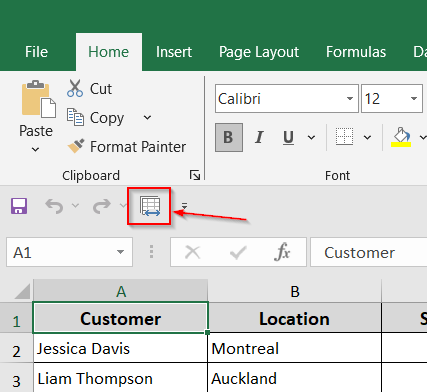
➤ Now, click Share Workbook (Legacy) from your toolbar.
➤ Under the Editing tab, check Use the old workbooks feature instead of the new co-authoring experience.
➤ Click OK.
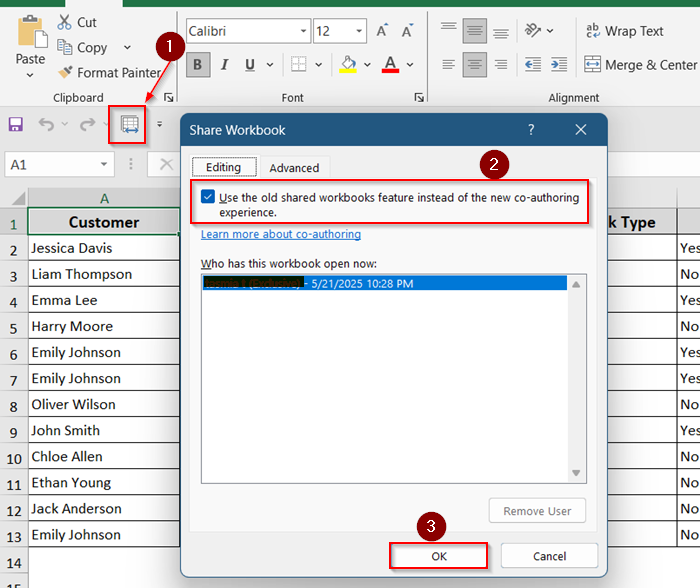
Now your workbook is shared and can be edited by multiple users.
Share Workbook Using OneDrive (Modern Co-authoring)
This is the recommended method in Microsoft Excel 365 and Excel 2019+, allowing real-time collaboration.It’s ideal when your workbook is stored on OneDrive or SharePoint. Users can co-author the file, and changes appear in real-time.
Steps:
➤ Save your Excel file to OneDrive.
➤ Click the Share button.
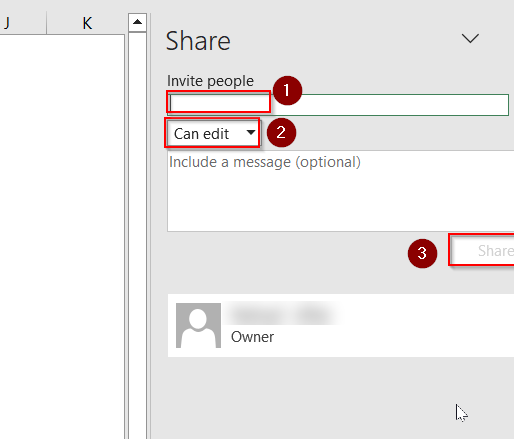
➤ Enter email addresses or copy the share link.

➤ Invite people and Set permission to Can Edit.
➤ Click Share.
➤ You can also click on the Get a Sharing Link option at the bottom corner of the same tab.
➤ You can Create an Edit Link and Copy to send.
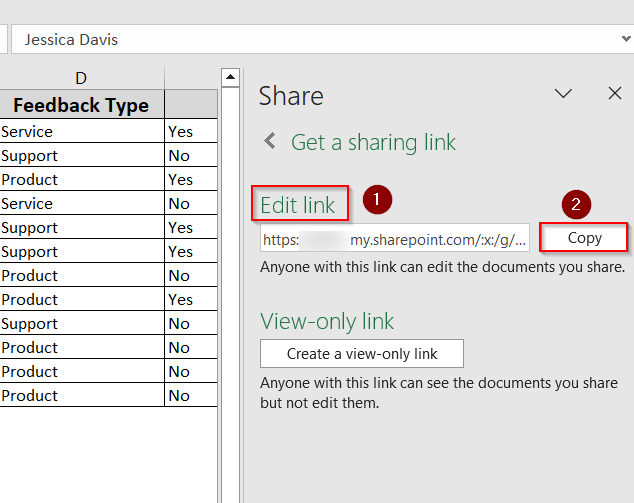
Other users can now open and edit the same file simultaneously.
Use the “Protect and Share Workbook” Option
This method adds a layer of protection to your shared file by allowing you to set a password and enable change tracking. Use this if you want to monitor edits and prevent unauthorized users from making changes.
Steps:
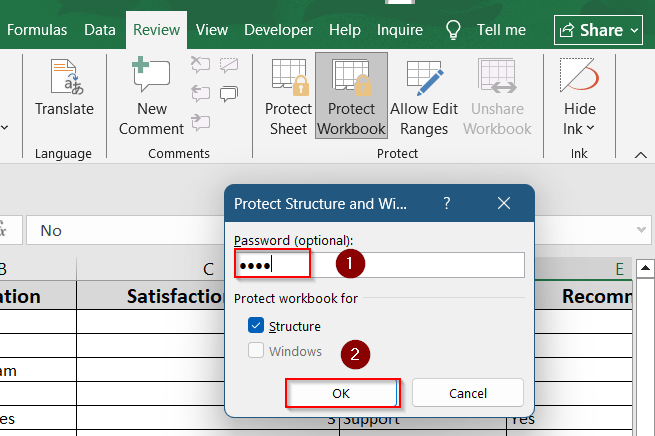
➤ Go to the Review tab >> Protect Workbook.

➤ Optionally, Enter password and click OK.
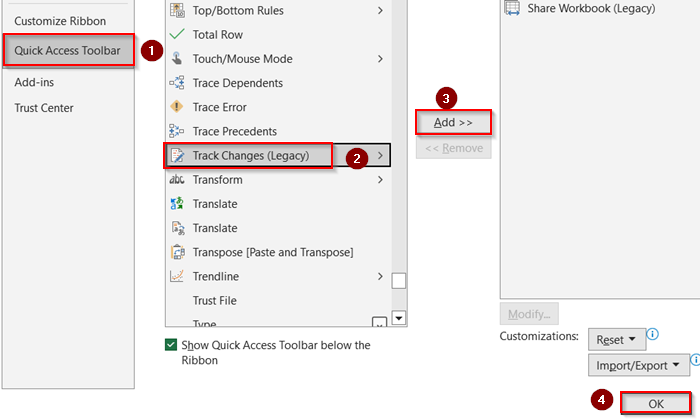
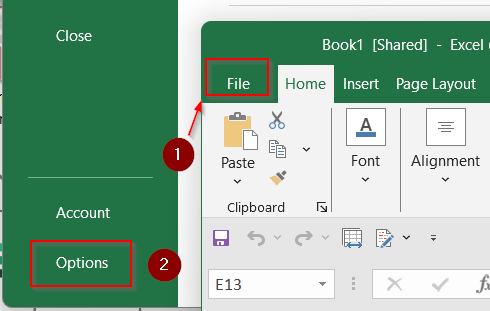
➤ Go to File >> Options.

➤Add Track changes (Legacy) from Quick Access Toolbar and click OK.
➤ Click on Track changes (Legacy) >> Highlight Changes >> Check Track changes while editing >> Click OK.
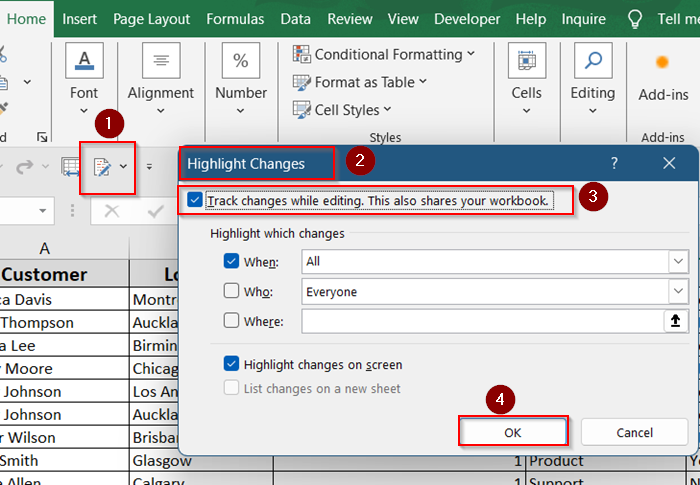
Your workbook will now track all edits, and users must enter the password to make changes.
Allow Specific Users to Edit Selected Ranges
Instead of sharing the whole file, you can allow others to edit only certain areas.
This option is perfect for assigning responsibilities (e.g., letting different team members fill in only their sections).
Steps:
➤ Select the cells you want to allow editing.
➤ Go to Review >> Allow Edit Ranges >> Click New.
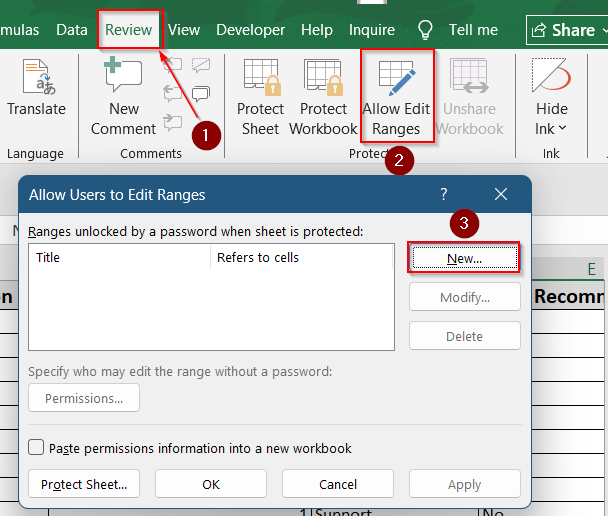
➤ Set the range and user permissions.
➤ Click OK.
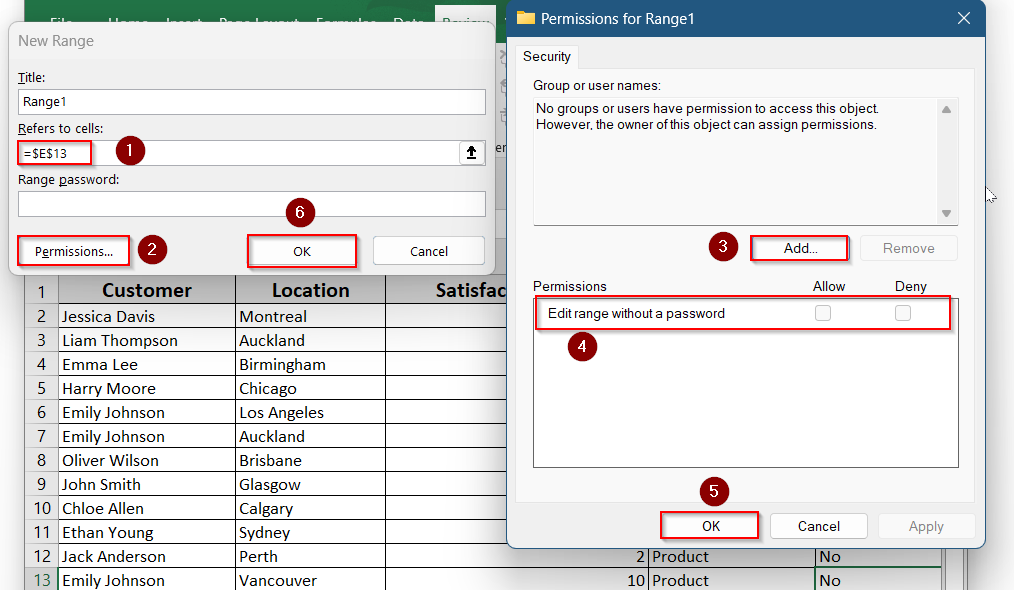
Only the assigned users can edit their specific ranges.
Compare and Merge Changes from Multiple Workbooks
If different users worked on separate copies of the same file, you can merge those versions.
Use this when offline edits have been made in multiple copies of a shared file.
Steps:
➤ First, Share the workbook.

➤ Go to File >> Options.
➤ Quick Access Toolbar >> Choose All Commands >> Add Compare and Merge Workbooks.
➤ Check Show Quick Access Toolbar below the Ribbon >> Click OK.
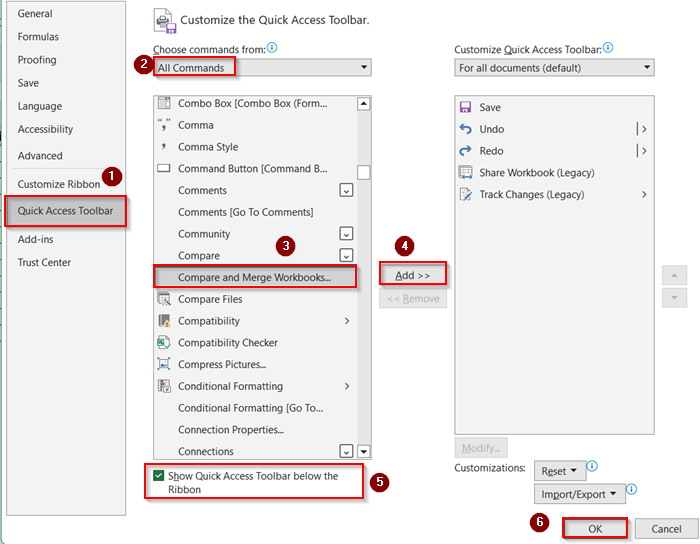
➤ Open the original (main) workbook.
➤ Click Compare and Merge Workbooks.
➤ Select the copies you want to merge.
➤ Click OK.
Edits from different users will now be merged into the master file.
Remove Users from a Shared Workbook
You may want to disconnect someone from editing your workbook.
Steps:
➤ Click Share Workbook (Legacy).
➤ Go to the Editing tab.
➤ Select the user you want to remove.
➤ Click Remove User.
➤ Click OK.
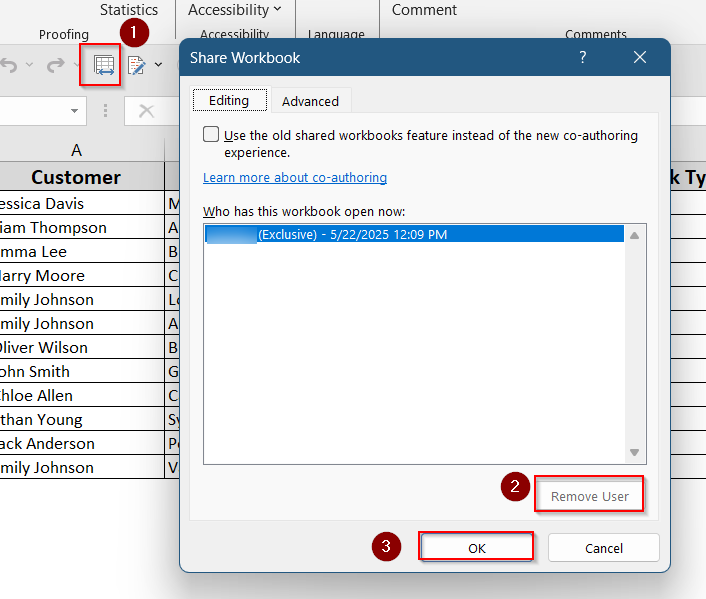
This prevents that user from continuing in the current session.
Frequently Asked Questions
Why can’t I find the “Share Workbook” button in Excel?
The “Share Workbook” button is hidden by default in modern Excel versions like Microsoft Office 365 and 2019. Microsoft replaced this feature with co-authoring via OneDrive. However, you can still enable the legacy button. Go to File > Options > Quick Access Toolbar, choose All Commands, find Share Workbook (Legacy), and add it. Once added, it will appear in your Toolbar, and you can use it like before.
Can I use sharing and track changes at the same time?
Yes, but only if you’re using the legacy sharing method. Track Changes doesn’t work with the modern co-authoring feature used in Microsoft Office 365 or Excel Online. To enable both, you’ll need to use Share Workbook (Legacy) and Protect and Share Workbook with track changes enabled. This method is mainly supported in older file types and versions.
How do I stop sharing a workbook?
To stop sharing a workbook using the legacy method, click on Share Workbook (Legacy) in your toolbar. In the dialog box, uncheck “Allow changes by more than one user at the same time”, and click OK. Excel will prompt you to save the workbook. Once saved, it will no longer be shared, and other users won’t be able to make simultaneous edits.
Can I co-author in Excel without OneDrive?
Unfortunately, co-authoring without OneDrive or SharePoint is not supported. Modern Excel collaboration requires your file to be stored in the cloud. You must save the workbook to OneDrive, OneDrive for Business, or a SharePoint Online location to allow real-time multi-user editing. Local or network drives won’t support this feature.
Why is Excel not letting me share the file?
If you’re unable to share your workbook, check for a few common issues. The file might be in .xls format, which doesn’t support modern sharing features. It may also contain features not compatible with sharing like macros, data models, or protection. Try converting the file to .xlsx, remove any sheet or workbook protection, and avoid using unsupported elements. Then try sharing again.
Wrapping Up
In this tutorial, we explored multiple ways on how to enable sharing workbook in Excel. From reviving the legacy “Share Workbook” button to using OneDrive for co-authoring, you now have options for both old-school and modern collaboration.
Whether you’re using Excel 2010 or Microsoft Office 365, these tools make it easier for teams to work on the same file without confusion. Feel free to download the practice file and share your thoughts and suggestions.