Automating repetitive tasks in Excel can save significant time, especially if you regularly apply the same formatting or calculations across multiple worksheets. The Macro Recorder is one of Excel’s most effective features for this since it allows you to record your actions step by step and replay them later, without needing to write VBA code manually.
In this article, we’ll walk you through how to use the Macro Recorder in Excel effectively. You’ll learn how to enable the Developer tab, record a macro, perform and stop your actions, and then run the macro whenever you need it. Let’s get started.
Steps to use macro recorder in excel:
➤ Enable the Developer tab to access macro tools.
➤ Record a macro by naming it, optionally assigning a shortcut, and performing your actions.
➤ Use relative or absolute references to make macros flexible or fixed.
➤ Stop recording and run your macro from the Developer tab.
➤ Save your workbook as a Macro-Enabled Workbook (.xlsm) to preserve macros.
Steps to Use Macro Recorder in Excel
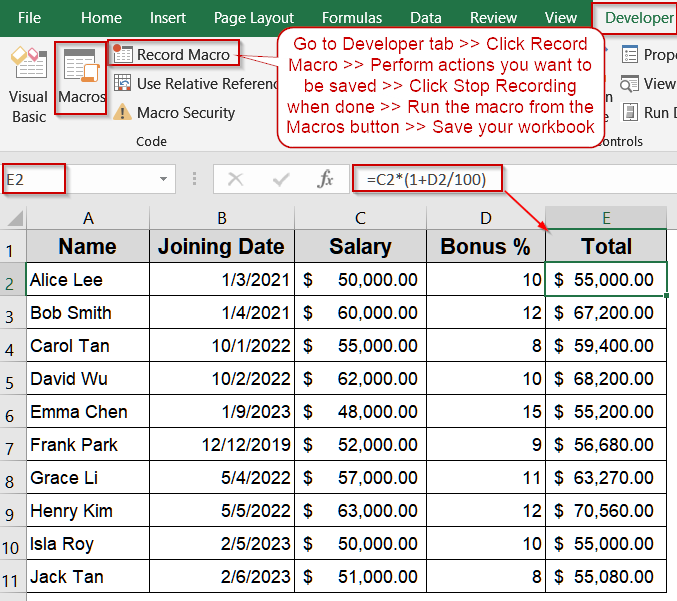
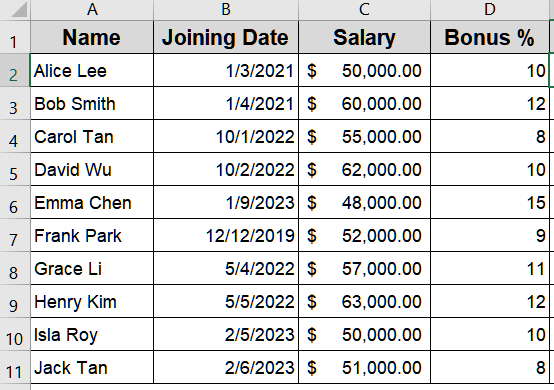
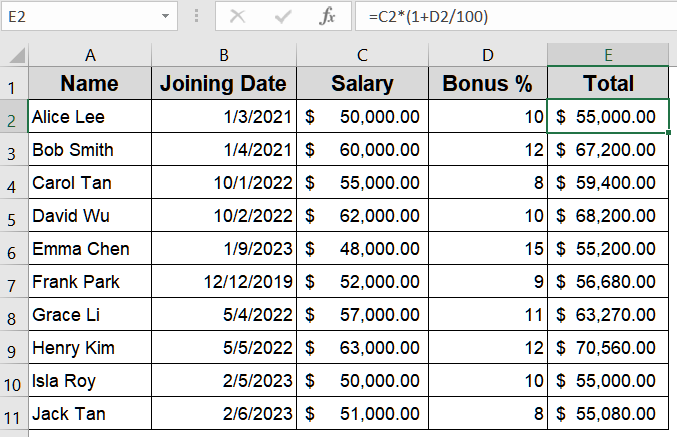
To follow along, we’ll use a simple dataset of employee information. This dataset will be used to demonstrate recording a macro that formats cells, applies bold headers, and calculates total payment automatically.
Step 1: Enable Developer Tab in Excel
The Developer tab is essential for accessing all macro-related features in Excel, but it’s hidden by default. Enabling it unlocks tools for recording, editing, and running macros. Activating this tab first ensures you have full control over automating tasks efficiently and consistently.
Steps:
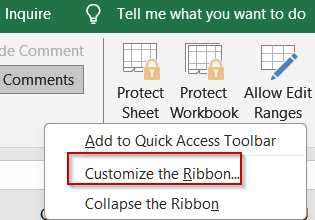
➤ Right-click on any tab in the ribbon and select Customize the Ribbon.
➤ In the right-hand panel, check the Developer box under Main Tabs.
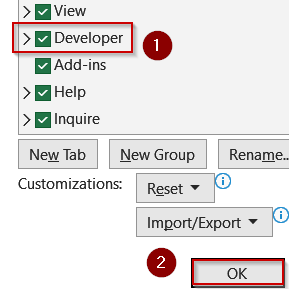
➤ Click OK. The Developer tab will now appear in your ribbon.
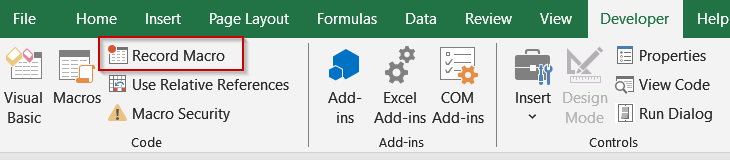
Step 2: Record Your First Macro
Recording a macro captures every keystroke, click, and formatting change in Excel, creating a repeatable sequence of actions. Think of it as a live tutorial for Excel to follow later. Planning your steps carefully ensures the macro performs exactly as intended, saving time on repetitive work.
Steps:
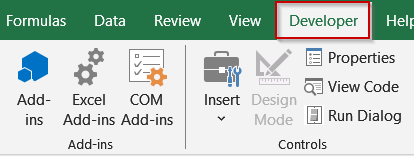
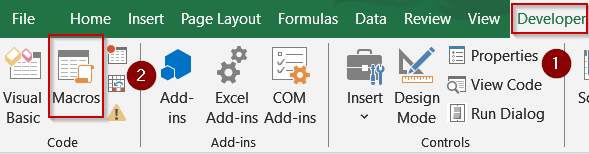
➤ Go to the Developer tab.
➤ Click Record Macro in the Code group.
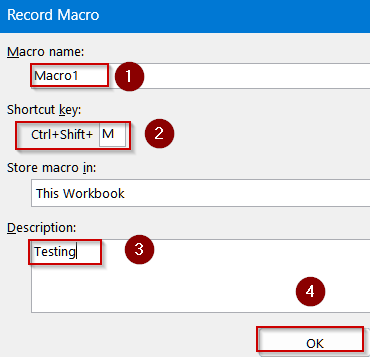
➤ In the dialog box, provide a Macro Name (no spaces, use underscores).
➤ Optionally assign a Shortcut Key to run the macro quickly.
➤ Add a Description to remember the macro’s purpose.
➤ Click OK to start recording.
Step 3: Perform Actions You Want to Automate
After starting the recorder, Excel tracks every move you make such as cell selections, formatting changes, formulas, and data entry. Planning your workflow before acting ensures clean, efficient results. Carefully perform your desired steps like formatting headers, calculating totals, or applying conditional formatting to create a reliable, reusable macro.
Steps:
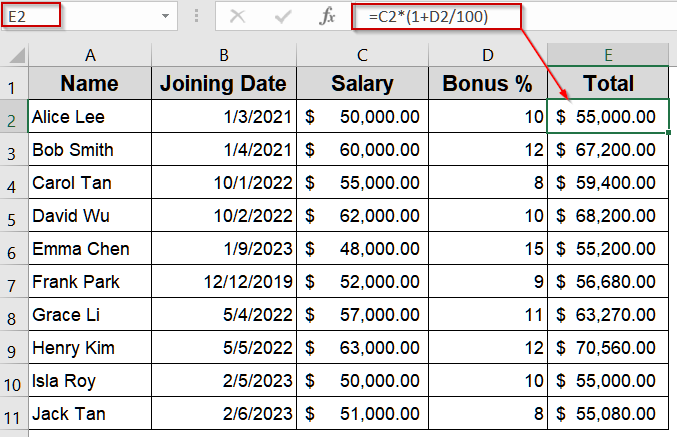
➤ Apply bold and background color formatting to header row (Row 1).
➤ Adjust column widths for better visibility.
➤ Insert a formula in Total (E2) as:
=C2*(1+D2/100)
➤ Copy the formula down all rows (E2:E11).
➤ Add conditional formatting to highlight high salaries if desired.
Step 4: Stop Recording the Macro
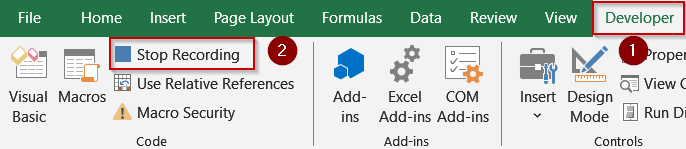
When you’ve completed all the tasks you want automated, you need to finalize the recording. Stopping the recorder saves every action you’ve performed, preserving your sequence of steps. This prevents accidental extra actions and ensures the macro reflects only your intended workflow for future use.
Steps:
➤ Go back to the Developer tab.
➤ Click Stop Recording (next to Record Macro).
Your macro is now saved and ready to run.
Step 5: Run Your Macro
Running the macro replays your recorded sequence instantly, automating repetitive formatting or calculations across different datasets. Instead of re-doing the same tasks manually, executing your macro saves time and ensures consistent results. This is especially useful when applying identical formatting or calculations across multiple worksheets.
Steps:
➤ Go to the Developer tab and click Macros.
➤ Select the macro you recorded from the list.
➤ Click Run.
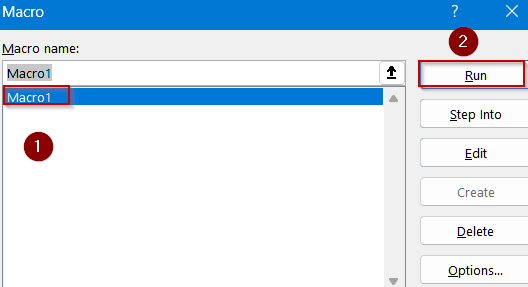
➤ Watch Excel automatically perform all recorded actions.
Step 6: Save Your Workbook as Macro-Enabled
Macros won’t persist in a standard Excel workbook format. To preserve and reuse your recorded actions, you must save the file as a Macro-Enabled Workbook. This special format (.xlsm) keeps your macro code intact, ensuring it works seamlessly whenever you reopen and share the workbook.
Steps:
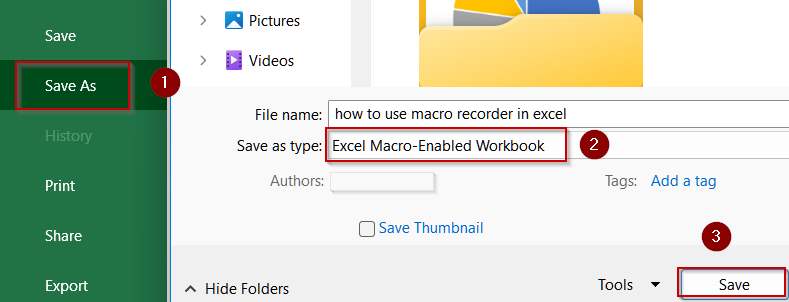
➤ Click File >> Save As.
➤ In the Save as type dropdown, select Excel Macro-Enabled Workbook (*.xlsm).
➤ Choose your location and click Save.
Frequently Asked Questions
What is the Macro Recorder in Excel used for?
The Macro Recorder in Excel automates repetitive tasks by recording your actions step by step. Instead of manually repeating formatting or calculations, you can record them once and run the macro whenever needed.
Can I edit a macro after recording it?
Yes. You can edit a macro by opening the VBA editor through the Developer tab. The recorded steps appear as VBA code, which can be modified to refine, expand, or correct the macro’s functionality.
Do macros work in all Excel file formats?
No. Macros only work in Macro-Enabled Workbook files with the .xlsm extension. If you save your workbook as .xlsx, macros will be removed, so always save in .xlsm to preserve functionality.
What’s the difference between absolute and relative references in macros?
Absolute references make the macro apply actions to fixed cells, while relative references adjust based on the active cell. Choosing relative references makes macros more flexible when applying recorded steps across different ranges.
Is it safe to enable macros from other people’s files?
Not always. Macros can contain malicious VBA code. Only enable macros from trusted sources. If unsure, review the VBA editor or use a sandbox file before running unfamiliar macros safely.
Wrapping Up
In this tutorial, we explored how to use Macro Recorder in Excel to automate repetitive tasks without writing VBA code. By enabling the Developer tab, naming and recording your macro, performing your desired actions, stopping the recording, and running the macro, you can save time and reduce manual errors. Use the provided dataset to practice and refine your macro-recording skills for future projects.