When managing tasks, projects, or data lists in Excel, it’s often helpful to visually identify rows that have been completed or selected. Highlighting an entire row based on a checkbox makes your spreadsheet more interactive and easier to read. This technique not only improves organization but also saves time when scanning through large datasets.
In this article, we will explore multiple methods to highlight a row if a checkbox is checked in Excel, including using conditional formatting, helper columns, and VBA macros. Let’s get started.
Steps to highlight row if checkbox is checked in Excel:
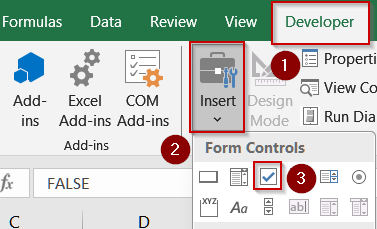
➤ Go to the Developer tab >> Click Insert and choose Checkbox under Form Control.
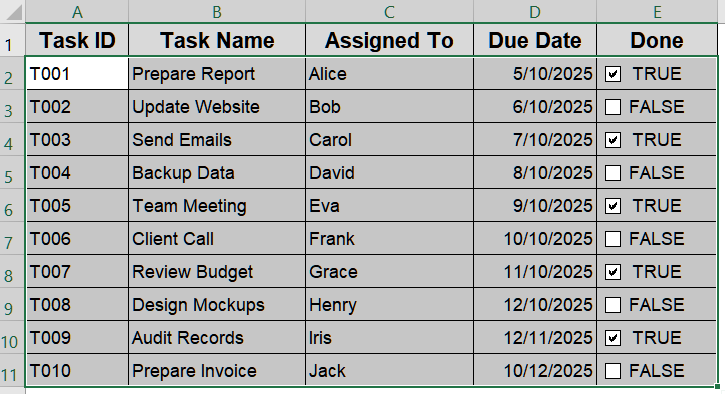
➤ Place each checkbox in column E (Done).
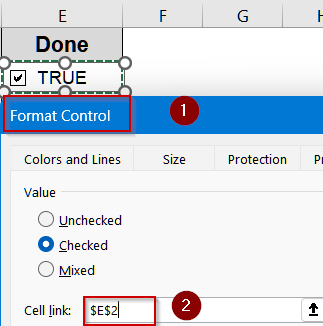
➤ Right-click a checkbox >> Format Control >> Cell Link, and link each checkbox to its corresponding cell in column E. Checked boxes will show TRUE and unchecked boxes will display FALSE.
➤ Highlight all rows and columns you want affected by the formatting (A2:E11 for the sample dataset).
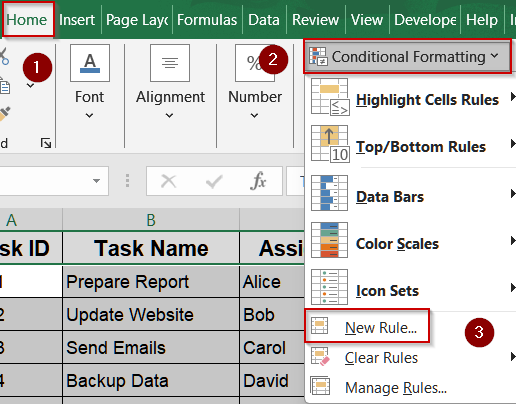
➤ Go to Home >> Conditional Formatting >> New Rule.
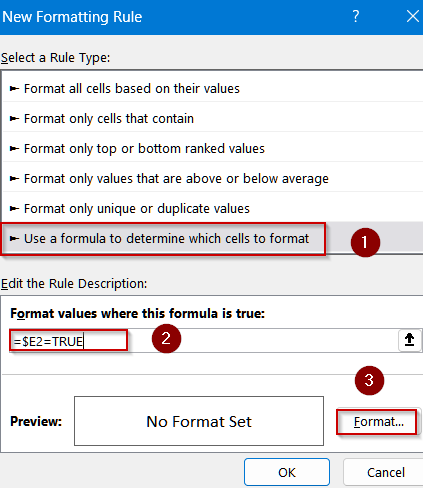
➤ Choose “Use a formula to determine which cells to format” and enter: =$E2=TRUE
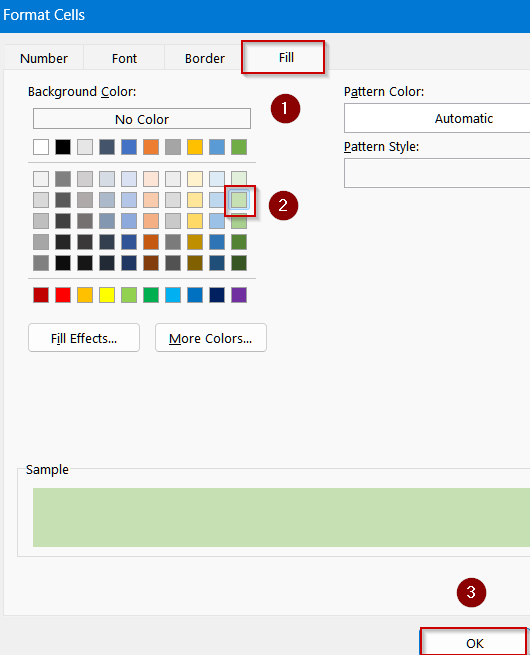
➤ Click Format, go to the Fill tab, and pick a color for the highlighted row. Then, click OK.
➤ Check or uncheck any box in column E; the corresponding row will highlight instantly.

Highlight Rows Using Conditional Formatting with Checkboxes
When you want a no-code, instantly responsive solution, conditional formatting with linked checkboxes is your best choice. This method doesn’t require VBA or formulas and uses Excel’s built-in formatting logic. By linking each checkbox to a cell that returns a TRUE or FALSE value, you can make rows highlight automatically whenever a box is checked. It’s particularly useful for creating to-do lists, task trackers, or attendance sheets, where color cues quickly distinguish completed or active rows.
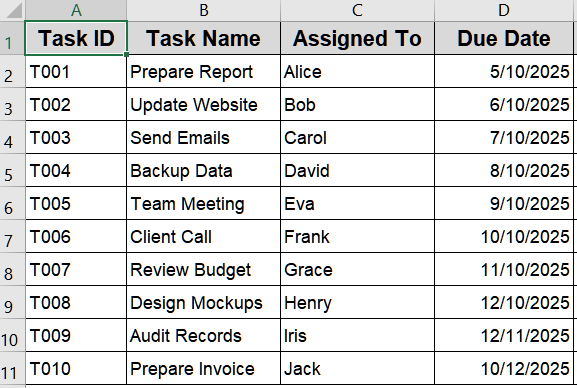
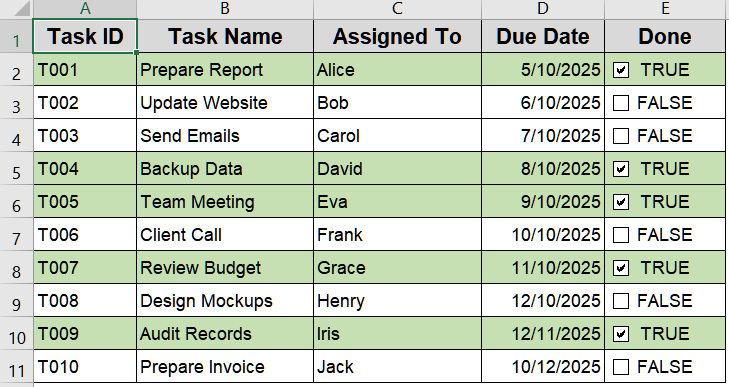
We’ll use the following dataset:
Steps:
➤ Go to the Developer tab >> Click Insert and choose Checkbox under Form Control.
➤ Place each checkbox in column E (Done).
➤ Right-click a checkbox >> Format Control >> Cell Link, and link each checkbox to its corresponding cell in column E. Checked boxes will show TRUE and unchecked boxes will display FALSE.
➤ Highlight all rows and columns you want affected by the formatting (A2:E11 for the sample dataset).
➤ Go to Home >> Conditional Formatting >> New Rule.

➤ Choose “Use a formula to determine which cells to format” and enter:
=$E2=TRUE
➤ Click Format, go to the Fill tab, and pick a color for the highlighted row. Then, click OK.
➤ Check or uncheck any box in column E; the corresponding row will highlight instantly.
Highlight Rows Based on Checkbox Value Using IF Formula
If you prefer a formula-based approach without using VBA, combining checkboxes with a helper column gives you more control and flexibility. This method is great when you want to create logical conditions or calculate metrics based on checkbox status. By adding a helper column that displays TRUE/FALSE depending on each checkbox, you can then use an IF formula or reference that helper cell in conditional formatting.
Steps:
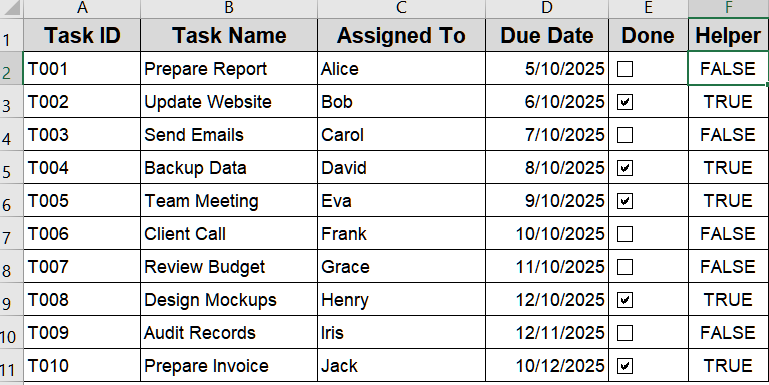
➤ Add Helper column by entering TRUE and FALSE for checked and unchecked boxes respectively.
➤ Select data range A2:E11.
➤ Go to Home tab >> Conditional Formatting >> New Rule.
➤ Choose Use a Formula and enter:
=$F2=TRUE
➤ Click Format, choose a fill color, and click OK.

Now all the checkboxes with the value TRUE in column F will be highlighted.

Automatically Highlight Rows with VBA Macro
For users managing large datasets or multiple sheets, VBA offers an effective automated solution. This method eliminates repetitive manual steps by scanning your linked checkbox column and applying formatting dynamically each time you run the macro. This method reduces manual setup and ensures rows are highlighted immediately every time you run the macro after checking a box.
Steps:
➤ Open VBA Editor by pressing Alt + F11 .
➤ Go to the Insert tab >> Click on Module.
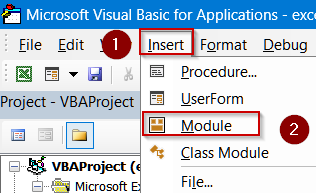
➤ Paste the following code:
Sub HighlightCheckedRowsUpToColumnE()
    Dim ws As Worksheet
    Dim lastRow As Long
    Dim i As Long
    ' Set the worksheet
    Set ws = ActiveSheet
    ' Find last row with data in column E
    lastRow = ws.Cells(ws.Rows.Count, "E").End(xlUp).Row
    ' Loop through each row and highlight columns A:E if checkbox is checked
    For i = 2 To lastRow ' Assuming row 1 has headers
        If ws.Cells(i, "E").Value = True Then
            ws.Range(ws.Cells(i, "A"), ws.Cells(i, "E")).Interior.Color = RGB(146, 208, 80) ' Green fill
        Else
            ws.Range(ws.Cells(i, "A"), ws.Cells(i, "E")).Interior.ColorIndex = xlNone ' Remove fill
        End If
    Next i
    MsgBox "Rows highlighted up to column E based on checked boxes!"
End Sub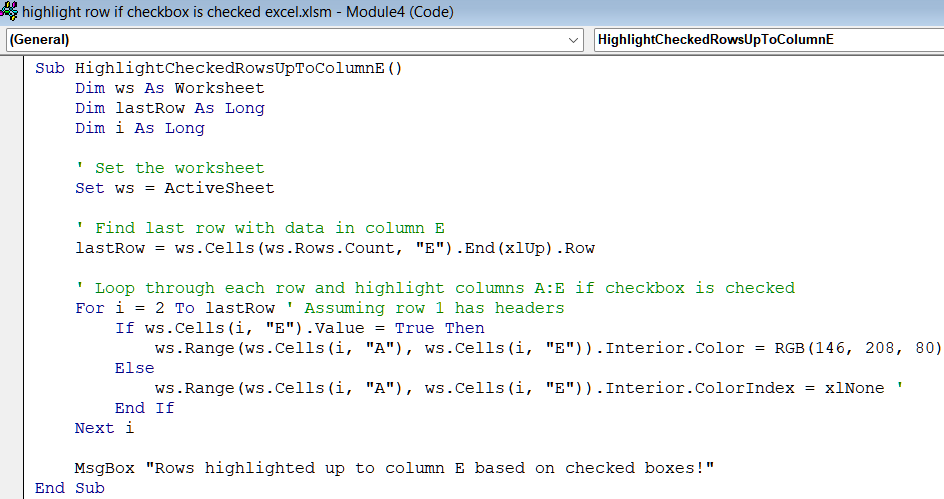
➤ Press F5 key to run the macro and update highlights according to changes made.
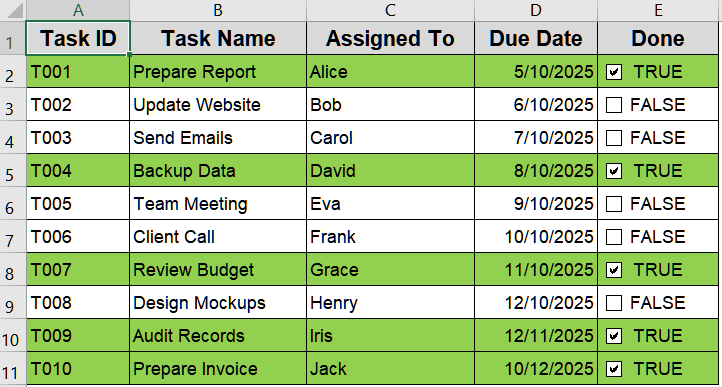
Now rows for all the checked boxes will be highlighted accordingly.
Frequently Asked Questions
Can I highlight multiple rows with one checkbox?
Yes. You can highlight multiple rows with a single checkbox by linking that checkbox to multiple cells or using conditional formatting formulas that reference the same linked cell. This allows simultaneous highlighting of all related rows.
Why isn’t my row highlighting after checking the box?
If the row isn’t highlighting, ensure the checkbox is properly linked to a cell returning TRUE/FALSE. Also, check that your conditional formatting formula references the correct column and row range corresponding to the checkbox cells.
Can I use colored text instead of row fill?
Yes, instead of filling the row with color, you can change the text color. In conditional formatting, choose the Font tab in the Format dialog and select a color to apply to the row text.
Does the VBA highlight work if I add new rows?
VBA only applies to the range specified in the code. If you add new rows, update the range variable in the macro to include them. Otherwise, new rows won’t be highlighted when checkboxes are checked.
Can I use this method in Excel Online?
Conditional formatting with linked checkboxes works in Excel Online, but VBA macros do not run there. For Excel Online, use formulas and conditional formatting rather than VBA for highlighting rows based on checkbox status.
Wrapping Up
In this tutorial, we explored multiple ways to highlight a row in Excel when a checkbox is checked. From using conditional formatting and helper columns to automating the process with VBA, each method ensures your data remains organized and visually clear. Feel free to download the practice file and share your feedback.