Drop-down lists in Excel help restrict inputs and maintain data accuracy by limiting entries to predefined options. By default, these lists allow only one item to be selected at a time. To enable users to select multiple items from a single drop-down such as choosing several product categories for one record, you can use a simple VBA macro. This macro enhances the standard data validation list, allowing multiple selections in the same cell while keeping the data organized and clean.
In this article, you’ll learn how to create a multiple selection drop-down list in Excel, step-by-step, so users can pick several options from one list without overwriting previous selections. We’ll also cover how to remove items if needed.
Steps to Create a Drop Down List with Multiple Selection in Excel:
➤ Create a standard drop-down list using Data Validation.
➤ Use a VBA macro to allow multiple selections within the same cell.
➤ Save your workbook as Excel Macro-Enabled Workbook (*.xlsm) and test the multiple selection drop-down list.
Steps to Create a Multiple Selection Drop-Down List in Excel
Creating a drop-down list that allows multiple selections involves combining Excel’s built-in data validation feature with a bit of VBA coding. This approach ensures that users can pick several options from the list without overwriting previous choices. Follow the step-by-step instructions below to set up and enable this functionality in your workbook.
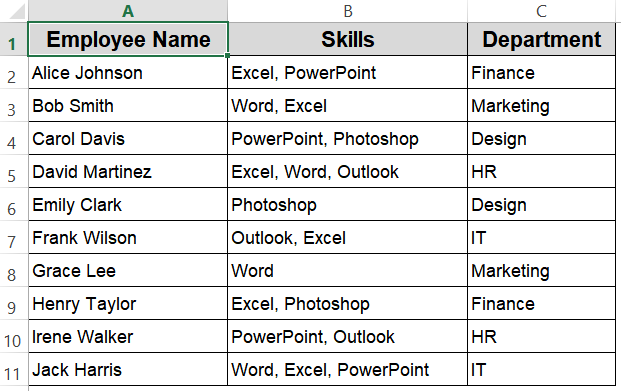
We’ll use a sample dataset that lists employees with their multiple skills and associated departments, demonstrating how multi-selection drop-downs can manage complex skill sets efficiently in Excel.
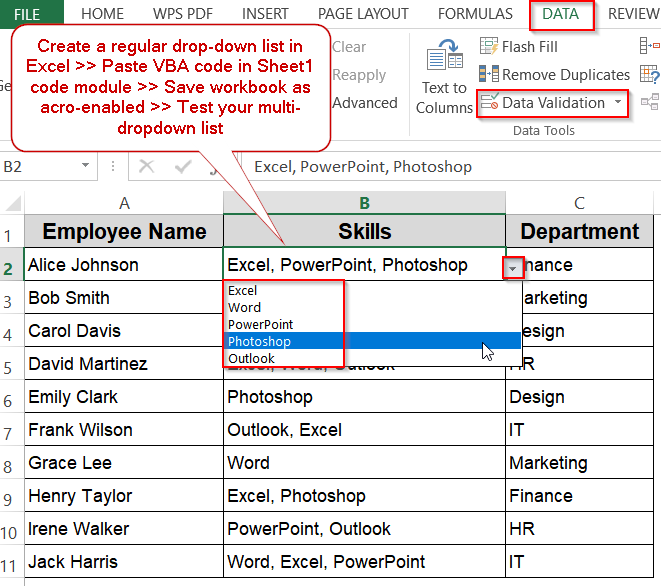
Step 1: Create a Regular Drop-Down List
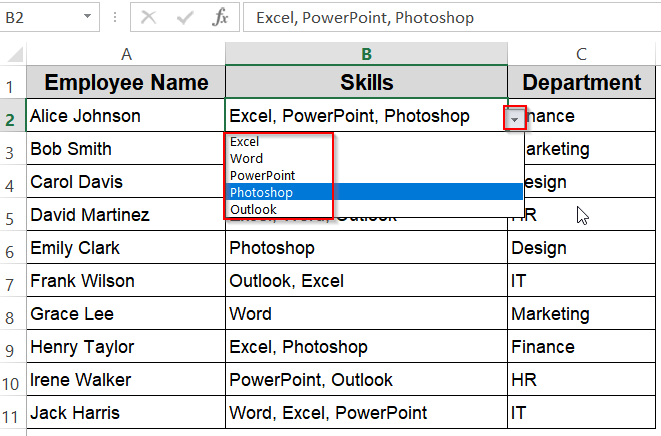
Before we can enable users to select multiple skills for each employee, we first need to establish a basic drop-down list containing the allowed skill options. This step is essential because it ensures consistency and accuracy in the data entry process, preventing typos or invalid entries. For instance, with the given dataset of employees and their skills (e.g., Excel, Word, PowerPoint, Photoshop, Outlook), creating a drop-down lets you standardize these skill options across all entries.
In this example, we will set up a drop-down list for the Skills column, specifically in cells B2 through B11, where each employee’s skills are listed. This ensures that when updating or adding new skills, users can pick from the predefined list instead of typing freely, which helps maintain clean and uniform data.
Steps:
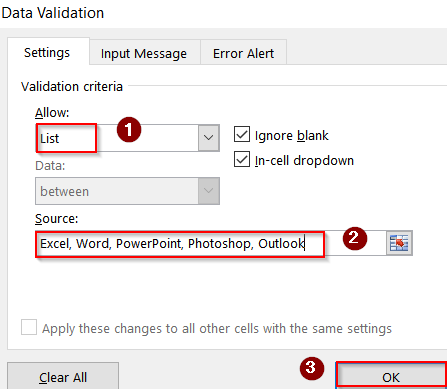
➤ Select the target cells where you want the skills drop-down to appear (e.g., B2:B11 in your employee table).
➤ Go to the Data tab on the Ribbon, then click Data Validation.
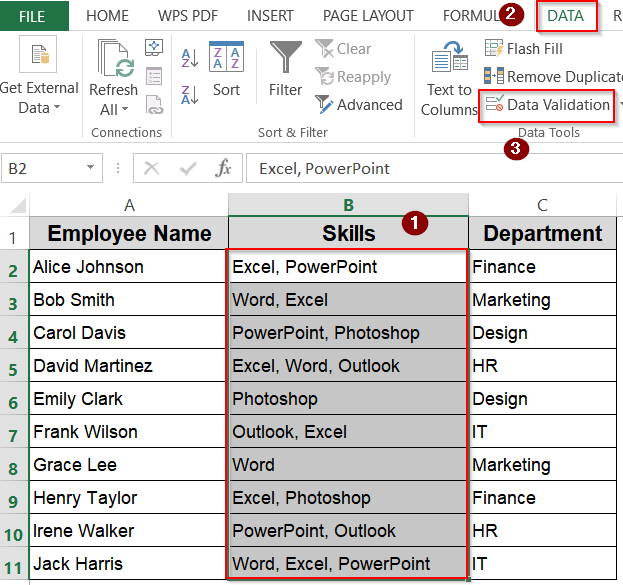
➤ Under Allow, choose List.
➤ In the Source box, type your list of skills separated by commas (e.g., Excel, Word, PowerPoint, Photoshop, Outlook), or reference a range where these skills are stored.
➤ Click OK to apply the drop-down list to the selected cells.
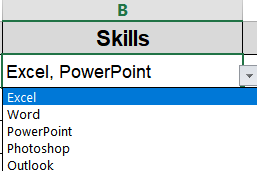
Now you’ll find the drop-down list has appeared in column B.
Step 2: Open the VBA Editor and Add the Code
Excel’s standard drop-down list only allows a single selection per cell. To allow multiple skills to be selected and stored within a single cell (for example, combining “Excel, PowerPoint, PhotoShop” as in Alice Johnson’s skills), we need to use VBA (Visual Basic for Applications) to customize these settings.
This step involves opening Excel’s built-in VBA editor and inserting a script that changes how selections behave in your drop-down cells. When a user selects a new skill from the list, this script appends it to the existing contents of the cell rather than replacing it. The VBA code also ensures that the same skill is not added multiple times, preserving data integrity and readability.
You will add this code specifically to the worksheet where your employee skills are listed (e.g., Sheet1).
Steps:
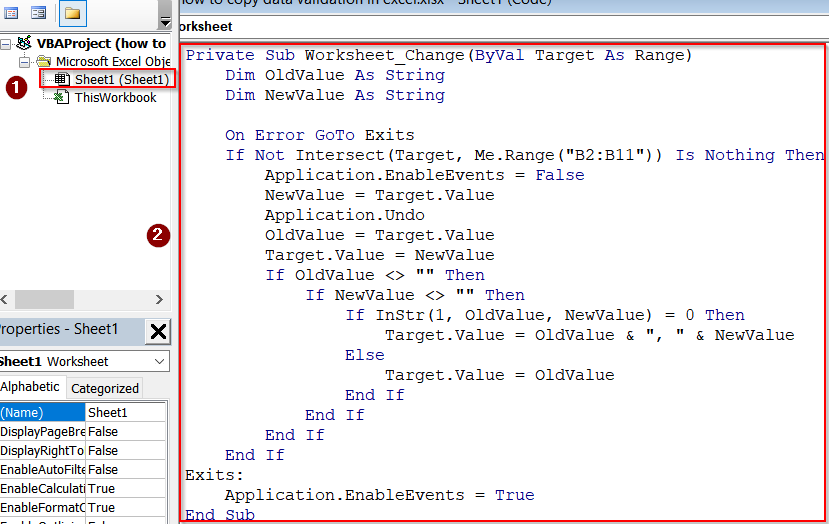
➤ Press Alt + F11 to open the VBA Editor.
➤ In the Project Explorer, double-click the worksheet where your drop-down is located (e.g., Sheet1).
➤ Copy and paste the following VBA code into the worksheet’s code window:
Private Sub Worksheet_Change(ByVal Target As Range)
    Dim OldValue As String
    Dim NewValue As String
    On Error GoTo Exits
    If Not Intersect(Target, Me.Range("B2:B11")) Is Nothing Then
        Application.EnableEvents = False
        NewValue = Target.Value
        Application.Undo
        OldValue = Target.Value
        Target.Value = NewValue
        If OldValue <> "" Then
            If NewValue <> "" Then
                If InStr(1, OldValue, NewValue) = 0 Then
                    Target.Value = OldValue & ", " & NewValue
                Else
                    Target.Value = OldValue
                End If
            End If
        End If
    End If
Exits:
    Application.EnableEvents = True
End Sub
This code lets users add multiple selections separated by commas. If they select the same item again, it won’t duplicate it.
Step 3: Save and Test Your Workbook
Since you’ve now added macros to your workbook, Excel requires the file to be saved in a macro-enabled format to preserve and execute this VBA script correctly. Saving it as a standard workbook (.xlsx) would strip out all the VBA code, causing the multi-selection functionality to stop working.
After saving the workbook properly, you should test your multi-select drop-down list to confirm everything works as expected. When you select a skill from the drop-down in the Skills column for any employee, it should add that skill alongside any previously selected ones, separated by commas, mimicking the skill entries shown in your dataset. Additionally, trying to select the same skill again will not duplicate it in the cell.
Steps:
➤ Press Ctrl + S (or go to File >> Save As).
➤ Choose Excel Macro-Enabled Workbook (*.xlsm) as the file type and hit Save to your desired location.
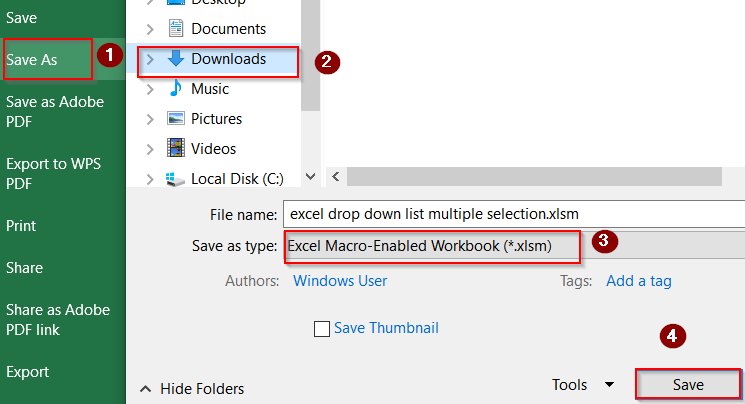
➤ Close the VBA Editor to return to your worksheet.
➤ Click on any cell in the Skills column (B2:B11) and select skills from the drop-down list.
➤ Now that each new skill you select adds to the existing list without overwriting it, separated by commas and duplicate selections will be ignored.
Frequently Asked Questions
Can I remove an item from the multiple selection once added?
There isn’t a built-in Excel feature to remove individual items from a multi-selection drop-down once they’re entered. However, you can manually edit the cell contents to delete unwanted selections. More complex VBA can automate this but requires additional coding.
Will this VBA code work on all Excel versions?
This VBA solution works on most desktop versions of Excel that support macros, including Windows and Mac versions. It does not function in Excel Online, Excel for iPad, or other mobile versions where macros are unsupported.
Can I use this with large datasets?
Yes, you can extend the VBA range to cover larger datasets by modifying the target range (like “B2:B1000“). However, very large ranges might cause minor slowdowns during data entry because of the event-based macro running repeatedly.
Is this method safe for sharing?
Since this approach relies on macros, users will need to enable macros when opening the workbook. It’s important to share only with trusted recipients and inform them to enable macros only if they trust the file source to avoid security risks.
Wrapping Up
In this tutorial, we learned how to create a multiple selection drop-down list in Excel using Data Validation combined with a simple VBA macro. This method greatly enhances data entry flexibility by allowing users to pick several options from one drop-down without losing previous selections. Feel free to download the practice file and share your feedback.