
Printing multiple sheets in Excel is essential when you’re working with reports, monthly summaries, or departmental dashboards that span across different tabs. Instead of printing each sheet one by one, Excel provides several ways to print multiple sheets together either all at once, selectively, or using automation through VBA.
In this article, you’ll learn how to print all sheets, specific selected sheets, or even set precise print areas across multiple worksheets. Let’s get started.
Steps to print multiple sheets in Excel:
➤ Click the File tab and select Print.
➤ In the Settings section, open the drop-down menu that says Print Active Sheets.
➤ Select Print Entire Workbook from the list.
➤ Click Print to send all sheets to the printer in one job.
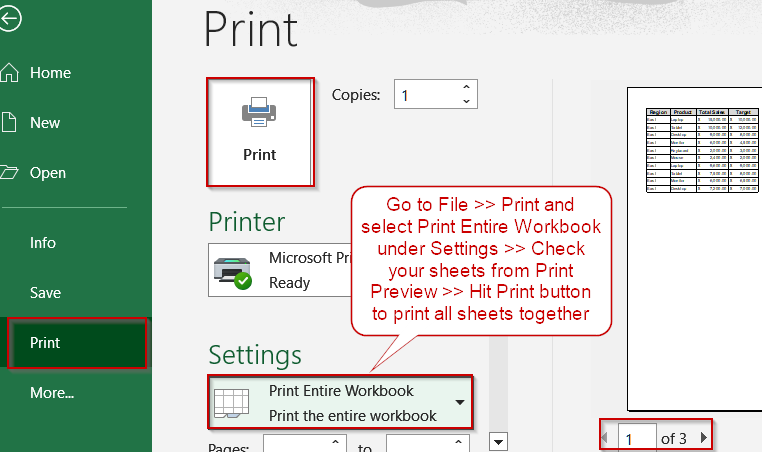
Utilize the Print Entire Workbook Option to Print All Sheets Simultaneously
When handling a workbook containing multiple regional or departmental sheets, printing them all at once can save significant time. Excel’s Print Entire Workbook feature makes this simple by printing every worksheet in sequence which is perfect for reports that include multiple data tabs. This method is ideal for users who prefer an instant, no-code approach to printing, ensuring each sheet starts on a new page and maintains consistent formatting throughout.
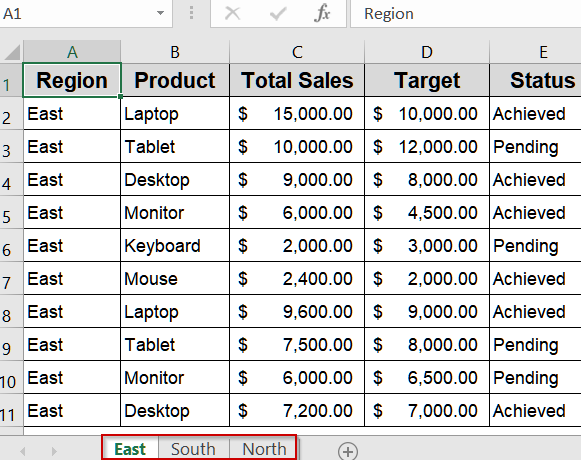
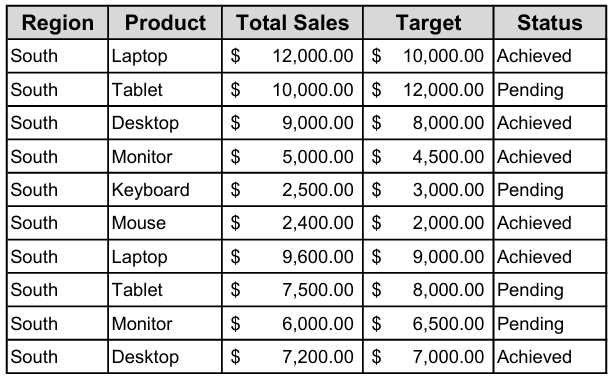
We’ll use the following workbook containing three sheets which presents sales data for specific regions like East, North and South:
Steps:
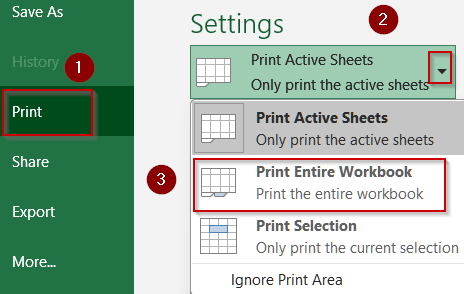
➤ Click the File tab and select Print.
➤ In the Settings section, open the drop-down menu that says Print Active Sheets.
➤ Select Print Entire Workbook from the list.
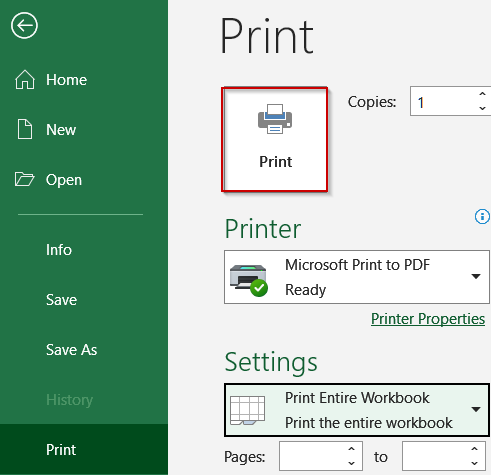
➤ Click Print to send all sheets to the printer in one job.
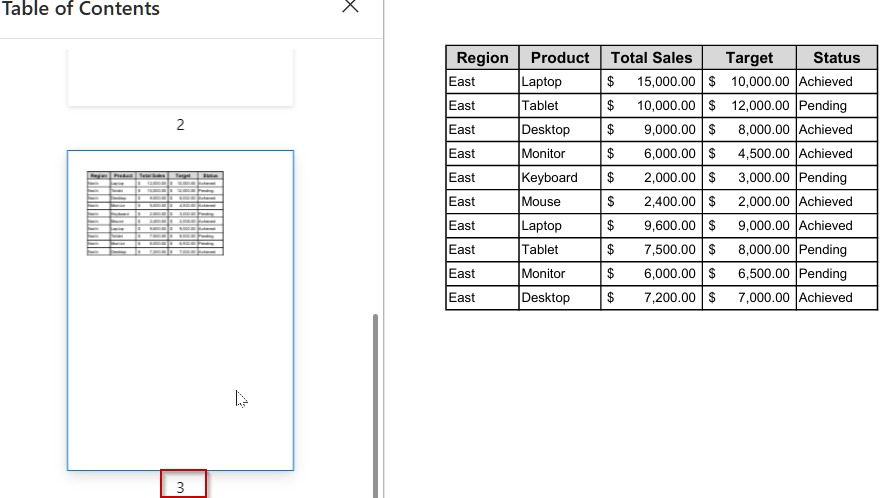
This method guarantees that every sheet is printed in proper order, maintaining a clean and professional output for reports or multi-sheet documents.
Print Selected Sheets Using the Active Sheets Feature
When you don’t need every sheet but want to print specific tabs such as North and South regions, then Excel’s Print Active Sheets feature lets you select multiple sheets before printing. This approach is ideal for generating combined reports without including unnecessary data, saving paper and time while keeping outputs organized.
Steps:
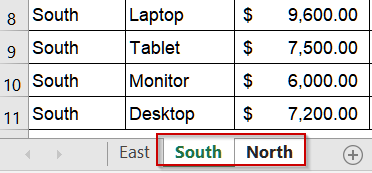
➤ Hold Ctrl and click each sheet tab you want to print.
➤ Go to File >> Print.
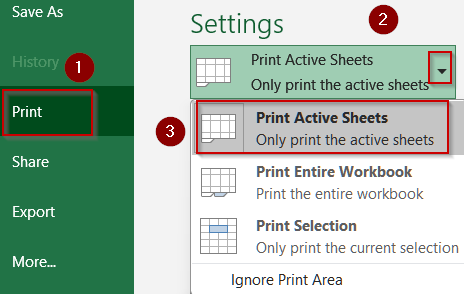
➤ Under Settings, select Print Active Sheets.
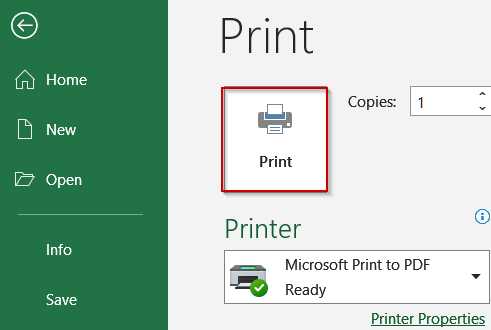
➤ Click on Print.
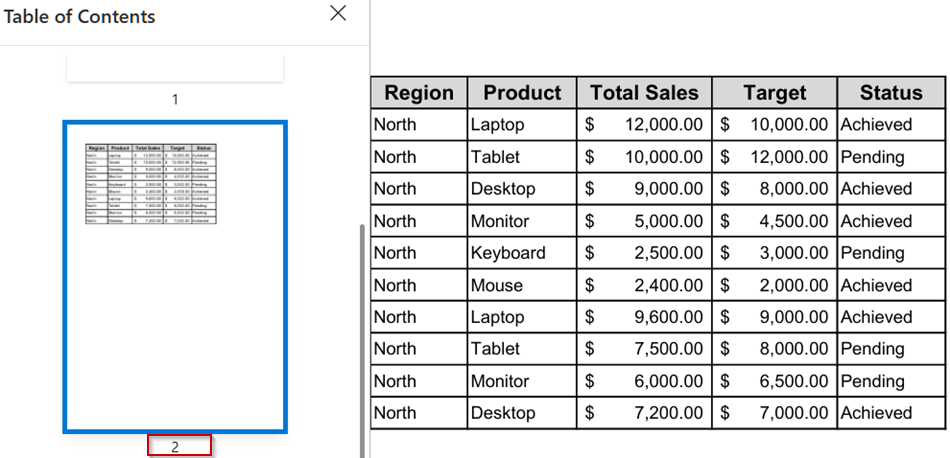
All selected sheets will print together as one continuous document, maintaining their individual layouts.
Define Print Area for Each Sheet Manually
When multiple sheets share similar layouts but you only want specific sections printed, setting a print area per sheet ensures consistent formatting. This method is ideal for reports where different sheets contain varying amounts of data.
Steps:
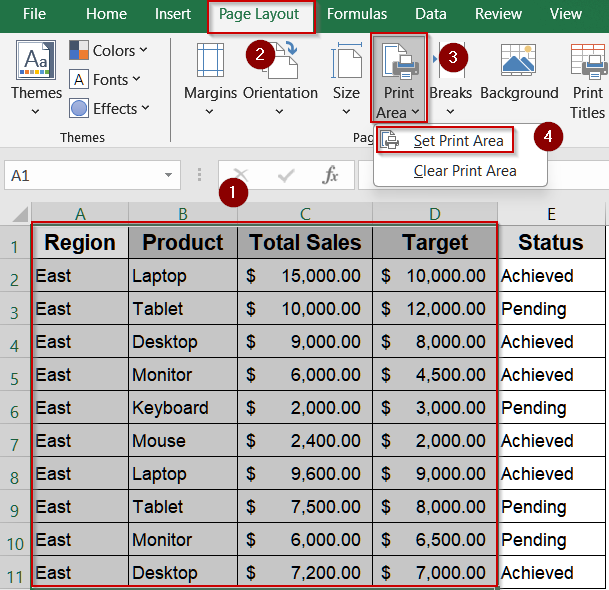
➤ Go to the first sheet and select the range of data you want to print.
➤ Navigate to Page Layout >> Print Area >> Set Print Area.
➤ Repeat for each sheet individually.
➤ Select all sheets to print, then go to File >> Print >> Print Active Sheets.
➤ Hit the Print button for final output.
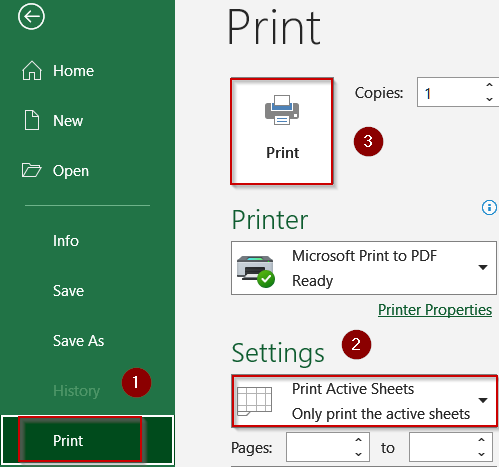
Each sheet prints only its defined area, ensuring uniformity across multiple outputs.
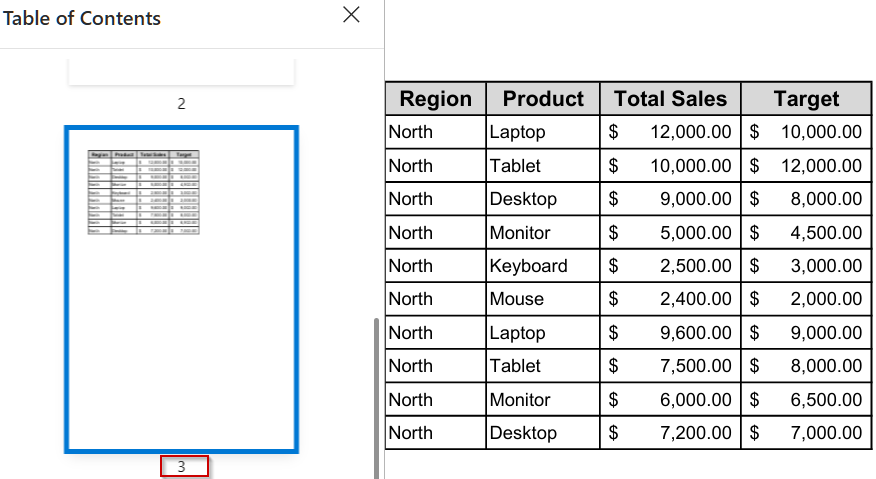
Replicate the Same Range Across Multiple Sheets for Printing
When working with workbooks where each sheet contains identical layouts such as monthly reports, sales dashboards, or departmental summaries, you often only need a specific portion of each sheet printed. Instead of adjusting each sheet individually, Excel allows you to select the same cell range across multiple sheets and print it all at once. This approach ensures uniform output, reduces printing errors, and saves time, especially when dealing with repetitive data that must appear consistently across several sheets.
Steps:
➤ Select the range to print (e.g., A1:D11) on the first sheet.
➤ Hold Ctrl and click the tabs of all sheets you want included.
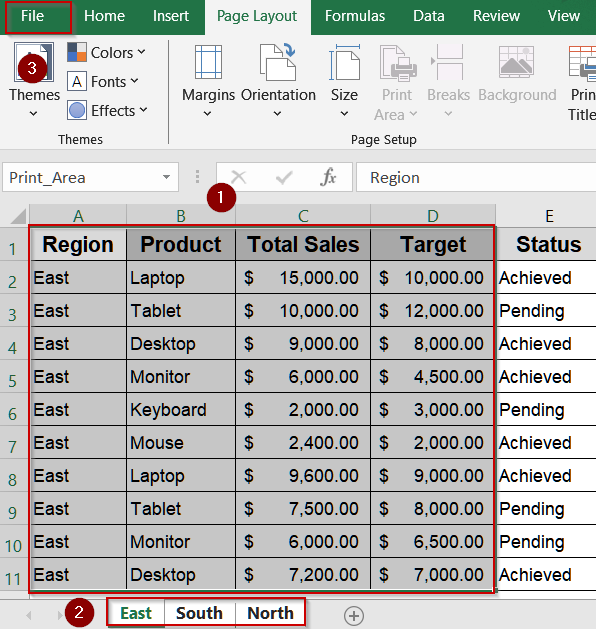
➤ Go to File >> Print >> Print Selection.
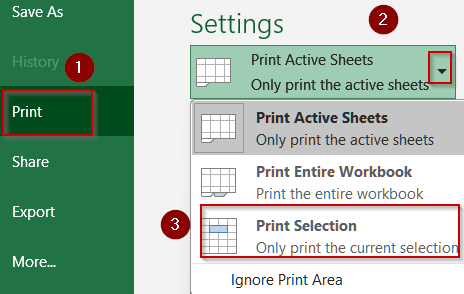
➤ Click Print.
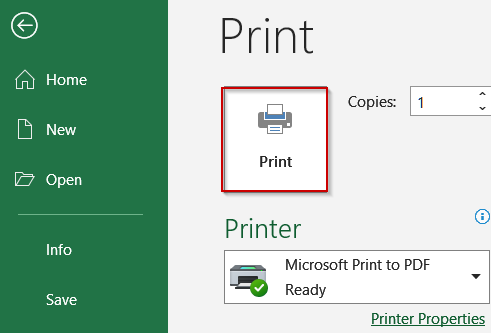
Excel prints only the chosen cell range from each selected sheet, providing a consistent and professional multi-sheet output.
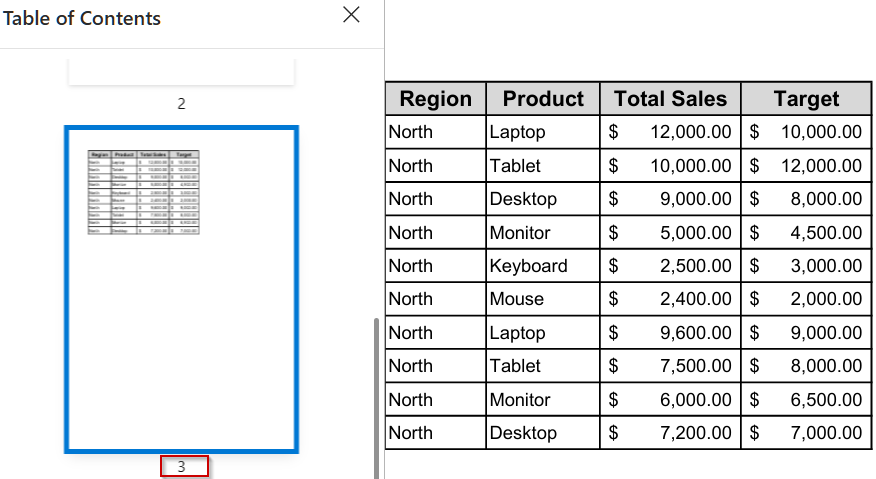
Consolidate Multiple Sheets on One Page Using the Camera Tool
When you need a one-page visual summary of key data from several worksheets, Excel’s Camera tool is invaluable. It allows you to capture areas from different sheets and combine them on a single sheet, perfect for dashboards, executive summaries, or presentations. This approach ensures that all critical information is displayed together, making it easier to analyze or print without switching between multiple tabs.
Steps:
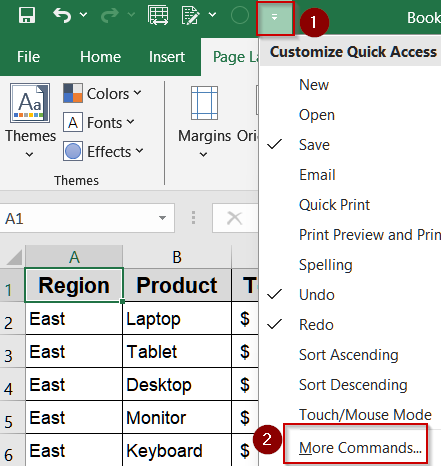
➤ Go to the Quick Access Toolbar, click the dropdown, and select More Commands.
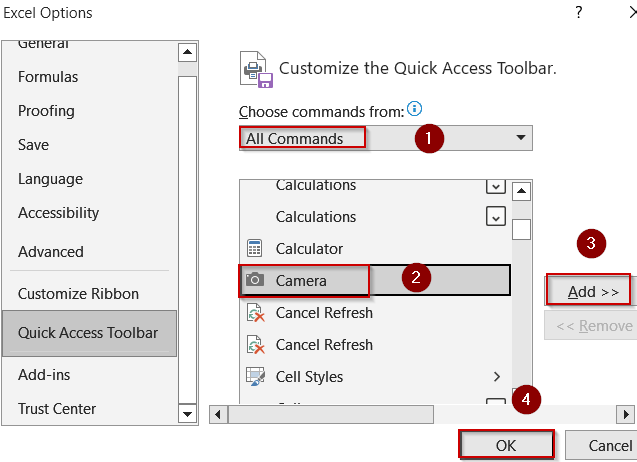
➤ Select All Commands >> Find the Camera tool and click on Add >> Hit OK to confirm changes.
➤ Select the range you want to capture from a sheet and click the Camera icon.
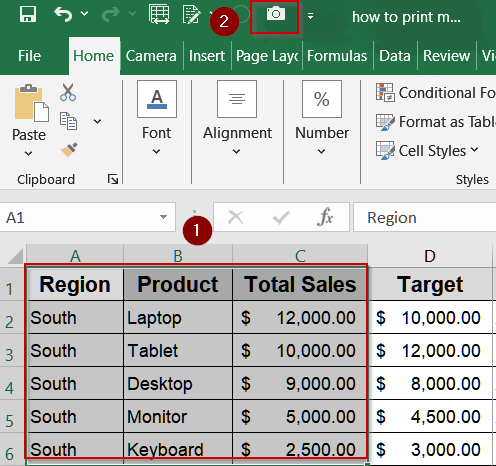
➤ Paste the captured area onto a single summary sheet using Ctrl + V .
➤ Repeat for other sheets, arranging each capture neatly.
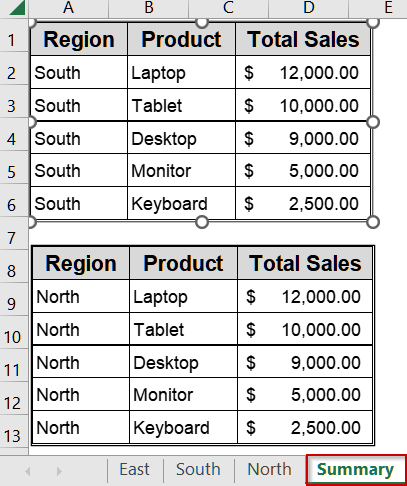
➤ Adjust the layout and print the summary sheet as usual by going to File >> Print.
➤ Under Settings, select Print Active Sheets and hit Print.
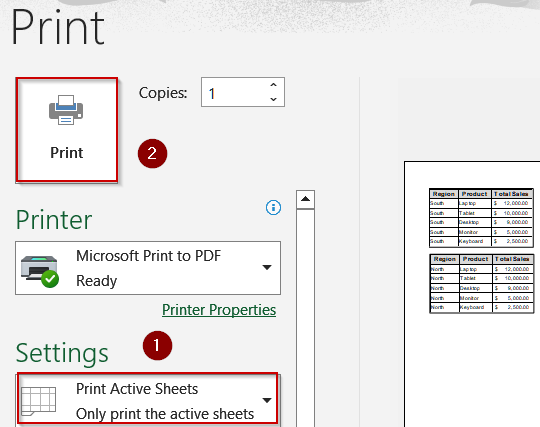
This method consolidates important information before printing, creating a clean, professional overview.
Automate Printing All Worksheets Using VBA
When you’re managing a large workbook with multiple sheets, printing each one manually can be tedious. Automating the process through VBA allows you to print the entire workbook instantly with one click. This method is ideal for users who prepare recurring reports, invoices, or financial summaries and want to simplify printing across all sheets in the correct order. It also ensures uniform print settings and eliminates the risk of missing any worksheet during bulk printing.
Steps:
➤ Press Alt + F11 to open the VBA Editor.
➤ Go to Insert >> Module to add a new module.
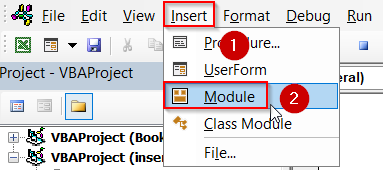
➤ Paste the following code:
Sub PrintAllSheetsToOnePDF()
    Dim pdfPath As String
    ' Set the path and filename for your PDF
    pdfPath = ThisWorkbook.Path & "\CompleteWorkbook.pdf"
    ' Export the entire workbook as a single PDF
    ThisWorkbook.ExportAsFixedFormat _
        Type:=xlTypePDF, _
        Filename:=pdfPath, _
        Quality:=xlQualityStandard, _
        IncludeDocProperties:=True, _
        IgnorePrintAreas:=False, _
        OpenAfterPublish:=True
End Sub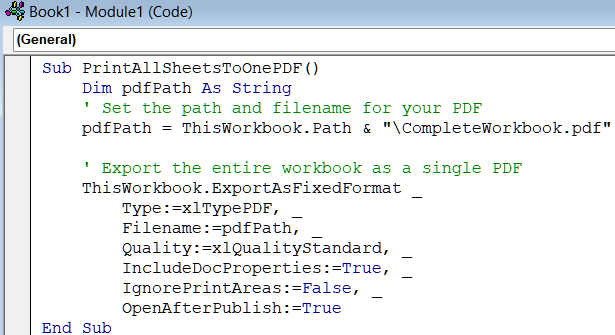
➤ Press F5 or run the macro from Excel.
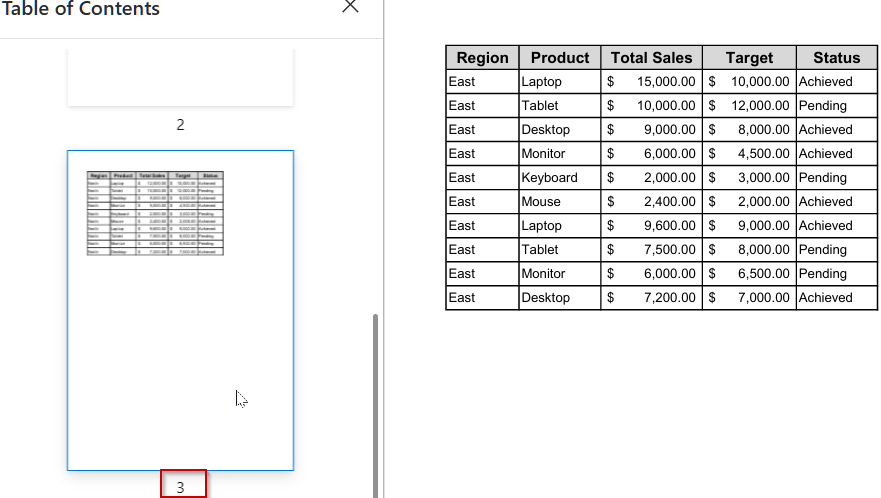
All worksheets in your workbook will now print automatically in the correct order, ensuring consistency and saving valuable time.
Run VBA Code to Automate Printing Only Selected Sheets
For repeated tasks or larger workbooks, using VBA ensures that only the currently selected sheets print quickly. This is perfect for recurring reports or when multiple users need consistent outputs from the same workbook without printing extra sheets.
Steps:
➤ Press Alt + F11 to open the VBA Editor.
➤ Go to Insert >> Module to add a new module.
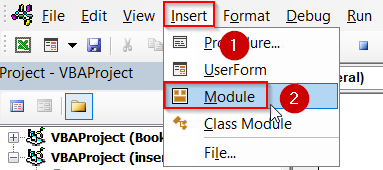
➤ Paste the following code:
Sub PrintActiveSheets()
    ActiveWindow.SelectedSheets.PrintOut
End Sub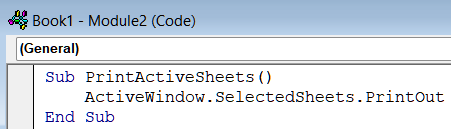
➤ In Excel, select the sheets you want printed, then press F5 to run the macro.
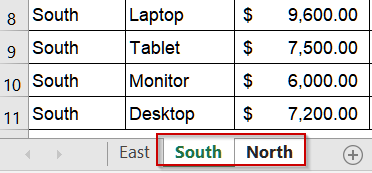
Only the selected sheets will print instantly, saving time and avoiding unnecessary pages.
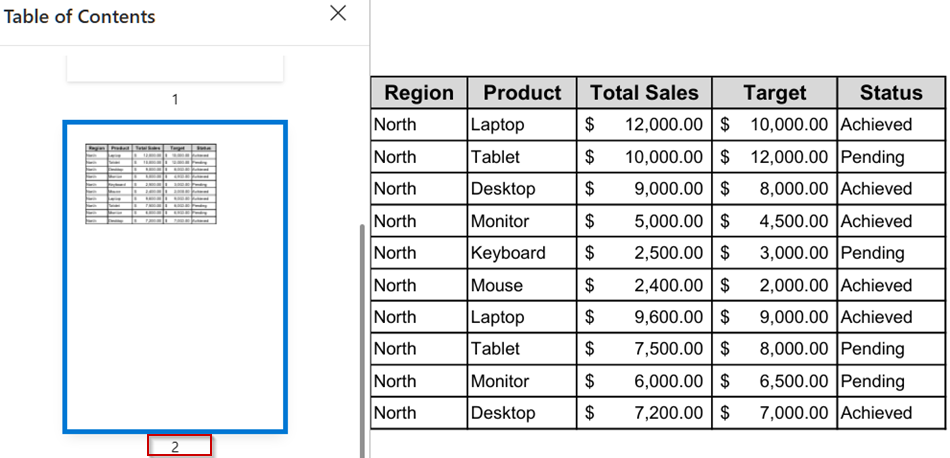
Include Comments While Printing Sheets Using VBA
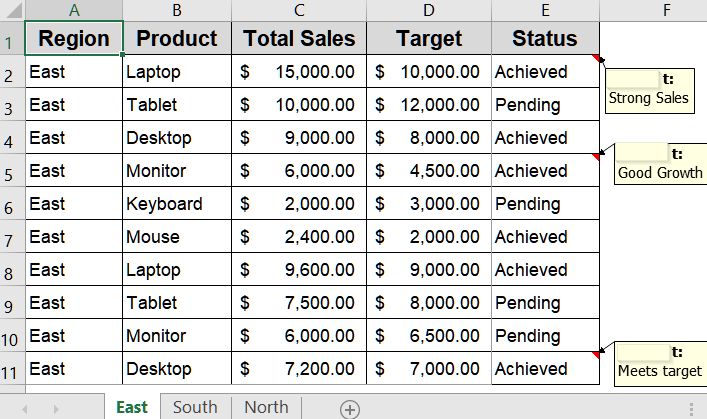
Worksheets often contain notes or comments that are essential for understanding data. Using VBA, you can automate printing so that each sheet’s comments appear at the end, saving time and ensuring no important context is lost.
This is the dataset we will be using:
Steps:
➤ Press Alt + F11 to open the VBA Editor.
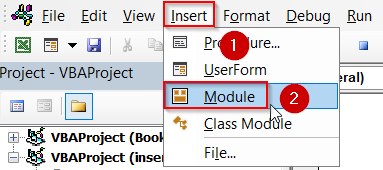
➤ Go to Insert >> Module to add a new module.
➤ Paste this code:
Sub PrintSheetsWithCommentsToOnePDF()
    Dim ws As Worksheet
    Dim pdfPath As String
    ' Set PDF filename and path
    pdfPath = ThisWorkbook.Path & "\WorkbookWithComments.pdf"
    ' Set each sheet to print comments at the end
    For Each ws In ThisWorkbook.Sheets
        ws.PageSetup.PrintComments = xlPrintSheetEnd
    Next ws
    ' Export the entire workbook as a single PDF
    ThisWorkbook.ExportAsFixedFormat _
        Type:=xlTypePDF, _
        Filename:=pdfPath, _
        Quality:=xlQualityStandard, _
        IncludeDocProperties:=True, _
        IgnorePrintAreas:=False, _
        OpenAfterPublish:=True
End Sub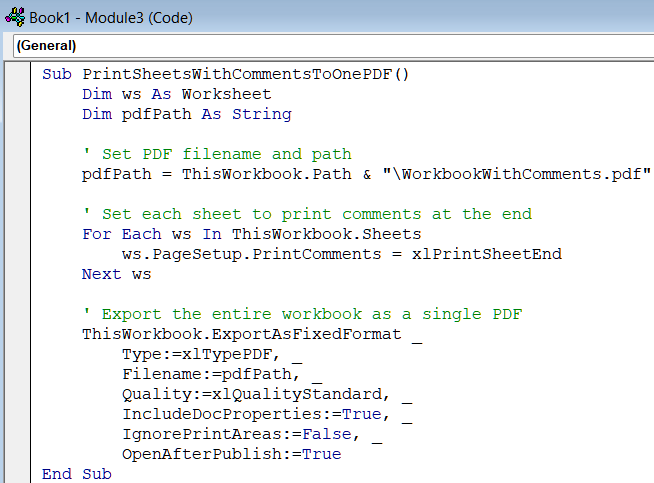
➤ Press F5 to run the macro.
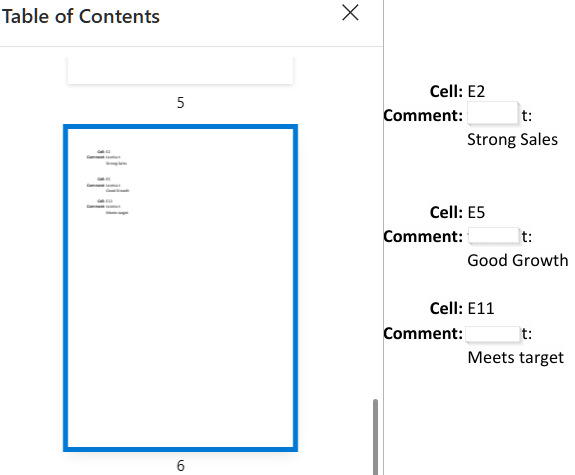
All worksheets will now print with their comments included at the end, keeping data and notes together.
Apply VBA code to Set Print Area and Print All Worksheets
When working with multiple sheets, you may want to print only a specific range across all worksheets. Using VBA, you can automate this so that the same print area is applied to every sheet and all sheets are exported to a single PDF, saving time and ensuring consistency.
Steps:
➤ Press Alt + F11 to open the VBA Editor.
➤ Go to Insert >> Module to add a new module.
➤ Paste this code:
Sub PrintAllSheetsWithPrintArea()
    Dim ws As Worksheet
    Dim pdfPath As String
    ' Set PDF filename and path
    pdfPath = ThisWorkbook.Path & "\Workbook_PrintArea_A1_D11.pdf"
    ' Loop through each worksheet and set print area
    For Each ws In ThisWorkbook.Sheets
        ws.Visible = xlSheetVisible
        ws.PageSetup.PrintArea = "A1:D11"
    Next ws
    ' Export the entire workbook as a single PDF
    ThisWorkbook.ExportAsFixedFormat _
        Type:=xlTypePDF, _
        Filename:=pdfPath, _
        Quality:=xlQualityStandard, _
        IncludeDocProperties:=True, _
        IgnorePrintAreas:=False, _
        OpenAfterPublish:=True
End Sub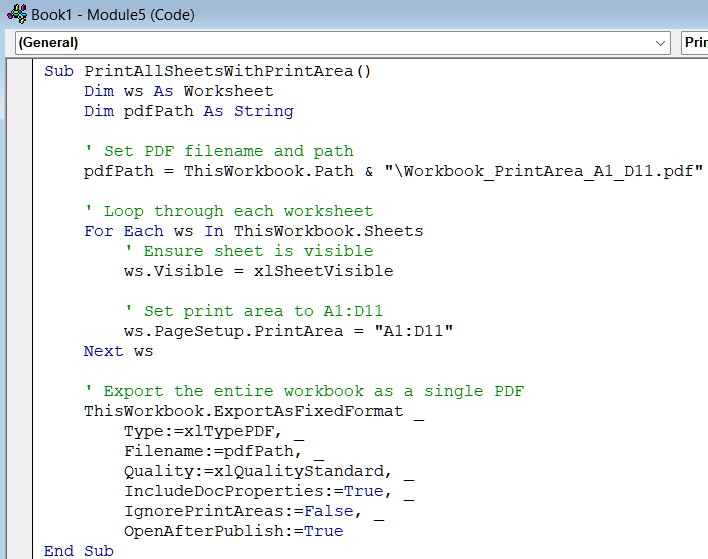
➤ Press F5 to run the macro.
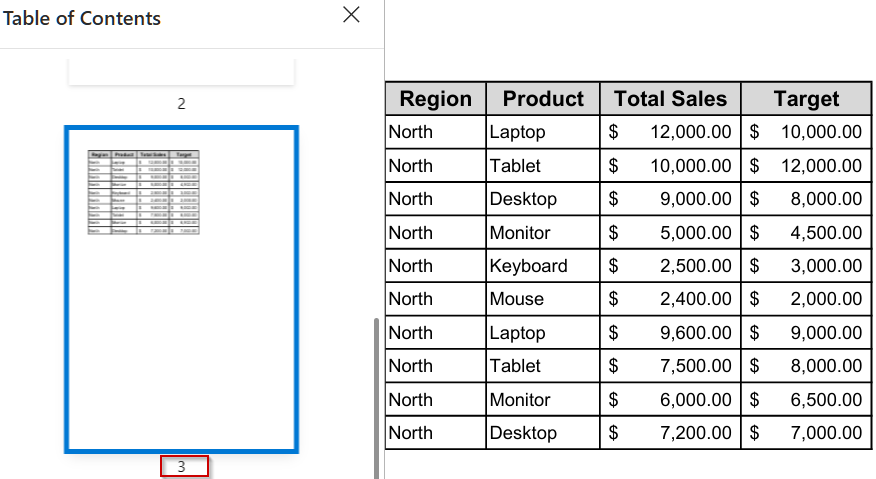
All worksheets will now print with the print area set to A1:D11, and the entire workbook will be exported as a single PDF automatically.
Handle Hidden Worksheets During Printing with VBA
Sometimes your workbook contains hidden sheets with summary data, calculations, or validation information that still need to be printed. VBA can temporarily unhide these sheets, print them, and then hide them again automatically. This is ideal for comprehensive reports without cluttering the visible workbook.
Steps:
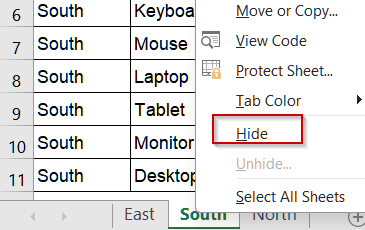
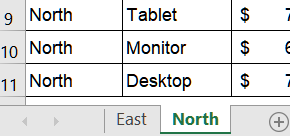
➤ We will hide the sheet called South by right-clicking on it.
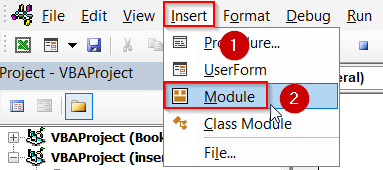
➤ Press Alt + F11 to open the VBA Editor.
➤ Go to Insert >> Module to add a new module.
➤ Paste this code:
Sub PrintHiddenSheets()
    Dim ws As Worksheet
    For Each ws In ThisWorkbook.Sheets
        If ws.Visible = xlSheetHidden Then
            ws.Visible = xlSheetVisible
            ws.PrintOut
            ws.Visible = xlSheetHidden
        End If
    Next ws
End Sub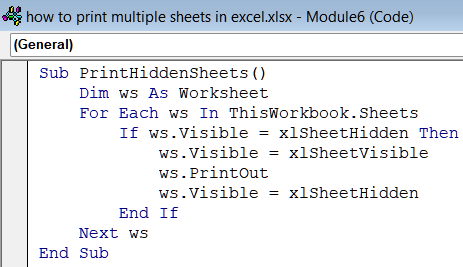
➤ Press F5 to execute the macro
Hidden sheets will temporarily appear, print, and then automatically return to hidden status, ensuring no sheets are missed.
Downloadable Resources
Get our practice workbook or necessary files that we have worked with to prepare this article.
Print Multiple Sheets or Pages.xlsx
Frequently Asked Questions
How do I print all sheets in one go in Excel?
Open File menu, choose Print, then under Settings click the dropdown and select Print Entire Workbook. Choose printer or PDF, then click Print. This prints every worksheet in the workbook in sequence automatically without intervention.
Can I print only specific sheets from my workbook?
Yes. Hold the Ctrl key and click each sheet tab you want to include. With those tabs selected go to File >> Print and ensure Print Active Sheets is chosen. Click Print to complete the job easily.
Why do my sheets print on separate pages instead of continuously?
Excel prints each worksheet separately by default with a page break between tabs. To print continuously, consolidate all data into one sheet or combine key areas on a summary sheet, then print that single sheet.
How do I print the same range from multiple sheets?
Select the range on the first sheet, hold Ctrl and click other sheet tabs to select them. Go to File then Print, choose Print Selection under Settings, and click Print to print that range now instantly.
Can I print hidden sheets without unhiding them manually?
You can print hidden sheets using VBA by temporarily making them visible, printing, and then hiding them again. A macro loops through worksheets, toggles visibility, sends each to the printer, and restores hidden status automatically.
Wrapping Up
In this tutorial, we learned multiple ways to print multiple sheets in Excel whether it’s all at once, selected sheets, or custom ranges. You can use Excel’s built-in print options for quick tasks or automate repetitive printing with VBA. Feel free to download the practice file and share your feedback.