Calculating cycle time in Excel is essential for tracking productivity, evaluating performance, and identifying areas for improvement in business processes or manufacturing workflows. Whether you’re managing project deadlines or monitoring production efficiency, Excel provides powerful yet simple tools to calculate and analyze cycle times effectively.
In this article, we’ll explore multiple methods for calculating cycle time in Excel, from basic start-and-end time calculations to advanced techniques using various formulas. Let’s begin.
Steps to calculate cycle time in Excel:
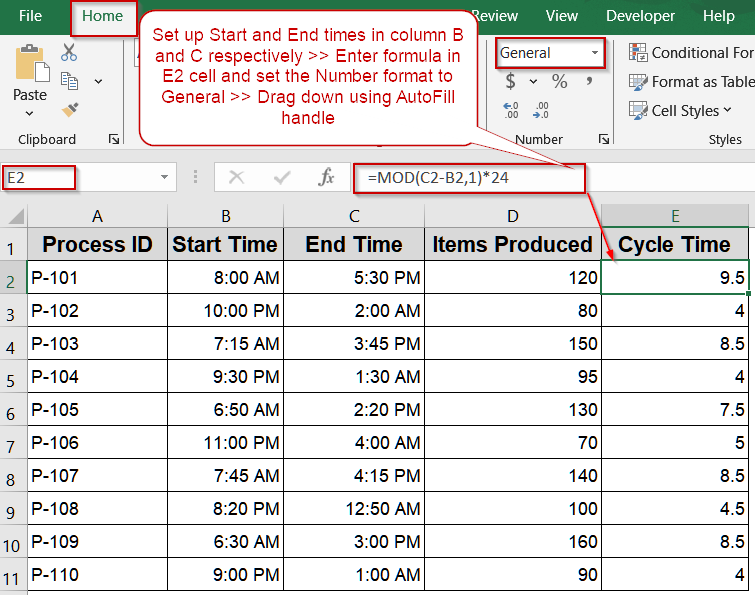
➤ Enter start times in column B and end times in C.
➤ Go to a blank cell like E2.
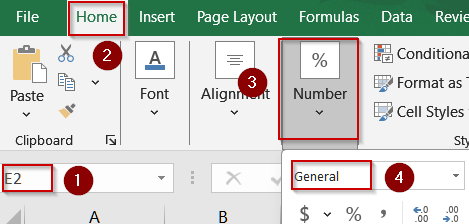
➤ For the correct results, select the output cell like E2 and go to the Home tab >> Choose General under Number group.
➤ To convert to hours, use this formula: =MOD(C2-B2,1)*24
➤ Press Enter.
➤ Drag the fill handle down for all rows.
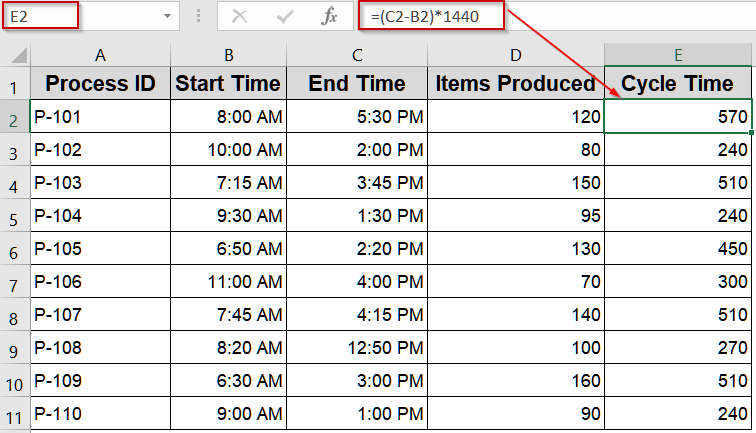
Use Simple Subtraction to Calculate Basic Cycle Time
This method is ideal for straightforward situations where your start and end times fall within the same day, such as single-shift operations, meetings, or small production runs. By simply subtracting the start time from the end time, Excel instantly calculates the total elapsed time between two events. It’s one of the fastest and most intuitive approaches, making it perfect for beginners or for quickly validating other, more complex calculations.
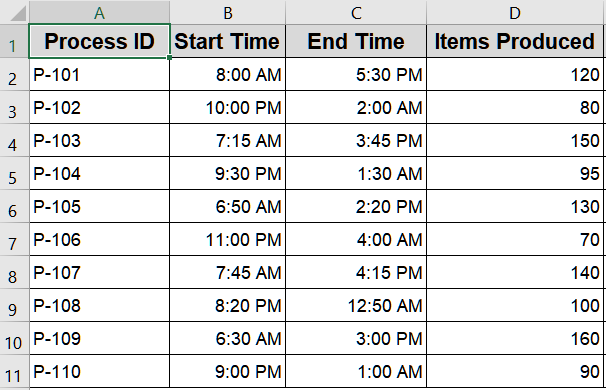
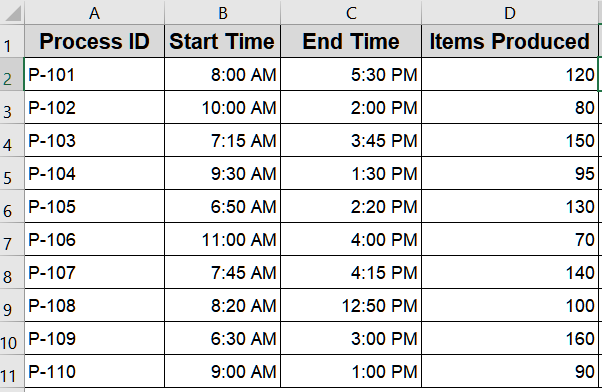
We’ll use the following dataset:
Steps:
➤ Enter start times in column B and end times in C.
➤ Go to a blank cell like E2.
➤ For the correct results, select the output cell like E2 and go to the Home tab >> Choose General under Number group.
➤ Use this formula to calculate cycle time in hours:
=(C2-B2)*24
➤ Press Enter.
➤ Drag the fill handle down for all rows.
Now the Cycle Time for all processes are displayed clearly in hours.
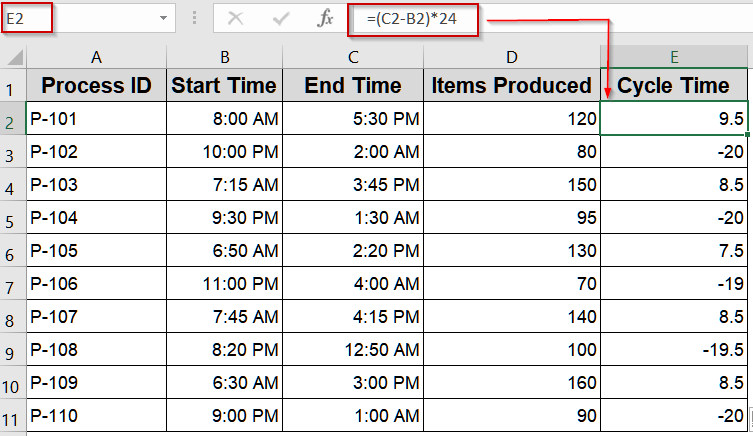
Apply MOD Function to Handle Times Crossing Midnight
When a process or task begins late at night and finishes after midnight, a simple subtraction of end time minus start time can produce a negative value in Excel. This happens because Excel treats times after midnight as an item of the next day. The MOD function solves this issue by wrapping the calculation so it always returns a positive value, no matter when the shift ends. This method is especially useful for industries with overnight operations, such as manufacturing, healthcare, or logistics, where accurate cycle times are critical for performance analysis and scheduling.
Steps:
➤ Enter start times in column B and end times in C.
➤ Go to a blank cell like E2.
➤ For the correct results, select the output cell like E2 and go to the Home tab >> Choose General under Number group.

➤ To convert to hours, use this formula:
=MOD(C2-B2,1)*24
➤ Press Enter.
➤ Drag the fill handle down for all rows.

This correctly calculates overnight processes like P-102, P-108 and so on.
Measure Cycle Time in Minutes to Analyze Speed
This method helps you evaluate production efficiency by calculating how many items or items are produced per minute. It’s particularly valuable in manufacturing, assembly lines, or any operation where tracking output speed is critical. By converting total cycle time into minutes and then dividing the number of items produced by that value, you gain a clear, actionable metric for productivity. This approach allows supervisors and analysts to identify slowdowns, compare process performance, and optimize workflow for maximum throughput.
We’ll use the following modified dataset:
Steps:
➤ Ensure your dataset includes the number of items produced in D2, the start time in B2, and the end time in C2.
➤ First, convert the total cycle time to minutes by entering this formula in E2:
=(C2-B2)*1440
This multiplies the time difference (in days) by 1440 (the number of minutes in a day) to convert it into minutes.
➤ Next, calculate items per minute by entering the following formula in F2:
=D2/((C2-B2)*1440)
This divides the number of items by the total minutes worked, giving the production rate per minute.
➤ Format the result as Number with a reasonable decimal setting for clarity.
➤ Drag the fill handle down to apply these formulas to the remaining rows in your dataset.
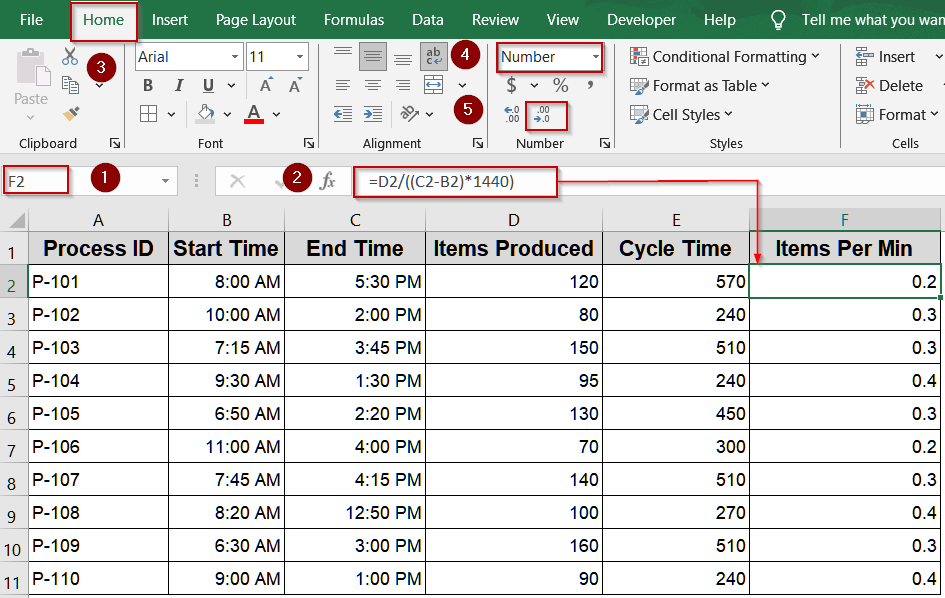
Now, Excel displays the production speed for each process in items per minute, making it easy to compare performance across tasks or operators and quickly spot slow points in your workflow.
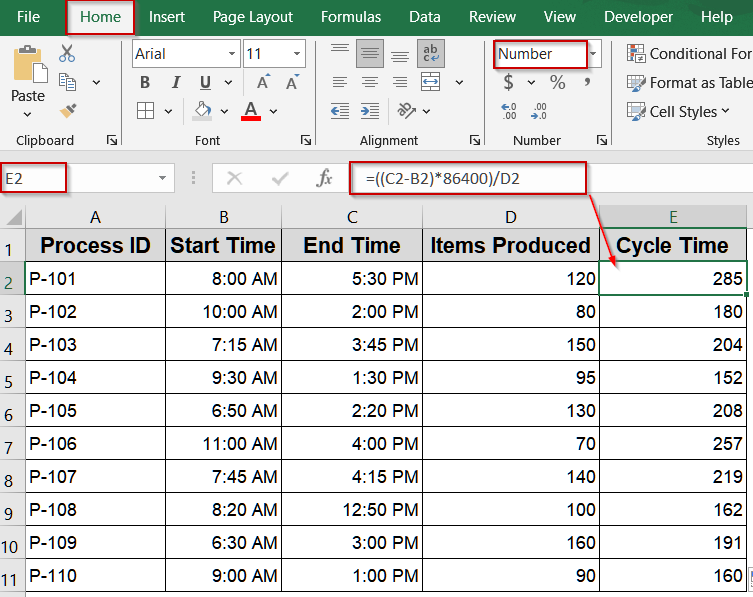
Compute Duration per Unit in Minutes in Excel
This method is useful when you want to measure the time taken to produce a single item instead of the number of items produced per minute. It’s particularly effective for identifying slow points, evaluating operator performance, or optimizing production scheduling. By converting the total cycle time into minutes and dividing it by the number of items produced, you can determine the exact duration for each unit. This approach is especially helpful in industries like manufacturing, assembly, or quality control where understanding per-item timing is crucial for improving throughput and reducing waste.
Steps:
➤ Ensure your dataset includes Start Time in B2, End Time in C2, and Items Produced in D2.
➤ In a new column (for example, E2), enter the formula:
=((C2-B2)*1440)/D2
This converts the total time difference between the start and end times into minutes (using *1440) and divides it by the number of items produced to find the minutes per item.
➤ Format the result as Number with appropriate decimal places for better readability.
➤ Drag the fill handle down to apply the formula to all rows in your dataset.

Now, Excel will display the exact number of minutes required to produce each item, giving you an accurate measure of process efficiency and helping you identify opportunities for productivity improvement.
Calculate Cycle Time in Seconds
In extremely fast manufacturing or automated assembly lines, measuring output in items per second is far more insightful than using minutes or hours. This metric is commonly applied in industries like electronics, packaging, or high-volume consumer goods, where even fractions of a second can influence throughput and efficiency. By converting the total process duration into seconds, you can accurately assess production speed and spot opportunities for fine-tuning machinery or workflows.
Steps:
➤ Ensure your dataset includes Start Time in B2, End Time in C2, and Items Produced in D2.
➤ In a new column (e.g., E2), enter the formula:
=D2/((C2-B2)*86400)
Here, 86400 represents the number of seconds in a day.
➤ Press Enter and format the cell as a Number with enough decimal places to capture small differences.
➤ Drag the fill handle down to apply the formula for all rows.
This gives you a precise items-per-second rate, perfect for analyzing high-speed production performance and ensuring processes remain optimized for maximum output.
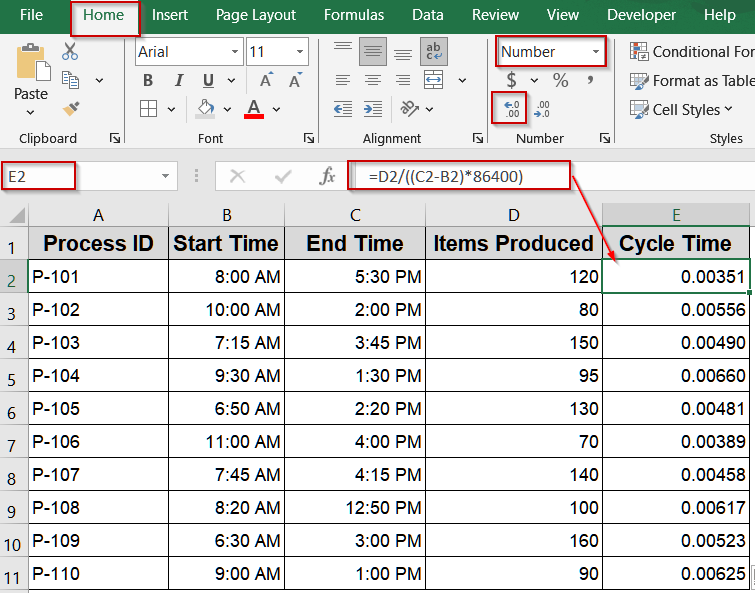
Determine Duration per Unit in Seconds
For ultra-fast production lines or processes where even fractions of a second matter such as electronics assembly, packaging, or automated manufacturing, it’s crucial to know exactly how many seconds each item takes to produce. By inverting the items-per-second calculation, you can measure cycle time per item directly in seconds. This metric is ideal for pinpointing performance slow points, benchmarking machine efficiency, and improving overall throughput.
Steps:
➤ Ensure your dataset includes Start Time in B2, End Time in C2, and Items Produced in D2.
➤ In a new column (e.g., E2), type the following formula:
=((C2-B2)*86400)/D2
Here, 86400 represents the total seconds in a day.
➤ Press Enter to calculate the seconds per item for that row.
➤ Format the result as a Number with appropriate decimal places for better accuracy.
➤ Drag the fill handle down to apply the formula for all records in your dataset.
This calculation gives you a precise measurement of how many seconds each unit takes to complete, enabling sharper analysis of production performance and operational efficiency.
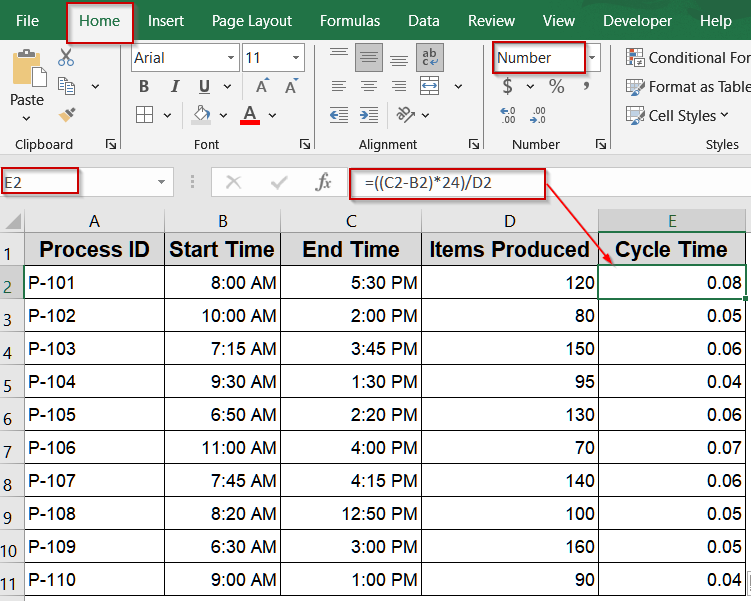
Evaluate Cycle Time in Hours
When you’re working with large-scale manufacturing or operations measured over hours, calculating cycle time in items per hour provides a clear picture of throughput. This method is especially useful for factories, assembly lines, or packaging facilities where production speed is measured on an hourly basis. By converting the elapsed time into hours and dividing the number of items produced by that time, you can benchmark performance and identify opportunities for efficiency gains.
Steps:
➤ Ensure your dataset includes Start Time in B2, End Time in C2, and Items Produced in D2.
➤ In a new column (e.g., E2), enter the following formula:
=D2/((C2-B2)*24)
Here, 24 converts the day fraction into hours.
➤ Press Enter to calculate the items produced per hour for the selected row.
➤ Format the result as a Number with suitable decimal places to reflect accuracy.
➤ Drag the fill handle downward to apply the calculation to all rows in your dataset.
This approach helps evaluate overall productivity and provides a consistent metric to compare different shifts, machines, or processes operating across hourly intervals.
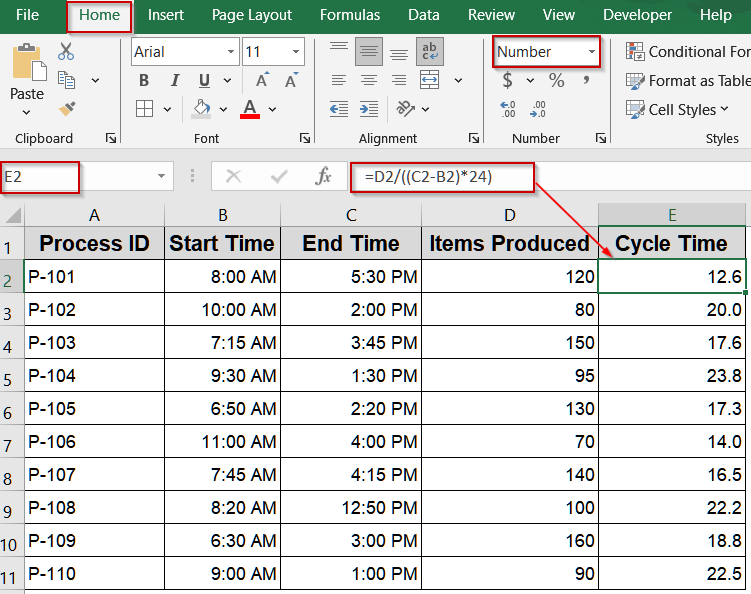
Find Duration per Unit in Hours
In scenarios where production cycles span several hours or even days, measuring hours per item can provide a more intuitive sense of efficiency. Instead of items per hour, this method shows exactly how many hours it takes to produce one item, making it especially valuable for processes like batch manufacturing, large equipment assembly, or projects with extended timelines. Tracking this metric helps identify inefficiencies, plan resources better, and compare performance between long-duration tasks.
Steps:
➤ Ensure your dataset includes Start Time in B2, End Time in C2, and Items Produced in D2.
➤ In a new column (e.g., E2), enter the following formula:
=((C2-B2)*24)/D2
This converts the elapsed time from days into hours and divides it by the number of items produced.
➤ Press Enter to calculate the hours per item for that row.
➤ Format the cell as a Number to display a clear decimal value.
➤ Drag the fill handle down to apply the calculation to all rows in your dataset.
Using this calculation allows you to compare long-duration production tasks effectively and optimize scheduling for processes where each item requires significant time to complete.
Frequently Asked Questions
Can Excel handle cycle times that cross midnight?
Yes. Use the MOD function like =MOD(EndTime-StartTime,1) to correctly calculate time differences crossing midnight. This wraps the negative result into a positive value, ensuring accurate cycle time calculations for overnight shifts or late-night processes.
How can I convert cycle time into hours, minutes, or seconds?
Multiply the time difference by 24 for hours, 1440 for minutes, or 86400 for seconds. For example, use =(EndTime-StartTime)*1440 for minutes. This converts Excel’s internal date-time value into standard time units.
Can I calculate average cycle time for multiple tasks?
Yes. Place all cycle time calculations in a column, then use =AVERAGE(range) to find the average. This helps assess overall process efficiency and identify slow points or variations in production speed across tasks.
What if I also need to include non-working breaks or downtime?
Subtract break durations from your total time before dividing by items. For example: =(EndTime-StartTime-BreakDuration). This ensures only productive time is included, giving an accurate measure of cycle time for operational planning and performance analysis.
Can Excel handle both production speed and single-item timing?
Yes. Use items-per-minute (=ItemsProduced/Minutes) to measure speed or minutes-per-item (=Minutes/ItemsProduced) for per-item timing. Switching between these views allows you to evaluate both overall throughput and the time required for a single output effectively.
Wrapping Up
In this tutorial, we covered several methods to calculate cycle time in Excel, including basic subtraction for start and end times, using MOD function for overnight shifts, and formulas for items-per-minute or per-hour calculations. By applying these techniques to your dataset, you can accurately track process durations, compare performance across tasks, and optimize workflows. Feel free to download the practice file and share your feedback.